
Popular categories
Looking for a yarn?


Comments / Questions (9)
![]() Stefanie Heßling wrote:
Stefanie Heßling wrote:
Mütze: Am Rundanfang 2 feste Maschen überspringen Runde mit 1 Kettmasche beenden In jeder Runde 2 Luftmaschen in den Luftmaschenbogen So wird die Mütze spitz und der Rand stufenlos. 😉
21.10.2018 - 16:49
![]() Stefanie Heßling wrote:
Stefanie Heßling wrote:
Bei mir wird der Hut eckig nicht spitz! Auf dem Foto sieht es so aus als wenn in den Luftmaschenbogen (die 2 Luftmaschen) feste Maschen gehäkelt wurden?! Laut Anleitung wird auf die festen Maschen der Vorrunde die festen Maschen gehäkelt?! Wenn ich feste Maschen in den Luftmaschenbogen häkle dann stimmt die Anzahl der Maschen nicht.
21.10.2018 - 14:20
![]() Maria wrote:
Maria wrote:
Si puede explicar con diagrama no pude entender
29.11.2012 - 22:39DROPS Design answered:
Hola Maria, lo siento, no hay diagrama para este modelo, pero si sigues vuelta por vuelta es texto escrito te saldrá bien.
04.12.2012 - 08:36
![]() EvaLena wrote:
EvaLena wrote:
Jo visst hoppade jag över 2 luftmaskorna, sen följde jag mönstret till punkt och pricka5 fm, nästa varv 6 fm sen 4 fm sen 5 fm, sist 3 fm. jag får ändå en fyrkantig hatt. Jag har mailat bild...........nu ger jag upp på Drops, trots otaliga inhandlade böcker TACK
05.12.2011 - 19:21
![]() Drosp Design wrote:
Drosp Design wrote:
EvaLena, du ska inte virka i de 2 lm, det står inte att man ska virka i dem. Du hoppar över dem, eftersom det står att du ska virka i de följande fm.
05.12.2011 - 17:28
![]() EvaLena Hallgren wrote:
EvaLena Hallgren wrote:
Ok jag tar tillbaka, nu ser jag att dc och sc är olika beroende på brittisk eller amerikanska. Mössan blir ändå inte som på bilden. Ska man virka i föregående 2 luftmaskor på toppen eller ? varv 3 virka 6 fm i var och en av föregående fm 2 lm, ska man hoppa över föregående lm ? det blir ju inte en toppluva då ? en fyrkantig hatt ??
05.12.2011 - 15:38EvaLena Hallgren wrote:
Återigen ett kasst mönster, på engelska ska man virka mössan i double chrochet, på svenska fm...............
05.12.2011 - 15:22
![]() Drops Design wrote:
Drops Design wrote:
Hi LIse. Last row on hat explains how to make 4 sts, then ch 24, then 4 st. The = 8 sts is just showing like previous rows how many sts you have on full row, this is not including the ch 24.
04.12.2009 - 16:17
![]() Lise wrote:
Lise wrote:
I have just tried to make this pattern, and I don't understand the end of it. In the English pattern, it seems to end with 8 stitches across the top of the hat, which doesn't look like the picture with the pattern. It also does not include the loop with which to hang it on the tree. Can you please check it and see if there are some instructions missing from the end of the pattern? Otherwise, I will just have to guess and try to design the end myself.
04.12.2009 - 15:08
|
|
Santa Red Nose#dropssantarednose |
|
|
|
|
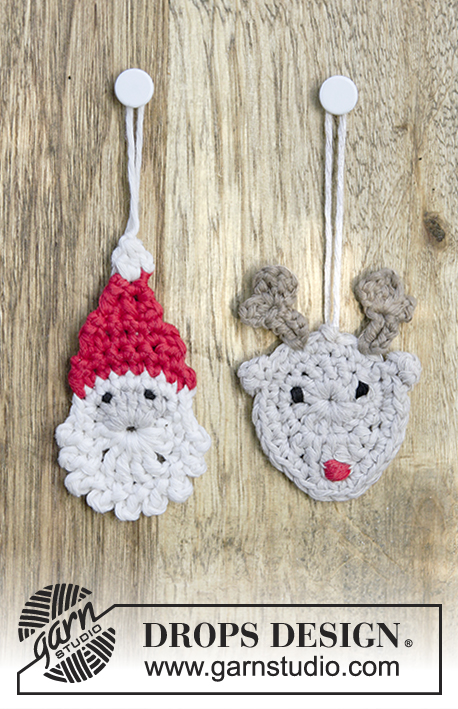
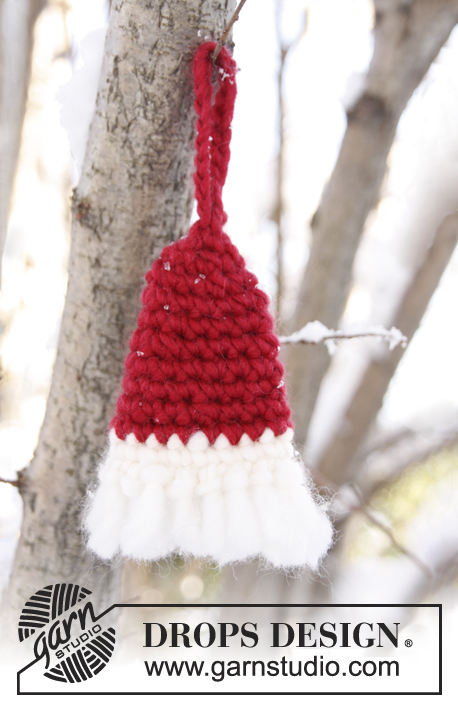
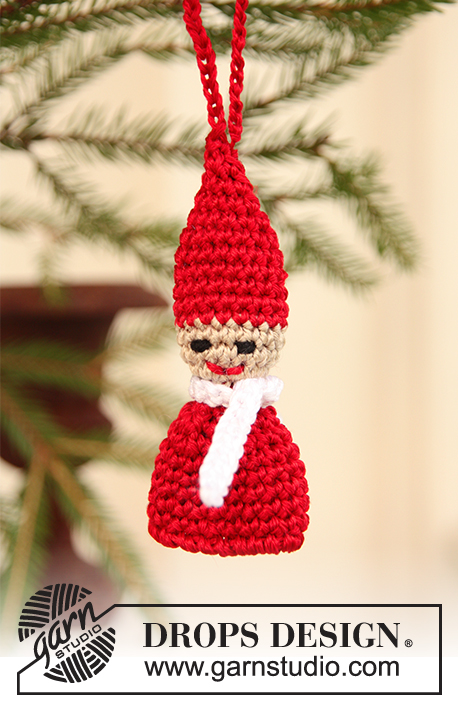
Crochet Christmas tree decoration in 2 threads DROPS Alpaca. Piece is worked as Santa Claus. Theme: Christmas
DROPS Extra 0-563 |
|
|
DECREASING TIP: Crochet 1 sc, but wait with the last pull-through (= 2 sts on hook), crochet next sc, but when doing the last pull-through pull thread through all sts on hook = 1 dec sc. -------------------------------------------------------- -------------------------------------------------------- NOSE: Ch 4 with 2 threads red and hook size 3 mm / C and form a ring with 1 sl st in first ch = first ring. Now ch 3 and form a new ring with 1 sl st in sl st from first ring = second ring. Turn piece. Ch 4, 5 tr in second ring, but wait with the last pull-through = 6 sts on hook. Now pull thread through all sts on hook = 1 half of nose. Ch 1, 5 tr in first ring, but wait with the last pull-through = 6 sts on hook. Now pull thread through all sts on hook = 1 whole nose. Cut and fasten thread. HEAD: Now crochet with 2 threads off-white. Crochet 1 sc at the top of ch between the 2 nose halves, ch 4, 1 sc at the other side between the 2 nose halves. Ch 4 and 1 sl st in the first sc. There are now 2 off-white ch-loops between the 2 nose halves. ROUND 1: Ch 1, then 5 sc round each of the 2 ch-loops and finish with 1 sl st in first sc on round = 10 sc round nose. ROUND 2: Ch 1, then 2 sc in each sc and finish with 1 sl st in first sc on round = 20 sc round nose. ROUND 3: Ch 1, then * 1 sc in first sc, 2 sc in next sc *, repeat from *-* and finish with 1 sl st in first sc on round = 30 sc. ROUND 4: Ch 8, 1 dc in first sc, * ch 4, 1 dc in next sc, ch 4, 1 dc in the same sc *, repeat from *-* a total of 14 times. Cut and fasten thread. HAT: Continue back and forth with 2 threads red. Beg in the next sc after the thread was cut. ROW 1: Crochet 1 sc in each of the next 7 sc, ch 2, 1 sc in each of the next 7 sc = 14 sc. Turn piece. ROW 2: ch 1, dec 1 sc - see DECREASING TIP - 1 sc in each of the next 5 sc, ch 2, 1 sc in each of the next 5 sc, dec 1 sc = 12 sc. Turn piece. ROW 3: ch 1, 1 sc in each of the first 6 sc, ch 2, 1 sc in each of the next 6 sc = 12 sc. Turn piece. ROW 4: ch 1, dec 1 sc, 1 sc in each of the next 4 sc, ch 2, 1 sc in each of the next 4 sc, dec 1 sc = 10 sc. Turn piece. ROW 5: ch 1, 1 sc in each of the first 5 sc, ch 2, 1 sc in each of the next 5 sc = 10 sc. Turn piece. ROW 6: ch 1, dec 1 sc, 1 sc in each of the next 3 sc, ch 24, 1 sc in each of the next 3 sc, dec 1 sc = 8 sc. Cut and fasten thread. |
|
Have you finished this pattern?Tag your pictures with #dropspattern #dropssantarednose or submit them to the #dropsfan gallery. Do you need help with this pattern?You'll find 5 tutorial videos, a Comments/Questions area and more by visiting the pattern on garnstudio.com. © 1982-2026 DROPS Design A/S. We reserve all rights. This document, including all its sub-sections, has copyrights. Read more about what you can do with our patterns at the bottom of each pattern on our site. |


With over 40 years in knitting and crochet design, DROPS Design offers one of the most extensive collections of free patterns on the internet - translated to 17 languages. As of today we count 324 catalogs and 12290 patterns - 12280 of which are translated into English (US/in).
We work hard to bring you the best knitting and crochet have to offer, inspiration and advice as well as great quality yarns at incredible prices! Would you like to use our patterns for other than personal use? You can read what you are allowed to do in the Copyright text at the bottom of all our patterns. Happy crafting!
Post a comment to pattern DROPS Extra 0-563
We would love to hear what you have to say about this pattern!
If you want to leave a question, please make sure you select the correct category in the form below, to speed up the answering process. Required fields are marked *.