
Popular categories
Looking for a yarn?


Comments / Questions (22)
![]() PROVOST wrote:
PROVOST wrote:
Bonjour, pour le bonnet, on monte les 6 mailles sur 1 aiguille double pointe, on tricote un cache oreille sur une 2eme, on monte les 18 mailles sur une 3eme, le 2eme cache oreille sur une 4eme et les 6 autres dernières mailles ? Avec les 6 premières ? Merci.
10.12.2014 - 15:56DROPS Design answered:
Bonjour Mme Provost, pour le bonnet, les tours commencent au milieu dos: on monte 6 m, puis on tricote le 1er cache-oreille, on monte 18 m pour le devant, on tricote le 2e cache-oreille et on monte 6 m (fin du tour) - on va avoir 12 m entre les 2 cache-oreilles au milieu dos, et un total de 70 m (taille 6/9 mois) à répartir sur 4 aiguilles soit 14 m par aig - notez bien que le début des tours se trouve au milieu dos (avant les 6 premières m montées) et se termine par les 6 dernières m montées. Bon tricot!
10.12.2014 - 18:10
![]() Rosalind Testa wrote:
Rosalind Testa wrote:
Conncerning the p st. What does it mean p st in first two stitches. I tried to find out from the store I buy my yarn from, but they could not help me.
06.11.2014 - 17:54DROPS Design answered:
Dear Mrs Testa, do you mean " working 2 sts in the first P-st" ? you have here to work the first P st in P-secion alternately in front and back loop of same st (= 1 st inc). Happy knitting!
07.11.2014 - 10:18
![]() Rosalind Testa wrote:
Rosalind Testa wrote:
For neck warmer it say use garter st for first two rows. But is says k3p3. Does that mean each knit row is that. Purl row is increase row.
05.11.2014 - 06:42DROPS Design answered:
Dear Mrs Testa, you start neck warmer with 2 garter st row (= K1 round, P 1 round = 1 ridge), then work in rib K3/P3 (*K3 sts, P3 sts* repeat from *-*), ie you will work sts in ribbing around until piece measures 5-8 cm. Happy knitting!
05.11.2014 - 09:33
![]() Voisin Fabienne wrote:
Voisin Fabienne wrote:
Merci pour vos beaux modèles aux explications simples et accessible ... tout comme pour votre large palette de produits à des prix concurrentiels.
24.11.2013 - 17:28
![]() Templier wrote:
Templier wrote:
Dur le modele du tour de cou a quoi correspond les sections dont vous parler pour faire les augmentations
20.11.2013 - 20:12DROPS Design answered:
Bonjour Mme Templier, le tour de cou se commence en côtes 3 m end/3 m env. Vous augmentez ensuite 1m dans les sections 3 m env (= côtes 3 m end/4 m env), vous allez ensuite continuer ces augmentations : 3 m end/5 m env, puis 3 m end/6 m env jusqu'à ce que les côtes soient 3 m end/10 m env. Bon tricot!
21.11.2013 - 08:47
![]() Verena wrote:
Verena wrote:
Hi nochmal, ich habe sie fertig juhuu! Schade nur dass ich wohl folgendes missverstanden habe: "..rot glatt weiterstricken. Nach 11 cm ..." Ich nehme an nach 11 cm insgesamt? Ich dachte nach 11 cm rot und habe jetzt eben eine längere Mütze. Schöne Weihnachtsfeiertage!
23.12.2012 - 17:54
![]() Verena wrote:
Verena wrote:
Hi, ich habe die Ohrenklappen in einer Runde rechts drangestrickt. bei einer habe ich 2 Reihen glatt rechts, bei der anderen nicht. Was habe ich falsch gemacht?
15.12.2012 - 16:50DROPS Design answered:
Hallo Verena, Sie haben sicher bei der einen vorbereiteten Ohrenklappe mit einer Hin-R geendet und dann nochmals eine Hin-R gestrickt (dann gibt es 2 R re hintereinander). Viel Spass beim Stricken!
16.12.2012 - 09:52
![]() Zhwtspmey wrote:
Zhwtspmey wrote:
Wholesale all
14.12.2012 - 23:20
![]() Verena wrote:
Verena wrote:
Hi, ich bin ganz am Anfang und Frage mich ob ich links und rechtsgerichtet zunehme? oder immer gleich? die ohrenklappe wird doch kraus rechts gestrickt?!
11.12.2012 - 20:39DROPS Design answered:
Liebe Verena, die Aufnahmen werden durch Umschläge gemacht, dadurch ergibt sich keine Richtung, wie dies bei Abnahmen der Fall ist. Viel Spass beim Stricken!
13.12.2012 - 08:26
![]() Kristin wrote:
Kristin wrote:
I oppskriften står det at hals strikken med 2tråder rød. Hva betyr det? Dobbelt tråd?
24.10.2012 - 21:22DROPS Design answered:
Ja!
25.10.2012 - 10:00
|
|
Baby Noel#babynoelset |
|
 |
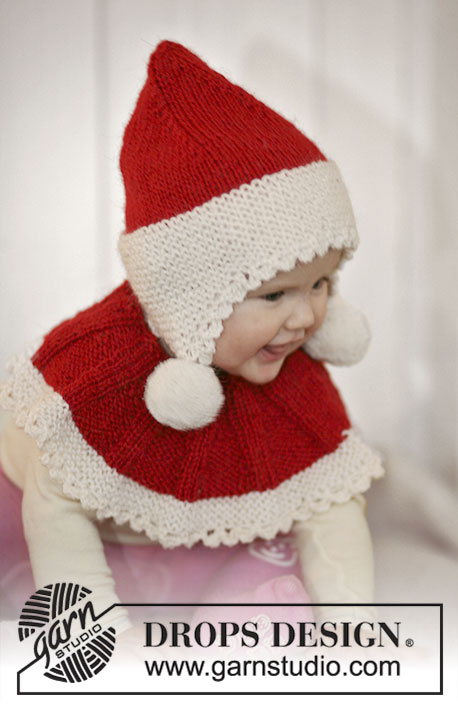 |
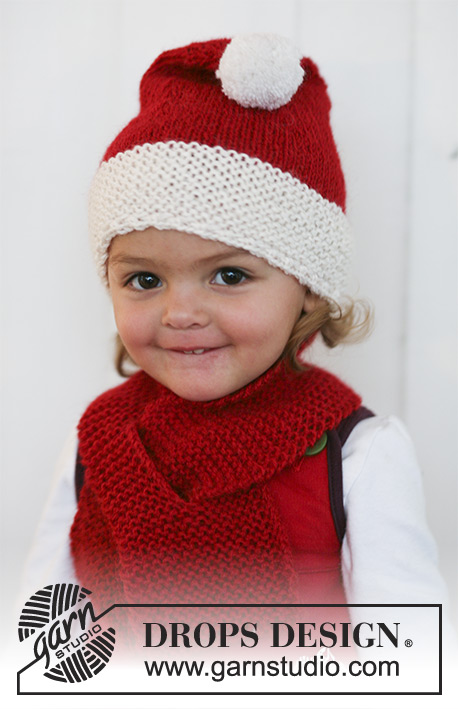
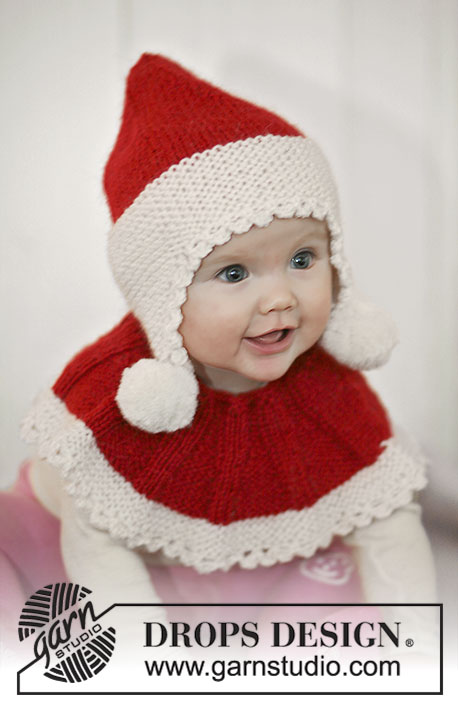
Set of knitted Santa hat and neck warmer for baby and children in 2 threads DROPS Alpaca
DROPS Baby 19-11 |
|
|
NECK WARMER: Size: 1/3-6/9-12/18 months (2-3/4-5/6) years Materials: DROPS ALPACA from Garnstudio 50-50-50 (50-100-100) g color no 3620, red. 50 g for all sizes color no 1101, white DROPS CIRCULAR NEEDLE (40 cm / 16") size 5 mm/ US 8 – or size needed to get 17 sts x 22 rows in stockinette st with 2 strands Alpaca = 10 x 10 cm / 4" x 4". DROPS CROCHET HOOK size 4.5 mm / US 7 - for crochet border. -------------------------------------------------------- HAT: INCREASING TIP: Inc 1 st inside 1 edge st by making 1 YO. On next row work YO into back of loop to avoid a hole. GARTER ST (back and forth on needle): K all rows. GARTER ST (in the round): K 1 round, P 1 round. -------------------------------------------------------- -------------------------------------------------------- HAT: Beg with the ear flaps, worked back and forth on double pointed needles, then cast on sts for the hat and work hat in the round on double pointed needles. EAR FLAP: Worked back and forth on double pointed needles. Cast on 6-6-6 (6-6-7) sts on double pointed needles size 5 mm / US 8 with 2 strands white. Work GARTER ST – see above – back and forth on needle (first row = RS). AT THE SAME TIME on row 3 inc 1 st each side - See INCREASING TIP – and repeat the inc on every other row a total of 5-6-7 (7-8-8) times = 16-18-20 (20-22-23) sts. After the last inc piece measures approx 3.5-4-4.5 (4.5-5-5) cm / 1¼"-1½"-1¾" (1¾"-2"-2"). Work 1 row from WS, AT THE SAME TIME inc 2-2-2 (4-4-4) sts evenly = 18-20-22 (24-26-27) sts. Slip sts on a stitch holder and knit one more ear flap. HAT: Worked in the round on double pointed needles. Cast on 6-6-5 (5-4-4) sts on double pointed needles size 5 mm / US 8 with 2 strands white, work 1 ear flap in on double pointed needles (= 18-20-22 (24-26-27) sts), cast on 17-18-18 (19-20-20) sts (= front), work the other ear flap in on double pointed needles (= 18-20-22 (24-26-27) sts) and cast on 6-6-5 (5-4-3) sts = 65-70-72 (77-80-81) sts on needle. Insert a marker, and now measure piece from here. Continue in GARTER ST – see above – until piece measures 5-5-6 (6-7-8) cm / 2"-2"-2⅜" (2⅜"-2¾"-3⅛") from marker. Now continue in stockinette st with 2 threads red. When piece measures 9-10-11 (13-15-18) cm / 3½"-4"-4⅜" (5⅛"-6"-7") from marker insert 5-5-6 (7-8-9) new markers in piece with 13-14-12 (11-10-9) sts between each. Now dec 1 st after each marker by K2 tog (i.e. = 5-5-6 (7-8-9) dec sts per round). Dec like this on every other round a total of 11-12-11 (10-9-8) times = 10-10-6 (7-8-9) sts left on needle. Now K2 tog all the way round = 5-5-3 (4-4-5) sts. Cut the thread, pull it through remaining sts, tighten and fasten. Hat measures approx 19-20-21 (22-23-24) cm / 7½"-8"-8¼" (8¾"-9"-9½") from marker mid back. CROCHET BORDER: Crochet a border round the edge of hat from RS with hook size 4.5 mm/ US 7 and 2 threads white as follows: 1 sc at the point of one ear flap and continue as follows: * 3 ch, 1 dc in the first of the 3 ch, skip approx 1 cm / ⅜", 1 sc in next st *, repeat from *-* and finish with 3 ch, 1 dc in the first of the 3 ch and 1 sl st in sc from beg of round. Cut and fasten thread. POMPOM: Make 2 pompoms with a diameter of approx 5 cm / 2" with white. Sew 1 pompom to the point of each earflap. -------------------------------------------------------- NECK WARMER: Worked in the round on circular needle from top down. Cast on 54-66-72 (84-96-102) sts on circular needle size 5 mm / US 8 with 2 strands red. Work 2 rows GARTER ST – see above – and continue in rib K3/ P3. When piece measures 5-6-7 (7-8-8) cm / 2"-2⅜"-2¾" (2¾"-3⅛"-3⅛") inc 1 st in each P-section by working 2 sts in the first P-st = 63-77-84 (98-112-119) sts. Repeat the inc in the last and first P-st alternately in each P-section on every 2-2-2 (3-3-3) round another 6-6-6 (5-5-5) times = 117-143-156 (168-192-204) sts. Continue with K3/P10-10-10 (9-9-9) until piece measures 11-12-13 (15-17-18) cm / 4⅜"-4¾"-5⅛" (6"-6¾"-7"). Now change to 2 threads white. Work 2 cm / ¾" garter st and bind off. CROCHET BORDER: Crochet a border round bottom edge from RS with crochet hook size 4.5 mm / US 7 and 2 threads white as follows: 1 sc, * 3 ch, 1 dc in the first of the 3 ch, skip approx 1 cm / ⅜", 1 sc in next st *, repeat from *-* and finish with 3 ch, 1 dc in the first of the 3 ch, skip approx 1 cm / ⅜" and 1 sl st in sc from beg of round. Cut and fasten thread. |
|
Have you finished this pattern?Tag your pictures with #dropspattern #babynoelset or submit them to the #dropsfan gallery. Do you need help with this pattern?You'll find 20 tutorial videos, a Comments/Questions area and more by visiting the pattern on garnstudio.com. © 1982-2026 DROPS Design A/S. We reserve all rights. This document, including all its sub-sections, has copyrights. Read more about what you can do with our patterns at the bottom of each pattern on our site. |
|


With over 40 years in knitting and crochet design, DROPS Design offers one of the most extensive collections of free patterns on the internet - translated to 17 languages. As of today we count 324 catalogs and 12290 patterns - 12280 of which are translated into English (US/in).
We work hard to bring you the best knitting and crochet have to offer, inspiration and advice as well as great quality yarns at incredible prices! Would you like to use our patterns for other than personal use? You can read what you are allowed to do in the Copyright text at the bottom of all our patterns. Happy crafting!
Post a comment to pattern DROPS Baby 19-11
We would love to hear what you have to say about this pattern!
If you want to leave a question, please make sure you select the correct category in the form below, to speed up the answering process. Required fields are marked *.