
Popular categories
Looking for a yarn?


Comments / Questions (74)
![]() Severine Lbc wrote:
Severine Lbc wrote:
Bonsoir, je me demandais si pour les demis carrés, il fallait faire le rang 5 sur les 3 côtés ou bien seulement sur 2 ? Aussi, faut il bloquer les carrés avant de les assembler entre eux ou n'est ce pas nécessaire ? Merci !
17.12.2021 - 00:32DROPS Design answered:
Bonjour Mme Lbc, le 5ème rang se fait sur/dans toutes les mailles du 4ème rang - soit 2 côtés seulement. Bloquer est souvent un choix personnel, certaines le font, d'autres pas. Demandez conseil à votre magasin si besoin, on vous aidera, même par mail ou téléphone. Bonne continuation!
17.12.2021 - 08:33
![]() Flo wrote:
Flo wrote:
Bonjour je n'arrive pas à comprendre comment on fait le dos après avoir fait les cotés et les diminutions d'emmanchures doit on tricoter en meme temps (pour une taille XL) 14 plus 76 mailles centrales plus 14 mailles de l'autre coté soit 104 mailles ou le dos est il indépendant ? merci bonne journée
05.09.2021 - 09:56DROPS Design answered:
Bonjour Flo, pour le haut du dos, crochetez les 76 mailles centrales en diminuant 1 m de chaque côté jusqu'à ce qu'il reste 62 mailles, puis à 55 cm, crochetez 2 rangs sur les 16 premières mailles (= 1ère épaule), coupez le fil, sautez les 30 m centrales pour l'encolure et crochetez 2 rangs sur les 16 dernières mailles (= 2ème épaule). Bon crochet!
06.09.2021 - 07:43
![]() Ольга wrote:
Ольга wrote:
Добрый день! Можете послать перевод описания на русском языке? Спасибо!!
27.01.2021 - 08:17DROPS Design answered:
Dear Ольга, our patterns are avalaible in 16 languages but unfortunately not in russian yet, please contact your DROPS Store in Russia for any futher assistance. Happy knitting!
27.01.2021 - 13:00
![]() Olga wrote:
Olga wrote:
Добрый день! Очень понравилось, но нет на русском языке описания👍🙏
26.01.2021 - 01:27DROPS Design answered:
Здравствуйте Ольга. В настоящее время нет перевода на русский язык.
31.01.2021 - 20:18
![]() Claudia wrote:
Claudia wrote:
Ich häkle Größe M, leider nein, vll steh ich auch auf der Leitung.
27.09.2019 - 14:29DROPS Design answered:
Liebe Claudia, in der Größe M häkeln Sie dann nur die 3 Maschen für das rechte Vorderteil (= überspringen Sie 5 Maschen = Armloch, und dann häkeln Sie die 3 Maschen und dann 1 M abnehmen bis alle Maschen abgenommen Sind. Bei linken Seitenteil häkeln Sie genauso aber spiegelsverkehr = es sind 5 Maschen die nicht gearbeitet werden = Armlöcher. Viel Spaß beim häkeln!
27.09.2019 - 15:52
![]() Claudia wrote:
Claudia wrote:
Es steht ja auch nach 29 cm abketten für Armloch, beim Bild sind aber bei Größe M 48cm angegeben bei der Bemaßung oder sehe ich das falsch?
27.09.2019 - 11:25DROPS Design answered:
Liebe Claudia, siehe Antwort unten und sagen Sie uns, ob es jetzt klarer wird. Viel Spaß beim häkeln!
27.09.2019 - 13:35
![]() Claudia wrote:
Claudia wrote:
Ich komme hier leider nicht weiter RECHTES SEITENTEIL: Mit dem Muster nur über die äussersten 0-3-5-7-8-11 M. weiterfahren (die nächsten 5-5-8-14-21-25 M. = Armloch – in Grösse S fallen alle M. für das Seitenteil beim Armloch weg). Weiter bei jeder R. gegen die Seite je 1 M. abn. bis alle M. des Seitenteils abgenommen sind – SIEHE TIPP ZUM ABNEHMEN!
27.09.2019 - 11:20DROPS Design answered:
Liebe Claudia, bei der Größe S stricken Sie keine Masche für rechtes und links Vorderteil = die 5 Maschen beidseitig vom Rücken und Seitenteil sind für die Armlöcher, dh Sie häkeln einfach über die mittleren 62 M für das Rückenteil. Viel Spaß beim häkeln!
27.09.2019 - 13:34
![]() Claudia wrote:
Claudia wrote:
Ich komme mit den zwei Teilen am Rücken nicht klar, was soll das heißen? 1. R. wie folgt: 1 fM in die 2. Lm von der Nadel gesehen, 1 fM in jede der 1-3-2-4-1-3 Lm nächsten Lm, * 1 Lm überspringen, 1 fM in jede der 4 nächsten *, von *-* wiederholen = 30-36-43-53-62-72 fM. Bitte um Hilfe
23.09.2019 - 17:14DROPS Design answered:
Liebe Claudia, Man überspringt in der ersten R in regelmäßigen Abständen 1 Lm, damit der Rand nicht zu stramm und eng wird und elastisch bleibt - in der Regel häkelt man die Lm etwas fester als später die M, um das auszugleichen, schlägt man mehr Lm an. Wenn Ihnen das mit den Löchern gar nicht gefällt und Sie sehr lockere Lm anschlagen, können Sie auch nur die Anzahl der Lm anschlagen, die Sie in der 2. R für die fM brauchen. Viel Spaß beim häkeln!
24.09.2019 - 10:07
![]() Lotta Stenegård wrote:
Lotta Stenegård wrote:
Förstår inte hur jag ska virka avm mot armhålor Står jag ska virka yttersta maskor mot armhål Rita gärba hur jag ska göra
14.12.2018 - 19:05DROPS Design answered:
Hei Lotta. Istedenfor å hekle over alle maskene, skal du nå kun hekle over de ytterste maskene i hver side. Begynn med det ene ermhullet. Du hekler frem og tilbake, og på hver omgang som starter ved ermhullet feller du 1 stav. Du fortsetter slik til du har felt alle de 0-3-5-7-8-11 maskene. Så gjør du det samme på den andre siden = det andre ermhullet. God fornøyelse
17.12.2018 - 10:46
![]() SF wrote:
SF wrote:
If you have been doing crochet for a while and think you have 'nailed it', try this pattern to exercise your brain (and patience). The instructions are made by someone who really knows the pattern and how to make it. The problem lies with the same person being totally unable to explain how to do it to another person - even when they ask in the comments section! The back bit can be explained by looking at the photo as it shows the 'flap' with two buttons for decoration.
06.08.2017 - 08:06
|
|
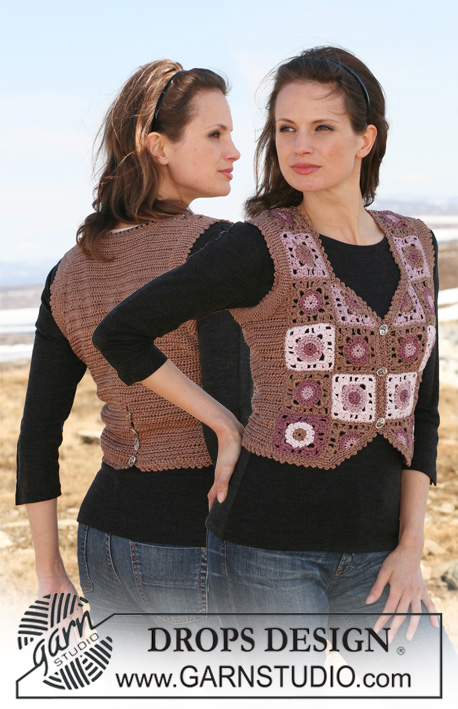
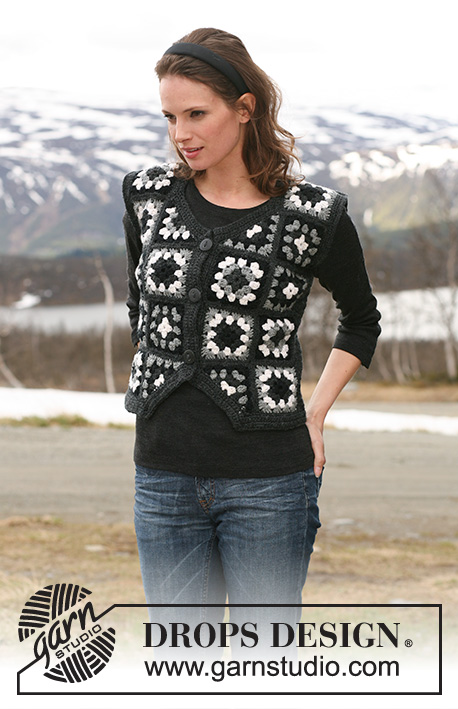
Licorice Squares Vest |
|
 |
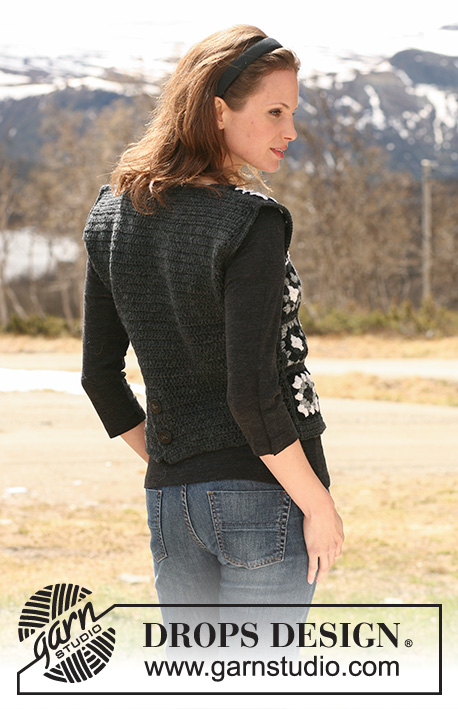 |
Crochet DROPS waistcoat in ”Karisma” with squares. Size S to XXXL.
DROPS 115-37 |
|
|
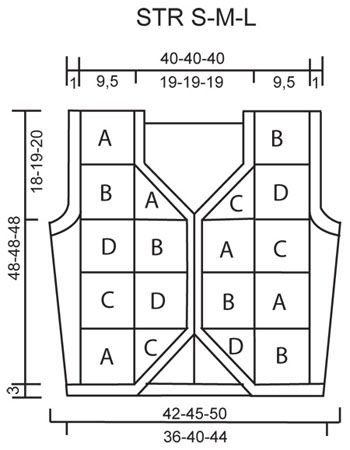
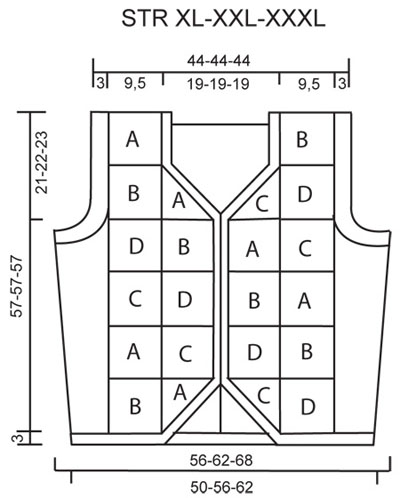
PATTERN: ROW 1: 1 dc in each sc, finish row with 1 ch to turn with. ROW 2: 1 sc in each dc, finish row with 3 ch to turn with. DECREASING TIP (armholes): Dec as follows at the end of row: work row until 1 st remain, turn piece and work return row. Dec as follows at beg of row: work 1 sl st in first st, continue as before. ---------------------------------------------------------- ---------------------------------------------------------- WAISTCOAT: Front piece crochet in squares. Back piece + side piece crochet in pattern rows. COLORS OF SQUARES: SQUARE A: Beg + round 1 = charcoal gray, round 2 = gray, round 3 = white, round 4 = black, round 5 = charcoal gray. SQUARE B: Beg + round 1 = black, round 2 = charcoal gray, round 3 = white, round 4 = gray, round 5 = charcoal gray. SQUARE C: Beg + round 1 = white, round 2 = charcoal gray, round 3 = black, round 4 = gray, round 5 = charcoal gray. SQUARE D: Beg + round 1 = white, round 2 = charcoal gray, round 3 = gray, round 4 = black, round 5 = charcoal gray. WHOLE SQUARE: Crochet 6 ch with crochet hook size 4 mm / G/6 and form a ring with 1 sl st in first ch. ROUND 1: 3 ch, 2 dc in ring, * 3 ch, 3 dc *, repeat from *-* a total of 3 times and finish with 3 ch and 1 sl st in 3rd ch from beg of round. Turn piece. ROUND 2: 3 ch, 2 dc in first ch-loop, 3 ch, 3 dc in the same ch-loop, * 1 ch, 3 dc in next ch-loop, 3 ch, 3 dc in the same ch-loop *, repeat from *-* a total of 3 times, finish with 1 ch and 1 sl st in 3rd ch from beg of round. Turn piece. ROUND 3: 3 ch, 2 dc in first ch-loop, 1 ch, * 3 dc in next ch-loop, 3 ch, 3 dc in the same ch-loop, 1 ch, 3 dc in next ch-loop, 1 ch *, repeat from *-* a total of 3 times, 3 dc in next ch-loop, 3 ch, 3 dc in the same ch-loop, 1 ch, finish with 1 sl st in 3rd ch from beg of round. Turn piece. ROUND 4: 3 ch, 2 dc in first ch-loop, 1 ch, * 3 dc in next ch-loop, 3 ch, 3 dc in the same ch-loop, 1 ch, 3 dc in next ch-loop, 1 ch, 3 dc in next ch-loop, 1 ch *, repeat from *-* a total of 3 times, 3 dc in next ch-loop, 3 ch, 3 dc in the same ch-loop, 1 ch, 3 dc in next ch-loop, 1 ch, finish with 1 sl st in 3rd ch from beg of round. Turn piece. ROUND 5: Crochet 1 sc in each dc and 1 sc in each ch, finish with 1 sl st in first sc. Square measures approx 9.5 x 9.5 cm / 3¾" x 3¾". HALF SQUARE: Read US/UK above! Crochet 6 ch with crochet hook size 4 mm / G/6 and form a ring with 1 sl st in first ch. ROW 1: 4 ch, 3 dc in ring, 3 ch, 3 dc in ring, 1 ch, 1 dc in ring. Turn piece. ROW 2: 4 ch, 3 dc in first ch from previous row, 1 ch, 3 dc in next ch-loop, 3 ch, 3 dc in the same ch-loop (= corner), 1 ch, 3 dc in last ch, 1 ch, 1 dc in the same ch. Turn piece. ROW 3: 4 ch, 3 dc in first ch from previous row, 1 ch, 3 dc in next ch, 1 ch, 3 dc in next ch-loop, 3 ch, 3 dc in the same ch-loop (= corner), 1 ch, 3 dc in next ch, 1 ch, 3 dc in last ch, 1 ch, 1 dc in the same ch. Turn piece. ROW 4: 4 ch, 3 dc in first ch from previous row, * 1 ch, 3 dc in next ch-loop *, repeat from *-* a total of 3 times, 3 ch, 3 dc in the same ch-loop, repeat from *-* a total of 3 times, 1 ch, 1 dc in the last ch. Turn piece. ROW 5: Crochet 1 sc in each dc and 1 sc in each ch. NUMBER OF SQUARES: SIZE S-M-L: Crochet 4 whole + 1 half square of A, 5 whole squares of B, 2 whole + 2 half squares of C and 3 whole + 1 half square of D = a total of 14 whole and 4 half squares. SIZE XL-XXL-XXXL: Crochet 4 whole + 2 half squares of A, 6 whole squares of B, 3 whole + 2 half squares of C and 5 whole squares of D = a total of 18 whole and 4 half squares. BACK PIECE + SIDE PIECE: Crochet the first 12 cm / 4¾" in 2 parts (for split mid back). PART-1 (= left side includes buttonhole band): Crochet 38-45-54-66-78-90 loose ch on crochet hook size 4.5 mm/US 7 with charcoal gray. Crochet first row as follows: 1 sc in 2nd ch from hook, 1 sc in each of the next 1-3-2-4-1-3 ch, * skip 1 ch, 1 sc in each of the next 4 ch *, repeat from *-* = 30-36-43-53-62-72 sc. Continue in PATTERN – see above. REMEMBER THE GAUGE! When piece measures 12 cm / 4¾" put it aside. PART-2 (= right side includes buttonhole band): Crochet like part-1, but when piece measures approx 5 cm / 2" – adjust so that next row is a row with dc - make 1 buttonhole towards mid back by replacing the last but 2 dc towards mid back with 1 ch, on next row crochet 1 sc in ch. Repeat when piece measures 10 cm / 4". Put piece aside when it measures 12 cm / 4¾" (adjust to no of rows on part-1. BACK PIECE + SIDE PIECE: Place part-1 and part-2 over each other (right side over left side) with 6 sts overlapping mid back – (i.e. 1 row crochet through 2 layers on these 6 sts) = 54-66-80-100-118-138 sts. Continue in pattern, AT THE SAME TIME on next row with dc inc 1 st each side by working 2 dc in the last but 1 dc each side. Repeat the inc on every other row a total of 9 times = 72-84-98-118-136-156 sts. When piece measures 30-29-28-36-35-34 cm / 11¾"-11⅜"-11"-14¼"-13¾"-13⅜" bind off for armhole as follows: RIGHT SIDE PIECE: Continue in pattern as before on the 0-3-5-7-8-11 outermost sts at the side (the next 5-5-8-14-21-25 sts = armhole - in size S all sts on side piece = armhole). Now dec 1 st on every row towards armhole until all sts have been dec – SEE DECREASING TIP! LEFT SIDE PIECE: Like right side piece. BACK PIECE: Crochet back and forth on the middle 62-68-72-76-78-84 sts only, AT THE SAME TIME dec 1 st towards armhole each side on every row until 62 sts remain (for all sizes). When piece measures 46-46-46-55-55-55 cm / 18"-18"-18"-21⅝"-21⅝"-21⅝" crochet 2 rows on 16 sts each side only (the middle 30 sts = neckline). Cut the thread. ASSEMBLY: Sew squares tog to 2 front pieces as shown in chart – sew edge to edge with charcoal gray in outer loops of sts. Sew front pieces to back piece and sew shoulder seams in the same way. BORDER ARMHOLE: Crochet 2-2-2-5-5-5 rounds with sc round armholes with charcoal gray and crochet hook size 4.5 mm/US 7 - approx 16 sc per 10 cm / 4" – make sure border is even, i.e. not too many sc. BORDER WAISTCOAT: Crochet a border round the whole waistcoat with charcoal gray on crochet hook size 4.5 mm/US 7. Beg at bottom of split on back piece, continue along bottom edge, up along right front piece, round neck, down along left front piece and along bottom edge to split mid back (i.e. do not crochet each side of split mid back) Crochet 5 rows back and forth with sc - approx 16 sc per 10 cm / 4" - NOTE: in all outward facing corners crochet 3 sc and in all inward facing corners skip 1 st. AT THE SAME TIME on row 2 (= WS) make 3-3-3-4-4-4 buttonholes on right front band. 1 BUTTONHOLE = 2 ch and skip 2 sc, on next row crochet 2 sc in each ch-loop. Make 1 buttonhole in each transition between the squares. Sew 2 buttons to split mid back and 3-3-3-4-4-4 buttons to left front band. |
|
 |
|
 |
|
Have you finished this pattern?Tag your pictures with #dropspattern or submit them to the #dropsfan gallery. Do you need help with this pattern?You'll find 11 tutorial videos, a Comments/Questions area and more by visiting the pattern on garnstudio.com. © 1982-2026 DROPS Design A/S. We reserve all rights. This document, including all its sub-sections, has copyrights. Read more about what you can do with our patterns at the bottom of each pattern on our site. |
|


With over 40 years in knitting and crochet design, DROPS Design offers one of the most extensive collections of free patterns on the internet - translated to 17 languages. As of today we count 324 catalogs and 12290 patterns - 12280 of which are translated into English (US/in).
We work hard to bring you the best knitting and crochet have to offer, inspiration and advice as well as great quality yarns at incredible prices! Would you like to use our patterns for other than personal use? You can read what you are allowed to do in the Copyright text at the bottom of all our patterns. Happy crafting!
Post a comment to pattern DROPS 115-37
We would love to hear what you have to say about this pattern!
If you want to leave a question, please make sure you select the correct category in the form below, to speed up the answering process. Required fields are marked *.