
Popular categories
Looking for a yarn?


Comments / Questions (131)
![]() Kim wrote:
Kim wrote:
The neckline said to pick up 56 stitches from RS round neck with 1 thread Eskimo on needle and change needle to smaller size and continue with 2 threads Eskimo etc. I am using a wool yarn, what does the one thread and two thread mean?
14.12.2018 - 03:19DROPS Design answered:
Dear Kim, the whole jacket is worked with only 1 strand of yarn, but to make the neck firm enough, you work with smaller needles and 2 strands of yarn (= double strand). Happy knitting!
14.12.2018 - 08:49
![]() Kim wrote:
Kim wrote:
Left front piece=29 stitches for size small. The pattern is a even numbered pattern. How are you to follow the M1design with odd number of stitches. Please help. Kim
14.12.2018 - 03:16
![]() Kim wrote:
Kim wrote:
I have read the directions for sleeves and confused. At the end of sleeve instructions, last sentence written WORK THE OTHER SLEEVE WITH THE M.3 FOR PLEATS. When do you introduce the pleats on the sleeve. I can't find it in the instructions. thanks kim
25.11.2018 - 19:11DROPS Design answered:
Dear Kim, on the first sleeve you will work M.2 for the pleat, on the 2nd sleeve you will work M.3 instead of M.2. Happy knitting!
26.11.2018 - 10:08
![]() Liina Kaev wrote:
Liina Kaev wrote:
Tere Teile ei ole võinalik kirjutada, kas saaks e postinaadressi
16.06.2018 - 13:53
![]() Paola wrote:
Paola wrote:
Fatto molto bello un consiglio quando fate le pieghe invece di riprendere il disegno fate direttamente il punto legaccio
18.09.2017 - 19:52
![]() Cecile wrote:
Cecile wrote:
Bonjour Ce tricot est magnifique ! J'envisage de tricoter ce modèle avec la laine Cloud (pelote de 50g pour 80m) et je souhaiterais savoir quelle quantité de laine Cloud serait nécessaire à la place de la laine Eskimo (pelote de 50g pour 50m) ? Dans l'attente de vous lire, je vous remercie. Cecile
22.08.2015 - 13:06DROPS Design answered:
Bonjour Cécile, cliquez ici pour calculer la quantité nécessaire dans une qualité alternative. Votre magasin saura vous aider si nécessaire. Bon tricot!
24.08.2015 - 10:34
![]() Oxana wrote:
Oxana wrote:
Hallo, ich komme mit den Ärmeln nicht ganz klar. Sie werden rund gestrickt, d.h. alle Reihen von der rechten Seite. Wie wird dann die M2 nach 20 cm von der linken Seite gestrickt? Danke
26.05.2015 - 14:20DROPS Design answered:
Die Beschreibung der Ärmel enthält leider Fehler, sie wird gleich überarbeitet. Sie stricken weiter in Runden und M.2 ensprechend von der Vorderseite, im Strukturmuster wie am Rumpf.
27.05.2015 - 13:28
![]() Martha wrote:
Martha wrote:
Ich habe das Modell 2008 zwei mal gestrickt. Einmal für mich in der grössten Grösse und einmal für eine Freundin in der kleinsten Grösse! Beide Grössen sehen auch nach mehrmaligem Waschen immer noch sehr schön aus!
03.03.2015 - 21:56
![]() Jose wrote:
Jose wrote:
Kan ik dit vest ook op breipennen maken. Dus geen rondbreinaald
11.02.2014 - 11:22DROPS Design answered:
Hoi Jose. Ik denk dat het lastig kan zijn ivm ruimte op rechte breinaalden (daarom wordt er ook een rondbreinaald hier gebruikt). Zie of je ruimte kan hebben voor alle steken (in het bijzonder voor het achterpand). De mouwen worden wel in de rondte gebreid op breinaalden zonder knoop, maar je kan kiezen om deze heen en weer te breien, zet dan 1 st op aan beide zijkanten voor de naad (= kantst).
11.02.2014 - 16:50
![]() Katharina wrote:
Katharina wrote:
Hallo, und noch eine Frage :) bevor ich den Kragen anstricke, muss ich aber die Schulternaht schließen indem ich sie zusammennähe, oder? Das fehlt in der Anleitung. Übrigens, toll, dass einem hier immer geholfen wird. DAnke
10.12.2013 - 10:22DROPS Design answered:
Liebe Katharina, ja genau, die Schulternähte werden zunächst geschlosssen.
11.12.2013 - 07:13
|
|||||||||||||
Sandy Bay |
|||||||||||||
 |
 |
||||||||||||
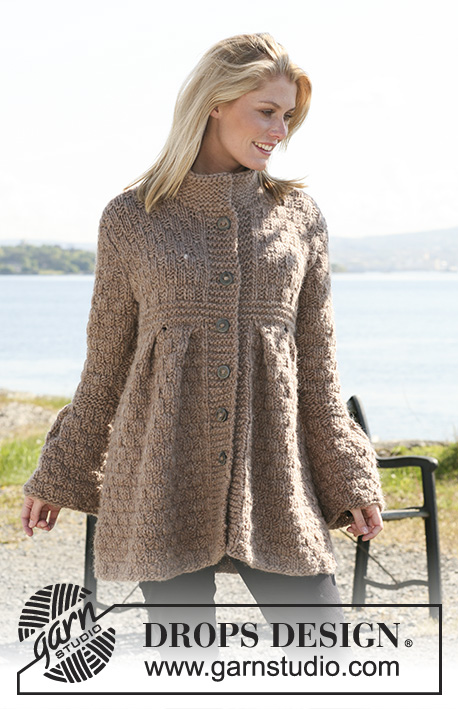
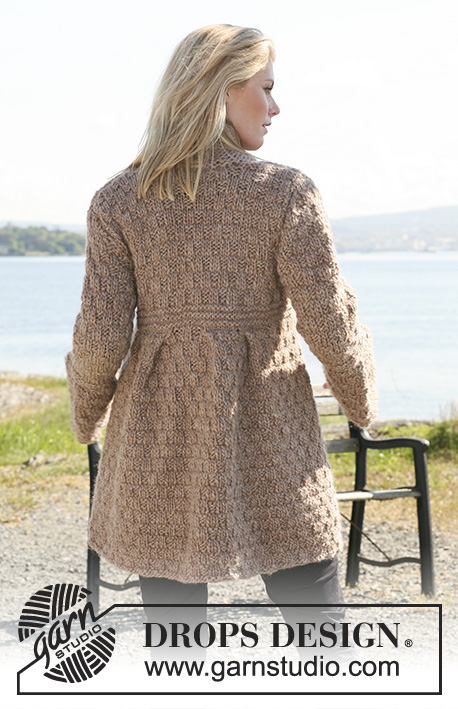
DROPS jacket with pleats in textured pattern in ”Snow”. Size S - XXXL.
DROPS 109-14 |
|||||||||||||
|
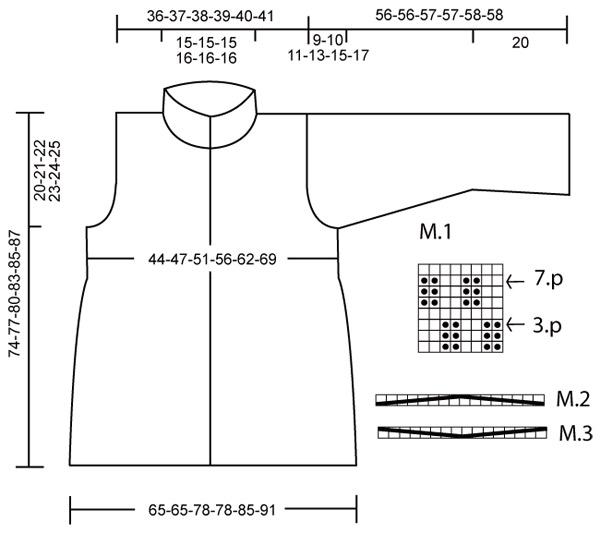
Measuring tip: Because of the weight of the yarn all measurements should be made whilst the garment is hanging, otherwise it will be too long when worn. Garter st, back and forth on needle: K all rows. Garter st, in the round: K 1 round, P 1 round. Pattern: See diagram M.1. Buttonholes: Bind off for buttonholes on right front piece. 1 buttonhole = bind off 4th st from mid front and cast on 1 new st on return row. Bind off for buttonholes when piece measures: Size S: 17, 27, 37, 47, 57 and 67 cm [6 ¾"-10⅝"-14½"-18½"-22½" and 26⅜"]. Size M: 20, 30, 40, 50, 60 and 70 cm [8"-11 ¾"-15 ¾"-19 ¾"-23⅝" and 27½"]. Size L: 23, 33, 43, 53, 63 and 73 cm [9"-13"-17"-21"-24 ¾" and 28 ¾"]. Size XL: 16, 26, 36, 46, 56, 66 and 76 cm [6 ¼"-10 ¼"-14 ¼"-18"-22"-26" and 30"]. Size XXL: 18, 28, 38, 48, 58, 68 and 78 cm [7"-11"-15"-19"-22 ¾"-26 ¾" and 30 ¾"]. Size XXXL: 20, 30, 40, 50, 60, 70 and 80 cm [8"-11 ¾"-15 ¾"-19 ¾"-23⅝"-27½" and 31½]. Pleats: See diagram M.2 and M.3. The pleats are worked in the Pattern on the 3rd or 7th row of diagram M.1. Increasing tip: Inc 1 st by making 1 YO. Work YO into back of loop on return row to avoid a hole. Knitting tip: When turning mid piece, slip 1 st as if to K. Tighten thread and work return row (to avoid a hole). JACKET Worked back and forth on circular needle from mid front. Cast on 160-160-188-188-204-216 sts on circular needle size 8 mm [US 11]. P 1 row, K 2 rounds. Work next row from WS as follows: 7 garter sts – see above – P 1, Pattern M.1 until 8 sts remain, and finish with P1, 7 garter sts (8 sts each side = front bands, work front bands in 7 garter sts and K1 from RS/ P1 from WS throughout). Continue in Pattern like this. Remember buttonholes – see above. See Measurement tip! When piece measures approx 39-40-41-42-42-42 cm [15¼"-15¾"-16⅛"-16½"-16½"-16½"] (adjust so that next row is the 3rd or 7th row in Pattern) work Pleat on next row from WS – see above – as follows: work front band (8 sts), 2 sts in Pattern, then 2 repeats of M.2, 18-18-18-18-26-32 sts in Pattern, then M.3 1-1-2-2-2-2 times, 8-8-4-4-4-4 sts in Pattern, M.2 1-1-2-2-2-2 times, 18-18-18-18-26-32 sts in Pattern, then M.3 2 times, 2 sts in Pattern, and finish with front band (8 sts) = 112-112-124-124-140-152 sts. The Pleats now sit towards each other mid front and mid back. Change to circular needle size 7 mm [US 10½] and work 6 rows garter st on all sts, at the same time inc 0-8-4-16-12-16 sts evenly on last row = 112-120-128-140-152-168 sts. Insert a marking Thread (MT) 32-34-36-39-42-46 sts in from each side (back piece = 48-52-56-62-68-76 sts). Change to needle size 8 mm [US 11] and continue in Pattern (M.1), with 8 front band sts each side. When piece measures 54-56-58-60-61-62 cm [21¼"-22"-22¾"-23⅝"-24"-24⅜"] bind off 3 sts on each side of both MT for armhole and complete each piece separately. Back piece: = 42-46-50-56-62-70 sts. Bind off to the shape the armhole each side at the beg of every row: 2 sts 0-0-1-2-3-4 times and 1 st 1-2-2-2-3-4 times = 40-42-42-44-44-46 sts. When piece measures 72-75-78-81-83-85 cm [28⅜"-29½"-30¾"-32"-32¾"-33½"] bind off the middle 14-14-14-16-16-16 sts for neck and dec 1 st on neckline on next row = 12-13-13-13-13-14 sts left on each shoulder. Bind off when piece measures 74-77-80-83-85-87 cm [29⅛"-30⅜"-31½"-32¾"-33½"-34¼"]. Left front piece: = 29-31-33-36-39-43 sts. Bind off for armhole at side as described for back piece, at the same time continue in Pattern and garter st. When piece measures 69-72-75-78-80-82 cm [27⅛"-28⅜"-29½"-30¾"-31½"-32¼"] bind off 10-10-10-11-11-11 sts towards mid front for neck. Bind off to shape the neckline on every other row: 2 sts 2 times and 1 st 2 times = 12-13-13-13-13-14 sts left on shoulder. Bind off when piece measures 74-77-80-83-85-87 cm [29⅛"-30⅜"-31½"-32¾"-33½"-34¼"]. Right front piece: Like left front piece, but mirrored. Continue to bind off for buttonholes. Sleeve: Worked in the round on double pointed needles. Cast on 48-48-48-52-52-52 sts on needle size 8 mm [US 11]. Work 2 rows garter st – see above. Insert a Marking Thread (MT) at beg of round. Continue in Pattern (M.1). When piece measures 20 cm [8"] (adjust so that next row is the 3rd or 7th row in diagram M.1) work next round as follows: 8-8-8-10-10-10 sts in Pattern, then M.2 2 times, finish with 8-8-8-10-10-10 sts in Pattern = 32-32-32-36-36-36 sts. Change to needle size 7 mm [US 10½] and work 6 rounds garter st, at the same time dec 2 sts evenly on the last round = 30-30-30-34-34-34 sts. Change to needle size 8 mm [US 11] and continue in Pattern with 1 P st on each side of MT. When piece measures 23 cm [9"] inc 1 st on both sides of the 2 P sts by MT and repeat the inc on every 6-4-3-3.5-2.5-2 cm [2⅜"-1½"-1⅛"-1¼"-⅞"-¾"] a total of 4-6-7-6-8-9 times = 38-42-44-46-50-52 sts. See Increasing tip! Incorporate inc sts in Pattern as you go along (no of sts will not always fit the pattern). When piece measures 47-46-46-44-43-41 cm [18½"-18"-18"-17¼"-17"-16⅛"] - less on the larger sizes because of longer sleeve cap and wider shoulders – bind off the 2 P sts and 2 sts on each side of these = 32-36-38-40-44-46 sts and now complete piece back and forth on needle. Bind off to shape the sleeve cap each side at the beg of every row: 2 sts 1 time, 1 st 2-4-4-5-7-8 times, then 2 sts each side until piece measures 55-55-56-56-57-57 cm [21⅝"-21⅝"-22"-22"-22½"-22½"], now bind off 3 sts each side 1 time and bind off remaining sts. Sleeve measures approx 56-56-57-57-58-58 cm [22"-22"-22½"-22½"-22¾"-22¾"]. Work the other sleeve with M.3 for Pleats. Sew shoulder seams. Neckline: Pick up 56-56-56-58-58-58 sts from RS round neck with 1 thread Snow on circular needle size 8 mm [US 11]. Change to needles size 7 mm [US 10½] and continue with 2 threads Snow as follows: K 1 row from WS and now work shortened rows as follows: * K 1 row on 41-41-41-42-42-42 sts, turn the piece – see above – K 1 row on 26 sts for all sizes, turn piece, K 1 row on 41-41-41-42-42-42 sts, turn piece, K 1 row on all sts *, repeat from *-* until neckline measures 5 cm [2"]. Now work 4 rows garter st on all sts. Collar measures approx 7 cm [2¾"] (on the shorter side). Bind off. Assembly: Set in sleeves. Sew on buttons. |
|||||||||||||
Diagram explanations |
|||||||||||||
|
|||||||||||||
 |
|||||||||||||
Have you finished this pattern?Tag your pictures with #dropspattern or submit them to the #dropsfan gallery. Do you need help with this pattern?You'll find 17 tutorial videos, a Comments/Questions area and more by visiting the pattern on garnstudio.com. © 1982-2026 DROPS Design A/S. We reserve all rights. This document, including all its sub-sections, has copyrights. Read more about what you can do with our patterns at the bottom of each pattern on our site. |
|||||||||||||


With over 40 years in knitting and crochet design, DROPS Design offers one of the most extensive collections of free patterns on the internet - translated to 17 languages. As of today we count 324 catalogs and 12285 patterns - 12275 of which are translated into English (US/in).
We work hard to bring you the best knitting and crochet have to offer, inspiration and advice as well as great quality yarns at incredible prices! Would you like to use our patterns for other than personal use? You can read what you are allowed to do in the Copyright text at the bottom of all our patterns. Happy crafting!
Post a comment to pattern DROPS 109-14
We would love to hear what you have to say about this pattern!
If you want to leave a question, please make sure you select the correct category in the form below, to speed up the answering process. Required fields are marked *.