
Popular categories
Looking for a yarn?


Comments / Questions (8)
![]() Ann-Jeanett wrote:
Ann-Jeanett wrote:
Man kan ikke se diagrammerne mere, er det en fejl der kan rettes.
18.05.2026 - 13:07DROPS Design answered:
Hei Ann-Jeanett. De vil bli rettet asap. Men du kan ta en titt på den norske eller engelske siden i mellomtiden. mvh DROPS Design
18.05.2026 - 13:57
![]() Annicka wrote:
Annicka wrote:
Hej! Jag förstår inte framstyckets vänster axel, det blir 7 maskor över, vad gör jag med dessa. Upplägget är 32 m och mönstret 24m + kantm?
14.05.2026 - 19:59DROPS Design answered:
Hei Annicka. Men A.1 består av 7 masker. Det strikkes slik: A.1 (=7 maskor) + 24 maskor räta + 1 maska i rätstickning = 7+24+1= 32 masker. mvh DROPS Design
18.05.2026 - 09:36
![]() Chloé wrote:
Chloé wrote:
Guten Tag, vielen Dank für die Anleitung ! Ich verstehe nur nicht weshalb man den Faden der linken Schulter des Vorderteiles nicht abschneiden darf. Wann braucht man ihn dann wieder ?
14.04.2026 - 14:41DROPS Design answered:
Liebe Chloé, wenn die linke Schulter des Vorderteiles fertig ist, muss man die rechte Schulter des Vorderteiles stricken, so braucht man den Faden am Ende der linken Schulter nicht mehr. Wenn die rechte Schulter fertig ist, wird man die neuen Maschen für den Halsausschnitt anschlagen und dann die Maschen der linken Schulter stricken = so hat man alle Maschen für Vorderteil. Viel Spaß beim Stricken!
14.04.2026 - 15:41
![]() Lisa wrote:
Lisa wrote:
Hallo, wird das Muster jetzt nach den Abnahmen oder den Zunahmen an der Seite in glatten Maschen Weitergeführt? Es steht "Wenn die letzte Zunahme an der Seite...." aber stimmt das auch, dann würde ja das Muster über das gesamte Vorderteil gehen? Vielen Dank schon mal für eine Antwort.
13.04.2026 - 16:08DROPS Design answered:
Liebe Lisa, hier wird sicher die Abnahmen gemeint - eine Korrektur erfolgt sicher in den nächsen Zeiten. Danke im voraus für den Hinweis. Viel Spaß beim Stricken!
13.04.2026 - 16:30
![]() Mary wrote:
Mary wrote:
Bonjour, pourriez vous m'expliquer le symbole au milieu de la grille A5 svp ? Je ne le vois pas dans la légende... D'avance, merci beaucoup pour votre réponse Je vous souhaite une bonne journée
12.04.2026 - 04:42DROPS Design answered:
Bonjour Marie, au 5ème rang de A.5 on tricote à l'endroit - si vous pensez au 7ème rang (à partir du bas), vous allez tricoter (2 m ens à l'end, 1 jeté) - ce symbole va être ajouté aussitôt que possible, merci pour votre retour. Bonne continuation!
13.04.2026 - 09:46
![]() Mònica wrote:
Mònica wrote:
¿Por qué este jersey está clasificado como "ganchillo", cuándo casi la totalidad está realizada en punto de media?
17.03.2026 - 12:39DROPS Design answered:
Hola Monica, tienes razon. Vamos a cambiar. Saludos!
14.04.2026 - 09:35
![]() Crina wrote:
Crina wrote:
Hi, for the crocheted edge the instructions specify diagram A.10a and A.10b which I don't see. There are only diagrams up to A.6 so could you please help? THX
10.03.2026 - 20:40DROPS Design answered:
Hi Crina, The crocheted edges are worked according to A.6a and A.6b (not A.10a and A.10b) which are just above the size chart. Regards, Drops Team.
11.03.2026 - 06:50
![]() Josefin wrote:
Josefin wrote:
Den är felmärkt som virkning i listan innan man trycker in sig på mönstret
10.03.2026 - 19:16
|
||||||||||||||||||||||||||||||||||||||||||||||
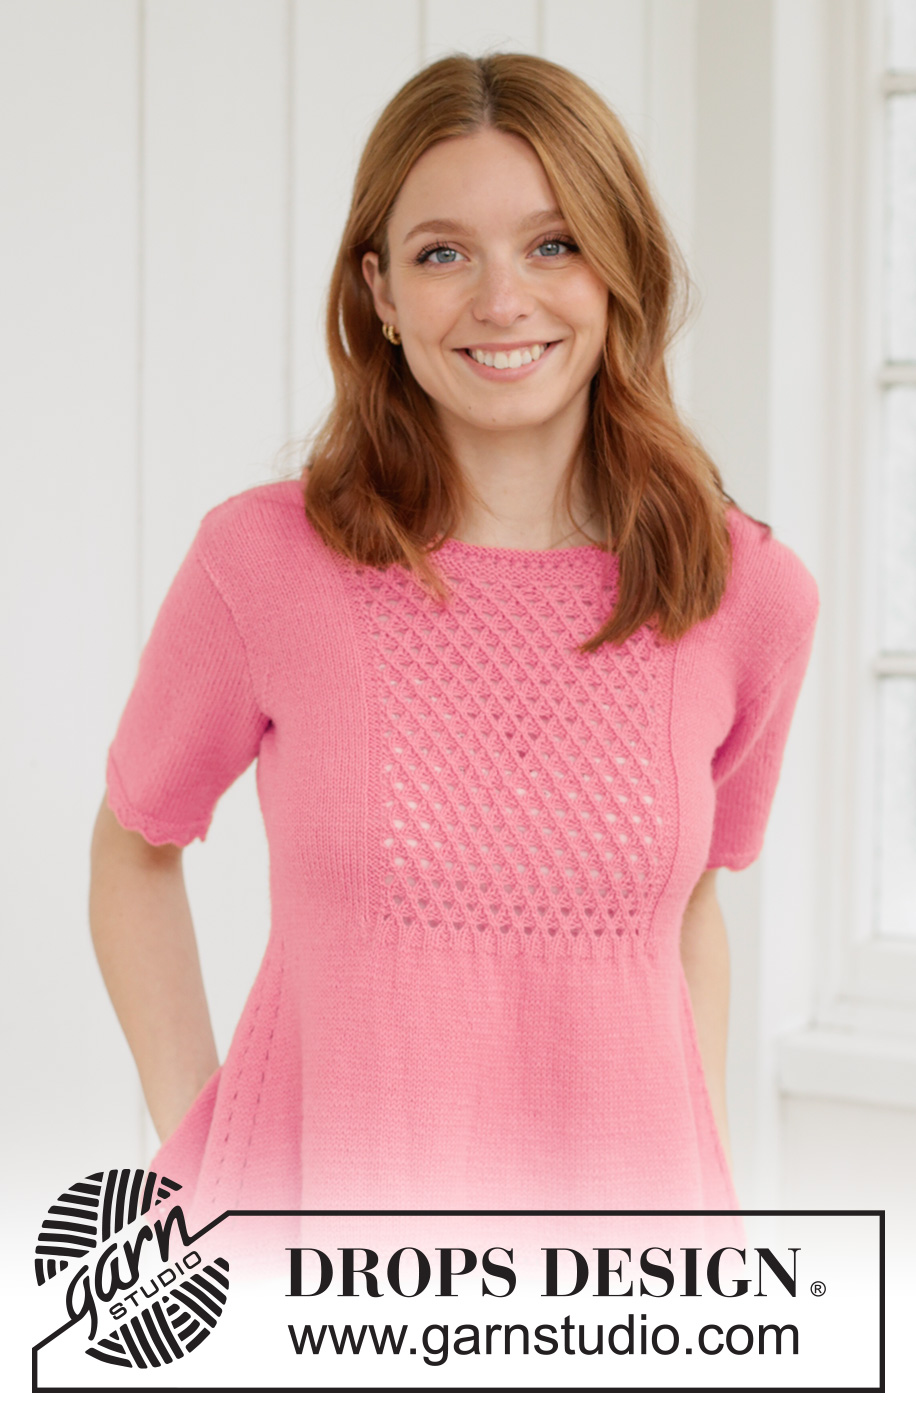
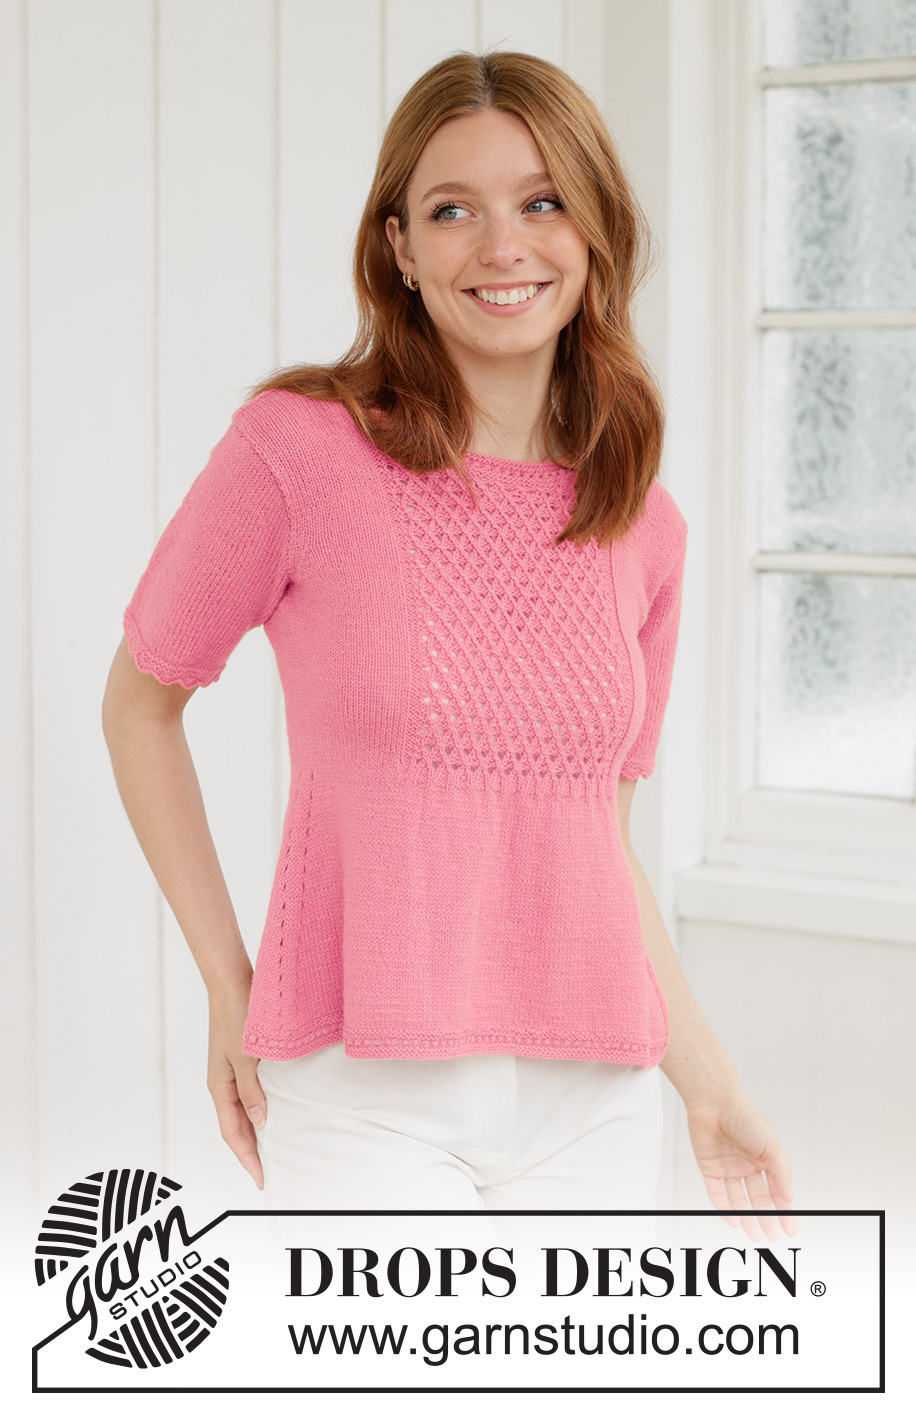
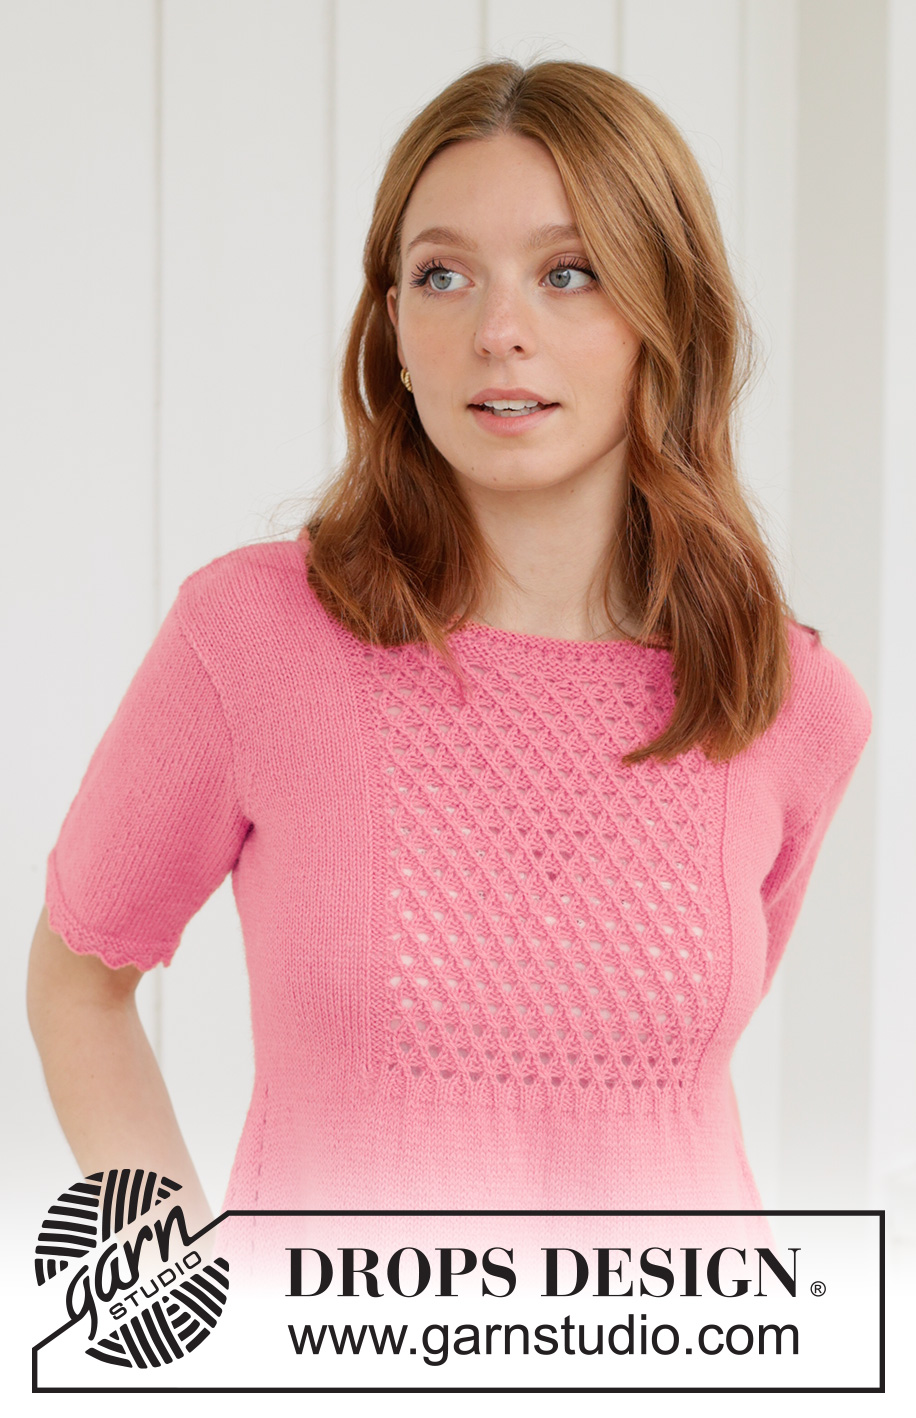
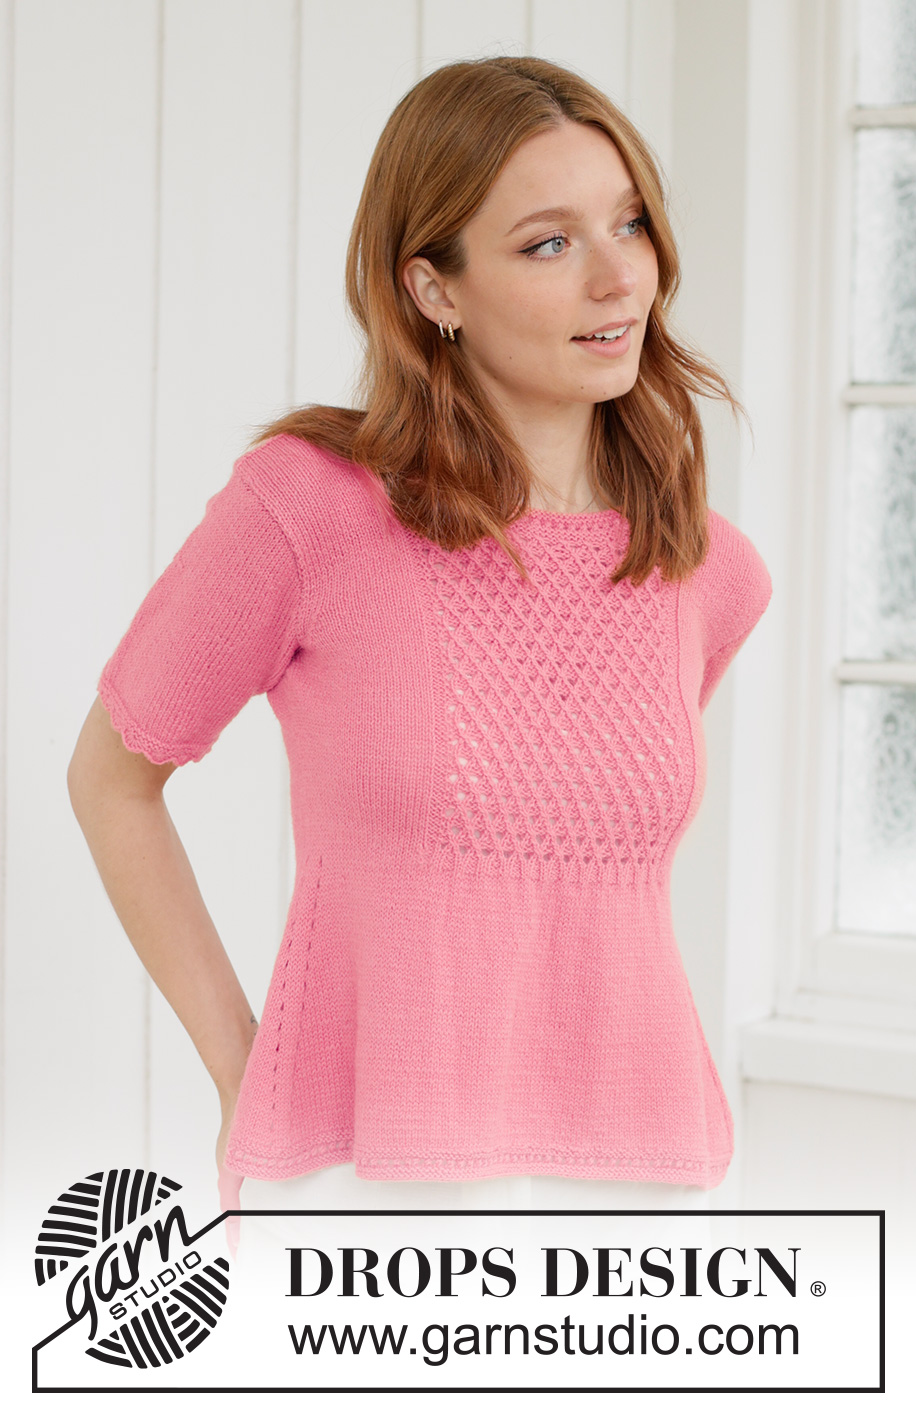
Strawberry Pie Tee#strawberrypiesweater |
||||||||||||||||||||||||||||||||||||||||||||||
 |
 |
|||||||||||||||||||||||||||||||||||||||||||||
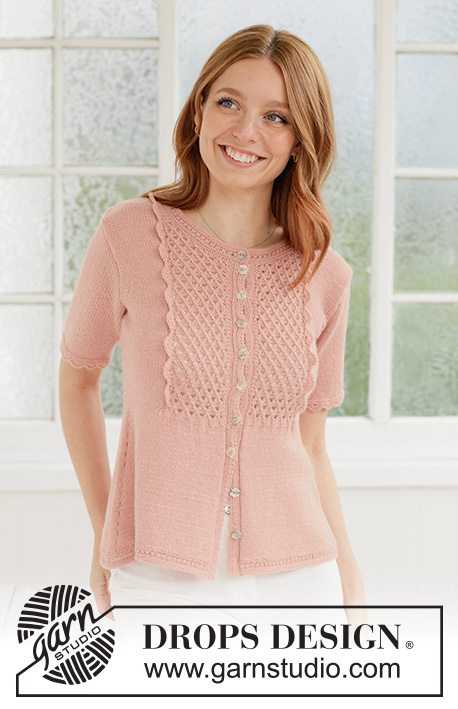
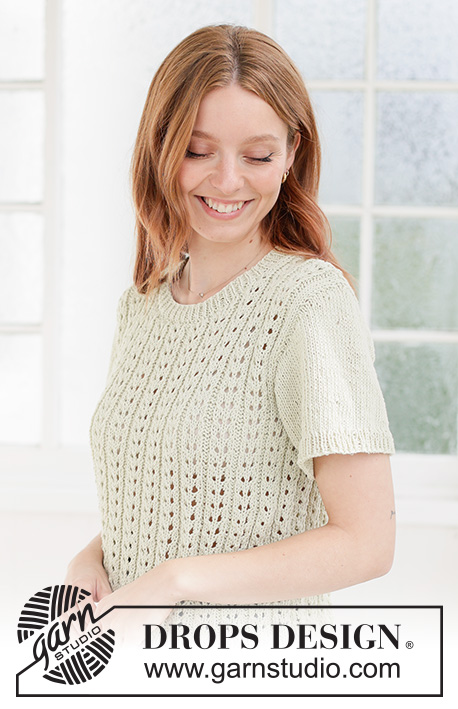
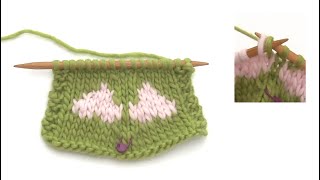
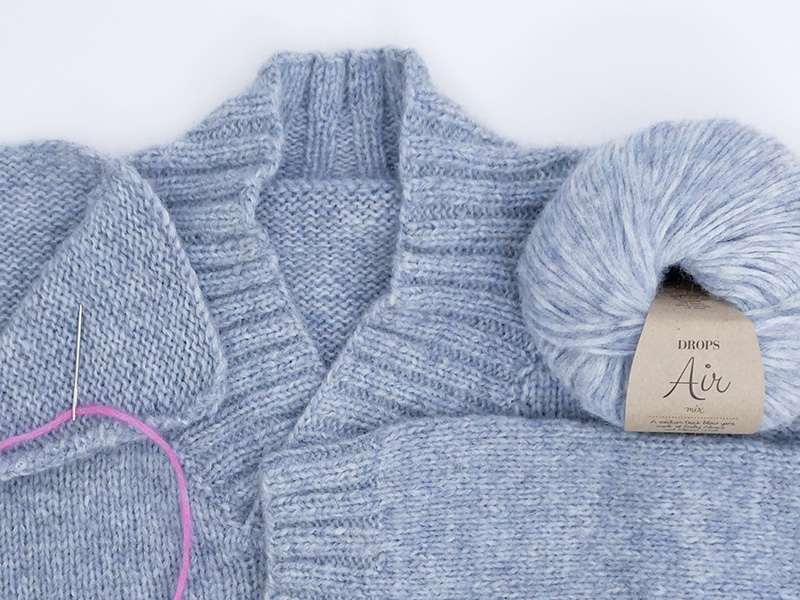
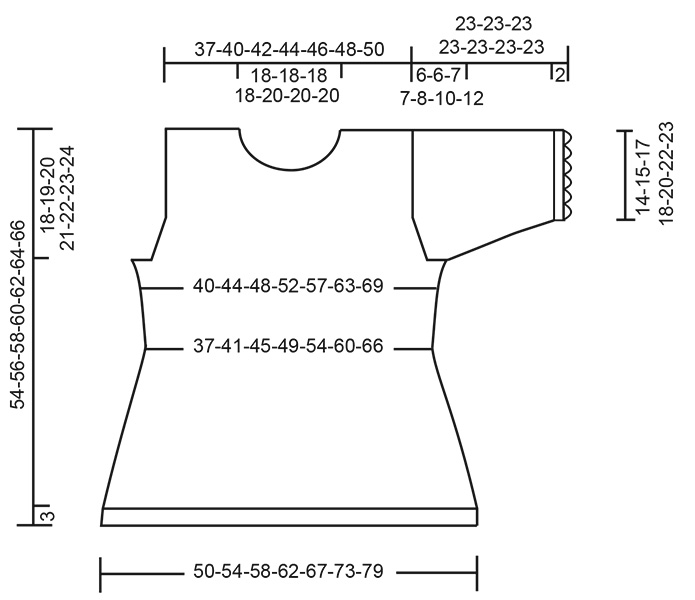
Knitted sweater with short sleeves in DROPS Flora. Piece is knitted top down with lace pattern on front piece, A-shape and crocheted edges. Size XS – XXXL.
DROPS 267-36 |
||||||||||||||||||||||||||||||||||||||||||||||
|
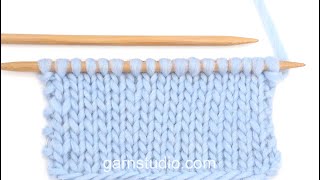
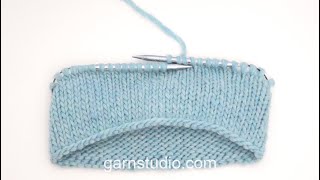
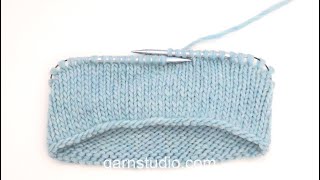
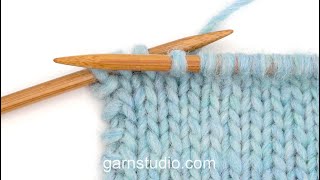
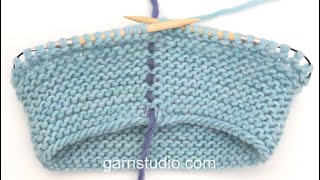
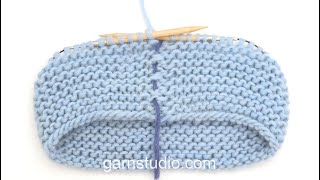
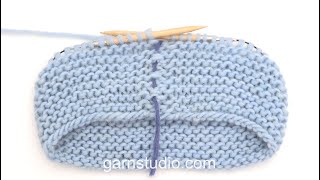
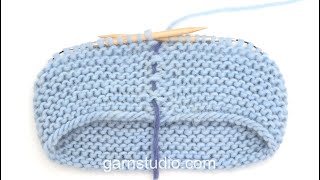
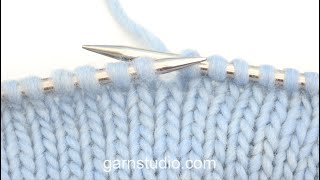
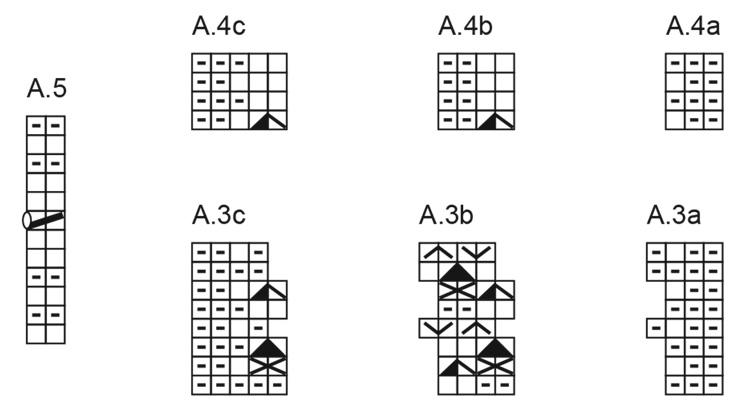
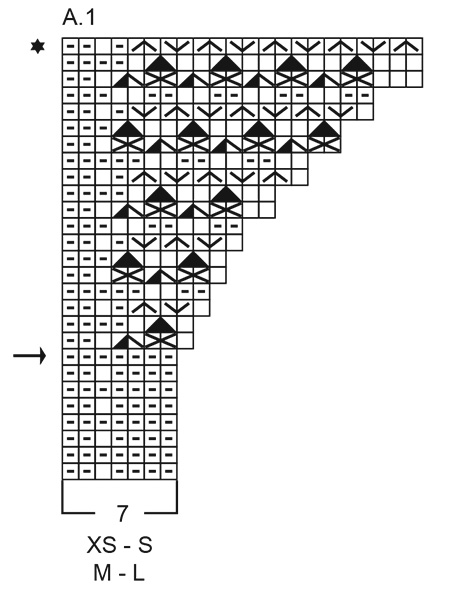
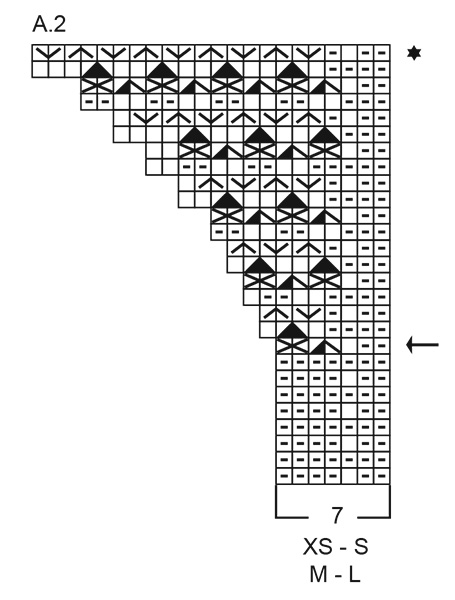
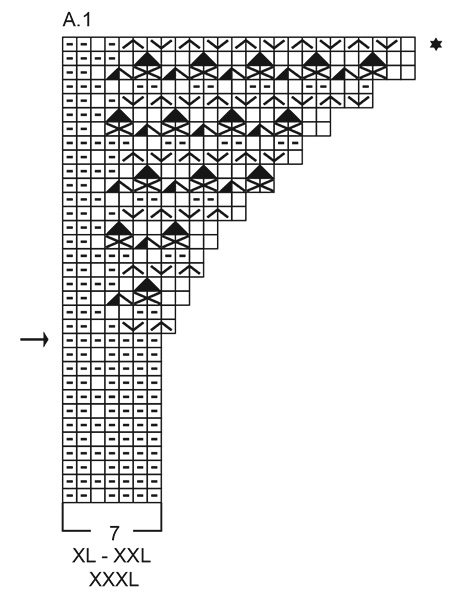
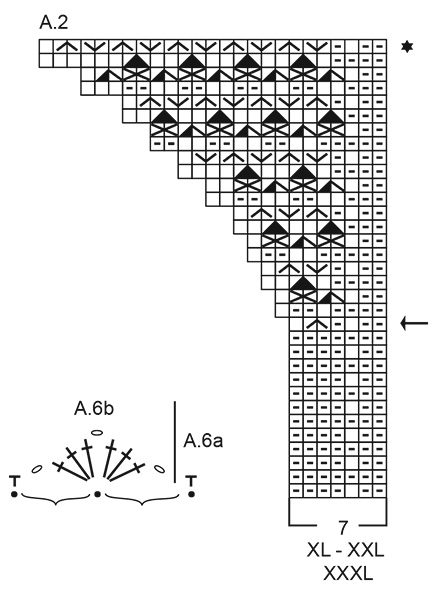
---------------------------------------------------------- EXPLANATION FOR THE PATTERN: ---------------------------------------------------------- GARTER STITCH (when working back and forth): Knit on all rows, i.e. knit from right side and knit from wrong side. 1 ridge vertically = knit 2 rows. GARTER STITCH (when working in the round): Alternately knit 1 round and purl 1 round. 1 ridge vertically = 2 rounds. PATTERN: See diagrams A.1 to A.6. Choose diagram for desired size (applies to A.1 and A.2). Read the diagrams from right to left when knitting/crocheting from the right side and from left to right when working from the wrong side. Diagram A.6 = crochet edge at the bottom around the sleeves. INCREASE TIP-1: INCREASE 1 STITCH TOWARDS THE LEFT- from RIGHT SIDE: Use left needle to pick up yarn between 2 stitches from row below, pick up yarn from the front and knit stitch in stitch loop behind the needle. INCREASE 1 STITCH TOWARDS THE RIGHT - from RIGHT SIDE: Use left needle to pick up yarn between 2 stitches from row below, pick up yarn from the back and knit stitch in stitch loop in front of needle. INCREASE TIP-2: Increase 1 stitch on each side of marker thread as follows: Work until 2 stitches remain before marker thread, make 1 yarn over, knit 4 (marker thread is in the middle of these 4 stitches), make 1 yarn over (= 2 stitches increased). On next round purl yarn overs to make holes. Work the new stitches in stockinette stitch. DECREASE TIP: Decrease 1 stitch on each side of marker thread as follows: Work until 4 stitches remain before marker thread and knit 2 together, knit 4 (marker thread is in the middle of these 4 stitches), slip 1 stitch knitwise, knit 1, pass slipped stitch over stitch worked (= 2 stitches decreased). KNITTING TIP: When working short rows there will be a small hole when turning the piece - the hole can be closed by tightening the yarn or using the technique German Short Rows as follows: Slip first stitch purlwise. Place strand over right needle and tighten well at the back (should lead to two loops on needle). Work these loops together on next row. ---------------------------------------------------------- START THE PIECE HERE: ---------------------------------------------------------- SWEATER - SHORT OVERVIEW OF THE PIECE: In this pattern needles of different length have been used, begin with fitting length for number of stitches and switch as needed. Work front and back piece back and forth on circular needle separately down to armholes, and work top down. Then put the parts together and work downwards in the round on circular needle. Pick up stitches for sleeves around the armholes and work sleeves downwards. First work back and forth with short rows to form a sleeve cap, then work sleeves downwards in the round on needle. Finish by picking up stitches around the neck and work a neck edge. Crochet an edge around the bottom of both sleeves. If 0 stitches are given for the chosen size, it means that you skip the information and jump to next information. BACK PIECE: RIGHT SHOULDER: Work back and forth on circular needle. Cast on 25-29-32-34-34-36-39 stitches on circular needle size 3 MM = US 2.5 with DROPS Flora. Work stockinette stitch back and forth with 1 stitch in GARTER STITCH in each side – read explanation above. Work until piece measures 2 cm = ¾" - adjust so so that next row is from the wrong side. Now cast on new stitches for neck as explained below. ROW 1 (= wrong side): Work 1 stitch in garter stitch, purl the rest of row, cast on 2 new stitches for neck at the end of row. ROW 2 (= right side): Knit until 1 stitch remains, 1 stitch in garter stitch. ROW 3 (= wrong side): Work 1 stitch in garter stitch, purl the rest of row, cast on 1 new stitch for neck at the end of row. ROW 4 (= right side): Knit until 1 stitch remains, 1 stitch in garter stitch. ROW 5 (= wrong side): Work 1 stitch in garter stitch, purl the rest of row, cast on 1 new stitch for neck at the end of row = 29-33-36-38-38-40-43 stitches. Put piece aside and work the left shoulder. BACK PIECE: LEFT SHOULDER: Cast on 25-29-32-34-34-36-39 stitches on circular needle size 3 MM = US 2.5 with DROPS Flora. Work in stockinette stitch back and forth with 1 stitch in garter stitch in each side. Work until piece measures 2 cm = ¾" - adjust so that next row is from the right side. Now cast on new stitches for neck as explained below. ROW 1 (= right side): Work 1 stitch in garter stitch, knit the rest of row, cast on 2 new stitches for neck at the end of row. ROW 2 (= wrong side): Purl until 1 stitch remains, 1 stitch in garter stitch. ROW 3 (= right side): Work 1 stitch in garter stitch, knit the rest of row, cast on 1 new stitch for neck at the end of row. ROW 4 (= wrong side): Purl until 1 stitch remains, 1 stitch in garter stitch. ROW 5 (= right side): Work 1 stitch in garter stitch, knit the rest of row, cast on 1 new stitch for neck at the end of row = 29-33-36-38-38-40-43 stitches. ROW 6 (= wrong side): Purl until 1 stitch remains, 1 stitch in garter stitch. Then slip shoulders together for back piece as explained below. BACK PIECE (left and right shoulder together): Work first row as follows from right side: Work as before over the 29-33-36-38-38-40-43 stitches from left shoulder, cast on 38-38-38-38-44-44-44 stitches for neck at the end of this row, work the 29-33-36-38-38-40-43 stitches from right shoulder = 96-104-110-114-120-124-130 stitches. Work in stockinette stitch with 1 stitch in garter stitch in each side until piece measures 17-18-18-17-17-16-15 cm = 6¾"-7"-7"-6¾"-6¾"-6¼"-6" from cast-on edge on the shoulder. Remember to follow the knitting gauge! Now increase in each side for armholes. INCREASE FOR ARMHOLES: ROW 1 (= right side): Read INCREASE TIP-1 and knit 4, increase 1 stitch towards the left, knit until 4 stitches remain, increase 1 stitch towards the right, knit 4. ROW 2 (= wrong side): Purl with 1 stitch in garter stitch in each side. Work 1st and 2nd ROW 1-2-3-7-8-12-15 times in total (= 2-4-6-14-16-24-30 rows worked) = 98-108-116-128-136-148-160 stitches on needle. Work until piece measures 18-19-20-21-22-23-24 cm = 7"-7½"-8"-8¼"-8¾"-9"-9½" from cast-on edge on the shoulder, finish with a row from the wrong side. Cut the yarn. Now work front piece as explained below. FRONT PIECE: LEFT SHOULDER: Cast on 25-29-32-34-34-36-39 stitches on circular needle size 3 MM = US 2.5 with DROPS Flora. Purl 1 row from wrong side. Work next row as follows from right side: Work A.1, knit 17-21-24-26-26-28-31, 1 stitch in garter stitch. Work next row as follows from wrong side: 1 stitch in garter stitch, purl 17-21-24-26-26-28-31, A.1 (read diagram from left to right when working from the wrong side). Continue pattern back and forth like this. AT THE SAME TIME at the end of row marked with arrow in A.1, begin increase for neck and cast on new stitches for neck at the end of every row from the wrong side as follows: Cast on 1 stitch 4 times, 2 stitches 4 times and 3 stitches 1-1-1-1-2-2-2 times - work the increased stitches in pattern as shown in the diagram. Work until 1 row remains in A.1 = 40-44-47-49-52-54-57 stitches. Last row worked is from the wrong side, cut the yarn. FRONT PIECE: RIGHT SHOULDER: Cast on 25-29-32-34-34-36-39 stitches on circular needle size 3 MM = US 2.5 with DROPS Flora. Purl 1 row from wrong side. Work next row as follows from right side: 1 stitch in garter stitch, knit 17-21-24-26-26-28-31, work A.2. Work next row as follows from wrong side: Work A.2 (read diagram from left to right when working from the wrong side), purl 17-21-24-26-26-28-31, 1 stitch in garter stitch. Continue pattern back and forth like this. AT THE SAME TIME at the end of row marked with arrow in A.2, begin increase for neck and cast on new stitches for neck at the end of every row from the right side as follows: Cast on 1 stitch 4 times, 2 stitches 4 times and 3 stitches 1-1-1-1-2-2-2 times - work the increased stitches in pattern as shown in the diagram. Work until 1 row remains in A.2 = 40-44-47-49-52-54-57 stitches. Last row worked is from the wrong side, do not cut the yarn. Now slip right and left shoulder together for front piece as explained below. FRONT PIECE (right and left shoulder together): Work first row as follows from right side: Work as before over the 40-44-47-49-52-54-57 stitches from right shoulder (now work last row in A.2), cast on 24-24-24-24-26-26-26 stitches for neck at the end of this row, work as before over the 40-44-47-49-52-54-57 stitches from left shoulder (work last row in A.1) = 104-112-118-122-130-134-140 stitches on needle. Continue pattern back and forth as follows – work first row from the wrong side: Work 1 stitch in garter stitch, purl 17-21-24-26-26-28-31, A.3c (read diagrams from left to right when working from wrong side), work A.3b until 21-25-28-30-30-32-35 stitches remain on row, work A.3a, purl 17-21-24-26-26-28-31 and 1 stitch in garter stitch. Work as follows from right side: 1 stitch in garter stitch, knit 17-21-24-26-26-28-31, A.3a, work A.3b until 23-27-30-32-32-34-37 stitches remain on row, work A.3c, knit 17-21-24-26-26-28-31 and 1 stitch in garter stitch. Continue pattern back and forth like this. When piece measures 17-18-18-17-17-16-15 cm = 6¾"-7"-7"-6¾"-6¾"-6¼"-6" from cast-on edge on shoulder, increase in each side for armholes. INCREASE FOR ARMHOLES: ROW 1 (= right side): Read INCREASE TIP-1 and knit 4, increase 1 stitch towards the left, work as before until 4 stitches remain, increase 1 stitch towards the right, knit 4. ROW 2 (= wrong side): Work as before with 1 stitch in garter stitch in each side. Work 1st and 2nd ROW 1-2-3-7-8-12-15 times in total (= 2-4-6-14-16-24-30 rows worked) = 106-116-124-136-146-158-170 stitches on needle. Work until piece measures 18-19-20-21-22-23-24 cm = 7"-7½"-8"-8¼"-8¾"-9"-9½" from cast-on edge on the shoulder, finish with a row from the wrong side. Now put front piece and back piece together for body as explained below. BODY: Work as before over the 106-116-124-136-146-158-170 stitches from front piece, cast on 6-6-8-8-12-16-20 new stitches at the end of this row (= in the side mid under sleeve), work the 98-108-116-128-136-148-160 stitches from back piece as before and cast on 6-6-8-8-12-16-20 new stitches on row (= in the side mid under sleeve) = 216-236-256-280-306-338-370 stitches on needle. Insert 1 marker thread in each side on body, in the middle of the 6-6-8-8-12-16-20 stitches cast on under each sleeve and move the marker threads when working, use the marker threads when decreasing and increasing in the sides on body. Continue as before with A.3 on front piece and stockinette stitch over the remaining stitches. When piece measures 3-3-3-3-4-4-4 cm = 1⅛"-1⅛"-1⅛"-1⅛"-1½"-1½"-1½" from where the parts were put together, decrease 1 stitch on each side of both marker threads - read DECREASE TIP (= 4 stitches decreased). Decrease like this every 2-2½-2½-3-3-3½-3½ cm = ¾"-1"-1"-1⅛"-1⅛"-1¼"-1¼" 4 times in total = 200-220-240-264-290-322-354 stitches. OVERVIEW OF NEXT SECTION: Now work last part of pattern on front piece and increase in each side on body for A-shape. Read all of the following section below before continuing! PATTERN: After last decrease in the sides is done and 5th round in diagrams has been worked work next round as follows: Work as before until A.3a, work A.4a, work A.4b over the next 60-60-60-60-68-68-68 stitches, work A.4c, work in stockinette stitch the rest of round. Continue pattern like this until A.4 has been worked vertically. Then working stockinette stitch in the round over all stitches. INCREASE: When piece measures 31-33-35-37-39-41-43 cm = 12¼"-13"-13¾"-14½"-15¼"-16⅛"-17" from cast-on edge on the shoulder (piece measures approx. 13-14-15-16-17-18-19 cm = 5⅛"-5½"-6"-6¼"-6¾"-7"-7½" from where parts were put together), increase 1 stitch on each side of both marker threads - READ INCREASE TIP-2 (= 4 stitches increased). Increase like this every 4th round 17 times in total = 268-288-308-332-358-390-422 stitches. Piece measures approx. 51-53-55-57-59-61-63 cm = 20"-21"-21⅝"-22½"-23¼"-24"-24¾" from cast-on edge on shoulder. Or continue increase until desired measurements. Then work an edge as explained below. EDGE: Switch to circular needle size 2.5 MM = US 1.5 and work A.5 in the round on body. When A.5 has been worked, switch to circular needle size 3 MM = US 2.5 before binding off by knitting. Sweater measures approx. 54-56-58-60-62-64-66 cm = 21¼"-22"-22¾"-23⅝"-24⅜"-25¼"-26" from cast-on edge on shoulder. ASSEMBLY: Sew the shoulder seams. SLEEVES: Sleeve is worked from the armhole and down. Place piece flat and insert 1 marker at the top of armhole = shoulder seam. Use circular needle size 3 MM = US 2.5 and tightly pick up stitches (use a thinner needle if needed). PICK UP STITCHES AS FOLLOWS: Begin in the middle of the new stitches cast on under sleeve - pick up 82-88-94-102-110-116-124 stitches – adjust to pick up same number of stitches on each side of marker. SLEEVE CAP: Now work stockinette stitch with short rows back and forth over sleeve cap, begin round mid under sleeve and work as follows: ROW 1 (= right side): Work 13-13-14-14-14-12-10 stitches past marker on top of the shoulder, turn piece – read KNITTING TIP. ROW 2 (= wrong side): Work 13-13-14-14-14-12-10 stitches past marker, turn piece. ROW 3 (= right side): Work 3 stitches past last turn, turn piece. ROW 4 (= wrong side): Work 3 stitches past last turn, turn piece. Work 3rd and 4th ROW 4-4-4-4-5-1-1 times (= 8-8-8-8-10-2-2 rows worked). Then work as follows: ROW 1 (= right side): Work 2 stitches past last turn, turn piece. ROW 2 (= wrong side): Work 2 stitches past last turn, turn piece. Work 1st and 2nd ROW 5-5-7-7-7-15-18 times (= 10-10-14-14-14-30-36 rows worked). 20-20-24-24-26-34-40 turns have been done in total (= 10-10-12-12-13-17-20 times in each side and last row is worked from the wrong side). Sleeve measures approx. 6-6-7-7-8-10-12 cm = 2⅜"-2⅜"-2¾"-2¾"-3⅛"-4"-4¾" from marker mid on top of shoulder. AFTER LAST TURN: Last turn and row were worked from the wrong side. Finish row by turning piece, then work from the right side until beginning of round (= mid under sleeve). Insert 1 marker thread mid under sleeve, marker thread is used when decreasing stitches under sleeve. Move marker thread upwards when working. THE SLEEVE ONWARDS: Now work in the round in stockinette stitch over all stitches while AT THE SAME TIME decreasing under sleeve, read DECREASE TIP and decrease like this: When 1 round has been worked, decrease 2 stitches 2-2-2-2-2-1-1 times on every other round, then decrease 2 stitches 2-2-2-2-1-1-0 times every 3 cm = 1⅛" = 74-80-86-94-104-112-122 stitches on needle. Work until sleeve measures 21 cm = 8¼" from mid on top of the shoulder in all sizes. Switch to double pointed needles size 2.5 MM = US 1.5 and work 2 ridges in GARTER STITCH in the round - see explanation above. Switch to double pointed needle size 3 MM = US 2.5 and bind off by knitting from the right side. Sleeve measures approx. 23 cm = 9" from marker mid on top of shoulder in all sizes. NECK EDGE: Use circular needle size 2.5 MM = US 1.5 and begin from the right side at one shoulder seam and pick-up edge approx. 126-126-126-126-142-142-142 stitches around the neck inside 1 stitch - number of stitches must be divisible by 2. Begin on 2nd round in A.5 and work A.5 in the round on neck. When A.5 has been worked, switch to circular needle size 3 MM = US 2.5 before binding off by knitting from the right side. CROCHET EDGE SLEEVES: Use crochet hook size 3 MM = US C, begin from the right side under sleeve and work diagram A.10a in first stitch, then work A.10b around the sleeve, finish after a whole repetition mid under sleeve. Cut and fasten the yarn. |
||||||||||||||||||||||||||||||||||||||||||||||
Diagram explanations |
||||||||||||||||||||||||||||||||||||||||||||||
|
||||||||||||||||||||||||||||||||||||||||||||||
 |
||||||||||||||||||||||||||||||||||||||||||||||
 |
||||||||||||||||||||||||||||||||||||||||||||||
 |
||||||||||||||||||||||||||||||||||||||||||||||
 |
||||||||||||||||||||||||||||||||||||||||||||||
 |
||||||||||||||||||||||||||||||||||||||||||||||
 |
||||||||||||||||||||||||||||||||||||||||||||||
Have you finished this pattern?Tag your pictures with #dropspattern #strawberrypiesweater or submit them to the #dropsfan gallery. Do you need help with this pattern?You'll find 56 tutorial videos, a Comments/Questions area and more by visiting the pattern on garnstudio.com. © 1982-2026 DROPS Design A/S. We reserve all rights. This document, including all its sub-sections, has copyrights. Read more about what you can do with our patterns at the bottom of each pattern on our site. |
||||||||||||||||||||||||||||||||||||||||||||||


With over 40 years in knitting and crochet design, DROPS Design offers one of the most extensive collections of free patterns on the internet - translated to 17 languages. As of today we count 325 catalogs and 12298 patterns - 12288 of which are translated into English (US/in).
We work hard to bring you the best knitting and crochet have to offer, inspiration and advice as well as great quality yarns at incredible prices! Would you like to use our patterns for other than personal use? You can read what you are allowed to do in the Copyright text at the bottom of all our patterns. Happy crafting!
Post a comment to pattern DROPS 267-36
We would love to hear what you have to say about this pattern!
If you want to leave a question, please make sure you select the correct category in the form below, to speed up the answering process. Required fields are marked *.