
Popular categories
Looking for a yarn?


Comments / Questions (4)
![]() Elisabet Eriksson wrote:
Elisabet Eriksson wrote:
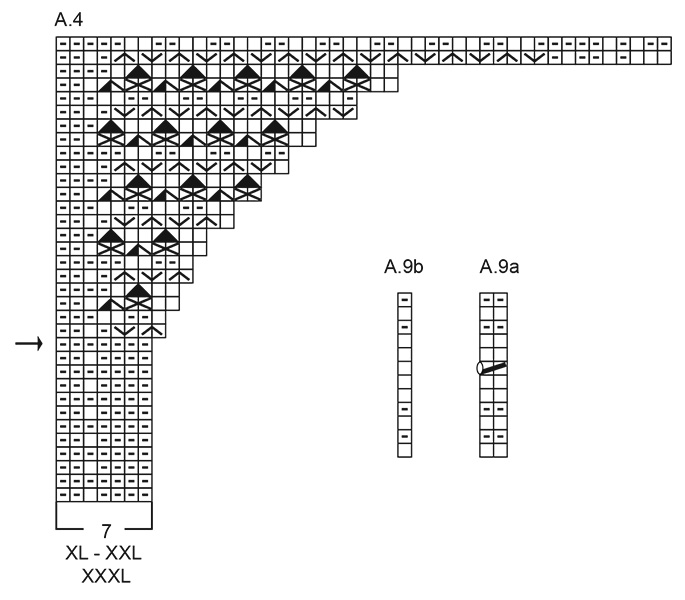
Förstår inte tecknet i diagram A.9a. Svart streck på tvären med en ring i vänsterkant.? Ska diagram A.9b göras efter A.9a?
13.05.2026 - 14:50DROPS Design answered:
Hei Elisabet. Svart streck på tvären med en ring i vänsterkant = strikk 2 rett sammen, lag 1 kast om pinnen. Vær obs på at det også har vært en rettelse på denne oppskriften (blir snart oppdatert på den svenske siden, se rød link over diagramteksten). mvh DROPS Design
18.05.2026 - 08:37
![]() Elisabet Eriksson wrote:
Elisabet Eriksson wrote:
Nu har jag knäckt koden på mönstret på framstycket! Blir så fint
19.04.2026 - 12:47
![]() Elisabet Eriksson wrote:
Elisabet Eriksson wrote:
Fattar inte mönster på framstycket. Har repat och provat massor av gånger. Tycker diagramförklaringen är svårtydd. Så synd när koftan är så fin. Mvh Elisabet
18.04.2026 - 14:16
![]() Vanessa wrote:
Vanessa wrote:
In dieser Anleitung liegt ein gravierender Fehler vor: bei A6 (XL-XXL) ist die 3 und 7 Reihe falsch! Ich musste nochmals ganz von vorne beginnen… schade
11.04.2026 - 21:09
|
|||||||||||||||||||||||||||||||||||||||||||
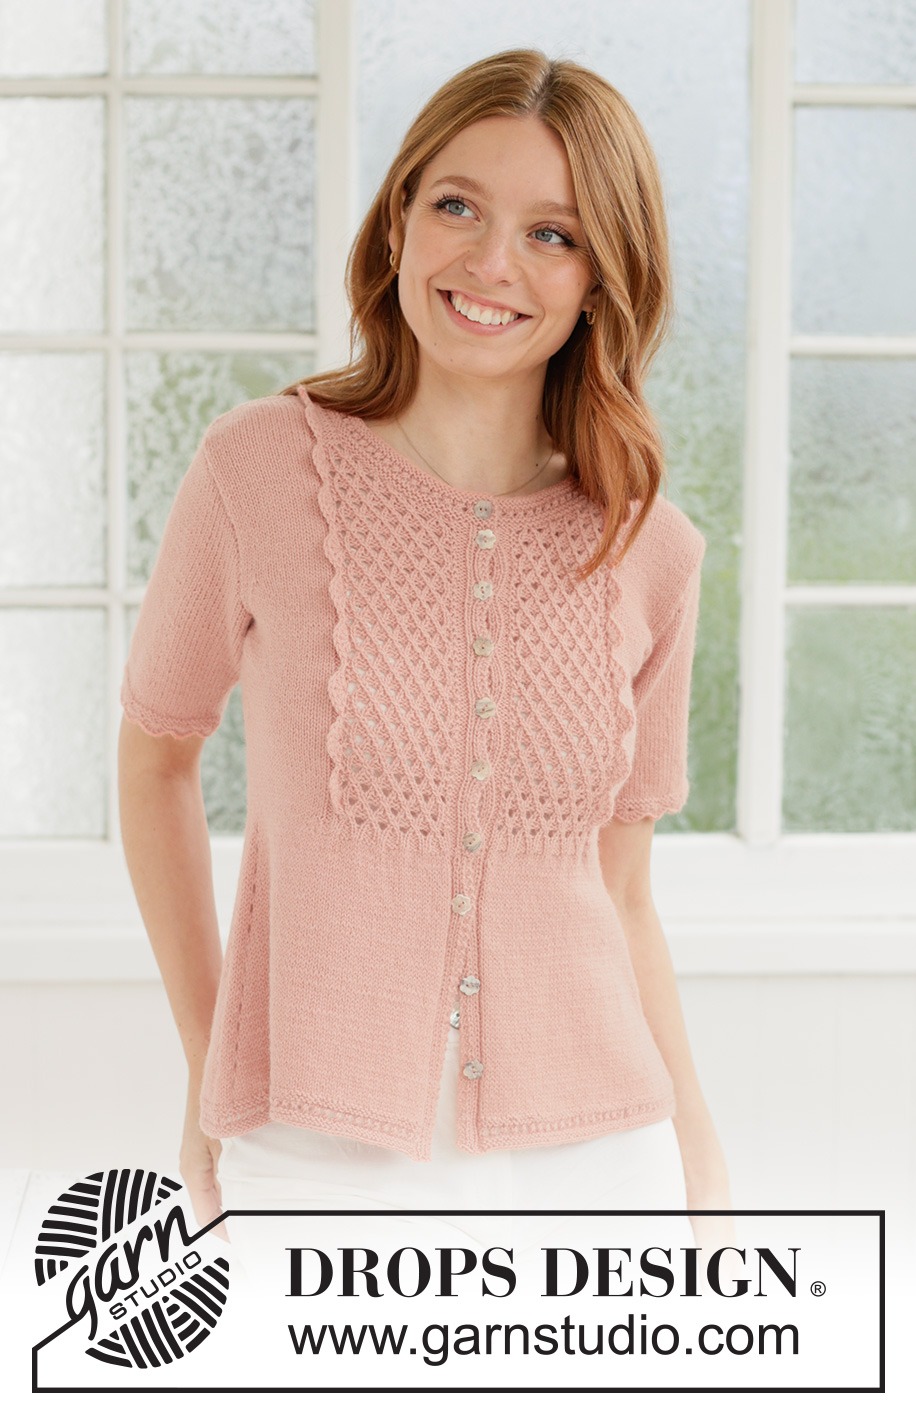
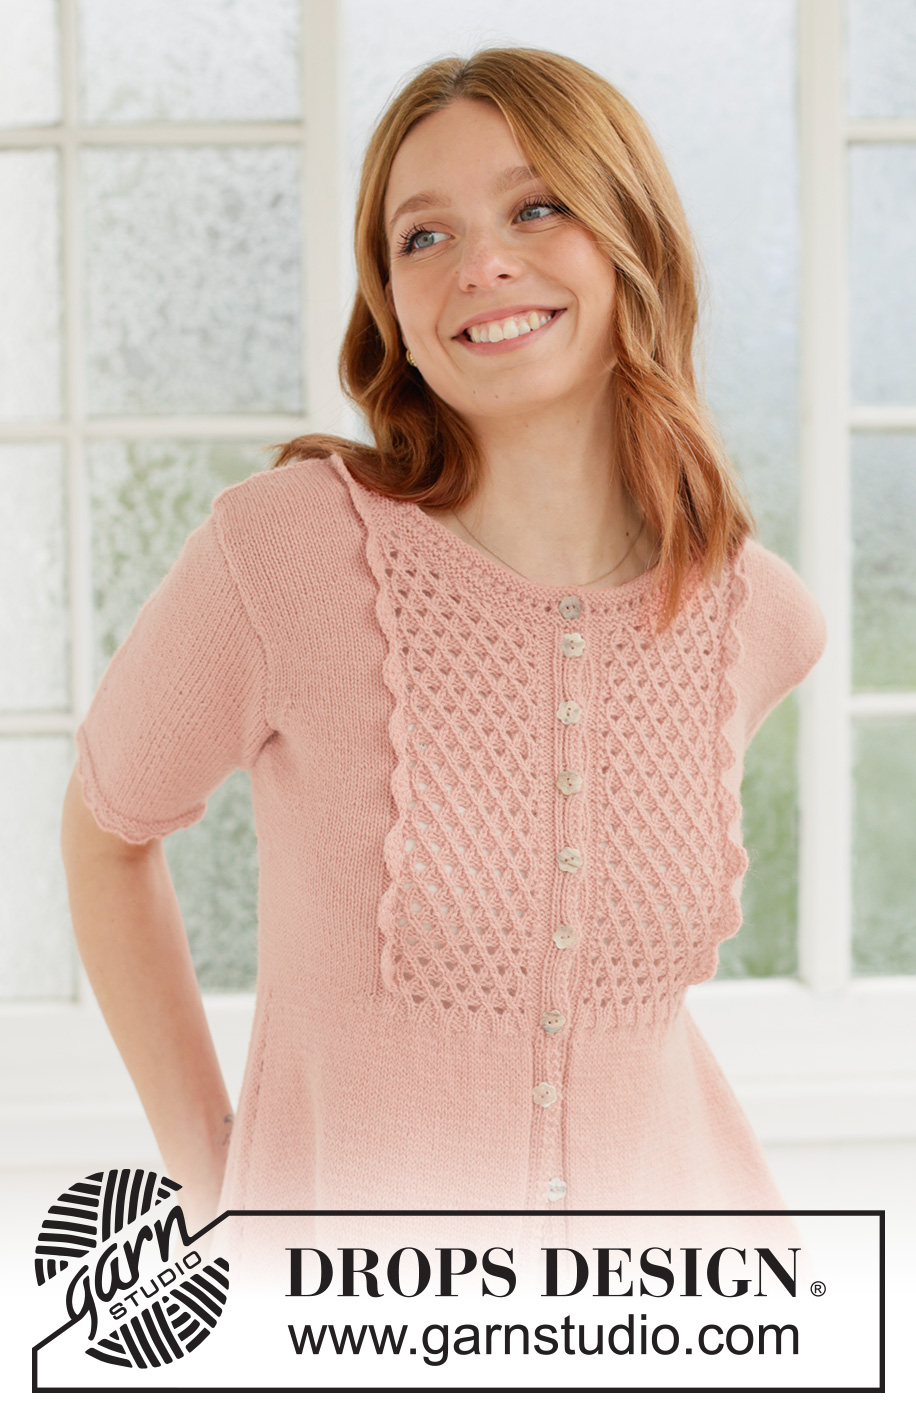
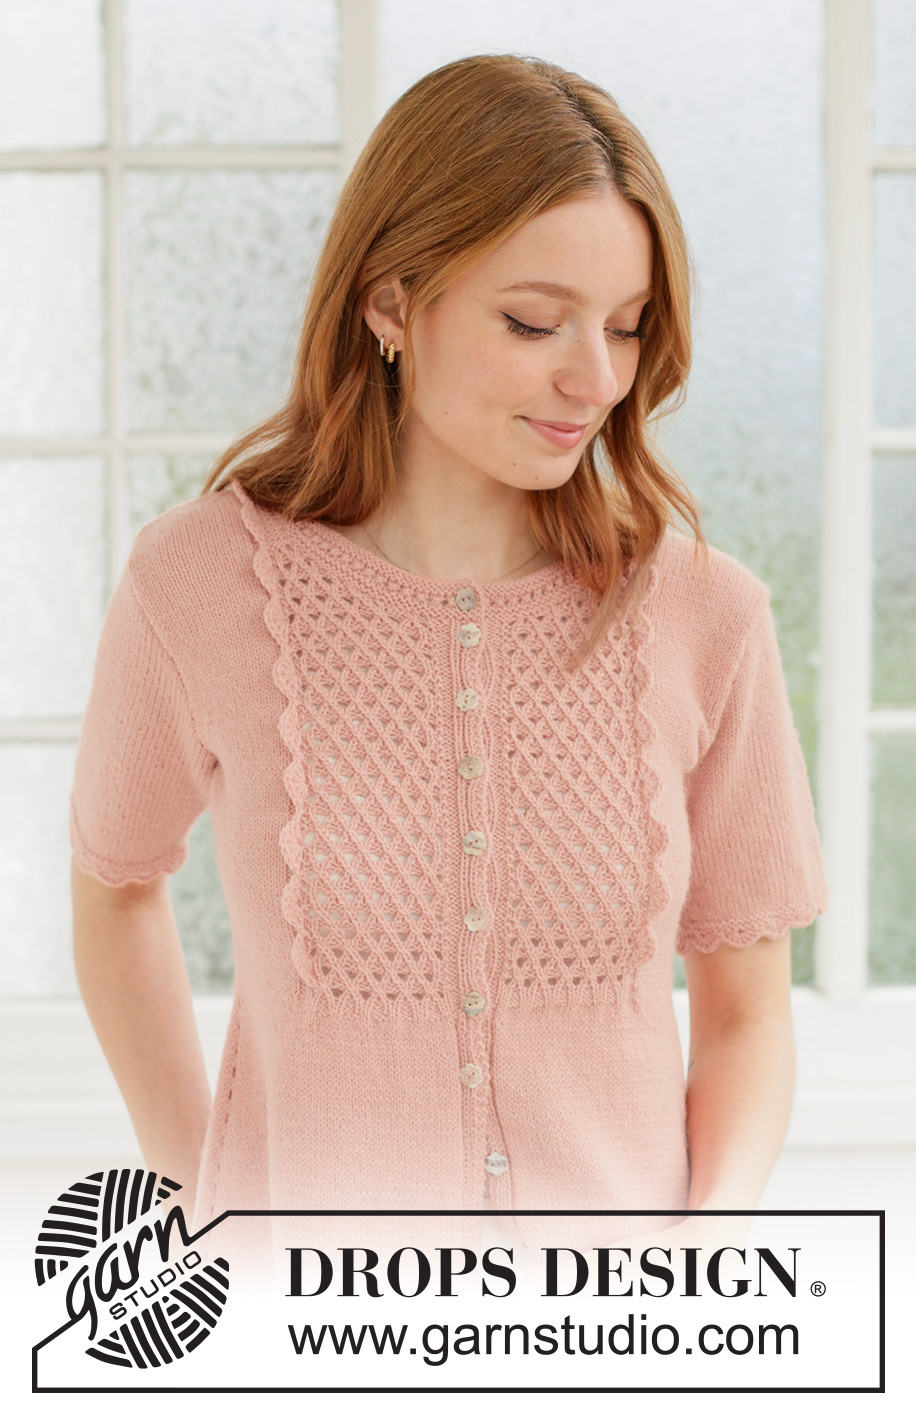
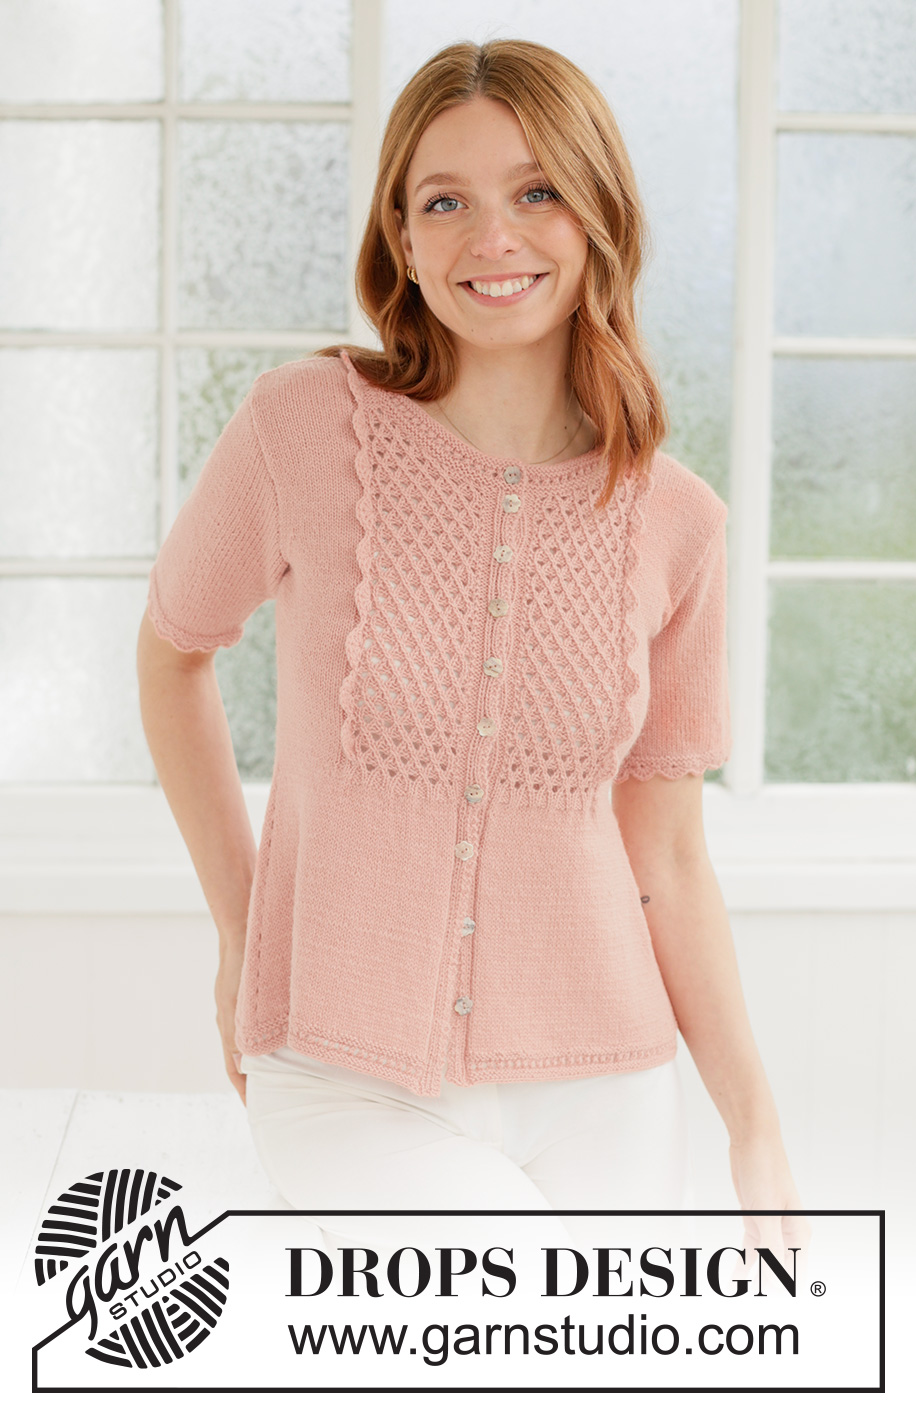
Pretty Jane Cardigan#prettyjanecardigan |
|||||||||||||||||||||||||||||||||||||||||||
 |
 |
||||||||||||||||||||||||||||||||||||||||||
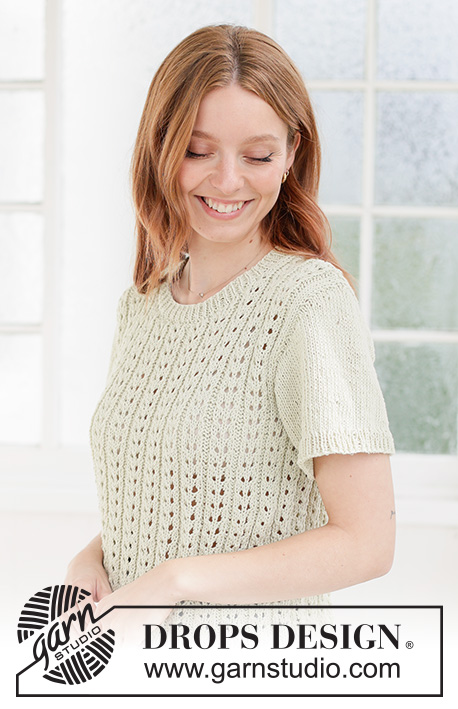
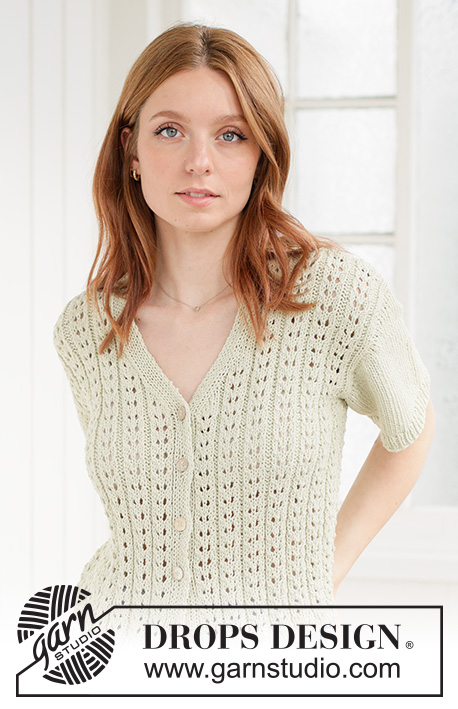
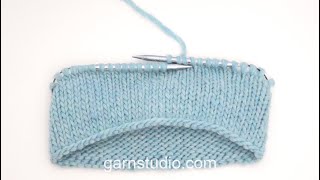
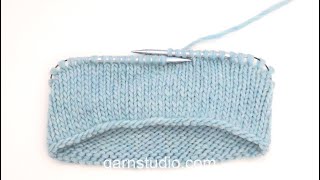
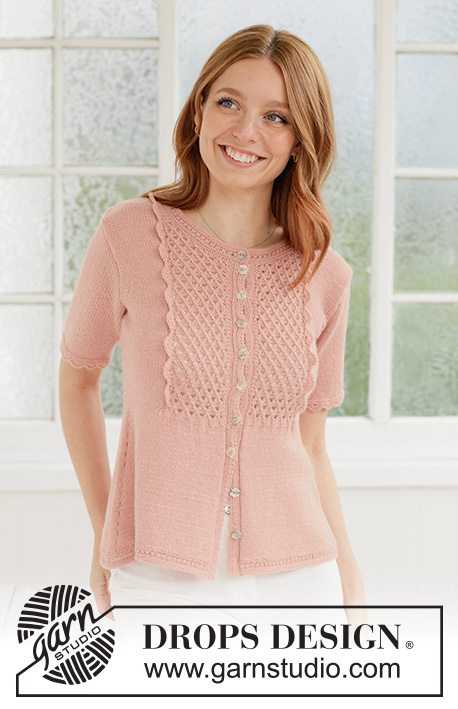
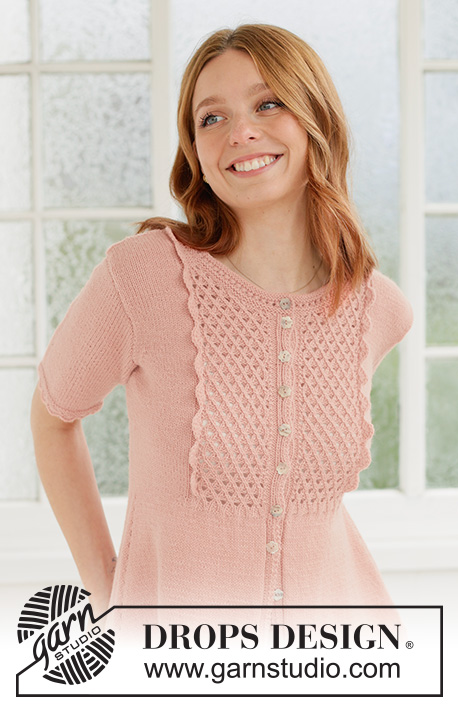
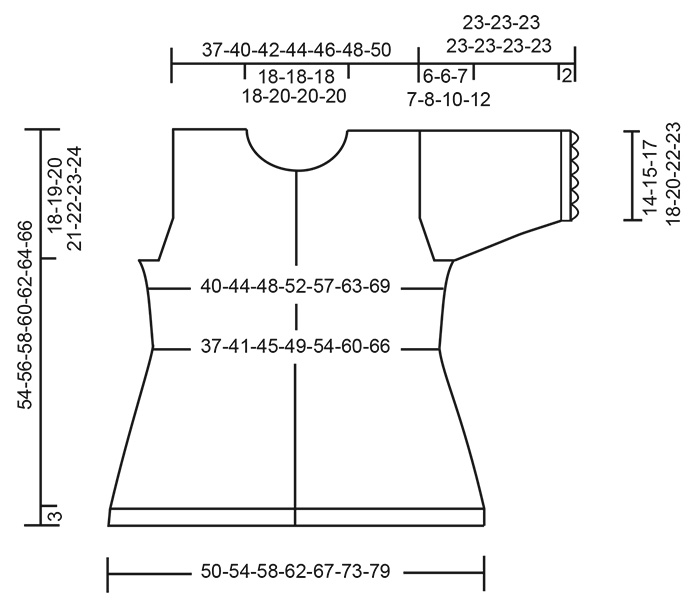
Knitted jacket in DROPS Flora. The piece is worked top down with lace pattern on the front pieces, A-shape, crocheted edges and short sleeves. Sizes XS - XXXL.
DROPS 267-35 |
|||||||||||||||||||||||||||||||||||||||||||
|
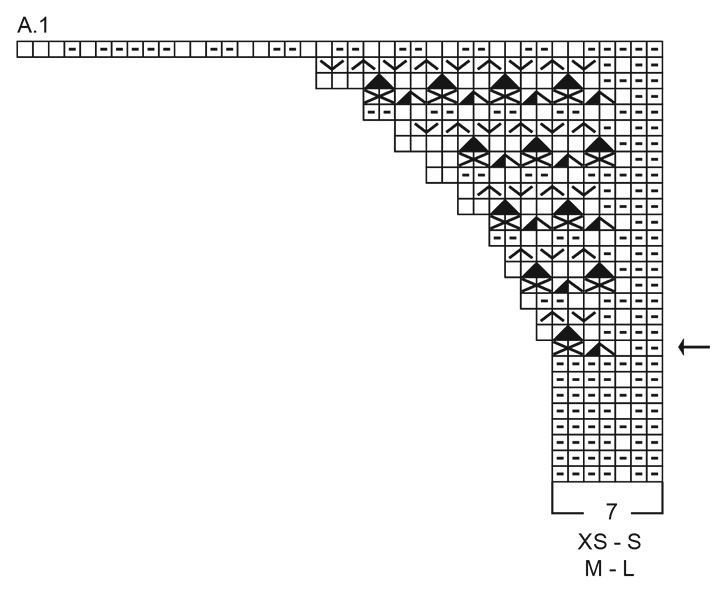
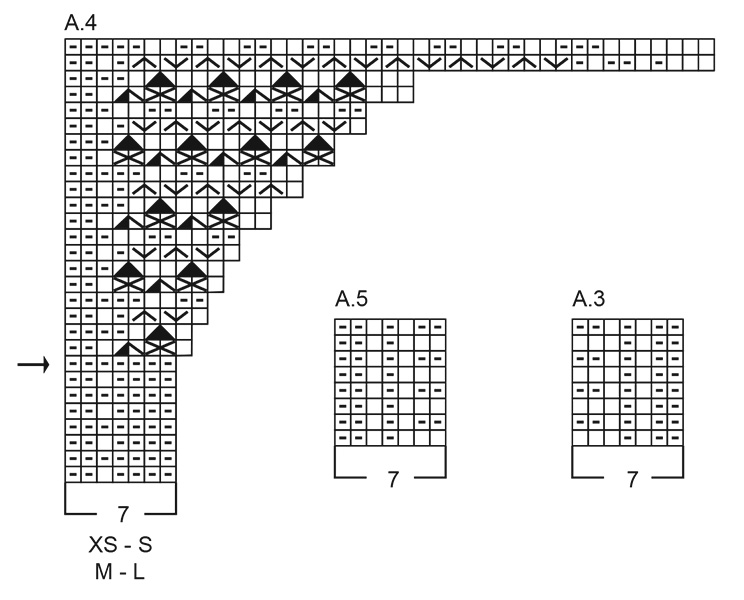
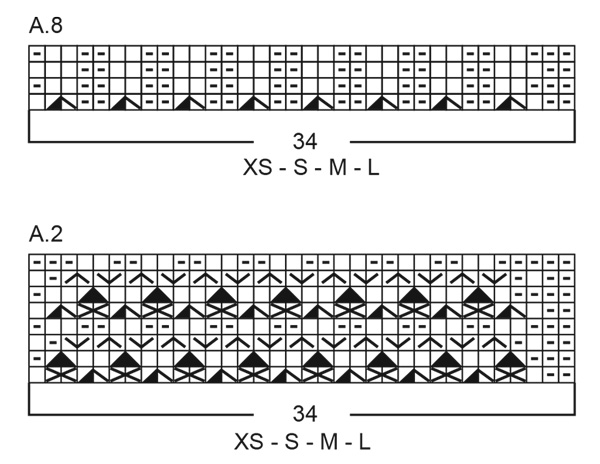
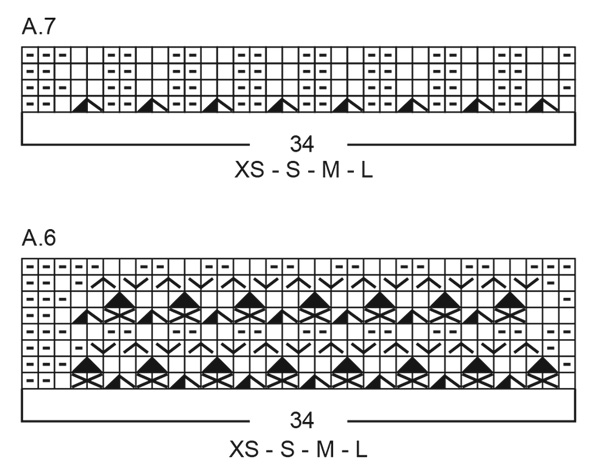
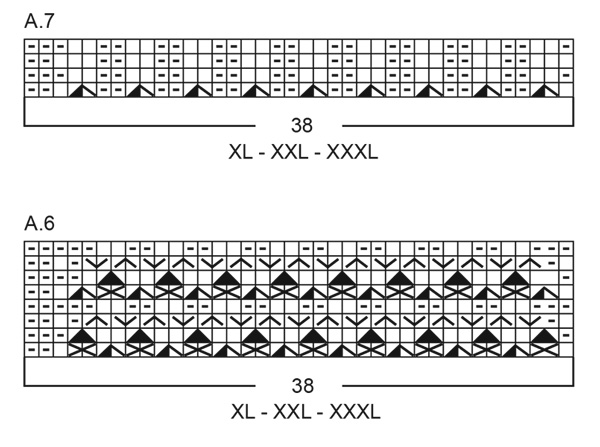
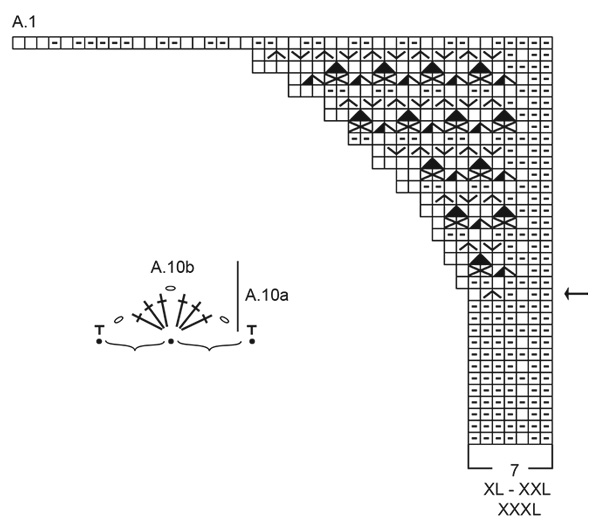
------------------------------------------------------- EXPLANATIONS FOR THE PATTERN: ------------------------------------------------------- GARTER STITCH (worked back and forth): Knit all rows, from both the right and wrong side. 1 ridge in height = knit 2 rows. GARTER STITCH (worked in the round): Alternately knit 1 round and purl 1 round. 1 ridge vertically = 2 rounds. BUTTONHOLES: Work the buttonholes on the right band (when the garment is worn) from the right side, when there are 4 stitches left on the row as follows: ROW 1 (right side): Make 1 yarn over, knit 2 together, work 2 garter stitches. ROW 2 (wrong side): Work the band as before, knitting the yarn over to leave a hole. The first buttonhole is worked 2 cm = ¾" after the neck is finished. Then work the other 8-8-8-8-8-9-9 buttonholes with 4½-5-5-5½-5½-5-5 cm = 1⅝"-2"-2"-2⅛"-2⅛"-2"-2" between each one. The last buttonhole is worked on the neck. PATTERN: See diagrams A.1 to A.10. Choose diagram for your size (applies to A.1, A.2, A.4, A.6, A.7 and A.8). The diagrams are worked from right to left when working from the right side and left to right when working from the wrong side. Diagram A.10 = crocheted edge on the front pieces and cuffs. INCREASE TIP-1: INCREASE 1 STITCH TOWARDS LEFT – from RIGHT SIDE: Use the left needle to pick up the strand between 2 stitches from the row below, pick up the strand from the front and knit through the stitch-loop that lies on the back of the needle. INCREASE 1 STITCH TOWARDS THE RIGHT- from RIGHT SIDE: Use the left needle to pick up the strand between 2 stitches from the row below, pick up the strand from the back and knit through the stitch-loop that lies on the front of the needle. INCREASE TIP-2: Increase 1 stitch on each side of the marker-thread. Work until there are 2 stitches left before the marker-thread, make 1 yarn over, knit 4 (marker-thread sits in the middle of these 4 stitches), make 1 yarn over (2 increased stitches). On the next row purl the yarn overs to leave holes. Then work the new stitches in stockinette stitch. DECREASE TIP: Decrease 1 stitch on each side of the marker-thread as follows: Work until there are 4 stitches left before the marker-thread, knit 2 together, knit 4 (marker-thread sits in the middle of these 4 stitches), slip 1 stitch knit-wise, knit 1 and pass the slipped stitch over the knitted stitch (2 stitches decreased). KNITTING TIP: When working short rows, there will be a small hole after each turn. This hole can be closed by tightening the strand or using the technique German Short Rows as follows: Slip the first stitch purl-wise, take the strand over the right needle and tighten well from the back (2 loops on the needle). These loops are worked together on the next row. ------------------------------------------------------- START THE PIECE HERE: ------------------------------------------------------- JACKET – SHORT OVERVIEW OF THE PIECE. The pattern uses both long and short needles; start with the length which fits the number of stitches and change when necessary. The back and front pieces are worked separately, back and forth with circular needle and top down, as far as the armholes. Then the pieces are joined and the body is finished back and forth from mid-front. Stitches are knitted up around the armholes for the sleeves, which are first worked back and forth with short rows for the sleeve cap, then finished in the round. Stitches are knitted up along the neckline and the neck is worked. A crocheted edge down each front piece and around the cuffs is worked to finish. If there is a «0» in your chosen size, skip the information and go straight to the next instruction. BACK PIECE: RIGHT SHOULDER: Cast on 25-29-32-34-34-36-39 stitches with circular needle size 3 MM = US 2.5 and DROPS Flora. Work stockinette stitch back and forth with 1 GARTER STITCH on each side – read explanation above, until the piece measures 2 cm = ¾", with the next row from the wrong side. Now cast on stitches for the neckline as follows. ROW 1 (wrong side): Work 1 garter stitch, purl to end of row and cast on 2 stitches at the end of the row. ROW 2 (right side): Knit until there is 1 stitch left, work 1 garter stitch. ROW 3 (wrong side): Work 1 garter stitch, purl to end of row and cast on 1 stitch at the end of the row. ROW 4 (right side): Knit until there is 1 stitch left, work 1 garter stitch. ROW 5 (wrong side): Work 1 garter stitch purl to end of row and cast on 1 stitch at the end of the row = 29-33-36-38-38-40-43 stitches. Lay the piece to one side and work the left shoulder. LEFT SHOULDER: Cast on 25-29-32-34-34-36-39 stitches with circular needle size 3 MM = US 2.5 and DROPS Flora. Work stockinette stitch back and forth with 1 garter stitch on each side until the piece measures 2 cm = ¾", with the next row from the right side. Now cast on stitches for the neckline as follows. ROW 1 (right side): Work 1 garter stitch, knit to end of row and cast on 2 stitches for the neckline. ROW 2 (wrong side): Purl until there is 1 stitch left, work 1 garter stitch. ROW 3 (right side): Work 1 garter stitch, knit to end of row and cast on 1 stitch at the end of the row. ROW 4 (wrong side): Purl until there is 1 stitch left, work 1 garter stitch. ROW 5 (right side): Work 1 garter stitch, knit to end of row and cast on 1 stitch = 29-33-36-38-38-40-43 stitches. ROW 6 (wrong side): Purl until there is 1 stitch left, work 1 garter stitch. Now join the 2 shoulders for the back piece. BACK PIECE (left and right shoulder joined): Work the first row from the right side as follows: Work across the 29-33-36-38-38-40-43 stitches on the left shoulder as before, cast on 38-38-38-38-44-44-44 stitches for the neckline and work across the 29-33-36-38-38-40-43 stitches from the right shoulder = 96-104-110-114-120-124-130 stitches. Work stockinette stitch back and forth with 1 garter stitch on each side until the piece measures 17-18-18-17-17-16-15 cm = 6¾"-7"-7"-6¾"-6¾"-6¼"-6" from the cast-on edge on the shoulder. Remember to maintain the knitting gauge. Now increase for the armholes. INCREASE FOR ARMHOLES: ROW 1 (right side): Read INCREASE TIP-1. Knit 4, increase 1 stitch towards the left, knit until there are 4 stitches left on the row, increase 1 stitch towards the right, knit 4. ROW 2 (wrong side): Purl with 1 garter stitch on each side. Work ROWS 1 and 2 a total of 1-2-3-7-8-12-15 times (2-4-6-14-16-24-30 rows worked) = 98-108-116-128-136-148-160 stitches. Continue working until the piece measures 18-19-20-21-22-23-24 cm = 7"-7½"-8"-8¼"-8¾"-9"-9½" from the cast-on edge on the shoulder, finishing after a row from the wrong side. Cut the strand. Work the front pieces as follows. RIGHT FRONT PIECE: Cast on 25-29-32-34-34-36-39 stitches with circular needle size 3 MM = US 2.5 and DROPS Flora. Purl 1 row from the wrong side, then work as follows from the right side: 1 garter stitch, knit 17-21-24-26-26-28-31, work A.1. From the wrong side: Work A.1 (reading the diagram from left to right when working from the wrong side), purl 17-21-24-26-26-28-31, 1 garter stitch. Continue this pattern back and forth. AT THE SAME TIME, on the row marked with an arrow in A.1, begin increasing for the neckline at the end of each row from the right side as follows: Cast on 1 stitch 4 times, 2 stitches 4 times and 3 stitches 1-1-1-1-2-2-2 times; the new stitches are worked into the pattern as shown in the diagram. At the end of the next row from the right side, cast on 19-19-19-19-20-20-20 stitches for the neckline and band = 59-63-66-68-72-74-77 stitches. Finish A.1 (the 7 outermost stitches mid-front = band). Work the next row from the right side as follows: 1 garter stitch, work 17-21-24-26-26-28-31 stockinette stitches, A.2, then A.3 (= band). Continue this pattern back and forth – remember the BUTTONHOLES – read explanation above. Work until the piece measures 17-18-18-17-17-16-15 cm = 6¾"-7"-7"-6¾"-6¾"-6¼"-6" from the cast-on edge on the shoulder. Now increase for the armhole. INCREASE FOR ARMHOLE: ROW 1 (right side): Remember INCREASE TIP-1. Knit 4, increase 1 stitch towards the left, work to end of row as before. ROW 2 (wrong side): Work as before without increasing. Work ROWS 1 and 2 a total of 1-2-3-7-8-12-15 times (2-4-6-14-16-24-30 rows worked) = 60-65-69-75-80-86-92 stitches. Continue working until the piece measures 18-19-20-21-22-23-24 cm = 7"-7½"-8"-8¼"-8¾"-9"-9½" from the cast-on edge on the shoulder, finishing after a row from the wrong side. Cut the strand. Work the left front piece as follows. LEFT FRONT PIECE: Cast on 25-29-32-34-34-36-39 stitches with circular needle size 3 MM = US 2.5 and DROPS Flora. Purl 1 row from the wrong side, then work as follows from the right side: Work A.4, knit 17-21-24-26-26-28-31, 1 garter stitch. From the wrong side: 1 garter stitch, purl 17-21-24-26-26-28-31, work A.4. Continue this pattern back and forth. AT THE SAME TIME, on the row marked with an arrow in A.4, begin increasing for the neckline at the end of each row from the wrong side as follows: Cast on 1 stitch 4 times, 2 stitches 4 times and 3 stitches 1-1-1-1-2-2-2 times; the new stitches are worked into the pattern as shown in the diagram. At the end of the next row from the wrong side, cast on 19-19-19-19-20-20-20 stitches for the neckline and band = 59-63-66-68-72-74-77 stitches. Finish A.4 (the 7 outermost stitches mid-front = band). Work the next row from the right side as follows: A.5 (= band), A.6, work 17-21-24-26-26-28-31 stockinette stitches and 1 garter stitch. Continue this pattern back and forth until the piece measures 17-18-18-17-17-16-15 cm = 6¾"-7"-7"-6¾"-6¾"-6¼"-6" from the cast-on edge on the shoulder. Now increase for the armhole. INCREASE FOR ARMHOLE: ROW 1 (right side): Remember INCREASE TIP-1. Work as before until there are 4 stitches left on the row, increase 1 stitch towards the right, knit 4. ROW 2 (wrong side): Work as before without increasing. Work ROWS 1 and 2 a total of 1-2-3-7-8-12-15 times (2-4-6-14-16-24-30 rows worked) = 60-65-69-75-80-86-92 stitches. Continue working until the piece measures 18-19-20-21-22-23-24 cm = 7"-7½"-8"-8¼"-8¾"-9"-9½" from the cast-on edge on the shoulder, finishing after a row from the wrong side. Do not cut the strand. The pieces are now joined as follows. BODY: Work as follows from the right side: Work across the 60-65-69-75-80-86-92 stiches from the left front piece, cast on 6-6-8-8-12-16-20 stitches (mid-under the sleeve), work 98-108-116-128-136-148-160 stockinette stitches (= back piece), cast on 6-6-8-8-12-16-20 stitches (mid-under the sleeve), work across the 60-65-69-75-80-86-92 stitches from the right front piece as before = 230-250-270-294-320-352-384 stitches. Insert 1 marker-thread in the middle of the 6-6-8-8-12-16-20 cast-on stitches under each sleeve. Allow these threads to follow your work onwards, they are used when decreasing and increasing in the sides. Continue working as before with 7 band-stitches each side, A.2 and A.6 on the front pieces and stockinette stitch across the other stitches. When the piece measures 3-3-3-3-4-4-4 cm = 1⅛"-1⅛"-1⅛"-1⅛"-1½"-1½"-1½" from the join, decrease 1 stitch on each side of both marker-threads – read DECREASE TIP (4 stitches decreased). Decrease like this every 2-2½-2½-3-3-3½-3½ cm = ¾"-1"-1"-1⅛"-1⅛"-1¼"-1¼" a total of 4 times = 214-234-254-278-304-336-368 stitches. OVERVIEW OF NEXT SECTION: While working the last section of pattern on the front pieces, you also increase each side for the A-shape. Read both the next 2 paragraphs before continuing. PATTERN: After the final decreases in the sides and A.2 and A.6 have been worked up to and including row 4 in the diagrams, work the next row from the right side as follows: The band as before, work A.7, then stockinette stitch until there are 41-41-41-41-45-45-45 stitches left on the row, work A.8 and the band as before. Continue this pattern until A.7 and A.8 are finished in height. Then continue with stockinette stitch with 7 band stitches on each side. INCREASES: When the piece measures 31-33-35-37-39-41-43 cm = 12¼"-13"-13¾"-14½"-15¼"-16⅛"-17" from the cast-on edge on the shoulder (approx. 13-14-15-16-17-18-19 cm = 5⅛"-5½"-6"-6¼"-6¾"-7"-7½" from the join), increase 1 stitch on each side of both marker-threads – read INCREASE TIP-2 (4 increased stitches). Increase like this every 4th row 17 times = 282-302-322-346-372-404-436 stitches. The piece measures approx. 51-53-55-57-59-61-63 cm = 20"-21"-21⅝"-22½"-23¼"-24"-24¾" from the cast-on edge on the shoulder. You can continue working to desired length, finishing after a row from the wrong side. Now work an edge as follows. EDGE: Change to circular needle size 2.5 MM = US 1.5. Work as follows from the right side: The band as before, work A.9a until there are 8 stitches left, increasing 1 stitch so the stitch count is an odd number, work A.9b and the band as before. When A.9 is finished, change to circular needle size 3 MM = US 2.5 and bind off with knit from the right side. The jacket measures approx. 54-56-58-60-62-64-66 cm = 21¼"-22"-22¾"-23⅝"-24⅜"-25¼"-26" from the cast-on edge on the shoulder. ASSEMBLY-1: Sew the shoulder seams. SLEEVES: The sleeve is worked top down. Lay the piece flat and insert 1 marker at the top of the armhole = shoulder-seam. Use circular needle size 3 MM = US 2.5. KNIT UP STITCHES AS FOLLOWS. Knit up tightly or use a smaller needle size. Start in the middle of the cast-on stitches under the sleeve and knit up 82-88-94-102-110-116-124 stitches around the armhole, with equal numbers of stitches on both sides of the marker. SLEEVE CAP: Work stockinette stitch back and forth with short rows for the sleeve cap, starting from mid-under the sleeve as follows: ROW 1 (right side): Knit to 13-13-14-14-14-12-10 stitches past the marker on top of the sleeve, turn – read KNITTING TIP. ROW 2 (wrong side): Purl to 13-13-14-14-14-12-10 stitches past the marker, turn. ROW 3 (right side): Knit to 3 stitches past the previous turn, turn. ROW 4 (wrong side): Purl to 3 stitches past the previous turn, turn. Work ROWS 3 and 4 a total of 4-4-4-4-5-1-1 times (8-8-8-8-10-2-2 rows worked). Then work as follows: ROW 1 (right side): Knit to 2 stitches past the previous turn, turn. ROW 2 (wrong side): Purl to 2 stitches past the previous turn, turn. Work ROWS 1 and 2 a total of 5-5-7-7-7-15-18 times (10-10-14-14-14-30-36 rows worked). You have turned a total of 20-20-24-24-26-34-40 times (10-10-12-12-13-17-20 times on each side with the last row from the wrong side). AFTER THE FINAL TURN: After the last turn from the wrong side, work from the right side to the end of the row (mid-under the sleeve). Insert 1 marker-thread here. This is used when decreasing under the sleeve. Allow the thread to follow your work onwards. SLEEVE CONTINUED: Work stockinette stitch in the round. AT THE SAME TIME after 1 round, decrease 2 stitches mid-under the sleeve – read DECREASE TIP: Decrease every 2nd round 2-2-2-2-2-1-1 times, then decrease 2 stitches 2-2-2-2-1-1-0 times every 3 cm = 1⅛" = 74-80-86-94-104-112-122 stitches. Continue working until the sleeve measures 21 cm = 8¼" from the shoulder. Change to double pointed needles size 2.5 MM = US 1.5 and work 2 ridges – see GARTER STITCH (in the round) above. Change to double pointed needles size 3 MM = US 2.5 and bind off with knit. The sleeve measures approx. 23 cm = 9" from the marker on the shoulder (in all sizes). NECK: Use circular needle size 2.5 MM = US 1.5. Start from the right side, mid-front and knit up 137-137-137-137-155-155-155 stitches inside 1 stitch along the neckline; stitch count should be divisible by 2 + 1. Start on row 2 in A.9 and work from the wrong side as follows: The band as before, work A.9b, then A.9a until there are 7 stitches left, work the band as before. When the neck measures 1 cm = ⅜", work the last buttonhole above the others on the right band (from the right side: 2 garter stitches, knit 2 twisted together, make 1 yarn over). The yarn over is knitted on the next row to leave a hole. When A.9 is finished, change to circular needle size 3 MM = US 2.5 and bind off with knit from the right side. ASSEMBLY-2: Sew the buttons onto the left band. CROCHETED EDGE ON RIGHT FRONT PIECE: Use crochet hook size 3 MM = US C. Start from the right side on one shoulder and work diagram A.10a in the first stitch from A.1 (the outermost stitch towards the side), then work diagram A.10b down the front piece (always working in the first stitch in A.1), continue with A.1 and A.2, finishing after a complete repeat. Cut and fasten the strand. CROCHETED EDGE ON LEFT FRONT PIECE: Use crochet hook size 3 MM = US C. Start from the right side at the bottom of A.6 and work diagram A.10a in the last stitch in A.6 (the outermost stitch towards the side), then A.10b upwards (always working in the last stitch in A.6/A.4), finishing after a complete repeat at the top of the shoulder. Cut and fasten the strand. CROCHETED EDGE AROUND THE CUFFS: Use crochet hook size 3 MM = US C. Start from the right side mid-under the sleeve and work diagram A.10a in the first stitch, then A.10b around the cuff, finishing after a complete repeat mid-under the sleeve. Cut and fasten the strand. |
|||||||||||||||||||||||||||||||||||||||||||
Diagram explanations |
|||||||||||||||||||||||||||||||||||||||||||
|
|||||||||||||||||||||||||||||||||||||||||||
 |
|||||||||||||||||||||||||||||||||||||||||||
 |
|||||||||||||||||||||||||||||||||||||||||||
 |
|||||||||||||||||||||||||||||||||||||||||||
 |
|||||||||||||||||||||||||||||||||||||||||||
 |
|||||||||||||||||||||||||||||||||||||||||||
 |
|||||||||||||||||||||||||||||||||||||||||||
 |
|||||||||||||||||||||||||||||||||||||||||||
 |
|||||||||||||||||||||||||||||||||||||||||||
 |
|||||||||||||||||||||||||||||||||||||||||||
Have you finished this pattern?Tag your pictures with #dropspattern #prettyjanecardigan or submit them to the #dropsfan gallery. Do you need help with this pattern?You'll find 54 tutorial videos, a Comments/Questions area and more by visiting the pattern on garnstudio.com. © 1982-2026 DROPS Design A/S. We reserve all rights. This document, including all its sub-sections, has copyrights. Read more about what you can do with our patterns at the bottom of each pattern on our site. |
|||||||||||||||||||||||||||||||||||||||||||


With over 40 years in knitting and crochet design, DROPS Design offers one of the most extensive collections of free patterns on the internet - translated to 17 languages. As of today we count 325 catalogs and 12298 patterns - 12288 of which are translated into English (US/in).
We work hard to bring you the best knitting and crochet have to offer, inspiration and advice as well as great quality yarns at incredible prices! Would you like to use our patterns for other than personal use? You can read what you are allowed to do in the Copyright text at the bottom of all our patterns. Happy crafting!
Post a comment to pattern DROPS 267-35
We would love to hear what you have to say about this pattern!
If you want to leave a question, please make sure you select the correct category in the form below, to speed up the answering process. Required fields are marked *.