
Popular categories
Looking for a yarn?


Comments / Questions (13)
![]() Dorothee wrote:
Dorothee wrote:
Hallo, Wird am hinteren Halsausschnitt kein ICord Abschluss gearbeitet?
10.04.2026 - 07:48DROPS Design answered:
Liebe Dorothee, nein das wird man hier nicht stricken. Viel Spaß beim Stricken!
10.04.2026 - 09:33
![]() Jennifer wrote:
Jennifer wrote:
I had seen before instructions for back elevation for a sweater. I am not able to find it now. Can you please point me in the right direction? Thank you.
09.01.2026 - 15:27DROPS Design answered:
Dear Jennifer, this type of pattern doesn't often include a back elevation. Here you can find a video explanation for the back elevation, and some models that use this technique. Happy knitting!
11.01.2026 - 23:39
![]() Abraham wrote:
Abraham wrote:
Bonjour, combien de pelotes de laine Brushed Alpaca silk sont nécessaires pour faire le modèle présenté en taille L ? (Soft horizon sweater) Merci de vos conseils.
25.12.2025 - 19:36DROPS Design answered:
Bonjour Mme Abraham, vous aurez besoin de 175 g de DROPS BRUSHED ALPACA SILK (7 pelotes) et 300 g de DROPS ALPACA (6 pelotes). Bon tricot!
25.12.2025 - 21:57
![]() Karin wrote:
Karin wrote:
Hej! När man ska maska av på armarna ska man minska 8 m(stl M) innan man maskar av med icord..det blir bra.. Men på fram och bakstycket står d inget om att d ska minskas maskor innan icord avmaskning..nu har jag fått repat upp avmaskningen för andra gång..första gång för att den blev for kort..o nu blir den liksom hängande ut i ”lösa luften” känns för stor .. Vad gör jag för fel?eller är d nåt i mönstret som är missat?
24.12.2025 - 20:07DROPS Design answered:
Hei Karin. Det skal ikke felles noen masker på fram- och bakstycket, men viktig at det ikke strikkes for stramt eller for løst. Du kan evnt felle noen masker før man starter på Icord avfellingen om du syns det blir penest på din genser. mvh DROPS Design
05.01.2026 - 10:40
![]() Nathalie wrote:
Nathalie wrote:
Bonjour, Pouvez vous me dire si la laine DROPS BRUSHED ALPACA SILK pique une fois le pull porté ? Je vous remercie d'avance pour votre réponse. Cordialement
21.12.2025 - 22:02DROPS Design answered:
Bonjour Nathalie, pour toute assistance au choix des laines, surtout en cas d'extrême sensibilité, contactez votre magasin qui saura vous conseiller, même par mail ou téléphone. Bon tricot!
22.12.2025 - 17:42
![]() Orit wrote:
Orit wrote:
I have a question about the row of joining the front and back pieces and adding stitches for the sleeves. It says to pick up 24 stc (for large) along the side for sleeve, I have knitted 5cm and 20 rows which comes to about 32 rows, so how can I pick only 24? skipping some rows? thanks for the pattern and the reply,
13.12.2025 - 17:46DROPS Design answered:
Dear Orit, yes, you skip every 4th row. So you pick up 1 stitch in the first 3 rows and skip the next row. This helps maintain the shape of the armhole, so that you have enough width but not too many stitches; otherwise the knitting may get wavy. Happy knitting!
14.12.2025 - 23:34
![]() Barbara wrote:
Barbara wrote:
Hallo, was kann ich tun, dass sich der Abschluss am Rumpfteil mit dem I-Cord nicht aufrollt?
02.12.2025 - 13:43DROPS Design answered:
Liebe Barbara, die I-Cord Kante sollte nicht aufrollen, aber Sie können den Pullover mit Stecknadeln auf einer geeigneten Unterlage spannen, anfeuchten (z.B. mit einer Sprühflasche für Blumen) und trocknen lassen, danach entfernen Sie die Stecknadeln, dann sollte sich der Rand nicht mehr rollen.
02.12.2025 - 17:31
![]() Barbara wrote:
Barbara wrote:
Hallo, den I-Cord habe ich am Ende des Rumpfteils gestrickt. Er rollt sich leider auf. Wie bekomme ich einen geraden Abschluss?
02.12.2025 - 13:41
![]() Mimosa wrote:
Mimosa wrote:
Buongiorno. Ho due domande: 1) Nel giro in cui si inizia il lavoro in tondo, dopo aver messo le ultime due maglie dell'i-cord in sospeso, le ho lavorate insieme alle successive due maglie dell'i-cord. Ho sbagliato? Grazie della risposta
01.11.2025 - 11:35
![]() PELTIER wrote:
PELTIER wrote:
Bonjour, je me demande s'il n'y a pas une erreur à la fin du rang 9. Comment peut-il rester 3 mailles, en mettre 2 sur une aiguille à torsade, tricoter les 2 suivantes ensemble, puis les 2 sur l'aiguille à torsade ? Je ne comprends pas vos explications , merci d'apporter quelques compléments d'informations.
22.10.2025 - 12:07DROPS Design answered:
Bonjour Mme Peltier, à la fin du 9ème rang, vous augmentez 1 maille avant les 3 dernières mailles du rang, vous tricotez ensuite 1 maille endroit, vous mettez les 2 dernières mailes en attente, et vous tricote ensemble à l'endroit les 2 premières mailles du tour (on va désormais tricoter en rond), puis vous tricotez les mailles de l'aiguille à torsades = votre ouvrage peut être désormais tricoté en rond. Bon tricot!
28.10.2025 - 18:59
|
|
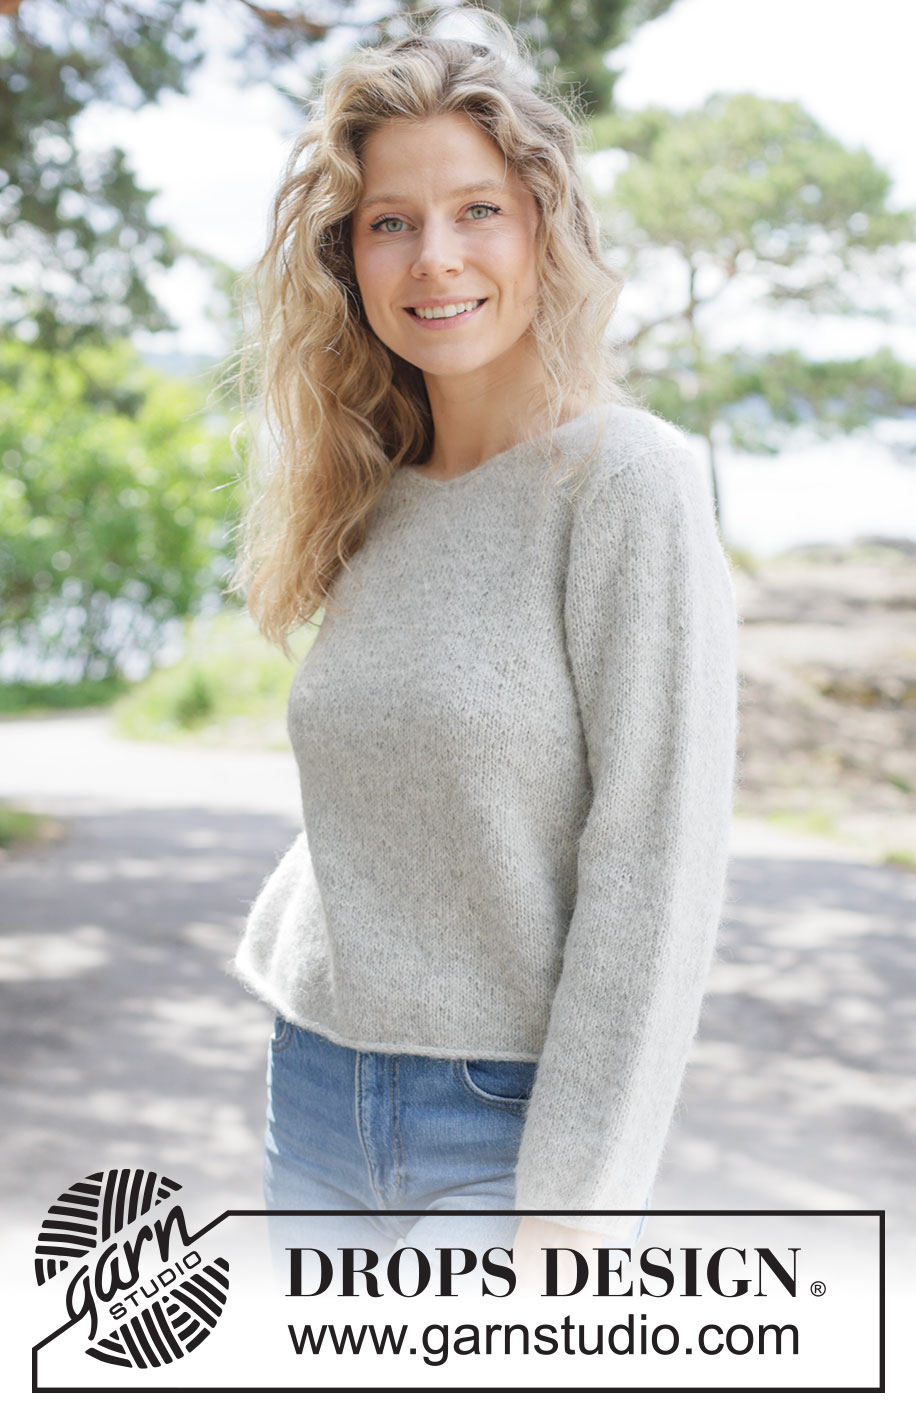
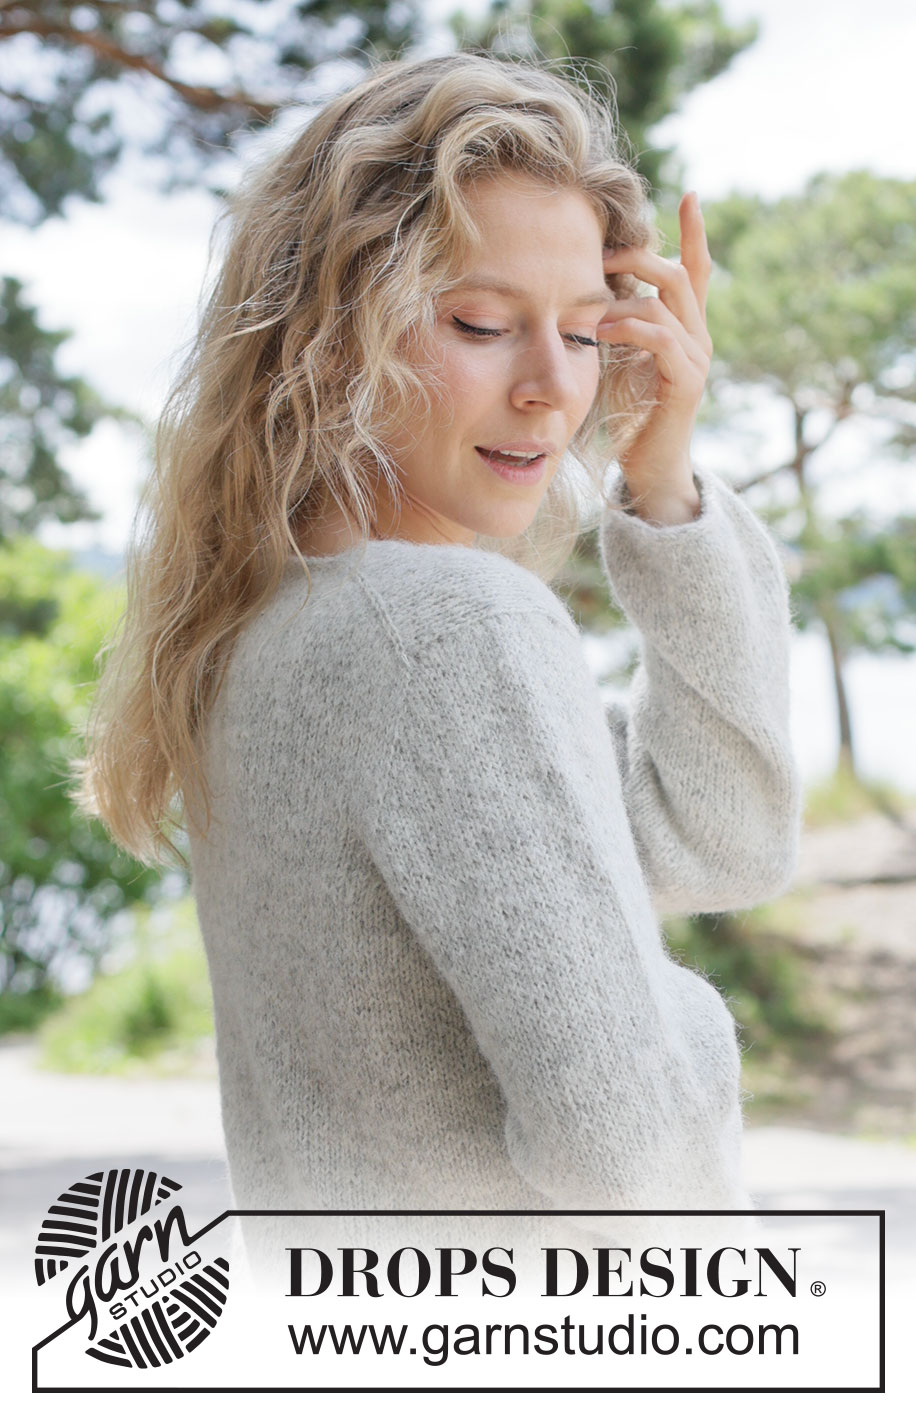
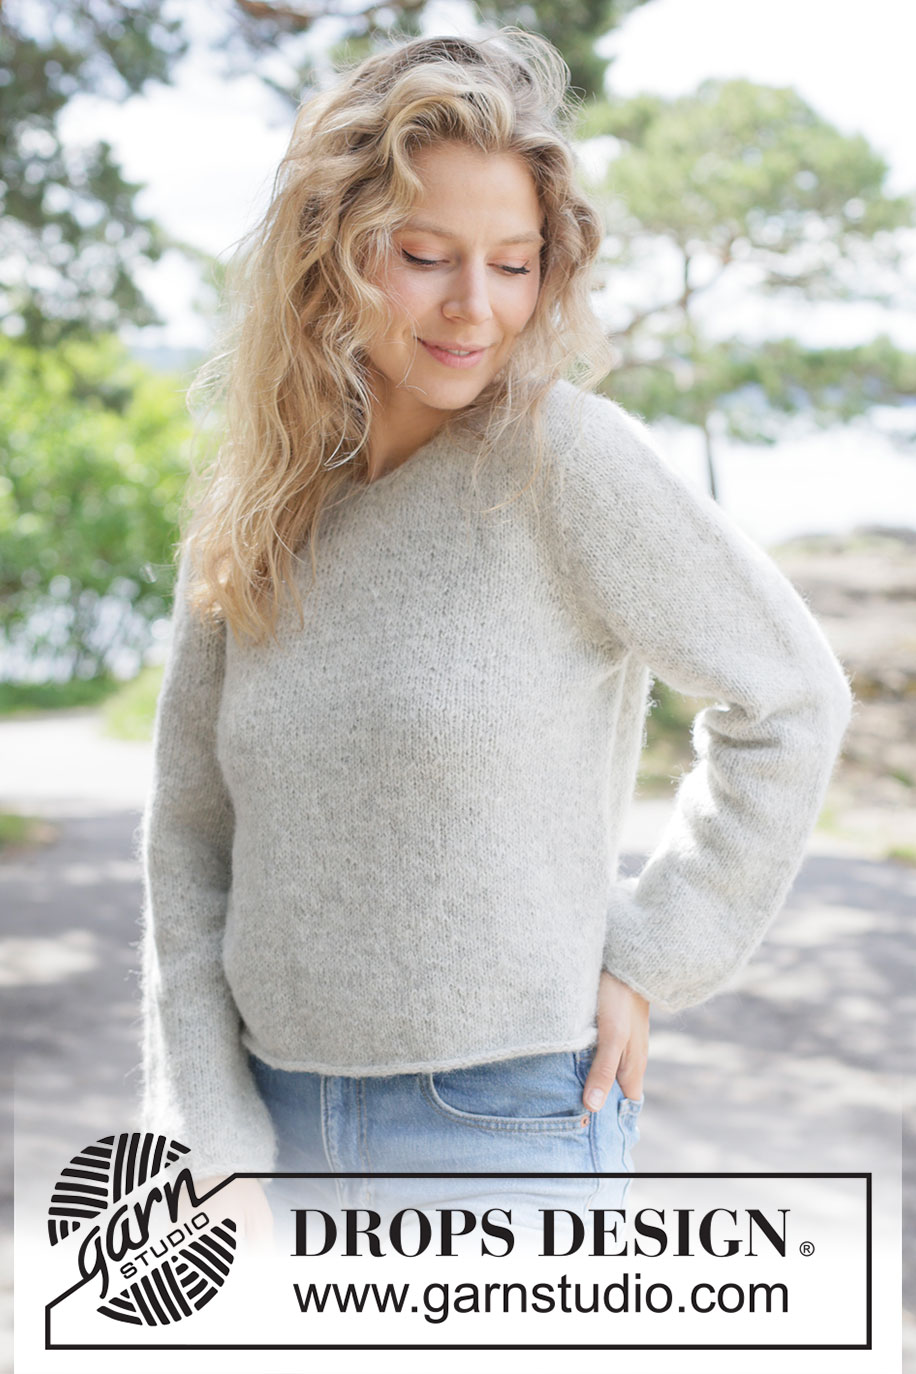
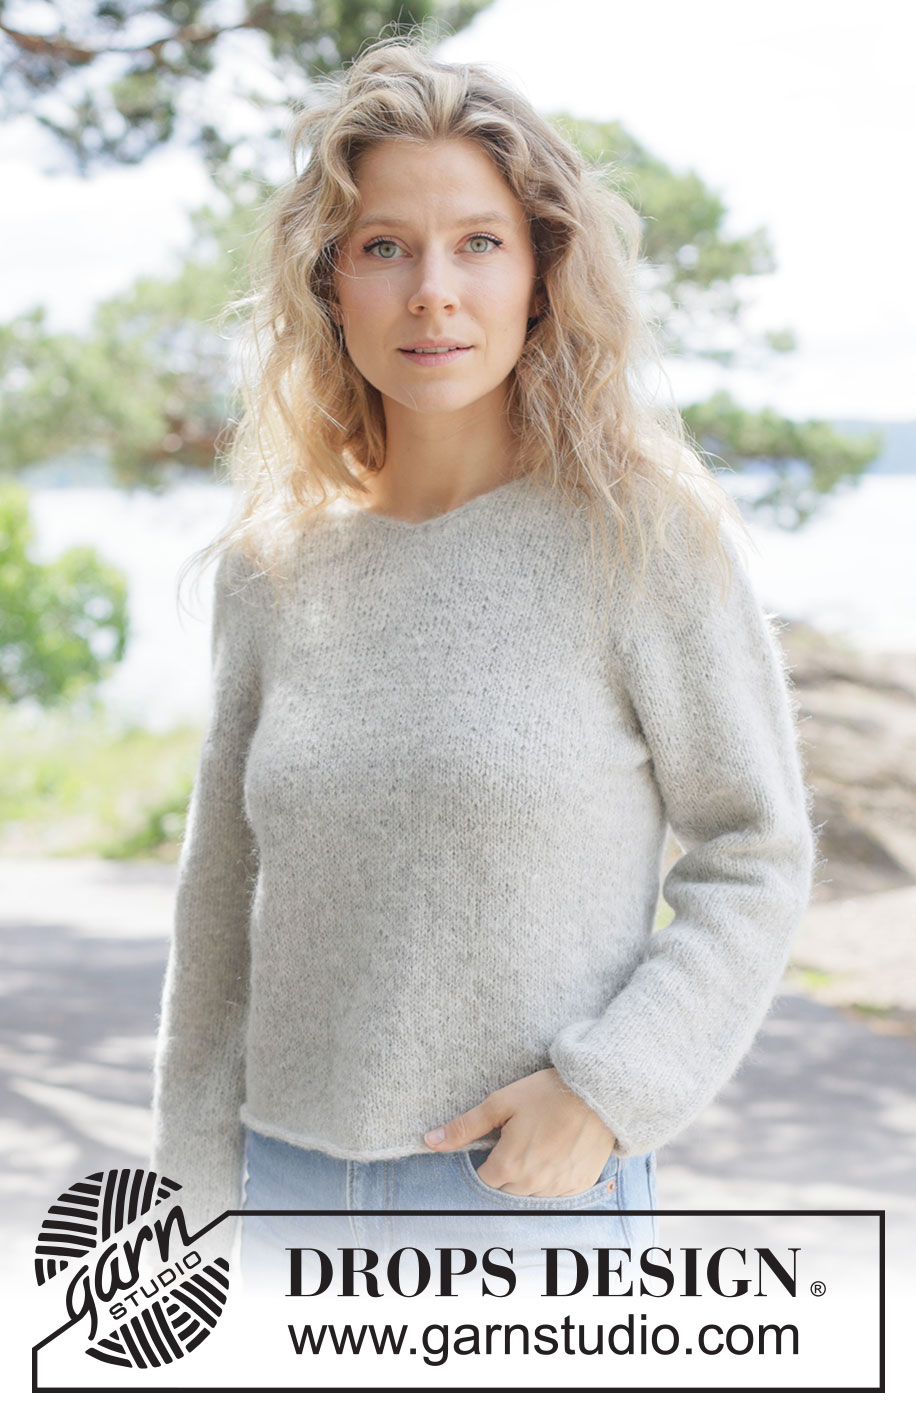
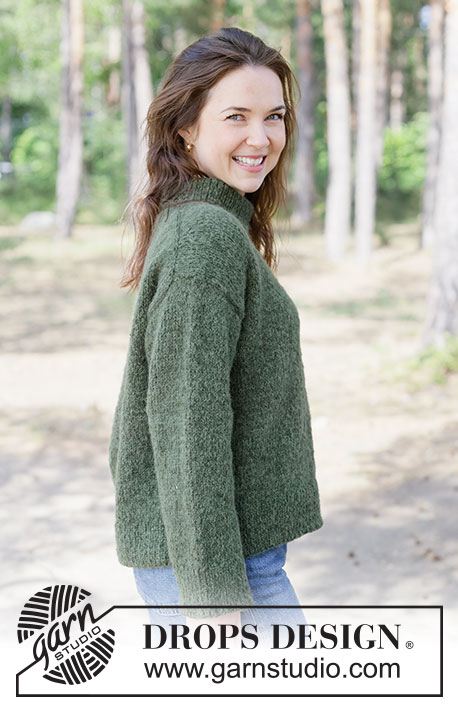
Soft Horizon Sweater#softhorizonsweater |
|
 |
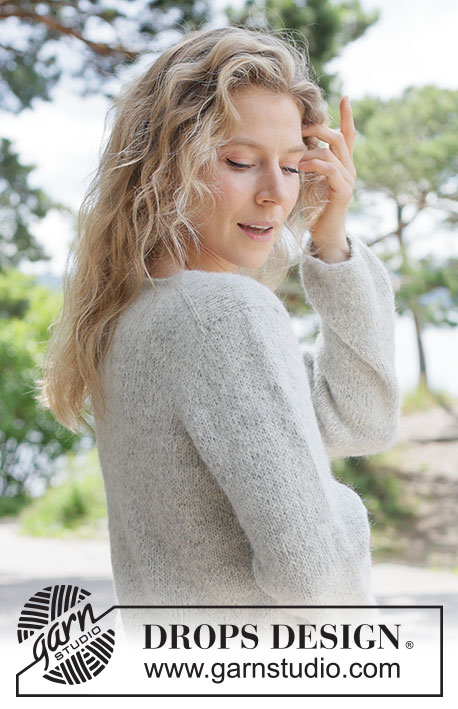 |
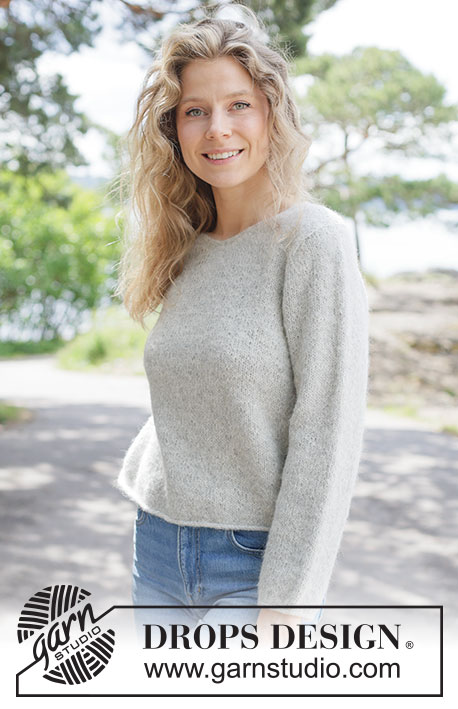
Knitted sweater in DROPS Brushed Alpaca Silk and DROPS Alpaca. The piece is worked top down in stockinette stitch with European yoke, V-neck and I-cord. Sizes XS - XXXL.
DROPS 263-20 |
|
|
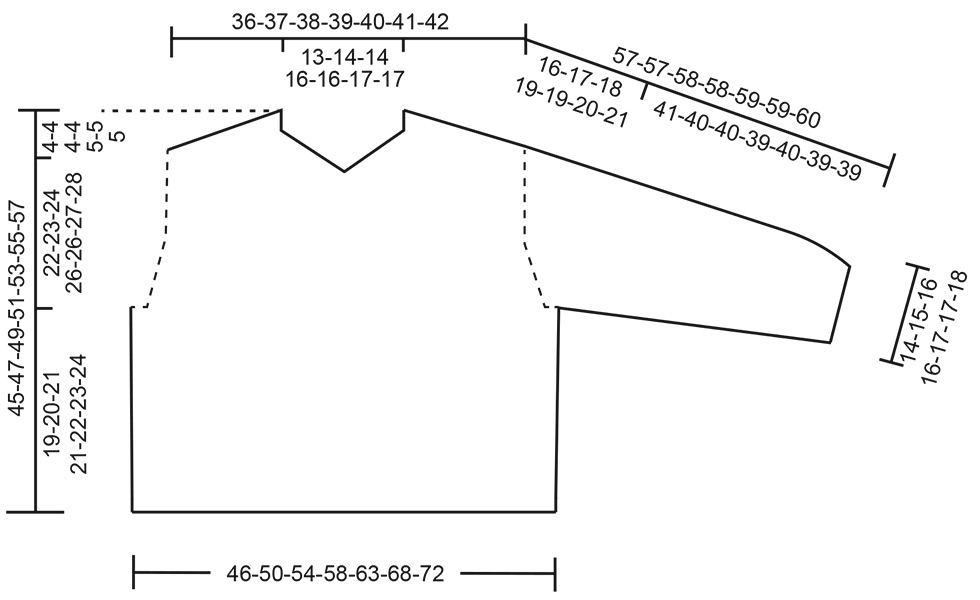
------------------------------------------------------- EXPLANATIONS FOR THE PATTERN: ------------------------------------------------------- INCREASE TIP-1: INCREASE 1 STITCH TOWARDS THE LEFT - from RIGHT SIDE: Use left needle to pick up yarn between 2 stitches from row below, pick up yarn from the front and knit in the stitch loop that is on the back of the needle. INCREASE 1 STITCH TOWARDS THE RIGHT - from RIGHT SIDE: Use left needle to pick up yarn between 2 stitches from row below, pick up yarn from the back and knit in the stitch loop that is on the front side of the needle. INCREASE TIP-2: INCREASE 1 STITCH TOWARDS THE RIGHT - from WRONG SIDE: Use left needle to pick up yarn between 2 stitches from row below, pick up yarn from the back and purl in the stitch loop that is on the front side of the needle. INCREASE 1 STITCH TOWARDS THE LEFT - from WRONG SIDE: Use left needle to pick up yarn between 2 stitches from row below, pick up yarn from the front and purl in the stitch loop that is on the back side of the needle. I-CORD (for neckline): START OF ROW: Slip 1 stitch purl-wise with the strand in front, knit 1. END OF ROW: Work until there are 2 stitches left on the row, slip 1 stitch purl-wise with the strand in front, knit 1. Work like this from both the right and wrong side. I-CORD BIND OFF: After the final round: START (right side): Cast on 2 stitches on the right needle. Slip these 2 stitches onto the left needle, with the working-strand now 2 stitches in on the left needle (the strand tightens when working to form a small tube). ROW 1 (right side): Knit 1, knit 2 twisted together. Slip the 2 stitches from the right needle onto the left needle. Do not turn. Repeat ROW 1 until there are 2 stitches left on the right needle. Slip these 2 stitches onto the left needle. Bind off. Sew a small stitch, joining the beginning and the end of the I-cord. SLEEVE TIP: When knitting up stitches under the sleeve, you can get a small hole in the transition between stitches on the body and sleeve. This hole can be closed by picking up the strand between 2 stitches and working this strand twisted together with the first stitch between body and sleeve. DECREASE TIP: Decrease 1 stitch on each side of the marker thread as follows: Work until there are 3 stitches left before the marker thread, knit 2 together, knit 2 (marker thread sits between these 2 stitches) slip 1 stitch knit-wise, knit 1 and pass the slipped stitch over the knitted stitch (= 2 stitches decreased). ------------------------------------------------------- START THE PIECE HERE: ------------------------------------------------------- SWEATER – SHORT OVERVIEW OF THE PIECE. The pattern uses both long and short needles; start with the length which fits the number of stitches and change when necessary. Work according to points 1 – 5. 1 BACK PIECE: Cast on stitches for the back of the neck. Work the back piece back and forth, increasing stitches on each side until the shoulder stitch count has been achieved. The back piece has slightly diagonal shoulder. 2 FRONT PIECE: Is worked in 2 sections (each side of neck). Start by knitting up stitches along one back shoulder, working downwards and increasing for the neckline. Repeat on the other shoulder. 3 YOKE: Place the front and back pieces on the same needle, working first one of the front pieces, knitting up stitches for one sleeve along the side of the front piece, then working the back piece, knitting up stitches for the second sleeve along the side of the other front piece and finally working this front piece. Continue in back and forth from mid-front 4 INCREASE FOR NECK, BODY AND SLEEVES: While working the yoke, you increase stitches first for the neck and sleeves. When the neck-increases are finished, the front pieces are joined and the yoke is continued in the round. The increases continue on the sleeves, then later for both the body and sleeves. 5 BODY AND SLEEVES: When all the increases are finished and the yoke is the correct length, it is divided and the body is continued in the round while the sleeves wait. Then the sleeves are worked top down in the round. If there is a «0» in your chosen size, skip the information and go straight to the next instruction. BACK PIECE: The piece is worked back and forth. Cast on 26-28-28-30-30-32-32 stitches with circular needle size 4 MM = US 6, 1 strand DROPS Brushed Alpaca Silk and 1 strand DROPS Alpaca (2 strands). ROW 1 (wrong side): Purl. ROW 2 (right side): Read INCREASE TIP-1. Knit 2, increase 1 stitch towards the left, knit until there are 2 stitches left on the row, increase 1 stitch towards the right, knit 2. ROW 3 (= wrong side): Read INCREASE TIP -2. Purl 2, increase 1 stitch towards the right, purl until there are 2 stitches left on the row, increase 1 stitch towards the left, purl 2. Work ROWS 2 and 3 a total of 10-10-10-10-11-11-11 times. Then repeat ROW 2, 0-0-1-1-0-0-1 more times (= 20-20-21-21-22-22-23 rows worked). There are 66-68-70-72-74-76-78 stitches. Remember to maintain the knitting gauge. Cut the strand and place the stitches on a stitch holder. RIGHT FRONT SHOULDER: Find the right back shoulder as follows: Lay the back piece flat, right side up, with the stitch holder towards you; right side of piece = right shoulder. Start from the right side on the back piece, by the armhole and knit up 1 stitch outermost by the armhole (= edge stitch), then knit up 1 stitch in each row worked (inside the outermost stitch = 20-20-21-21-22-22-23 stitches) to the neckline = 21-21-22-22-23-23-24 shoulder-stitches. Insert 1 marker by the neck. All length-measurements on the front piece are taken from here. Purl back from the wrong side. Continue with stockinette stitch and 2 stitches I-CORD by the neckline – read explanation above, as follows: ROW 1 (right side): Knit until there are 2 stitches left, work 2 stitches I-cord. ROW 2 (wrong side): Work 2 stitches I-cord, purl to end of row. Repeat ROWS 1 and 2 until the piece measures 4-4-4-5-5-5-6 cm = 1½"-1½"-1½"-2"-2"-2"-2⅜", with the last row from the wrong side. Now increase for the neckline inside 3 stitches – remember INCREASE TIP-1, as follows: ROW 1 (right side): Knit until there are 3 stitches left, increase 1 stitch towards the right, knit 1, work 2 stitches I-cord. ROW 2 (wrong side): Work 2 stitches I-cord, purl to end of row. Work ROWS 1 and 2 a total of 8-9-9-10-10-11-11 times (16-18-18-20-20-22-22 rows worked) = 29-30-31-32-33-34-35 stitches. Cut the strand and place the stitches on a stitch holder. Work the left front shoulder. LEFT FRONT SHOULDER: Start from the right side by the neckline on the left back shoulder and knit up 1 stitch in each row worked (inside the outermost stitch = 20-20-21-21-22-22-23 stitches) then knit up 1 stitch outermost on the shoulder (= edge stitch) = 21-21-22-22-23-23-24 shoulder-stitches. Insert 1 marker by the neck. All length-measurements on the front piece are taken from here. Purl back from the wrong side. Continue with stockinette stitch and 2 stitches I-cord by the neckline as follows: ROW 1 (right side): Work 2 stitches I-cord, knit to end of row. ROW 2 (wrong side): Purl until there are 2 stitches left, work 2 stitches I-cord. Repeat ROWS 1 and 2 until the piece measures 4-4-4-5-5-5-6 cm = 1½"-1½"-1½"-2"-2"-2"-2⅜", with the last row from the wrong side. Now increase for the neckline inside 3 stitches as follows: ROW 1 (right side): Work 2 stitches I-cord, knit 1, increase 1 stitch towards the left, knit to end of row. ROW 2 (wrong side): Purl until there are 2 stitches left, work 2 stitches I-cord. Work ROWS 1 and 2 a total of 8-9-9-10-10-11-11 times (16-18-18-20-20-22-22 rows worked) = 29-30-31-32-33-34-35 stitches. The front and back pieces are now joined and stitches are knitted up for the sleeves, continuing the increases for the neckline as follows: ROW 1 (right side): Start with the left front piece: Work 2 stitches I-cord, knit 1, increase 1 stitch towards the left, knit until there are 2 stitches left on the front piece, slip 1 stitch, knit 1 and pass the slipped stitch over (edge stitch decreased), insert 1 marker, knit up 20-22-22-24-24-26-27 stitches along the side of the left front piece (sleeve-stitches, knitted up inside the outermost stitch), insert 1 marker, place the back piece on the needle, knit the first 2 stitches together (edge stitch decreased), knit until there are 2 stitches left on the back piece, slip 1 stitch, knit 1 and pass the slipped stitch over (edge stitch decreased), knit up 20-22-22-24-24-26-27 stitches along the side of the right front piece (sleeve-stitches, knitted up inside the outermost stitch), insert 1 marker, place the right front piece on the needle, knit the first 2 stitches together, (edge stitch decreased) knit until there are 3 stitches left, increase 1 stitch towards the right, knit 1 and work 2 stitches I-cord = 162-170-174-182-186-194-200 stitches. There are 29-30-31-32-33-34-35 stitches on each front piece, 20-22-22-24-24-26-27 stitches on each sleeve and 64-66-68-70-72-74-76 stitches on the back piece. ROW 2 (wrong side): Work 2 stitches I-cord, purl to the first marker, move the marker onto the right needle, increase 1 stitch towards the left – remember INCREASE TIP-2, purl to the next marker, increase 1 stitch towards the right, move the marker onto the right needle, purl to the next marker, move the marker onto the right needle, increase 1 stitch towards the left, purl to the next marker, increase 1 stitch towards the right, move the marker onto the right needle, purl until there are 2 stitches left, work 2 stitches I-cord (4 increased stitches) = 166-174-178-186-190-198-204 stitches. ROW 3 (right side): Work 2 stitches I-cord, knit 1, increase 1 stitch towards the left, knit to the first marker, move the marker onto the right needle, increase 1 stitch towards the left, knit to the next marker, increase 1 stitch towards the right, move the marker onto the right needle, knit to the next marker, move the marker onto the right needle, increase 1 stitch towards the left, knit to the next marker, increase 1 stitch towards the right, move the marker onto the right needle, knit until there are 3 stitches left, increase 1 stitch towards the right, knit 1, work 2 stitches I-cord (6 increased stitches) = 172-180-184-192-196-204-210 stitches. ROW 4 (wrong side): Work 2 stitches I-cord, purl until there are 2 stitches left, work 2 stitches I-cord. ROW 5 (right side): As ROW 3. ROW 6 (wrong side): As ROW 4. ROW 7 (right side): As ROW 3. ROW 8 (wrong side): As ROW 4. ROW 9 (right side): The front pieces are now joined as follows: Work 2 stitches I-cord, knit 1, increase 1 stitch towards the left, knit to the first marker, move the marker onto the right needle, increase 1 stitch towards the left, knit to the next marker, increase 1 stitch towards the right, move the marker onto the right needle, knit to the next marker (= back piece), move the marker onto the right needle, increase 1 stitch towards the left, knit to the next marker, increase 1 stitch towards the right, move the marker onto the right needle, knit until there are 3 stitches left, increase 1 stitch towards the right, knit 1, place the last 2 stitches on a cable needle, knit the first 2 stitches together (the 2 I-cord stitches), knit the 2 stitches from the cable needle together = 188-196-200-208-212-220-226 stitches. There are 30-32-32-34-34-36-37 stitches on each sleeve and 64-66-68-70-72-74-76 stitches on the front and back pieces. The piece measures approx. 14-15-15-16-16-17-18 cm = 5½"-6"-6"-6¼"-6¼"-6¾"-7" from the marker. A little of the neck-length will lie on the back piece. Neck-length in front approx. 12-13-13-14-14-14-15 cm = 4¾"-5⅛"-5⅛"-5½"-5½"-5½"-6". Neck-length at back approx. 2-2-2-2-2-3-3 cm = ¾"-¾"-¾"-¾"-¾"-1⅛"-1⅛". Continue in the round, beginning mid-front. YOKE ROUND 1: Knit without increasing. ROUND 2: Knit, increasing 1 stitch on each side of the sleeves as before – remember INCREASE TIP-1 (4 increased stitches). The stitch count on the sleeves increases but remains the same on the front and back pieces. Work ROUNDS 1 and 2 a total of 7-6-5-5-3-1-1 times (14-12-10-10-6-2-2 rounds worked; a total of 12-11-10-10-8-6-6 increases in height on the sleeves = 44-44-42-44-40-38-39 sleeve-stitches and 64-66-68-70-72-74-76 stitches on the front and back pieces) = 216-220-220-228-224-224-230 stitches. Now you increase on both the body and sleeves, increasing for the body inside 2 knitted stitches on each side of the front and back pieces as follows: ROUND 1: Knit without increasing. ROUND 2: Knit until there are 2 stitches left before the first marker, increase 1 stitch towards the right, knit 2, move the marker onto the right needle, increase 1 stitch towards the left, knit to the next marker, increase 1 stitch towards the right, move the marker onto the right needle, knit 2, increase 1 stitch towards the left, knit until there are 2 stitches left before the next marker, increase 1 stitch towards the right, knit 2, move the marker onto the right needle, increase 1 stitch towards the left, knit to the next marker, increase 1 stitch towards the right, move the marker onto the right needle, knit 2, increase 1 stitch towards the left, knit to end of round (8 increased stitches, i.e. 1 increased stitch on each side of 2 knitted stitches in each transition between the body and sleeves). Work ROUNDS 1 and 2 a total of 7-9-11-12-15-18-19 times (14-18-22-24-30-36-38 rounds worked). A total of 19-20-21-22-23-24-25 increases in height on the sleeves and 7-9-11-12-15-18-19 increases in height on the body (58-62-64-68-70-74-77 sleeve-stitches and 78-84-90-94-102-110-114 stitches on the front and back pieces) = 272-292-308-324-344-368-382 stitches. Knit 1 round. The sleeves measure approx. 16-17-18-19-19-20-21 cm = 6¼"-6¾"-7"-7½"-7½"-8"-8¼". When the sweater is folded double at the shoulder, the piece should measures approx. 22-23-24-26-26-27-28 cm = 8¾"-9"-9½"-10¼"-10¼"-10⅝"-11" from outermost on the shoulder and down the armhole. If the piece is shorter than this, continue working to the correct length without further increases. Now divide for the body and sleeves. DIVIDE FOR BODY AND SLEEVES: Knit to the first marker, place the next 58-62-64-68-70-74-77 stitches on a thread for the sleeve, cast on 4-6-8-10-12-12-16 stitches (mid-under the sleeve), knit 78-84-90-94-102-110-114 (= back piece), place the next 58-62-64-68-70-74-77 stitches on a thread for the sleeve, cast on 4-6-8-10-12-12-16 stitches (mid-under the sleeve), knit the last 78-84-90-94-102-110-114 stitches (= front piece). The body and sleeves are finished separately. BODY: = 164-180-196-208-228-244-260 stitches. Continue stockinette stitch in the round for a further 19-20-21-21-22-23-24 cm = 7½"-8"-8¼"-8¼"-8¾"-9"-9½". Work I-CORD BIND-OFF – read description above. The sweater measures approx. 45-47-49-51-53-55-57 cm = 17¾"-18½"-19¼"-20"-21"-21⅝"-22½" from the top of the shoulder. SLEEVES: Place the 58-62-64-68-70-74-77 sleeve-stitches from one thread on circular needle size 4 MM = US 6 and knit up 1 stitch in each of the 4-6-8-10-12-12-16 stitches cast on under the sleeve – read SLEEVE TIP = 62-68-72-78-82-86-93 stitches. Insert a marker-thread in the middle of the 4-6-8-10-12-12-16 stitches under the sleeve- the round starts by the marker-thread. Work stockinette stitch in the round. AT THE SAME TIME, when the sleeve measures 1 cm = ⅜" from the division, decrease mid-under the sleeve – read DECREASE TIP as follows: Decrease 2 stitches every 2nd round 2-2-2-2-2-2-3 times, then decrease 2 stitches every 9-5-4-3-3-3-2½ cm = 3½"-2"-1½"-1⅛"-1⅛"-1⅛"-1" a total of 3-5-6-8-9-10-12 times = 52-54-56-58-60-62-63 stitches. Continue working until the sleeve measures 41-40-40-39-40-39-39 cm = 16⅛"-15¾"-15¾"-15¼"-15¾"-15¼"-15¼" from the division. Knit 1 round and decrease 7-7-8-8-9-9-9 stitches evenly on the round = 45-47-48-50-51-53-54 stitches. Work I-CORD BIND OFF. |
|
 |
|
Have you finished this pattern?Tag your pictures with #dropspattern #softhorizonsweater or submit them to the #dropsfan gallery. Do you need help with this pattern?You'll find 30 tutorial videos, a Comments/Questions area and more by visiting the pattern on garnstudio.com. © 1982-2026 DROPS Design A/S. We reserve all rights. This document, including all its sub-sections, has copyrights. Read more about what you can do with our patterns at the bottom of each pattern on our site. |
|


With over 40 years in knitting and crochet design, DROPS Design offers one of the most extensive collections of free patterns on the internet - translated to 17 languages. As of today we count 324 catalogs and 12285 patterns - 12275 of which are translated into English (US/in).
We work hard to bring you the best knitting and crochet have to offer, inspiration and advice as well as great quality yarns at incredible prices! Would you like to use our patterns for other than personal use? You can read what you are allowed to do in the Copyright text at the bottom of all our patterns. Happy crafting!
Post a comment to pattern DROPS 263-20
We would love to hear what you have to say about this pattern!
If you want to leave a question, please make sure you select the correct category in the form below, to speed up the answering process. Required fields are marked *.