
Popular categories
Looking for a yarn?


Comments / Questions (53)
![]() Sandrine Poteaux wrote:
Sandrine Poteaux wrote:
Bonjour,je ne tricote qu'avec des aiguilles normal ,comment faire ce modele car tous vos modeles sont avec aiguille circulaire et personnellement je n arrive pas a tricoter . merci.
23.10.2020 - 16:23DROPS Design answered:
Bonjour Sandrine! Regardez la lecon DROPS sur ce sujet ICI. Bon tricot!
23.10.2020 - 16:39
![]() Lydia wrote:
Lydia wrote:
Wollte noch mal ein update geben, ist ein toller pulli geworden, den ich zwar etwas anders gestrickt habe, aber er sieht trotzdem klasse aus. (im Rippenmuster gestrickt, anstatt Zunahmen Abnahmen gemacht, sodass er in der Taille nicht auseinandergeht, sondern taillenbetont ist. Ärmel habe ich auch anders gestrickt. Aber man sieht trotzdem das Grundmuster:-)
19.09.2020 - 20:13
![]() Lydia wrote:
Lydia wrote:
Hallonochmal, die Hin- und Rückreihen sind hier etwas unklar. ich habe die Hin und Rückreihen entweder vertauscht oder sie sind bei a.4a und a.4c vertauscht worden,habe ich jetzt geändert, die Hinreihen bei a.4a und a.4c sind nicht rechts gestrickt sondern Muster a.1b, ansonsten kommt es nicht hin. Nund hebt sih auch der Mittelteil heraus. Grüße
27.07.2020 - 08:13DROPS Design answered:
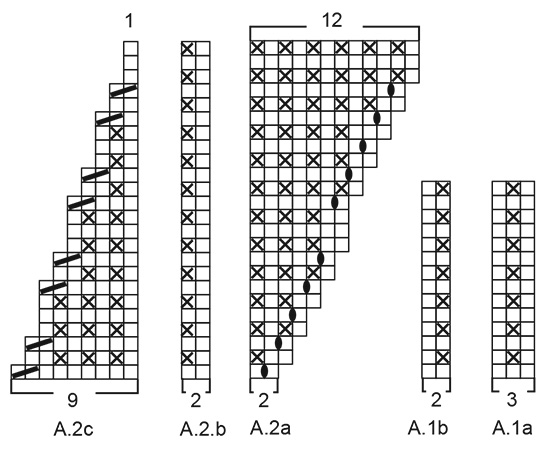
Liebe Lydia, Sie stricken beim Zusammensetzen der Teile 2 Reihen von A.1b, also 1 Hin-Reihe und 1 Rück-Reihe. Mit A.2, A.3 und A.4 beginnen Sie dann wieder mit der Hin-Reihe, daher sollte das eigentlich passen. Alle Diagramme beginnen dabei mit 1 Reihe glatt rechts ohne Strukurmusterung. A.2a und A.4c haben in der ersten Reihe einen Zunahme-Umschlag zwischen den beiden Maschen, vielleicht haben Sie das falsch interpretiert? Gutes Gelingen!
27.07.2020 - 10:30
![]() Lydia wrote:
Lydia wrote:
Hallo, leider gleicht der mittlere Teil unterm Halsausschnitt nicht dem auf dem Foto. (7 m rechts, 9 m r, 7 r) auf dem Foto wirkt es strukturrell,bei mir eben/glatt. Könnte es sein,dass der Pulli auf dem Foto nicht 1:1 der aus der Strickanleitung ist; denn der Mittelteil hebt sich bei mir nicht heraus. Vielen Dank für eine Antwort,Grüße
26.07.2020 - 18:04DROPS Design answered:
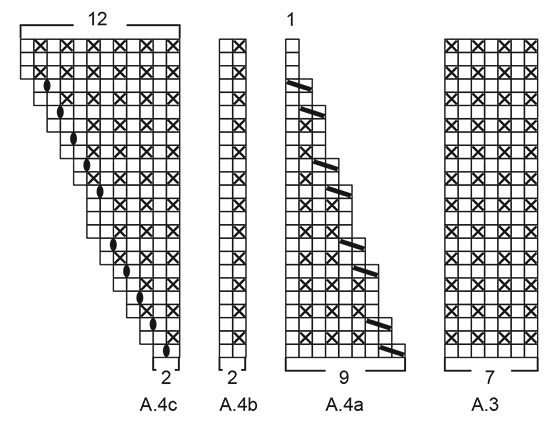
Liebe Lydia, den mittleren Teil des Vorderteils stricken Sie wie folgt: A.2c über 9 Maschen, A.3 über 7 Maschen (= Halsausschnitt) A.4a über 9 Maschen. A.3 wird dabei nicht glatt rechts gestrickt, sondern ist auch das Strukturmuster, d.h. abwechselnd wird 1 Reihe rechts und 1 Reihe mit 1 Masche rechts + 1 Masche links gestrickt. Gutes Gelingen weiterhin!
27.07.2020 - 10:05
![]() Valerie Deyde wrote:
Valerie Deyde wrote:
Bonjour comment peux t on avoir un fond en v alors que les rangs raccourci c au niveau des épaules merci
20.01.2020 - 16:00DROPS Design answered:
Bonjour Mme Deyde, c'est en tricotant le bas du pull, après l'encolure (jeu d'augmentations et de diminutions) que l'on va former cette échancrure en bas du devant du pull. Bon tricot!
20.01.2020 - 16:16
![]() Carina wrote:
Carina wrote:
Hej! I mönstret på nätet står det stickor nr. 7 men jag har gjort tröjan tidigare och på min utskrift står det 5,5 och den blev ju bra. Är det fel på nätet?
05.01.2020 - 19:59DROPS Design answered:
Hej Carina, det som är viktigt för att få måttet i måttskissen är att du får 15 maskor i bredden, om du stickar löst kan du göra det på stickor 5,5. Lycka till :)
15.01.2020 - 12:00
![]() Tantavan wrote:
Tantavan wrote:
Hei. Jeg har strikket forstykket og økt etter mønster til 95m. Skal jeg stoppe å øke nå, eller skal jeg forsette å øke? Slik at jeg får lik m antall som bakstykket?
26.11.2019 - 11:13DROPS Design answered:
Hei Tantavan! På grunn av økning og felling i mønsteret på forstykket vil det være flere masker på forstykket enn på bakstykket. Det viktigste er at forstykket og bakstykket strikkes til den lengden som blir oppgitt i oppskriften. Lykke til!
27.11.2019 - 08:49
![]() Gundi wrote:
Gundi wrote:
Welche Nadelstärke ist die richtige? Hab jetzt mit 7 mm gestrickt und es wird wahnsinnig riesig. Kann man das in der Anleitung ausbessern?
08.11.2019 - 13:37DROPS Design answered:
Liebe Gundi, Sie brauchen eine Rundnadel Nr 7 oder die benötigte Größe um die Maschenprobe zu bekommen, hier lesen Sie mehr über Maschenprobe. Viel Spaß beim stricken!
08.11.2019 - 14:19
![]() Elisabeth wrote:
Elisabeth wrote:
Bonjour, je débute et voudrais m'assurer avoir bien compris, le premier rang après avoir monter les mailles est l'envers du travail et pour le 1er rang endroit la succession de motifs A1a et A1b équivaut à un rang endroit? Par avance merci
04.10.2019 - 13:47DROPS Design answered:
Bonjour Elisabeth, après avoir monté les mailles, vous tricotez 1 rangs en mailles envers = c'est l'envers de l'ouvrage. Vous tricotez ensuite sur l'endroit en suivant les diagrammes A.1a et b comme expliqué, le 1er rang de ces diagrammes se tricote sur l'endroit. plus d'infos sur les diagrammes ici. Bon tricot!
04.10.2019 - 14:31
![]() Annette wrote:
Annette wrote:
Hei! Ohjeessa mainitaan kahta eri puikkokokoa, ensin koko 7 ja sitten itse ohjeessa lukee puikkokokona 5.5. Kumpi mahtaa olla oikea?
20.09.2019 - 17:05DROPS Design answered:
Hei! 7 mm ole oikea! Hyvää neuloa!
08.10.2019 - 21:18
|
||||||||||||||||
Freedom Found#freedomfoundsweater |
||||||||||||||||
 |
 |
|||||||||||||||
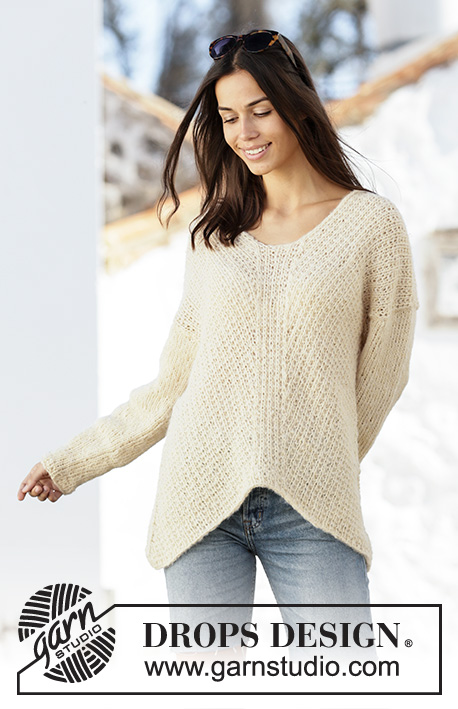
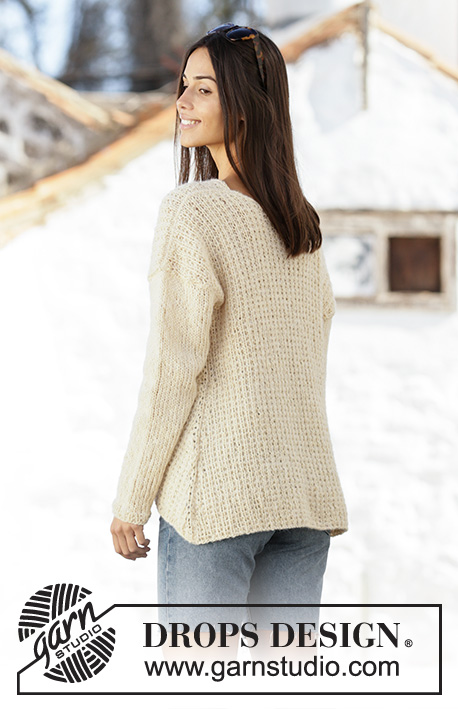
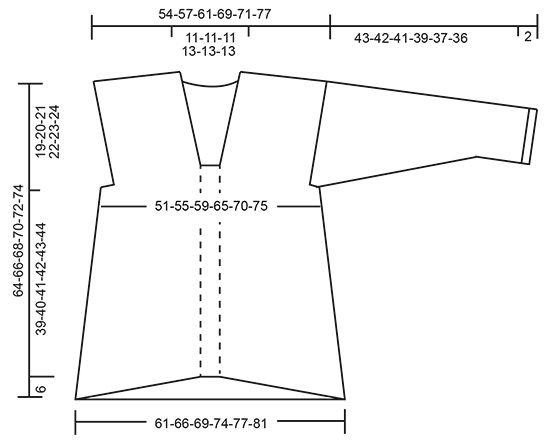
Knitted sweater in DROPS Alpaca and DROPS Brushed Alpaca Silk. Piece is knitted with texture at an angle with V-neck, top down. Size: S - XXXL
DROPS 201-23 |
||||||||||||||||
|
---------------------------------------------------------- EXPLANATION FOR THE PATTERN: ---------------------------------------------------------- GARTER STITCH (back and forth): Knit all rows. 1 ridge vertically = knit 2 rows. PATTERN: See diagrams A.1 to A.4. DECREASE TIP (applies to back piece): All decreases are done from the right side! Work 1 stitch in garter stitch, slip 1 stitch knitwise, knit 1, pass slipped stitch over stitch worked, work until 3 stitches remain, knit 2 together, 1 stitch in garter stitch. INCREASE TIP (applies to sides on back piece): All increases are done from the right side. Work 1 stitch in garter stitch, knit 1, 1 yarn over, work until 2 stitches remain on row, 1 yarn over, knit 1 and 1 stitch in garter stitch. On next row work yarn overs twisted to avoid holes. Then work the new stitches in pattern. INCREASE TIP (applies to sleeves): Work until 2 stitches remain before marker thread, 1 yarn over, knit 4 (marker thread is in the middle of these stitches), 1 yarn over. On next round knit yarn overs twisted to avoid holes. Then work the new stitches in stockinette stitch. ---------------------------------------------------------- START THE PIECE HERE: ---------------------------------------------------------- SWEATER - SHORT OVERVIEW OF THE PIECE: Worked back and forth in several pieces and sewn together when finished. Work sleeves in the round on double pointed needles/a short circular needle. FRONT PIECE: RIGHT SHOULDER: Cast on 33-35-39-43-45-49 stitches (including 1 edge stitch in each side) on circular needle size 5.5 mm = US 9 with 1 strand Alpaca and 1 strand Brushed Alpaca Silk (= 2 strands). Purl 1 row from wrong side. Work next row as follows from right side: Work 1 stitch in garter stitch, A.1a (= 3 stitches), repeat A.1b until 1 stitch remains (= 14-15-17-19-20-22 repetitions of 2 stitches), and finish with 1 stitch in garter stitch. When 2 rows have been worked, continue this pattern AT THE SAME TIME on next row work short rows as follows, begin from right side: Work over the first 25-27-31-31-35-37 stitches, turn, tighten yarn and work back from wrong side. Work over the first 17-19-21-21-23-25 stitches, turn, tighten yarn and work back from wrong side. Work over the first 9-9-11-11-11-13 stitches, turn, tighten yarn and work back from wrong side. Then work over all the 33-35-39-43-45-49 stitches - REMEMBER THE KNITTING GAUGE! When piece measures 17-18-19-20-21-22 cm = 6¾"-7"-7½"-8"-8¼"-8¾" along the shortest side, i.e. towards the neck (= approx. 19-20-21-22-23-24 cm = 7½"-8"-8¼"-8¾"-9"-9½" towards armhole), finish after row from wrong side. Cut the yarn. Put piece aside and work the left shoulder. LEFT SHOULDER: Cast on 33-35-39-43-45-49 stitches (including 1 edge stitch in each side) on circular needle size 5.5 mm = US 9 with 1 strand Alpaca and 1 strand Brushed Alpaca Silk (= 2 strands). Purl 1 row from wrong side. Work next row as follows from right side: Work 1 stitch in garter stitch, A.1a (= 3 stitches), work A.1b until 1 stitch remains (= 14-15-17-19-20-22 repetitions of 2 stitches), and finish with 1 stitch in garter stitch. When 3 rows have been worked, continue this pattern AT THE SAME TIME on next row work short rows as follows, begin from wrong side: Work over the first 25-27-31-31-35-37 stitches, turn, tighten yarn and work back from right side. Work over the first 17-19-21-21-23-25 stitches, turn, tighten yarn and work back from right side. Work over the first 9-9-11-11-11-13 stitches, turn, tighten yarn and work back from right side. Then work over all the 33-35-39-43-45-49 stitches. When piece measures 17-18-19-20-21-22 cm = 6¾"-7"-7½"-8"-8¼"-8¾" along the shortest side, i.e. towards the neck (= approx. 19-20-21-22-23-24 cm = 7½"-8"-8¼"-8¾"-9"-9½" towards armhole) - adjust according to right shoulder, finish after row from wrong side. Cut the yarn. FRONT PIECE: Slip right shoulder on to same circular needle size 5.5 mm = US 9 as left shoulder – make sure that the short rows are in each side of piece and that the shortest sides are against the neck = 66-70-78-86-90-98 stitches. Now work right shoulder together with left shoulder as follows - from right side: Cast on 4-4-4-4-6-6 new stitches on needle for armhole, work A.1b over the next 32-34-38-42-44-48 stitches (= 16-17-19-21-22-24 repetitions of 2 stitches), work 1 stitch in garter stitch, (= right shoulder), cast on 5 new stitches on needle (= middle piece), continue over left shoulder as follows: Work A.1b over the first 32-34-38-42-44-48 stitches (= 16-17-19-21-22-24 repetitions of 2 stitches), work 1 stitch in garter stitch and finish by casting on 4-4-4-4-6-6 new stitches on needle for armhole (= left shoulder) = 79-83-91-99-107-115 stitches. Work row back from wrong side. Then work as follows from right side: Work 1 stitch in garter stitch, work A.2a over the next 2 stitches, work A.2b over the next 24-26-30-34-38-42 stitches (= 12-13-15-17-19-21 repetitions of 2 stitches), work A.2c over the next 9 stitches, work A.3 over the next 7 stitches (= middle piece) work A.4a over the next 9 stitches, work A.4b over the next 24-26-30-34-38-42 stitches (= 12-13-15-17-19-21 repetitions of 2 stitches), work A.4c over the next 2 stitches and finish with 1 stitch in garter stitch. When A.2 and A.4 have been worked vertically, 4 stitches have been increased in total = 83-87-95-103-111-119 stitches on needle. Repeat this pattern, every time A.2 to A.4 have been worked 1 time vertically, work 1 repetition more of A.2b and A.4b in width. Work until piece measures 39-40-41-42-43-44 cm = 15¼"-15¾"-16⅛"-16½"-17"-17¼" straight up from middle piece, loosely bind off with knit over knit and purl over purl from right side. BACK PIECE: RIGHT SHOULDER: Cast on 33-35-39-43-45-49 stitches (including 1 edge stitch in each side) on circular needle size 5.5 mm = US 9 with 1 strand Alpaca and 1 strand Brushed Alpaca Silk (= 2 strands). Purl 1 row from wrong side. Work next row as follows from right side: Work 1 stitch in garter stitch, work A.1b over the remaining stitches (= 16-17-19-21-22-24 repetitions of 2 stitches). When 3 rows have been worked, continue this pattern AT THE SAME TIME on next row work short rows as follows, begin from wrong side: Work over the first 25-27-31-31-35-37 stitches, turn, tighten yarn and work back from right side. Work over the first 17-19-21-21-23-25 stitches, turn, tighten yarn and work back from right side. Work over the first 9-9-11-11-11-13 stitches, turn, tighten yarn and work back from right side. Work over all the 33-35-39-43-45-49 stitches, turn and work back from right side. Cut the yarn. Put piece aside and work the left shoulder. LEFT SHOULDER: Cast on 33-35-39-43-45-49 stitches (including 1 edge stitch in each side) on circular needle size 5.5 mm = US 9 with 1 strand Alpaca and 1 strand Brushed Alpaca Silk (= 2 strands). Purl 1 row from wrong side. Work next row as follows - from right side: Work A.1b until 1 stitch remains (= 16-17-19-21-22-24 repetitions of 2 stitches) and finish with 1 stitch in garter stitch. When 2 rows have been worked, continue this pattern AT THE SAME TIME on next row work short rows as follows, begin from right side: Work over the first 25-27-31-31-35-37 stitches, turn, tighten yarn and work back from wrong side. Work over the first 17-19-21-21-23-25 stitches, turn, tighten yarn and work back from wrong side. Work over the first 9-9-11-11-11-13 stitches, turn, tighten yarn and work back from wrong side. Work over all the 33-35-39-43-45-49 stitches, turn and work back from wrong side. Do not cut the yarns! BACK PIECE: Slip right shoulder on to same circular needle size 5.5 mm = US 9 as left shoulder – make sure that the short rows in each side of piece and that the shortest sides are against the neck = 66-70-78-86-90-98 stitches. Now work left shoulder together with right shoulder as follows - from right side: Work A.1b until 1 stitch remains on left shoulder (= 16-17-19-21-22-24 repetitions of 2 stitches), work 1 stitch in garter stitch, cast on 17-17-17-19-19-19 new stitch on needle (= neck), work A.1b until 1 stitch remains on right shoulder (= 16-17-19-21-22-24 repetitions of 2 stitches) and finish with 1 stitch in garter stitch. On next row work the new stitches in pattern. Continue this pattern, at the same time decrease 1 stitch in each side on next row from right side - read DECREASE TIP. Decrease like this every 6th row 1-1-2-2-4-4 times in total, then every 4th row 5-4-4-5-3-3 times in total = 71-77-83-91-95-103 stitches on needle. When piece measures 19-20-21-22-23-24 cm = 7½"-8"-8¼"-8¾"-9"-9½" along one armhole, cast on 4-4-4-4-6-6 new stitches at the end of the next 2 rows for armholes = 79-85-91-99-107-115 stitches. Continue pattern as before over all stitches. When piece measures 3 cm = 1⅛", increase 1 stitch in each side - read INCREASE TIP. Increase like this every 6-5½-6-6-9-12 cm = 2⅜"-2⅛"-2⅜"-2⅜"-3½"-4¾" 7-8-7-7-5-4 times in total = 93-101-105-113-117-123 stitches. Work until piece measures 62-64-66-68-70-72 cm = 24⅜"-25¼"-26"-26¾"-27½"-28⅜" from shoulder (towards the neck) and down. Bind off stitches with knit over knit and purl over purl. SLEEVE: Cast on 32-34-36-36-38-40 stitches on double pointed needles size 5.5 mm = US 9 with 1 strand Alpaca + 1 strand Brushed Alpaca Silk (= 2 strands). Work A.1b (= 2 stitches) the entire round. Work 4 rounds in total. Insert 1 marker at beginning of round = mid under sleeve. Then work in stockinette stitch in the round - REMEMBER THE KNITTING GAUGE! When piece measures 8-9-8-8-8-9 cm = 3⅛"-3½"-3⅛"-3⅛"-3⅛"-3½", increase 2 stitches mid under sleeve - READ INCREASE TIP above. Increase like this every 3-2½-2½-2-2-1½ cm = 1⅛"-1"-1"-¾"-¾"-½" 12-13-13-15-15-16 times in total = 56-60-62-66-68-72 stitches. Continue with stockinette stitch without increases until piece measures 42-41-40-37-36-34 cm = 16½"-16⅛"-15¾"-14½"-14¼"-13⅜" (shorter measurements in the larger sizes because of wider shoulders and longer sleeve cap). The piece is now split at the marker mid under sleeve and worked back and forth until finished measurements. Insert 1 marker in each side, markers mark where sleeve should be sewn into armhole. Work back and forth until piece measures 45-44-43-41-39-38 cm = 17¾"-17¼"-17"-16⅛"-15¼"-15". Then loosely bind off stitches with knit over knit and purl over purl. Work the other sleeve the same way. ASSEMBLY: Sew shoulder seams inside cast-on edge. Sew side seams inside 1 edge stitch. Sew in sleeves inside 1 edge stitch in each side on front and back piece. Marks on sleeves should fit bottom of armhole. |
||||||||||||||||
Diagram explanations |
||||||||||||||||
|
||||||||||||||||
 |
||||||||||||||||
 |
||||||||||||||||
 |
||||||||||||||||
Have you finished this pattern?Tag your pictures with #dropspattern #freedomfoundsweater or submit them to the #dropsfan gallery. Do you need help with this pattern?You'll find 25 tutorial videos, a Comments/Questions area and more by visiting the pattern on garnstudio.com. © 1982-2026 DROPS Design A/S. We reserve all rights. This document, including all its sub-sections, has copyrights. Read more about what you can do with our patterns at the bottom of each pattern on our site. |
||||||||||||||||


With over 40 years in knitting and crochet design, DROPS Design offers one of the most extensive collections of free patterns on the internet - translated to 17 languages. As of today we count 324 catalogs and 12245 patterns - 12235 of which are translated into English (US/in).
We work hard to bring you the best knitting and crochet have to offer, inspiration and advice as well as great quality yarns at incredible prices! Would you like to use our patterns for other than personal use? You can read what you are allowed to do in the Copyright text at the bottom of all our patterns. Happy crafting!
Post a comment to pattern DROPS 201-23
We would love to hear what you have to say about this pattern!
If you want to leave a question, please make sure you select the correct category in the form below, to speed up the answering process. Required fields are marked *.