
Popular categories
Looking for a yarn?


Comments / Questions (25)
![]() Christine Sherriffs wrote:
Christine Sherriffs wrote:
So sleeve cap decrease. S/b dec 2 stitches at each end of row 3 times and 1 stitch at each end 5 times I’m sorry to be a pain and I truly appreciate your responses.
03.03.2020 - 17:23DROPS Design answered:
Dear Mrs Sherriffs, if you are working 1st size you will cast off: 2 stitches at the beg of next 6 rows (= 2 sts 3 times on each side), then 1 stitch at the beg of next 10 rows (= 1 st 5 times on each side) then cast off 2 stitches at the beg of every row until sleeve measures 54 cm (number of times will depend on your tension in height, just make sure you cast off the same number of times from RS + from WS). Then cast off remaining stitches. Hope this helps :) Happy knitting!
04.03.2020 - 08:42
![]() Christine Sherriffs wrote:
Christine Sherriffs wrote:
So really then, the decreases are done at the beginning and end of each row , correct?
03.03.2020 - 16:18DROPS Design answered:
Hi Christine, Yes the decreases are at the beginning and end of each decrease-row. Happy knitting!
04.03.2020 - 08:19
![]() Christine Sherriffs wrote:
Christine Sherriffs wrote:
So in reading the other comments when doing the sleeve cap decrease it is suppose to be done every row, not every other row as is written in the pattern? I’m so sadly confused.
03.03.2020 - 03:19DROPS Design answered:
Dear Mrs Sherrifs, you will decrease at the beginning of every row (= both from RS and from WS), this means you will cast off on each side every other row. Happy knitting!
03.03.2020 - 09:56
![]() Christine Sherriffs wrote:
Christine Sherriffs wrote:
Hello. I am working on the sleeve decrease. For size small. Where it says dec 1 stitch 5 times is this done on either end every row or 1 stitch 5 times every other row? Thank you.
02.03.2020 - 19:15DROPS Design answered:
Hi Christine, Each decrease is at both ends of the row, so 1 stitch at each end x 5 (10 stitches decreased). Happy knitting!
03.03.2020 - 09:26
![]() Jan wrote:
Jan wrote:
Hi, I am going to make your cute sweater 69-21. I am reading the pattern instructions and cannot understand the 5 stitches that you put onto a stitch holder and what you do with them later during assembly. It says to knit in garter for 7+ inches and sew them to the body. I seem to be missing something. Do you have anymore detailed instructions for the assembly of the sweater. Thank you for your help.
28.02.2020 - 22:44DROPS Design answered:
Dear Jan, these stitches are first slip aside then worked back in garter stitch then sewn to the back/front piece for the edge. They are worked separately since tension is different in garter stitch and in pattern and that way your edge over these 5 stitches will be nicer. Happy knitting!
02.03.2020 - 09:04
![]() Marisa Flores wrote:
Marisa Flores wrote:
Hola!! El sombrero tiene en la parte superior un borde sobresaliente que no lo veo explicado, o no lo entiendo. También dice que aumente "hasta que la labor mida 9.5-10.5 cm desde el anillo" y luego "continuar hasta que la circunferencia sea de aprox 55-57 cm". No entiendo por qué hace llegar hasta 9.5 - 10.5 para después decir que siga igual hasta 55. Hay que hacer algo al llegar a 9.5-10.5? porque me queda una circunferencia de 55 y no tiene la misma forma que la foto
04.01.2019 - 22:04DROPS Design answered:
Hola Marisa. En el patrón dan dos medidas ( el largo de la labor desde el inicio y la circunferencia del gorro) que se mantienen siempre y cuando estés trabajando con la misma tensión del tejido que el patrón. Puede ser que alcances el largo de la labor pero no tengas la circunferencia del gorro necesaria. En este caso tienes que continuar con los aumentos. Al llegar a la medida de la circunferencia del gorro continúa sin aumentos.
17.10.2019 - 18:51
![]() Gudrun wrote:
Gudrun wrote:
Hej. Jag kan inte hitta beskrivningen till den snygga hatten.
06.12.2018 - 20:09DROPS Design answered:
Hei Gudrun. Her har tallene byttet plasse, hatten finner du på 69-10 her. Vi skal få rettet dette. God fornøyelse.
07.12.2018 - 10:11
![]() DROPS Design wrote:
DROPS Design wrote:
For Mrs Bowen: For sleeve cap, bind off at the beg of every row on each side: 2 sts 3-2 times, 1 st 5-11 times then cast off 2 sts at the beg of each row until piece measures 54-55 cm (depending on your tension you will have to work more or less rows, the number of sts cast off will depend on your tension in height, just make sure you cast off the same number of sts on each side and cast off the remaining sts. Happy knitting!
17.04.2018 - 09:03
![]() Jackie Bowen wrote:
Jackie Bowen wrote:
It says Drops 69-21 at the top; refer to my previous email sent; i’m hving trouble with the section after sleeve increases; the middle section on increasing leading to neckline and neckline—front says bo 12 while back says 22. Need # if sts we shld hv on each side after all decreases r done
16.04.2018 - 18:59DROPS Design answered:
Dear Mrs Bowen, for front piece, cast off for neck the middle 12 sts and continue each side separately casting off at the beg of each row from neck 2 sts 1 time and 1 st 5 times = 15 sts remain for shoulder. On back piece, cast off the middle 22 sts for neck and then continue each side separately casting off 2 sts at the beg of next row from neck = 15 sts remain. (to be continued under "comments").
17.04.2018 - 09:02
![]() Jackie Bowen wrote:
Jackie Bowen wrote:
I don’t understand these instructions: does not tell how many sts u end up with and do the decreases go every other row then u multiply the number of sts times the number given fir hiw many times? It’s confusing to me to follow as written
16.04.2018 - 00:47DROPS Design answered:
Dear Mrs Bowen, can you please let us know more? which size are you working, for which piece do you need help? Remember you can get any individual assistance from the store where you bought your yarn, even per mail or telephone. Happy knitting!
16.04.2018 - 10:04
|
|
DROPS 69-21 |
|
|
|
|
DROPS Pullover in Ribbon. Crocheted hat in Muskat.
DROPS 69-21 |
|
|
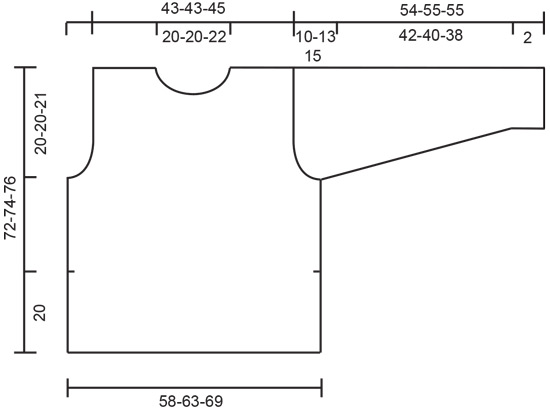
Gauge: 13 sts x 22 rows in pattern = 10 x 10 cm [4" x 4"]. Pattern: Row 1 (right side): P Row 2 (wrong side): * P 1, yo *, repeat from * - *. Row 3: * K 1, let yo from previous row drop *, repeat from * - *. Row 4: K Row 5: * K 1, yo *, repeat from * - *. Row 6: * P 1, let yo from previous row drop *, repeat from * - *. Repeat rows 1 - 6. Garter st, when knitting flat: Knit all sts, all rows. Garter st, when knitting in the round: *Rnd 1, knit. Rnd 2, purl.* Repeat from * - *. Knitting tip: Ribbon has a tendency to twist when knit. For best results, untwist the yarn as you go along. NOTE: All measurements in the pattern refer to the garment measured when held up or worn. This is because the pattern pulls in and lengthens. Front: Cast on 76-82-90 sts on smaller needles and knit 6 rows garter st. Put 5 sts at each side on a st holder (these 5 sts will be knit in garter st and sewn to Body afterwards) = 66-72-80 sts on needles. Continue with pattern - see instructions above. When the piece measures approx. 20 cm [7⅞"] cast on 6 sts at each side = 78-84-92 sts. Continue pattern over all sts. When the piece measures 52-54-55 cm [20.5" - 21.25" - 21⅝"] bind off for armhole at each side every other row: 3 sts 1-1-1 time, 2 sts 2-4-5 times, 1 st 4-3-4 times = 56-56-58 sts. When the piece measures 65-66-67 cm [25⅝" - 26" - 26⅜"] bind off the center 12 sts for the neck. Then bind off at each neck edge every other row: 2 sts 1-1-1 time and 1 st 5-5-6 times. When the piece measures 71-73-75 cm [28" - 28.75" - 29.5"] knit 2 rows garter st over all sts and then bind off all sts. The piece measures approx. 72-74-76 cm [28.25" - 29⅛" - 29⅞"]. Back: Cast on and knit the same as the front. Bind off for armhole as on front and continue until the piece measures 70-72-74 cm [ 27⅝" - 28.25" - 20⅛"]. Bind off the center 22-22-24 sts for the neck. On the next row bind off 2 sts at each neck edge. Knit 2 rows garter st when the piece measures 71-73-75 cm [28" - 28.75" - 29.5"] and then bind off remaining 15 sts on each shoulder. The piece measures approx. 72-74-76 cm [28.25" - 29⅛" - 29⅞"]. Sleeve: Cast on 30-32-34 sts. Knit 6 rows garter st, then change to pattern. When the piece measures 9 cm [3.5"] inc 1 st at each side 11-10-10 times every 3 cm [1.25"] = 52-52-54 sts. When sleeve measures 44-42-40 cm [17.25" - 16.5" - 15.75"] bind off for sleeve cap at each side every other row: 2 sts 3-2-1 times, 1 st 5-11-14 times, then bind off 2 sts at each side every other row until the piece measures 54-55-55 cm [21.25" - 21⅝" - 21⅝"]. Bind off the remaining sts. Assembly: Put the 5 sts from st holders on each side on needles. Knit garter st over all sts for approx. 20 cm [7⅞"] (match length of side slit), bind off. Sew garter st band to Body. Sew right shoulder. Pick up approx. 75 to 80 sts around the neck. Knit 4 rows garter st, bind off. Sew left shoulder and up along neckband. Sew in sleeves. Sew sleeve and side seams using edge sts as seam allowance – begin side seams above side slit. CROCHETED HAT IN MUSKAT: Sizes: S/M - M/L Head measurement: 55 - 57 cm [21⅝" - 22.5"] Materials: Garnstudio MUSKAT from Garnstudio 100% mercerized Egyptian cotton, 50 g./100 m./109 yards 200-200 g. col. no. 61, light beige. DROPS 3 mm [US C] crochet hook, or size needed to obtain correct gauge. Crochet gauge: 21 sc x 24 rows = 10 x 10 cm [4" x 4"] Reverse crochet: Crochet sc on right side of work, from left to right without turning work. Crochet 1 sc in every sc from previous row. Hat: Ch 4 and join into a ring with 1 sl st. Ch 1, 6 sc in the ring, ch 1 to turn. 1st row: 2 sc in every sc from previous row = 12 sc, put a marker at start of row. 2nd row: * 1 sc in first sc, 2 sc in the next sc *, repeat from * - * = 18 sc. 3rd row: * 1 sc in the first 2 sc , 2 sc in the next sc *, repeat from * - * = 24 sc. 4th row: * 1 sc in the first 3 sc, 2 sc in the next sc *, repeat from * - * = 30 sc. 5th row: * 1 sc in the first 4 sc, 2 sc in the next sc *, repeat from * - * = 36 sc. Continue in this manner, increasing 6 sc per row - work 1 sc more between each inc on successive rows - until the piece measures 9.5-10.5 cm [3.75" - 4⅛"] from ring (the circumference will inc approx. 2 cm [0.75"] every row - continue until circumference = approx. 55-57 cm [21⅝" - 22.5"]). Then continue with sc without increasing until piece measures approx. 19-20 cm [7.5" - 7⅞"] from center. On the next row inc as follows: * 2 sc, 2 sc in the next sc *, repeat from * *. Then work 22 rows without increasing =hat brim. Work 1 row reverse crochet around edge - see instructions above. Cut yarn and fasten off. Assembly: Make a small double edge (= rolled edge) on the outside of hat at the top as follows: with right side out, at the point you stop increasing make a fold and work a row of sc over the 2 layers. Crochet over 2 rows of sc each side of fold, so that 4 rows sc are worked into the rolled edge. Fold hat brim (the last 22 rows) double to the right side. Attach edge to hat over 2 rows of sc in the same manner as the rolled edge. |
|
 |
|
Have you finished this pattern?Tag your pictures with #dropspattern or submit them to the #dropsfan gallery. Do you need help with this pattern?You'll find 21 tutorial videos, a Comments/Questions area and more by visiting the pattern on garnstudio.com. © 1982-2026 DROPS Design A/S. We reserve all rights. This document, including all its sub-sections, has copyrights. Read more about what you can do with our patterns at the bottom of each pattern on our site. |


With over 40 years in knitting and crochet design, DROPS Design offers one of the most extensive collections of free patterns on the internet - translated to 17 languages. As of today we count 325 catalogs and 12298 patterns - 12288 of which are translated into English (US/in).
We work hard to bring you the best knitting and crochet have to offer, inspiration and advice as well as great quality yarns at incredible prices! Would you like to use our patterns for other than personal use? You can read what you are allowed to do in the Copyright text at the bottom of all our patterns. Happy crafting!
Post a comment to pattern DROPS 69-21
We would love to hear what you have to say about this pattern!
If you want to leave a question, please make sure you select the correct category in the form below, to speed up the answering process. Required fields are marked *.