
Popular categories
Looking for a yarn?


Comments / Questions (46)
![]() EGEaXkcKNt wrote:
EGEaXkcKNt wrote:
Buy ambien 10 mg of ambien erowid - ambien cr 7.5
31.12.2014 - 15:51
![]() YXEQcMouoE wrote:
YXEQcMouoE wrote:
Ambien no prescription do employers drug test ambien - what does ambien high feel like
31.12.2014 - 02:20
![]() FmSLuVIqNc wrote:
FmSLuVIqNc wrote:
Ambien pills ambien side effects yahoo - ambien cr side effects anger
30.12.2014 - 02:58
![]() Ulla wrote:
Ulla wrote:
Blue City
14.12.2014 - 11:33
![]() Johanna wrote:
Johanna wrote:
Dit zou ik het liefst nog voor de zomer af hebben.
12.12.2014 - 16:36
![]() Valerie wrote:
Valerie wrote:
Superbe. Je la mettrai bien tout de suite sur mes aiguilles. Le dessin est super sympa.
11.12.2014 - 15:53
|
|||||||||||||||||||
Water Diamonds#waterdiamondsjacket |
|||||||||||||||||||
 |
 |
||||||||||||||||||
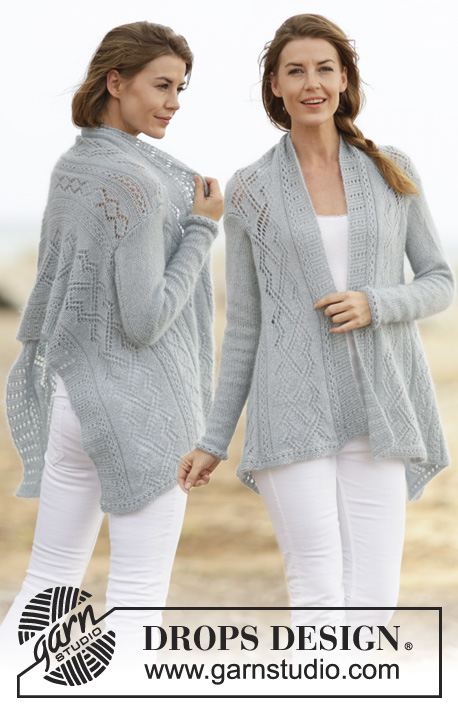
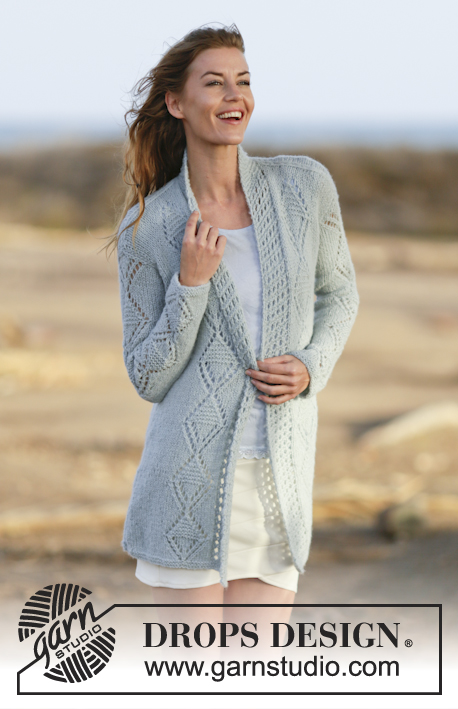
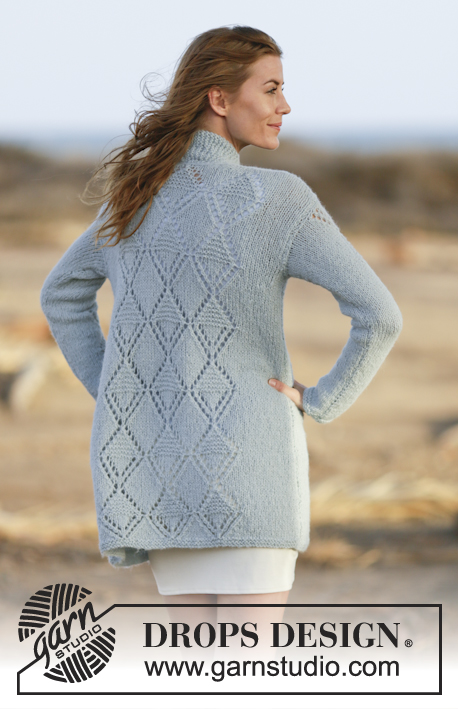
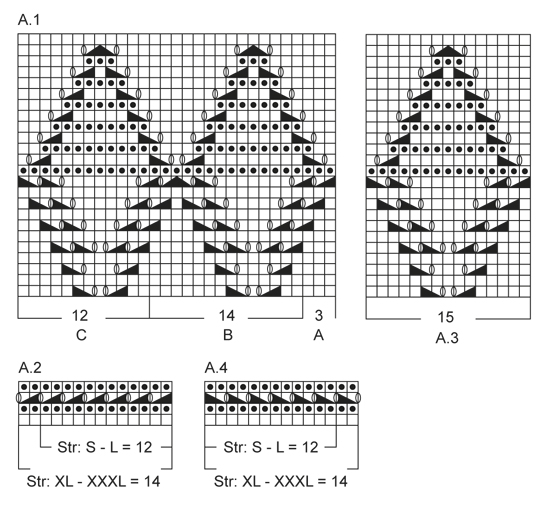
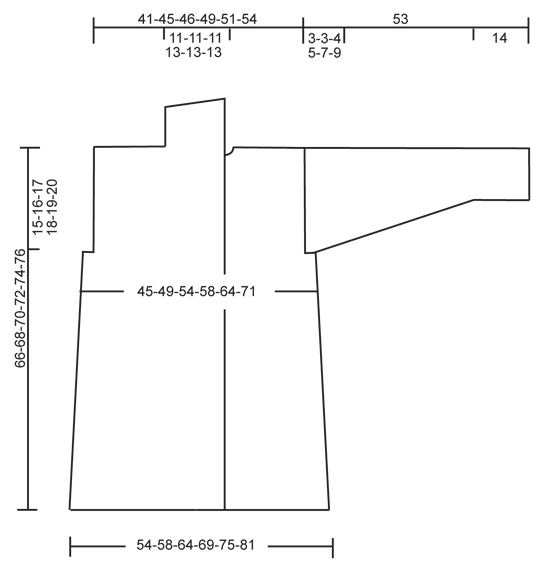
Knitted DROPS jacket with lace pattern and shawl collar in "Brushed Alpaca Silk" and "Alpaca". Size: S - XXXL.
DROPS 161-13 |
|||||||||||||||||||
|
GARTER ST (back and forth): K all rows. 1 ridge = K2 rows. PATTERN: See diagrams A.1 to A.4. The diagrams show all rows in pattern seen from RS. NOTE: Finish 3rd row in A.2 with YO, and beg 3rd row in A.4 with YO. DECREASE TIP: All dec are done from RS. Dec 1 st at beg of row as follows: 1 edge st in garter st, slip next st as if to K, K 1, psso. Dec 1 st at end of row as follows: Work until 3 sts remain on needle, K the next 2 sts tog, 1 edge st in garter st. INCREASE TIP: Inc 1 st by making 1 YO, on next row work YO twisted to avoid holes. ---------------------------------------------------------- BACK PIECE: Worked back and forth on circular needle. Cast on 77-83-91-99-107-115 sts (includes 1 edge st in each side) on circular needle size 5 mm / US 8 with 1 strand Brushed Alpaca Silk + 1 strand Alpaca (= 2 strands). Work 2 ridges in GARTER ST - see explanation above. Switch to circular needle size 6 mm / US 10. Work as follows from RS: 1 edge st in garter st, 16-19-23-27-31-35 sts in stockinette st, A.1A (= 3 sts), A.1B over the next 28 sts, A.1C (= 12 sts), 16-19-23-27-31-35 sts in stockinette st, 1 edge st in garter st. REMEMBER THE KNITTING GAUGE Continue the pattern like this - AT THE SAME TIME when piece measures 7 cm / 2¾", dec 1 st inside 1 edge st in each side - READ DECREASE TIP. Repeat dec in each side every 8-8½-7-6-6½-6½ cm / 3"-3¼"-2¾"-2⅜"-2½"-2½" - 5-5-6-7-7-6 more times = 65-71-77-83-91-101 sts. When piece measures 51-52-53-54-55-56 cm / 20"-20½"-21"-21¼"-21⅝"-22" – adjust according to 10th or last row in A.1 insert 1 marker in each side (markers are needed for adjustment of pattern and for assembly). Bind off 4-4-6-7-10-13 sts for armholes at beg of the next 2 rows = 57-63-65-69-71-75 sts. When 24 rows have been worked from marker, continue in stockinette st over all sts – AT THE SAME TIME when piece measures 13-14-15-16-17-18 cm / 5⅛"-5½"-6"-6¼"-6¾"-7" from marker (piece measures approx. 64-66-68-70-72-74 cm / 25¼"-26"-26¾"-27½"-28⅜"-29⅛"), bind off the middle 13-13-13-15-15-15 sts for neck and finish each shoulder separately. Bind off 1 st on next row towards the neck = 21-24-25-26-27-29 sts remain on each shoulder. Bind off when piece measures 15-16-17-18-19-20 cm / 6"-6¼"-6¾"-7"-7½"-8" / 6"-6¼"-6¾"-7"-7½"-8" from marker (piece measures approx. 66-68-70-72-74-76 cm / 26"-26¾"-27½"-28⅜"-29⅛"-30"). RIGHT FRONT PIECE: Worked back and forth on circular needle. Cast on 43-46-50-55-59-63 sts (includes 12-12-12-14-14-14 band sts and 1 edge st) on circular needle size 5 mm / US 8 with 1 strand Brushed Alpaca Silk + 1 strand Alpaca (= 2 strands). Work 2 ridges. Switch to circular needle size 6 mm / US 10. Work as follows from RS: A.2 (= 12-12-12-14-14-14 band sts), 1 st in stockinette st, A.3 (= 15 sts), 14-17-21-24-28-32 sts in stockinette st, 1 edge st in garter st. Continue the pattern like this - AT THE SAME TIME when piece measures 7 cm / 2¾", dec 1 st inside 1 edge st in the side. Repeat dec in the side every 8-8½-7-6-6½-6½ cm / 3"-3¼"-2¾"-2⅜"-2½"-2½" 5-5-6-7-7-6 more times = 37-40-43-47-51-56 sts. When piece measures 51-52-53-54-55-56 cm / 20"-20½"-21"-21¼"-21⅝"-22" – adjust according to back piece – insert a marker in the side (marker is needed for adjustment of pattern and for assembly). Bind off 4-4-6-7-10-13 sts for armhole at beg of next row from WS = 33-36-37-40-41-43 sts. When 24 rows have been worked from marker, continue in stockinette st over A.3. When piece measures 15-16-17-18-19-20 cm / 6"-6¼"-6¾"-7"-7½"-8" from marker - adjust according to back piece and so that next row is from WS, bind off the first 21-24-25-26-27-29 sts (= shoulder), work the rest of row = 12-12-12-14-14-14 sts. Work in garter st over these sts for shawl collar - AT THE SAME TIME work short rows, beg from the neck (1st row = RS) as follows: * Work 1 ridge over all sts. On next row from RS K 8-8-8-10-10-10, turn and K back *, repeat from *-* until piece measures approx. 8-8-8-9-9-9 cm / 3"-3"-3"-3½"-3½"-3½" from bound off for shoulder (short side). Loosely bind off all sts. LEFT FRONT PIECE: Cast on and work the same way as on right front piece but reversed - work A.4 (= 12-12-12-14-14-14 band sts) instead of A.2. Beg short rows on shawl collar from WS. SLEEVE: Worked back and forth on circular needle. Cast on 33-35-35-37-39-39 sts (includes 1 edge st in each side) on circular needle size 5 mm / US 8 with 1 strand Brushed Alpaca Silk + 1 strand Alpaca (= 2 strands). Work 2 ridges. Switch to circular needle size 6 mm / US 10 and work next row from RS as follows: 1 edge st in garter st, 8-9-9-10-11-11 sts in stockinette st, A.3 (= 15 sts), 8-9-9-10-11-11 sts in stockinette st, 1 edge st in garter st. Continue the pattern like this - AT THE SAME TIME when piece measures 14 cm / 5½", inc 1 st inside 1 edge st in each side - READ INCREASE TIP. Repeat inc in each side every 7-7-5½-4½-4½-3 cm / 2¾"-2¾"-2¼"-1¾"-1¾"-1" 5-5-6-7-7-9 more times = 45-47-49-53-55-59 sts. When piece measures 50-50-49-48-46-44 cm / 19¾"-19¾"-19 ¼"-19"-18"-17¼", insert 1 marker in each side (these markers are needed for assembly). Bind off when piece measures approx. 53 cm / 21". ASSEMBLY: Sew shoulder seams and sew in sleeves in outer loops of edge sts (make sure that markers on sleeve meet markers on front and back piece). Sew sleeve and side seams in one inside 1 edge st. Sew band tog mid back for collar. Sew collar to neck line. |
|||||||||||||||||||
Diagram explanations |
|||||||||||||||||||
|
|||||||||||||||||||
 |
|||||||||||||||||||
 |
|||||||||||||||||||
Have you finished this pattern?Tag your pictures with #dropspattern #waterdiamondsjacket or submit them to the #dropsfan gallery. Do you need help with this pattern?You'll find 23 tutorial videos, a Comments/Questions area and more by visiting the pattern on garnstudio.com. © 1982-2026 DROPS Design A/S. We reserve all rights. This document, including all its sub-sections, has copyrights. Read more about what you can do with our patterns at the bottom of each pattern on our site. |
|||||||||||||||||||


With over 40 years in knitting and crochet design, DROPS Design offers one of the most extensive collections of free patterns on the internet - translated to 17 languages. As of today we count 324 catalogs and 12272 patterns - 12262 of which are translated into English (US/in).
We work hard to bring you the best knitting and crochet have to offer, inspiration and advice as well as great quality yarns at incredible prices! Would you like to use our patterns for other than personal use? You can read what you are allowed to do in the Copyright text at the bottom of all our patterns. Happy crafting!
Post a comment to pattern DROPS 161-13
We would love to hear what you have to say about this pattern!
If you want to leave a question, please make sure you select the correct category in the form below, to speed up the answering process. Required fields are marked *.