
Popular categories
Looking for a yarn?


Comments / Questions (38)
![]() Kaytea wrote:
Kaytea wrote:
I want to make this pattern but id life to change the needle size. I can't find the gauge anywhere on the pattern though. How many stiches per inch does this one come out to?
10.04.2026 - 02:28DROPS Design answered:
Dear Kaytea, you will find the gauge under tab "Pattern" on top of the pattern page, together with sizes, finished measurments, yarn required for each size and buttons. Happy knitting!
10.04.2026 - 09:21
![]() Jara wrote:
Jara wrote:
Hallo, bei "Passe" steht, dass man in Größe S 27 Maschen für ein Vorderteil strickt, dann 33 M für einen Ärmel stilllegt (+ 7 neue M), 43 M für das Rückenteil strickt. Aber so würden bei mir nur 29 M für einen Ärmel bleiben. Wenn 1 M glatt re vor und nach den Ärmeln dazukommen sollen (wie es weiter oben bei "Passe" steht), dann wären es aber nur 26 M für ein Vorderteil und 41 M für das Rückenteil und 31 M für einen Ärmel (+ 7 neue Maschen). Wie soll man stricken? Vielen Dank
17.11.2025 - 15:15DROPS Design answered:
Liebe Jara, in Gr. S haben Sie anfangs pro Vorderteil 16 M, 11 M pro Ärmel (1 + 9 + 1, die Raglan-M werden mit zu den Ärmeln gerechnet) und 21 M für das Rückenteil. Sie nehmen insgesamt 11 x in der Höhe als Raglanzunahmen zu, d.h. Sie nehmen an jedem Vorderteil insgesamt 11 M zu, an jedem Ärmel nehmen Sie insgesamt 22 M zu (= an beiden Seiten des Ärmels je 11 M) und am Rückenteil nehmen Sie insgesamt 22 M zu (= an beiden Seiten des Rückenteils je 11 M). Also ergibt das diese Maschenzahlen: 27 M pro Vorderteil (16 + 11), 33 M pro Ärmel (11 + 22) und 43 M für das Rückenteil (21 + 22) = 163 M insgesamt. Vermutlich haben Sie eine Raglanzunahme zu wenig gemacht? Gutes Gelingen!
17.11.2025 - 23:12
![]() Kerstin wrote:
Kerstin wrote:
Liebes Drops-Team, zum Halbpatent-Rückreihe: Soll ich laut Anleitung den Umschlag und die abgehobene Masche wie eine linke Masche stricken? Also von rechts nach links abstricken? Und die einzelne Masche als rechte Masche? Dann würde ich auf der Hinrunde auf die Vorderseite des Strickstücks schauen, richtig? Viele Grüße, ich freue mich über eine Antwort :)
01.05.2025 - 16:01DROPS Design answered:
Liebe Kerstin, die Maschen werden bei den Hinreihen abgehoben (und damit 1 Umschlag bearbeitet) und bei den Rückreihen stricken Sie die abgehobenen Maschen links zusammen mit ihrem Umschlag. So wird die 1. Reihe eine Hinreihe und die 2. Reihe vom Halbpatent eine Rückreihe. Siehe auch dieses Video. Viel Spaß beim Stricken!
02.05.2025 - 08:22
![]() Jara wrote:
Jara wrote:
Hallo, in der Anleitung beim falschen Patentmuster steht, dass man den Umschlag und die abgehobene Masche links zusammenstricken soll. Unterhalb der Videoanleitung steht das zwar auch, aber im Video selbst werden Umschlag und abgehobene Masche rechts zusammengestrickt. Wie ist es richtig? Vielen Dank
09.03.2025 - 21:05DROPS Design answered:
Liebe Jara, beide sind richtig, das sind aber 2 etwas unterschiedliche Erklärungen, Videos sind nur da, um Ihnen zu helfen, aber das Muster sollen Sie wie in der Anleitung stricken. Viel Spaß beim Stricken!
10.03.2025 - 09:50
![]() Jara wrote:
Jara wrote:
Hallo, ich habe eine Frage zum Anfang der Passe. Wenn ich das richtig verstehe, ist die Anschlagsreihe eine Hin-Reihe, dann kommt eine Rück-Reihe mit rechten Maschen, dann kommt eine Hin-Reihe mit rechten Maschen (=KRAUSRIPPE inkl. Zunahme) und danach würde ja noch eine Rück-Reihe kommen. Davon steht aber nichts. Es steht, dass man bei der nächsten Hin-Reihe mit der Blende und dem falschen Patentmuster beginnen soll. Vielen Dank
09.03.2025 - 16:26DROPS Design answered:
Liebe Jara, nach Anschlag wird die 1. Reihe eine Hinreihe sein, so wird die 1. Reihe der Krausrippe eine Hinreihe und die 2. Reihe (mit den Zunahmen) ist dann eine Rückreihe. Die nächste Reihe = die 1. vom falschen Patentmuster ist dann eine Hin-Reihe. Viel Spaß beim Stricken!
10.03.2025 - 09:32
![]() Bailey wrote:
Bailey wrote:
Hello! In the body section after casting on for underarms, it says “P in the middle of the new 7sts under each sleeve” - does this mean to purl one stitch, and use false English rib on the three stitches before and after? Or are more than one “middle” stitches meant to be purled?
23.02.2023 - 18:57DROPS Design answered:
Dear Mrs Bailey, only one stitch will be purled: the one in the middle of the new 7 stitches cast on mid under sleeve. The remaining stitches on each side of this one will be worked in English rib as the other ones. Happy knitting!
24.02.2023 - 10:00
![]() Ann wrote:
Ann wrote:
Är det de udda varven (1, 3, 5 osv.) eller de jämna varven (2,4, 6 osv.) som utgör rätsida på oket? Med vänlig hälsning Ann
25.11.2022 - 13:40DROPS Design answered:
Hej Ann, du strikker 1.pind i falsk patent fra retsiden. Men du vælger naturligvis den side du synes er pænest :)
30.11.2022 - 14:00
![]() Ann wrote:
Ann wrote:
Är det de udda varven (1, 3, 5 osv.) eller de jämna varven (2,4, 6 osv.) som utgör rätsida på oket? Med vänlig hälsning Ann
24.11.2022 - 15:22DROPS Design answered:
Hei Ann. Etter at du har lagt opp og strikket 2 pinner retstrikk, starter du fra retten med patentstrikk. Så da blir 1. pinne retstrik og 1. pinne med patentstrikk fra retten (1,3.5 osv). mvh DROPS Design
28.11.2022 - 13:39
![]() Ann wrote:
Ann wrote:
Är det första varvet som man stickar rätsida eller avig sida ? Jag trodde att det första varvet alltid brukade vara avigsidan och att den räta sidan är på varv nr, 2, 4 , 6 o.s.v. I det här mönstret verkar det dock som om varv 1, 3, 5 o.s.v. är rätsidan för det står att man ska börja med patent på varv 3 och patenten börjar med ett varv på rätsidan. Är det korrekt uppfattat att de udda varven (dvs 1, 3, 5 osv) är på rätsidan i det här mönstret? / Ann
16.11.2022 - 19:06
![]() Ann wrote:
Ann wrote:
Hej. På det tredje varvet står det att man ska börja med falsk patent och att det då är rätsidan man börjar med den falska patenten på. Dock är ju varv nummer tre ett varv på avigsidan eftersom varv nummer ett efter uppläggning alltid är på avigsidan. Om man vill börja med falsk patent på rätsidan behöver man ju starta på varv nummer två eller varv nummer fyra. Ska man använda det som vanligtvis brukar betraktas som avigsida, dvs udda varv, som rätsida i det här mönstret?
29.10.2022 - 10:01
|
|
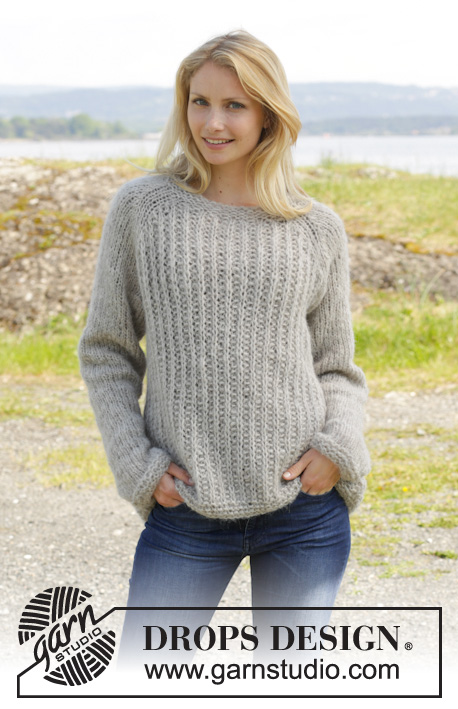
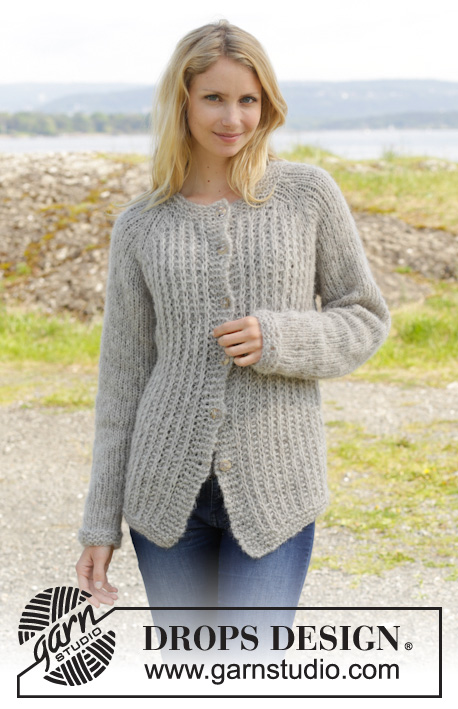
Lazy Afternoon Jacket#lazyafternoonjacket |
|
 |
 |
Knitted DROPS jacket with raglan and false English rib, worked top down in 2 strands ”Brushed Alpaca Silk”. Size S-XXXL
DROPS 157-19 |
|
|
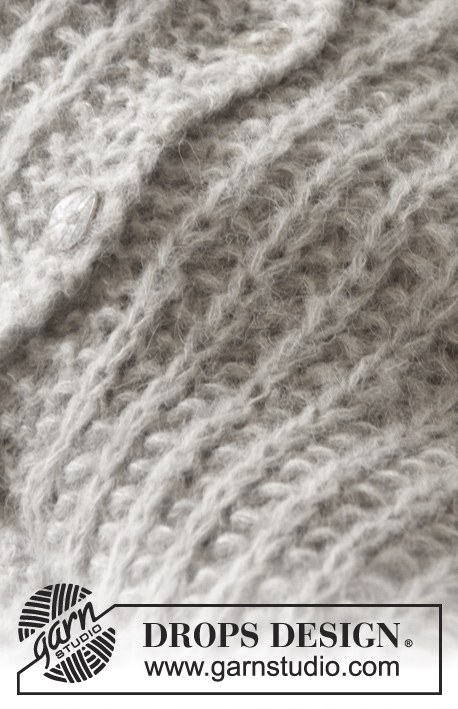
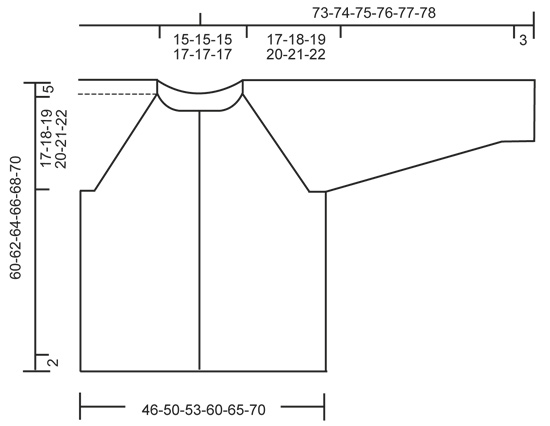
GARTER ST (back and forth on circular needle): K all rows. 1 ridge = K2 rows. GARTER ST (in the round on double pointed needles): * K 1 round and P 1 round *, repeat from *-*. 1 ridge = 2 rounds. FALSE ENGLISH RIB (back and forth on circular needle): ROW 1: * K1 st, 1 YO, slip 1 st as if to P *, repeat from *-* until 1 st remains, finish with K1 st. ROW 2: K1 st, * P tog YO and slipped st from previous row, K1 st *, repeat from *-*. Repeat 1st and 2nd row upwards. RAGLAN: Inc on each side of every marker as follows: Work until 1 st remains before marker, 1 YO, work 2 sts in stockinette st and 1 YO. Repeat at the remaining markers on round. On next round work YOs twisted (i.e. work in back loop of st instead of front) to avoid holes. DECREASE TIP (applies to sleeve): Dec as follows BEFORE st with marker in: Slip 1 st as if to K, K 1, psso. Dec as follows AFTER st with marker in: K 2 tog. BUTTONHOLES: Dec for buttonholes on right band. 1 buttonhole = K tog third and fourth st from edge and make 1 YO. Dec for buttonholes when piece measures (measured from cast-on edge): SIZE S: 1, 9, 17, 25, 33 and 41 cm / ⅜",3½",6¾",9¾",13",16" SIZE M: 1, 9, 17, 25, 33 and 41 cm / ⅜",3½",6¾",9¾",13",16" SIZE L: 1, 8, 15, 22, 29, 36 and 43 cm / ⅜"-3"-6",8¾",11½",14¼",17" SIZE XL: 1, 8, 15, 22, 29, 36 and 43 cm / ⅜"-3"-6",8¾",11½",14¼",17" SIZE XXL: 1, 8, 15, 22, 29, 36, 43 and 50 cm / ⅜"-3"-6",8¾",11½",14¼",17", 19¾" SIZE XXXL: 1, 8, 15, 22, 29, 36, 43 and 50 cm / ⅜"-3"-6",8¾",11½",14¼",17", 19¾" ---------------------------------------------------------- JACKET: Worked back and forth, top down on circular needle/double pointed needles. Pick up sts around the neck and work an edges in garter st at the end. YOKE: Cast on 65-65-65-69-69-69 sts with 2 strands Brushed Alpaca Silk on circular needle size 9 mm / US 13. Work 1 ridge in GARTER ST – see explanation above, AT THE SAME TIME on last row in ridge, inc 10-10-10-12-12-12 sts evenly = 75-75-75-81-81-81 sts. Then work as follows from RS: 5 band sts in garter st, 11-11-11-13-13-13 sts in FALSE ENGLISH RIB - see explanation above (= left front piece), 1 st in stockinette st, insert 1st marker here, 9 sts in stockinette st, insert 2nd marker here, 1 st in stockinette st (= sleeve), 21-21-21-23-23-23 sts in false English rib (= back piece), 1 st in stockinette st, insert 3rd marker here, 9 sts in stockinette st, insert 4th marker here, 1 st in stockinette st (= sleeve), 11-11-11-13-13-13 sts in false English rib, 5 band sts in garter st (= right front piece). Remember BUTTONHOLES - see explanation above. Continue like this AT THE SAME TIME on next row from RS beg inc for RAGLAN – see explanation above! Repeat inc every row from RS 5-7-10-13-18-22 more times, and every other row from RS 5-5-4-3-1-0 times = 163-179-195-217-241-265 sts. NOTE: Work the new inc sts on front and back piece in false English rib and work the new inc sts on sleeves in stockinette st. REMEMBER THE GAUGE! Piece measures 22-23-24-25-26-27 cm / 8¾"-9"-9½"-9¾"-10¼"-10⅝" from shoulder. Now work as follows from WS: Work the first 27-29-31-35-38-41 sts (= front piece), slip the next 33-37-41-45-51-57 sts on a stitch holder (= sleeve), cast on 7 new sts under sleeve, work the next 43-47-51-57-63-69 sts (= back piece), slip the next 33-37-41-45-51-57 sts on a stitch holder (= sleeve), cast on 7 new sts under sleeve, work the remaining 27-29-31-35-38-41 sts (= front piece). BODY: There are now 111-119-127-141-153-165 sts for body. Continue false English rib as before. P the middle of the 7 new sts under each sleeve, work the remaining new sts in false English rib. Continue like this until piece measures 35-36-37-38-39-40 cm / 13¾"-14¼"-14½"-15"-15¼"-15¾" from the new sts under sleeve. Now work 3 ridges before loosely binding off. SLEEVE: Slip the 33-37-41-45-51-57 sts back on double pointed needles. Work 1 row in stockinette st over all sts. Then cast on 7 sts at the end of row = 40-44-48-52-58-64 sts. Insert a marker in the middle of the new sts under the sleeve. NOW MEASURE THE PIECE FROM HERE. Then work the sleeve in stockinette st in the round. When piece measures 4 cm / 1½", beg dec for sleeve – READ DECREASE TIP. Repeat dec every 5½-5-4-3½-2½-2½ cm / 2¼"-2"-1½"-1¼"-⅞"-⅞" 6-7-9-10-13-15 more times = 26-28-28-30-30-32 sts. When piece measures 41-41-41-40-40-40 cm / 16"-16"-16"-15¾"-15¾"-15¾", work 3 ridges in GARTER ST in the round on double pointed needles - see explanation above! Loosely bind off. ASSEMBLY: Sew the holes under the sleeves. Sew the buttons on to the left band. NECK EDGE: Pick up 1 st in every st in ridge in the neck with 2 strands Brushed Alpaca Silk = 65-65-65-69-69-69 sts. Work 2 ridges and loosely bind off. |
|
 |
|
Have you finished this pattern?Tag your pictures with #dropspattern #lazyafternoonjacket or submit them to the #dropsfan gallery. Do you need help with this pattern?You'll find 22 tutorial videos, a Comments/Questions area and more by visiting the pattern on garnstudio.com. © 1982-2026 DROPS Design A/S. We reserve all rights. This document, including all its sub-sections, has copyrights. Read more about what you can do with our patterns at the bottom of each pattern on our site. |
|


With over 40 years in knitting and crochet design, DROPS Design offers one of the most extensive collections of free patterns on the internet - translated to 17 languages. As of today we count 324 catalogs and 12290 patterns - 12280 of which are translated into English (US/in).
We work hard to bring you the best knitting and crochet have to offer, inspiration and advice as well as great quality yarns at incredible prices! Would you like to use our patterns for other than personal use? You can read what you are allowed to do in the Copyright text at the bottom of all our patterns. Happy crafting!
Post a comment to pattern DROPS 157-19
We would love to hear what you have to say about this pattern!
If you want to leave a question, please make sure you select the correct category in the form below, to speed up the answering process. Required fields are marked *.