
Popular categories
Looking for a yarn?


Comments / Questions (47)
![]() Anita Ales wrote:
Anita Ales wrote:
Ik krijg het niet voor elkaar op de manier zoals aangegeven. Het wordt bij mij niet mooi. Misschien doe ik iets verkeerd maar als ik het doe zoals ik heb aangegeven krijg ik wel mooie kabels.
24.10.2014 - 10:19DROPS Design answered:
Wij kunnen vanaf hier niet beoordelen wat u dan verkeerd doet, maar onze tekening en de uitleg komt overeen met de foto. Wel fijn om te horen dat u er op uw manier goed uitkomt, succes met breien verder.
24.10.2014 - 11:50
![]() Anita wrote:
Anita wrote:
Er zit een foutje in A1. Het kabelen gaat niet goed als je breid zoals aangegeven. Wat voorlangs gekabeld staat moet achter langs gekabeld worden en omgekeerd.
19.10.2014 - 16:36DROPS Design answered:
We hebben het patroon gecontroleerd en het is correct. De kabels gaan zo de goede kant op.
21.10.2014 - 11:21
![]() Annette wrote:
Annette wrote:
Sorry, but that's the point. For example, explain row 3 to me? Do I pearl or knit? I am unable to tell! Maybe this seems obvious and I'm dumb, but it doesn't make sense to me. Especially since the pattern is in the round.
18.09.2014 - 16:44DROPS Design answered:
Dear Annette, on row 3 in A.1, you will K the st to both cables. When both cables go back towards middle of diagram, you will have to P the st (1 P st more each side). Happy knitting!
19.09.2014 - 09:05
![]() Annette wrote:
Annette wrote:
I do not understand one part of the pattern. In the chart, part A1, it states 'slip 1 st on cable behind piece, K2, ***P/K1*** from cable needle.' I don't understand the part between the *'s. How do I know when it's knit and when it's pearl?
17.09.2014 - 21:56DROPS Design answered:
Dear Anette, when you are working the cables in A.1 (3rd and 4th text in diagram), you will have either to P or to K the st from cable needle or the next st following the pattern. Happy knitting!
18.09.2014 - 08:37
![]() Anja Løvaas wrote:
Anja Løvaas wrote:
Får ikke diagram a1 til å stemme med resten av mønstrene
25.08.2014 - 18:10
![]() Ilva wrote:
Ilva wrote:
Bellissimi ma complicati, meghlio toglire qualche motivo.
17.06.2014 - 08:29Gisele Richer wrote:
Je suis du Canada. Encore ici, le confort pour ces journées froides d'hiver.
08.06.2014 - 00:21
|
||||||||||||||||||||||
Walk With Me#walkwithmesocks |
||||||||||||||||||||||
|
|
||||||||||||||||||||||
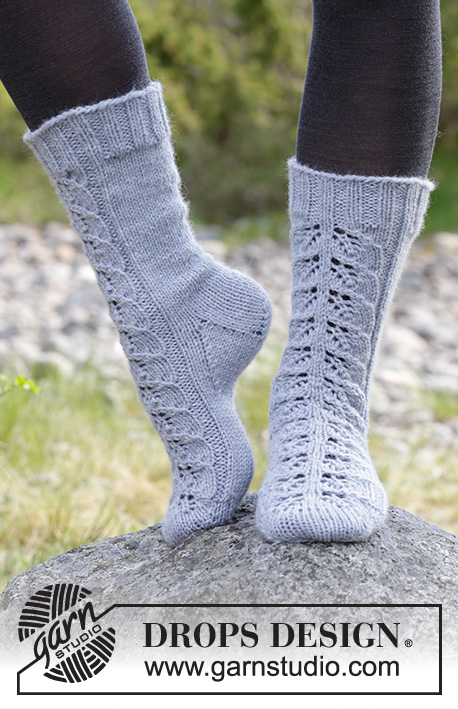
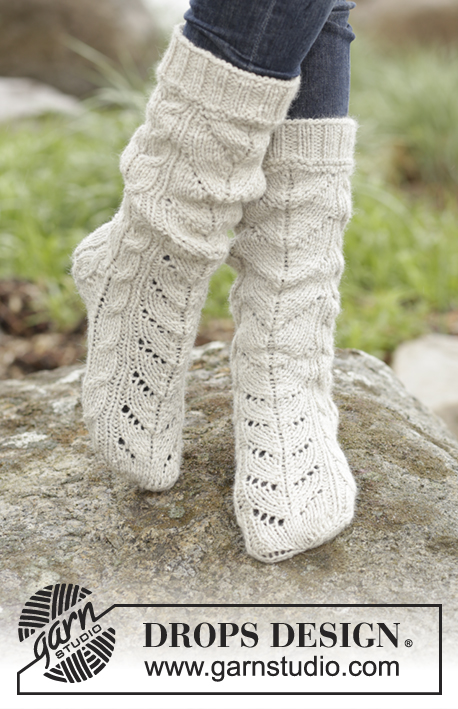
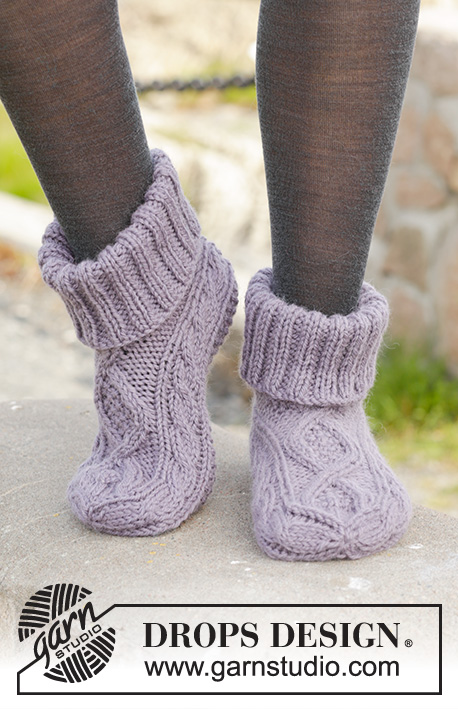
Knitted DROPS socks with cables in "Nepal".
DROPS 156-51 |
||||||||||||||||||||||
|
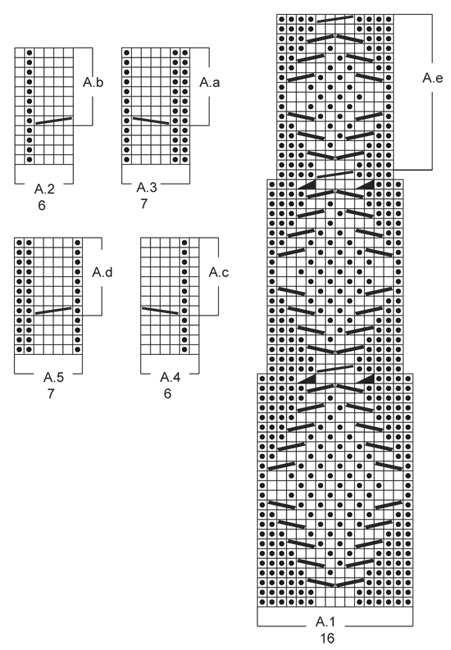
PATTERN: See diagrams A.1-A.5. The diagrams show the pattern seen from RS. DECREASE TIP: Dec 1 st before marker/A.3 as follows: K 2 tog. Dec 1 st after marker/A.5 as follows: K 2 twisted tog. HEEL DECREASE: Row 1 (= RS): Work until 7-7-8 sts remain, slip next st as if to K, K 1, psso, turn piece. Row 2 (= WS): Work until 7-7-8 sts remain, slip next st as if to P, P 1, psso, turn piece. Row 3 (= RS): Work until 6-6-7 sts remain, slip next st as if to K, K 1, psso, turn piece. Row 4 (= WS): Work until 6-6-7 sts remain, slip next st as if to P, P 1, psso, turn piece. Continue dec like this with 1 st less before each dec until there are 10-12-12 sts on needle. ---------------------------------------------------------- SOCK: Worked in the round on double pointed needles from mid back. Cast on 60-64-68 sts on double pointed needles size 4.5 mm / US 7 with Nepal. K 1 round. Then work rib = K 2/P 2 until piece measures 4 cm / 1½". REMEMBER THE GAUGE! * P 1 round, K 1 round*, repeat from *-* 1 more time, AT THE SAME TIME dec 8 sts evenly on last round = 52-56-60 sts. Switch to double pointed needles size 5 mm / US 8. Then K 5-7-9, A.3 (= 7 sts) – see explanation above, A.2 (= 6 sts), A.1 (= 16 sts), A.4 (= 6 sts), A.5 (= 7 sts), finish with K 5-7-9. Continue pattern like this. When A.2 to A.5 have been worked 1 time vertically, repeat A.a to A.d until finished measurements. When A.1 has been worked 1 time vertically, work A.e until finished measurements. Continue this pattern AT THE SAME TIME dec – READ DECREASE TIP above - in the different sizes: Size 5/6½ (EU35/37): When piece measures 14 and 20 cm / 5½" and 8", dec 1 st before A.3 and 1 st after A.5 = 44 sts after all dec. NOTE: Dec 4 sts in A.1 - see diagram. Size 7½/9 (EU38/40): When piece measures 7, 16 and 21 cm / 2 ¾", 6¼" and 8¼", dec 1 st before A.3 and 1 st after A.5 = 46 sts after all dec. NOTE: Dec 4 sts in A.1 - see diagram. Size 9½/10½ (EU41/43): When piece measures 7, 16, 21 and 26 cm / 2¾", 6¼", 8¼" and 10¼", dec 1 st before A.3 and 1 st after A.5 = 48 sts after all dec. NOTE: Dec 4 sts in A.1 - see diagram. Work until piece measures 26-27-28 cm / 10¼"-10⅝"-11". Now keep the first 10-11-12 sts on needle (i.e. 3-4-5 K sts and A.3), slip the next 24 sts on 1 stitch holder (= mid on top of foot) and keep the last 10-11-12 sts on needle (i.e. A.5 and 3-4-5 K sts) = 20-22-24 sts for heel. Now work piece back and forth. On next row from RS, inc 1 st in each side of piece by working 2 sts in first and last st = 22-24-26 sts. P 1, A.3, stockinette st and A.5 and finish with P 1 back and forth over heel sts for 5½ cm / 2¼". Insert 1 marker and measure the piece from here. Adjust to finish the pattern nicely. Now work in stockinette st over all sts and dec for heel - READ HEEL DECREASE. After heel dec, pick up 10-10-11 sts on each side of heel and slip the 24 sts from stitch holder back on needle = 54-56-58 sts. K 5-6-6 (= mid under foot) = beg of round. Then work as follows while AT THE SAME TIME inserting 2 markers in piece: K 14-15-16, insert 1 marker, P 1, A.2, A.e, A.4, P 1, insert 2nd marker, K 14-15-16. Continue the pattern like this AT THE SAME TIME dec 1 st before 1st marker and 1 st after 2nd marker on every round 9 times in total = 36-38-40 sts (= 10-12-14 sts in stockinette st under foot). Work until piece measures 19-21-23 cm / 7½"-8¼"-9" from marker on heel (= 3 cm / 1" remain). Now work in stockinette st over sts in A.e, adjust to finish with 1 half repetition of A.e vertically, or beg stockinette st earlier. Continue A.2 and A.4 until finished measurements. Insert 4 markers in the piece as follows: K 5-6-7, insert 1st marker, P 1, work A.2 AT THE SAME TIME insert 2nd marker between 5th and 6th st, K sts over foot (= 14 sts), A.4 AT THE SAME TIME insert 3rd marker between 1st and 2nd st, P 1, insert 4th marker, finish with K 5-6-7 (= 14 sts on top of foot, 10-12-14 sts under foot and 6 sts in each side). Now dec for toe on next round as follows: Dec 1 st after 2nd marker on top of foot and 1 st before 3rd marker on top of foot, repeat dec every round 2-1-0 times in total – remember DECREASE TIP = 10-12-14 sts on top of foot and 10-12-14 sts under foot (= 32-36-40 sts in total). On next round, dec as follows: Dec 1 st before 1st and 3rd marker and 1 st after 2nd and 4th marker (= 4 dec in total). Repeat dec every round 4-5-6 times in total AT THE SAME TIME on last dec work cable sts in A.2 and A.4 as follows: K 2 twisted tog, K 2 tog. After all dec there are 12 sts on needle. Cut the yarn and pull it through the remaining sts, tighten tog and fasten. |
||||||||||||||||||||||
Diagram explanations |
||||||||||||||||||||||
|
||||||||||||||||||||||
 |
||||||||||||||||||||||
Have you finished this pattern?Tag your pictures with #dropspattern #walkwithmesocks or submit them to the #dropsfan gallery. Do you need help with this pattern?You'll find 22 tutorial videos, a Comments/Questions area and more by visiting the pattern on garnstudio.com. © 1982-2026 DROPS Design A/S. We reserve all rights. This document, including all its sub-sections, has copyrights. Read more about what you can do with our patterns at the bottom of each pattern on our site. |
||||||||||||||||||||||


With over 40 years in knitting and crochet design, DROPS Design offers one of the most extensive collections of free patterns on the internet - translated to 17 languages. As of today we count 324 catalogs and 12284 patterns - 12274 of which are translated into English (US/in).
We work hard to bring you the best knitting and crochet have to offer, inspiration and advice as well as great quality yarns at incredible prices! Would you like to use our patterns for other than personal use? You can read what you are allowed to do in the Copyright text at the bottom of all our patterns. Happy crafting!
Post a comment to pattern DROPS 156-51
We would love to hear what you have to say about this pattern!
If you want to leave a question, please make sure you select the correct category in the form below, to speed up the answering process. Required fields are marked *.