
Popular categories
Looking for a yarn?


Comments / Questions (47)
![]() Annhelen wrote:
Annhelen wrote:
Hej, jag är en rätt avancerad stickare med lång erfarenhet, men det här mönstret var otroligt dåligt och krångligt skrivet och förklarat. Kanske beror det på att det är ett gratismöster? Efter att ha stickat skaftet på den första tappade jag helt sugen och repade upp. Får leta upp något annat
28.04.2020 - 19:42
![]() Jimmy Selvin wrote:
Jimmy Selvin wrote:
Hej, är i princip en nybörjare märker jag nu. På strumpstickor har jag ju enbart en rätsida. Visar diagrammen varje varv? Hur ska jag förhålla mig till tex "sticka 2rm 1 av/rm från hjälpstickan" och "sticka 1av/rm 2 rm från hjälpstickan"? Mvh
06.04.2020 - 06:26DROPS Design answered:
Hej På en del av sockan (vid hälen) kommer du att sticka fram och tillbaka så det är därför vi skrivit så. Lycka till!
14.04.2020 - 13:37
![]() Force wrote:
Force wrote:
Hi, in the pattern you say "When piece measures 7, 16 and 21 cm" - where is the start of that measure, at the very start or at the start of the pattern. Also "Work until piece measures 26-27-28 cm" According to the gauge at the beginning (22st = 10 cm), A1 of itself should measure about 28 cm, how can I repeat A.e then?
19.12.2019 - 15:00DROPS Design answered:
Dear Mrs Force, you will measure the 7, 16 and 21 cm + the 26-27-28 cm in height from the cast on edge. you work A.1 from after ribbing to the toe, ie when A.1 has been worked 1 time in height, you will repeat A.1e, but depending on your tension, you will start before heel or affter heel. Happy knitting!
20.12.2019 - 08:26
![]() Sandra Small wrote:
Sandra Small wrote:
I can't figure out what the back of the sock looks like. Does it have cables or is it just plain stocking stitch? Please help.
15.12.2019 - 18:41DROPS Design answered:
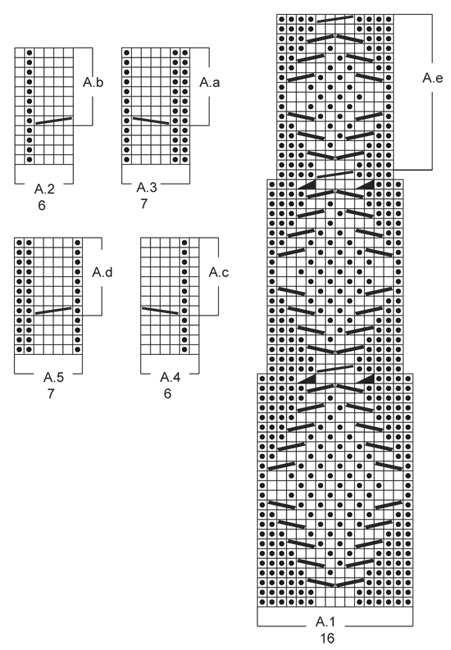
Dear Sandra, there is one cable on each side of heel (see photo and diagram A.3, A.5). Between A.3 and A.5 you work plain stocking sts. i.e. P 1, A.3, stocking st and A.5 and finish with P 1 back and forth over heel sts for 5½ cm. Happy knitting!
15.12.2019 - 21:20
![]() Patricia Olivia Fuchs wrote:
Patricia Olivia Fuchs wrote:
Hallo. In A2 fehlt meiner Meinung nach eine zweite linke Masche, genau so wie in A4 zwei linke Maschen gestrickt werden müssen, um vor und nach dem Zopf ein symetrisches Muster zu erhalten.
01.06.2019 - 14:35DROPS Design answered:
Liebe Frau Fuchs, Diagramme A.2 und A.4 stimmen so: die rechte Masche (letzte Masche in A.2 und erste Masche in A.4) sieht man auf dem Bild = es ist die rechte Masche links (auf dem Foto) von A.1. Viel Spaß beim stricken!
03.06.2019 - 11:05
![]() TT wrote:
TT wrote:
Goedemorgen, ik ben nu bij de hiel aangekomen maar vraag mij af waar de meerdering nou precies moet komen. \"Brei het werk nu heen en weer. Meerder in de volgende nld aan de goede kant 1 st aan elke kant van het werk door 2 st te breien in de eerste en laatste st\" Hieruit maak ik op dat ik aan het begin en einde van de naald moet meerderen, maar dan kom ik uit op 2av A.3, tricotst en A.5 en eindigen met 2 av. Moet ik meerderen in het midden van de tricotsteken? Alvast hartelijk dank!
15.03.2019 - 08:24Sean wrote:
Hi-Thank u very much- follow up Q related to legends: slip1 P/K-(really appreciate your help for a newbie). If I understand in A1 (should be in Moss =KPPK). Would this be correct then....Dig. A1= Row3 (P5 [S1B K2 "K/P"] then [S2F "K/P" K2 ]P5 --because I selected "K" for R3 then Row 5 -I should select to "P" and row 7 I also need to "P" and row 9 to then K and R11 to Start with "k" again or “P” and continue with P in R15 & K in 17 and so forth- this really has me confused.
14.11.2018 - 14:56DROPS Design answered:
Dear Sean, on row 3 you will P the stitch from cable needle on first cable and K the st from needle on next cable, so that on next round you will work these 2 sts K over P and P over K. The moss stitch section is in the middle of A.1 (in the diamonds). Happy knitting!
14.11.2018 - 15:07Sean wrote:
Hi. When ready the chart legend (following 2 pnts) 1.slip 1st on cable needle behind piece, K 2, P/K 1 from cable needle. 2.slip 2sts on cable needle in front of piece, P/K 1, K 2 from cable need Question. The meaning of P/K 1 - I should choose to Purl OR Knit this stitch from the cable - correct? If I choose to P then for point 2 where it say P/K 1 do I then K that one or do I also P since I P'ed the first one. Then in the next row I do the opposite, if I first P'ed do I then K? Thank u
14.11.2018 - 10:07DROPS Design answered:
Dear Sean, you have to choose K or P the stitch following next row from diagram, ie these stitches should be worked in moss (seed) stitch, alternately K and P every other round. Happy knitting!
14.11.2018 - 12:38
![]() Jeanette wrote:
Jeanette wrote:
Forstår ikke helt hvor jeg skal måle når det står; "Når arb måler 7, 16 OG 21 cm felles det 1 m før A.3 og 1 m etter A.5" - Hva/hvor skal jeg måle?
16.07.2018 - 18:45DROPS Design answered:
Hei Jeanette, Du måler fra oppleggkanten. God fornøyelse!
17.07.2018 - 07:47
![]() Marie wrote:
Marie wrote:
J'ai tricoté les chaussettes en pointure 35/37 mais il n'y avait pas assez avec 150 g.
08.01.2018 - 19:29
|
||||||||||||||||||||||
Walk With Me#walkwithmesocks |
||||||||||||||||||||||
|
|
||||||||||||||||||||||
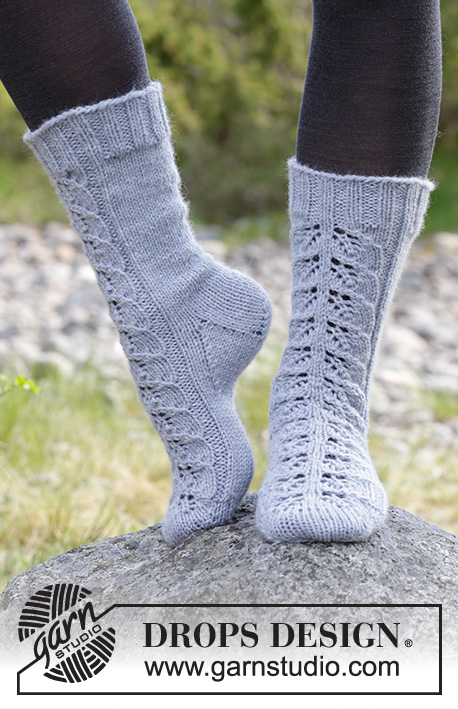
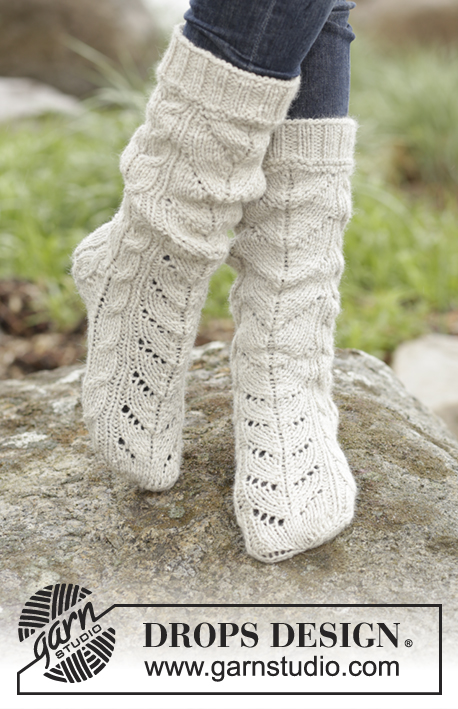
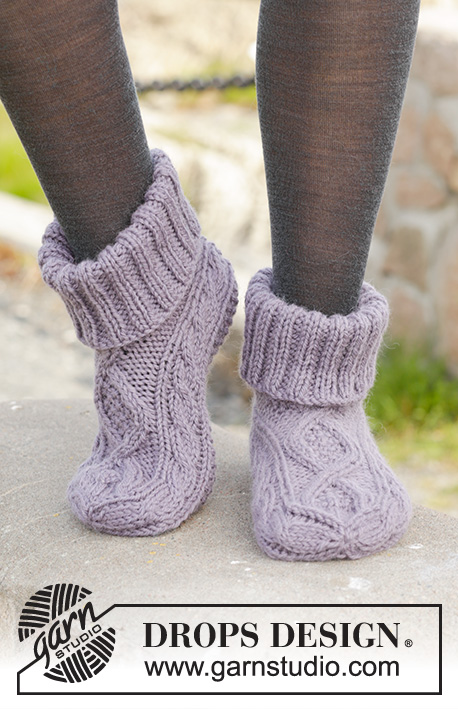
Knitted DROPS socks with cables in "Nepal".
DROPS 156-51 |
||||||||||||||||||||||
|
PATTERN: See diagrams A.1-A.5. The diagrams show the pattern seen from RS. DECREASE TIP: Dec 1 st before marker/A.3 as follows: K 2 tog. Dec 1 st after marker/A.5 as follows: K 2 twisted tog. HEEL DECREASE: Row 1 (= RS): Work until 7-7-8 sts remain, slip next st as if to K, K 1, psso, turn piece. Row 2 (= WS): Work until 7-7-8 sts remain, slip next st as if to P, P 1, psso, turn piece. Row 3 (= RS): Work until 6-6-7 sts remain, slip next st as if to K, K 1, psso, turn piece. Row 4 (= WS): Work until 6-6-7 sts remain, slip next st as if to P, P 1, psso, turn piece. Continue dec like this with 1 st less before each dec until there are 10-12-12 sts on needle. ---------------------------------------------------------- SOCK: Worked in the round on double pointed needles from mid back. Cast on 60-64-68 sts on double pointed needles size 4.5 mm / US 7 with Nepal. K 1 round. Then work rib = K 2/P 2 until piece measures 4 cm / 1½". REMEMBER THE GAUGE! * P 1 round, K 1 round*, repeat from *-* 1 more time, AT THE SAME TIME dec 8 sts evenly on last round = 52-56-60 sts. Switch to double pointed needles size 5 mm / US 8. Then K 5-7-9, A.3 (= 7 sts) – see explanation above, A.2 (= 6 sts), A.1 (= 16 sts), A.4 (= 6 sts), A.5 (= 7 sts), finish with K 5-7-9. Continue pattern like this. When A.2 to A.5 have been worked 1 time vertically, repeat A.a to A.d until finished measurements. When A.1 has been worked 1 time vertically, work A.e until finished measurements. Continue this pattern AT THE SAME TIME dec – READ DECREASE TIP above - in the different sizes: Size 5/6½ (EU35/37): When piece measures 14 and 20 cm / 5½" and 8", dec 1 st before A.3 and 1 st after A.5 = 44 sts after all dec. NOTE: Dec 4 sts in A.1 - see diagram. Size 7½/9 (EU38/40): When piece measures 7, 16 and 21 cm / 2 ¾", 6¼" and 8¼", dec 1 st before A.3 and 1 st after A.5 = 46 sts after all dec. NOTE: Dec 4 sts in A.1 - see diagram. Size 9½/10½ (EU41/43): When piece measures 7, 16, 21 and 26 cm / 2¾", 6¼", 8¼" and 10¼", dec 1 st before A.3 and 1 st after A.5 = 48 sts after all dec. NOTE: Dec 4 sts in A.1 - see diagram. Work until piece measures 26-27-28 cm / 10¼"-10⅝"-11". Now keep the first 10-11-12 sts on needle (i.e. 3-4-5 K sts and A.3), slip the next 24 sts on 1 stitch holder (= mid on top of foot) and keep the last 10-11-12 sts on needle (i.e. A.5 and 3-4-5 K sts) = 20-22-24 sts for heel. Now work piece back and forth. On next row from RS, inc 1 st in each side of piece by working 2 sts in first and last st = 22-24-26 sts. P 1, A.3, stockinette st and A.5 and finish with P 1 back and forth over heel sts for 5½ cm / 2¼". Insert 1 marker and measure the piece from here. Adjust to finish the pattern nicely. Now work in stockinette st over all sts and dec for heel - READ HEEL DECREASE. After heel dec, pick up 10-10-11 sts on each side of heel and slip the 24 sts from stitch holder back on needle = 54-56-58 sts. K 5-6-6 (= mid under foot) = beg of round. Then work as follows while AT THE SAME TIME inserting 2 markers in piece: K 14-15-16, insert 1 marker, P 1, A.2, A.e, A.4, P 1, insert 2nd marker, K 14-15-16. Continue the pattern like this AT THE SAME TIME dec 1 st before 1st marker and 1 st after 2nd marker on every round 9 times in total = 36-38-40 sts (= 10-12-14 sts in stockinette st under foot). Work until piece measures 19-21-23 cm / 7½"-8¼"-9" from marker on heel (= 3 cm / 1" remain). Now work in stockinette st over sts in A.e, adjust to finish with 1 half repetition of A.e vertically, or beg stockinette st earlier. Continue A.2 and A.4 until finished measurements. Insert 4 markers in the piece as follows: K 5-6-7, insert 1st marker, P 1, work A.2 AT THE SAME TIME insert 2nd marker between 5th and 6th st, K sts over foot (= 14 sts), A.4 AT THE SAME TIME insert 3rd marker between 1st and 2nd st, P 1, insert 4th marker, finish with K 5-6-7 (= 14 sts on top of foot, 10-12-14 sts under foot and 6 sts in each side). Now dec for toe on next round as follows: Dec 1 st after 2nd marker on top of foot and 1 st before 3rd marker on top of foot, repeat dec every round 2-1-0 times in total – remember DECREASE TIP = 10-12-14 sts on top of foot and 10-12-14 sts under foot (= 32-36-40 sts in total). On next round, dec as follows: Dec 1 st before 1st and 3rd marker and 1 st after 2nd and 4th marker (= 4 dec in total). Repeat dec every round 4-5-6 times in total AT THE SAME TIME on last dec work cable sts in A.2 and A.4 as follows: K 2 twisted tog, K 2 tog. After all dec there are 12 sts on needle. Cut the yarn and pull it through the remaining sts, tighten tog and fasten. |
||||||||||||||||||||||
Diagram explanations |
||||||||||||||||||||||
|
||||||||||||||||||||||
 |
||||||||||||||||||||||
Have you finished this pattern?Tag your pictures with #dropspattern #walkwithmesocks or submit them to the #dropsfan gallery. Do you need help with this pattern?You'll find 22 tutorial videos, a Comments/Questions area and more by visiting the pattern on garnstudio.com. © 1982-2026 DROPS Design A/S. We reserve all rights. This document, including all its sub-sections, has copyrights. Read more about what you can do with our patterns at the bottom of each pattern on our site. |
||||||||||||||||||||||


With over 40 years in knitting and crochet design, DROPS Design offers one of the most extensive collections of free patterns on the internet - translated to 17 languages. As of today we count 324 catalogs and 12284 patterns - 12274 of which are translated into English (US/in).
We work hard to bring you the best knitting and crochet have to offer, inspiration and advice as well as great quality yarns at incredible prices! Would you like to use our patterns for other than personal use? You can read what you are allowed to do in the Copyright text at the bottom of all our patterns. Happy crafting!
Post a comment to pattern DROPS 156-51
We would love to hear what you have to say about this pattern!
If you want to leave a question, please make sure you select the correct category in the form below, to speed up the answering process. Required fields are marked *.