
Popular categories
Looking for a yarn?


Comments / Questions (298)
![]() Anne Lise wrote:
Anne Lise wrote:
Muss ich im Groesse XL-XXL ein paar mal A.# und linke Maschen weg lassen, habe ich gemacht und haben sehr viel Maschen in Gr. M ueber
08.08.2014 - 19:52DROPS Design answered:
Liebe Anne Lise, an welcher Stelle genau haben Sie M übrig und wie viele? Können Sie das genauer beschreiben?
11.08.2014 - 09:41
![]() Anne Lise wrote:
Anne Lise wrote:
Wenn ich das Muster stricke fuer Groesse M habe ich viele Maschen uebrig. Ich muss doch nur 2 Markierungen Machen . A.3 und mehrere linke Maschen muss ich ja wohl weglassen da die zu Groesse Xl - XXl gehoeren
08.08.2014 - 19:49DROPS Design answered:
Kommentar siehe oben!
15.08.2014 - 11:31
![]() Mannaerts Griet wrote:
Mannaerts Griet wrote:
Mevr, zou het kunnen dat de breibeschrijving van model u728 niet klopt??
08.08.2014 - 16:46
![]() Swantje wrote:
Swantje wrote:
Stricke Gr. S. Maschenprobe war mit NS 4,5 perfekt. Habe 24cm in der Höhe und mal 225 M abgezählt und gemessen = 107cm. Nach allen Abnahmen sollten später dann aber 225M nur 76cm sein. Bin etwas beunruhigt. Was stimmt nicht?
07.08.2014 - 17:46DROPS Design answered:
Liebe Swantje, das Muster "schrumpft" ja in der Breite durch die Zöpfe um einiges. Die Maschenprobe gilt für glatt rechts, aber nach allen Abnahmen haben Sie ja immer weniger glatt gestrickte M (in diesem Fall glatt links), und die Zopfmuster-M ziehen sich in der Breite zusammen.
11.08.2014 - 21:50
![]() Marina wrote:
Marina wrote:
Hallo, ich habe die Jacke fast fertig, es fehlen nur noch die Ärmel. Sie ist traumhaft schön. Die Anleitung ist sehr gut verständlich und sehr genau. Ein großes Kompliment an das DROPS-Team. Jetzt warte ich noch auf die Anleitung vom Pullover 156-19, den ich dann als nächstes stricken will. Viele Grüße Marina
30.07.2014 - 19:32Gun wrote:
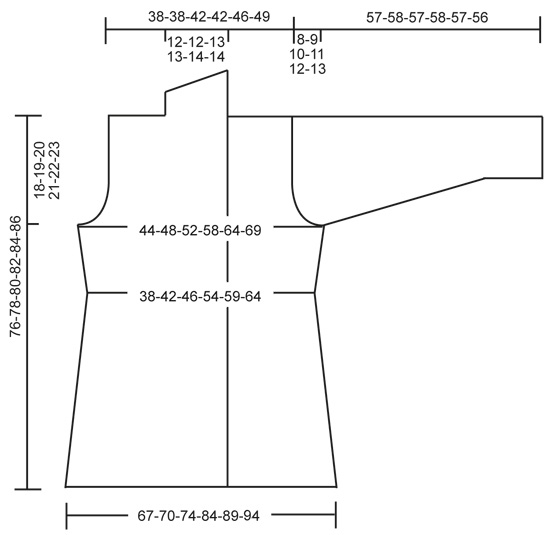
Die 38 cm sind die Breite und nicht die Höhe des Diagramms
22.07.2014 - 12:54
![]() Andrea wrote:
Andrea wrote:
Hallo, ich habe angefangen,diese schöne Jacke zu stricken. Allerdings habe ich das Gefühl, dass die Zeichnung des Schnittes nicht mit der Beschreibung übereinstimmt. Kann das sein? In der Beschreibung steht, man soll ab 44cm zunehmen, aber auf der Zeichnung sieht das eher so aus, als müsste man nach 38cm zunehmen. (Ausgehend von der kleinen Grösse). Hilfe.... bin jetzt bei 38cm. Viele Grüsse Andrea
22.07.2014 - 12:08DROPS Design answered:
Liebe Andrea, die Maße, die Sie in der Zeichnung sehen und bei denen Sie nun irritiert sind, gelten ja für die Breite, die 44 cm in der Anleitung hingegen für die Höhe. Die Jacke ist an der schmalsten Stelle 38 cm breit, in der kleinsten Größe. Es ist also richtig, dass Sie bei 44 cm Höhe die beschriebenen Zunahmen arbeiten.
22.07.2014 - 21:32
![]() Fran Hoffman wrote:
Fran Hoffman wrote:
What are the measurements for S, M, L, etc.?
16.07.2014 - 23:05DROPS Design answered:
Dear Mrs Hoffman, you will find at the bottom of the page a measurement chart with all measurements for each size, in cm, taken flat from side to side. Compare these to a similar garment you have and like the shape to find out the matching size. Happy knitting!
17.07.2014 - 09:04
![]() Bep Van Ham wrote:
Bep Van Ham wrote:
Ik wilde vragen als je bij de mindering van 16 steken 4x16 alle vier keer 2 steken minder kom je toch op 8steken
15.07.2014 - 19:25DROPS Design answered:
Hoi Bep. Je mindert in elk av-deel van 16 st door: 2 av samen te breien (2 st worden 1), brei 12 av, 2 av samen. Dus na de eerste keer minderen heb je aan het einde van de nld 14 av in elk av-deel. Je herhaalt deze mindering nog 7 keer op elke 4 cm.
16.07.2014 - 17:26
![]() Irina Dyck wrote:
Irina Dyck wrote:
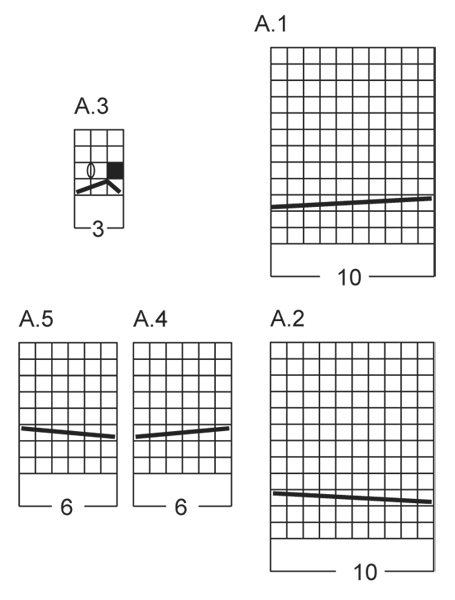
Sehr geehrte Damen und Herren, Ich habe gestern die Wolle für diese schöne Jacke bekommen und wollte schon gestern anfangen zu stricken.. Aber ich verstehe das Diagramm A.3 nicht( die 2.Reihe ist die Rück-R? Danke für die Hilfe! Mit freundlichen Grüßen Irina
09.07.2014 - 10:25DROPS Design answered:
Liebe Irina, ja genau, die 2. R ist die Rück-R, es sind alle R eingezeichnet. In der 1. R von A.3 (= Hin-R) heben Sie also 1 M ab, stricken 2 M re und ziehen die abgehobene M über die 2 gerade gestrickten M. Damit haben Sie 1 M abgenommen. Das wird in der Rück-R wieder ausgeglichen, A.3 besteht ja jetzt nur noch aus 2 M, daher stricken Sie dazwischen 1 Umschlag, um wieder 3 M zu erhalten. Das schwarze Kästchen steht für die abgenommene M, die also nicht mehr vorhanden ist.
09.07.2014 - 22:31
|
|||||||||||||||||||||||||
Morning Glory#morningglorycardigan |
|||||||||||||||||||||||||
 |
 |
||||||||||||||||||||||||
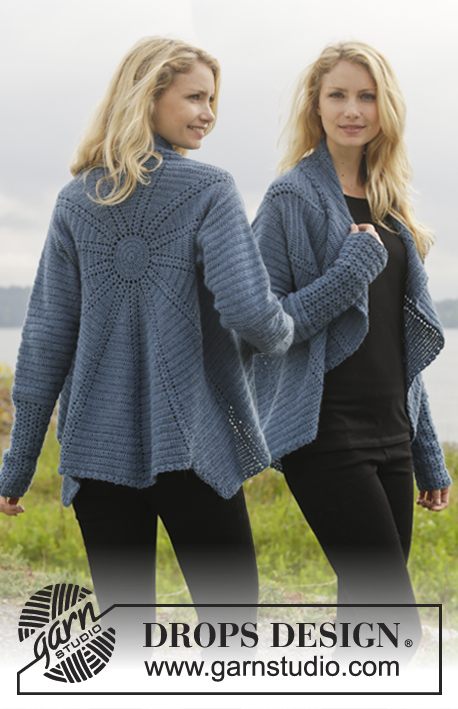
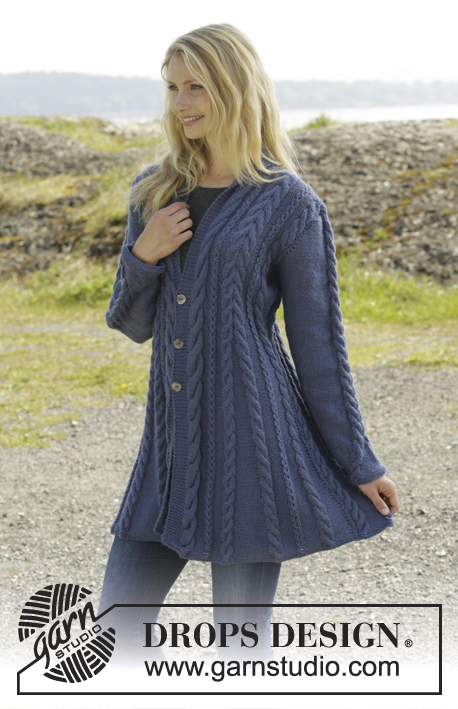
Knitted DROPS jacket with cables and shawl collar in ”Karisma”. Size: S - XXXL.
DROPS 158-1 |
|||||||||||||||||||||||||
|
GARTER ST (back and forth on needle): K all rows. 1 ridge = K2 rows. GARTER ST (in the round on double pointed needles): * K 1 round and P 1 round *, repeat from *-*. 1 ridge = 2 rounds. DECREASE TIP: Dec 1 st before marker/A.3 as follows: Work until 2 sts remain before marker, P 2 tog. Dec 1 st after marker/A.3 as follows: P 2 tog. PATTERN 1: See diagrams A.1-A.5. The diagrams show all rows in pattern seen from RS. PATTERN 2: P 7-7-8-8-9-10, A.3, P 7-7-8-8-9-10. PATTERN 3: P 4-5-6-6-7-8, A.3, P 4-5-6-6-7-8. BUTTONHOLES: Dec for buttonholes on right band. 1 buttonhole = K tog second and third st from edge and make 1 YO. Dec for buttonholes when piece measures: SIZE S: 31, 39 and 47 cm / 12¼",15¼",18½" SIZE M: 31, 39 and 47 cm / 12¼",15¼",18½" SIZE L: 31, 39 and 47 cm / 12¼",15¼",18½" SIZE XL: 32, 40 and 48 cm / 12½",15¾",19" SIZE XXL: 32, 40 and 48 cm / 12½",15¾",19" SIZE XXL: 32, 40 and 48 cm / 12½",15¾",19" ---------------------------------------------------------- BODY: Worked back and forth on circular needle. Cast on 306-318-334-378-398-418 sts (includes 8 band sts in each side of piece) on circular needle size 3.5 mm / US 4 with Karisma. Work 2 ridges in GARTER ST - see explanation above AT THE SAME TIME on last row inc 44 sts evenly = 350-362-378-422-442-462 sts. Switch to circular needle size 4 mm / US 6. Then work from RS AT THE SAME TIME insert 2 markers and 0-0-0-4-4-4 strands in the piece as follows: Work 8 band sts in garter st, A.2, PATTERN 2 – see explanation above, A.4, P 14-16-16-16-16-16, A.5, pattern 2, A.4, P 0-0-0-8-9-10, insert 1 strand in size XL-XXL-XXXL, A.3 0-0-0-1-1-1 time, insert 1st marker, P 8-9-9-9-9-9, A.3 0-0-0-1-1-1 time, insert 1 strand in size XL-XXL-XXXL, P 0-0-0-8-9-10, A.5, pattern 2, A.4, P 14-16-16-16-16-16, A.5, pattern 2, A.1, P 14-16-16-16-16-16, A.2, pattern 2, A.4, P 14-16-16-16-16-16, A.5, pattern 2, A.4, P 0-0-0-8-9-10, insert 1 strand in size XL-XXL-XXXL, A.3 0-0-0-1-1-1 time, P 8-9-9-9-9-9, insert 2nd marker, A.3 0-0-0-1-1-1 time, insert 1 strand in size XL-XXL-XXXL, P 0-0-0-8-9-10, A.5, pattern 2, A.4, P 14-16-16-16-16-16, A.5, pattern 2, A.1, 8 band sts in garter st. Move the markers and strands upwards when working. Work band sts in garter st until finished measurements. Work K over K sts between cables from WS, i.e. P sts seen from RS. Continue pattern like this. Remember BUTTONHOLES - see explanation above. REMEMBER THE GAUGE! When piece measures 8-10-10-10-10-10 cm / 4", dec as follows: Dec in every section with 14-16-16-16-16-16 P sts by working as follows: P 2 tog, P 10-12-12-12-12-12, P 2 tog (= 10 sts dec in total). Repeat this dec every 5-4-4-4-4-4 cm / 2"-1½"-1½"-1½"-1½"-1½" 6-7-7-7-7-7 more times. NOTE: On last dec work the remaining 2 P tog. AT THE SAME TIME when piece measures 8-10-10-10-10-10 cm / 3"-4"-4"-4"-4"-4", dec as follows: Dec 1 st after 1st marker and 1 st before 2nd marker - see DECREASE TIP. Repeat this dec every 6-4½-4½-4½-4½-4½ cm / 2⅜"-1¾"-1¾"-1¾"-1¾"-1¾" 5-6-6-6-6-6 more times. AT THE SAME TIME when piece measures 16 cm / 6¼", dec as follows in pattern 2: Dec 1 st before A.3 and 1 st after A.3 (= 16 sts dec). Repeat this dec every 10-20-20-20-20-20 cm / 4"-8"-8"-8"-8" 2-1-1-1-1-1 more times. AT THE SAME TIME in size XL-XXL-XXXL dec as follows at every strand: Dec 1 st by working the 2 P sts closes to A.3 P tog (= 4 sts dec). Repeat this dec every 20 cm / 8" 1 more time. When all dec are done, there are 225-241-257-293-313-333 sts on needle. There are now 2 P st at markers in the sides and 1 P st between A.4 and A.5 and between A.1 and A.2 and 4-5-6-6-7-8 P sts on each side of A.3. When piece measures 44 cm / 17¼", adjust so that next row is from RS, inc as follows: 8 band sts in garter st, A.2, PATTERN 3 – see explanation above, A.4, P 1, A.5, pattern 3, A.4, P 0-0-0-6-7-8, A.3 0-0-0-1-1-1 time, 1 YO, P 2, 1 YO, A.3 0-0-0-1-1-1 time, P 0-0-0-6-7-8, A.5, pattern 3, A.4, P 1, A.5, pattern 3, A.1, P 1, A.2, pattern 3, A.4, P 1, A.5, pattern 3, A.4, P 0-0-0-6-7-8, A.3 0-0-0-1-1-1 time, 1 YO, P 2, 1 YO, A.3 0-0-0-1-1-1 time, P 0-0-0-6-7-8, A.5, pattern 3, A.4, P 1, A.5, pattern 3, A.1, 8 band sts in garter st (= 4 sts inc). K YOs twisted on next row to avoid holes. Repeat inc every 6th-6th-6th-12th-10th-12th row 5-5-5-3-4-4 more times = 249-265-281-309-333-353 sts. Work inc sts P from RS and K from WS. When piece measures 58-59-60-61-62-63 cm / 22¾"-23¼"-23⅝"-24"-24⅜"-24¾", divide the piece, finish front and back pieces separately as follows: Slip the first and last 66-70-74-81-87-92 sts on a stitch holder for front pieces, cut the yarn, then work only over the middle 117-125-133-147-159-169 sts (= back piece). BACK PIECE: Now bind off for armholes at beg of every row in each side as follows: bind off 3 sts 1 time, then 2 sts 1-1-1-3-4-4 times and 1 st 1-1-1-4-4-5 times = 105-113-121-121-129-137 sts. Then dec on next row from RS as follows: Dec 1 st before A.3 and 1 st after A.3 0-1-1-1-1-1 time = 105-105-113-113-121-129 sts. When piece measures 73-75-77-79-81-83 cm / 28¾"-29½"-30⅜"-31"-32"-32¾", dec 5 sts over A.1 and 5 sts over A.2 by working 2 and 2 sts K tog = 95-95-103-103-111-119 sts on needle. Then bind off the middle 25-25-27-27-29-31 sts for neck and finish each shoulder separately = 35-35-38-38-41-44 sts remain on each shoulder. When piece measures 75-77-79-81-83-85 cm / 29½"-30⅜"-31"-32"-32¾"-33½", dec 3 sts over every A.4 and A.5 (= 9 sts dec) = 26-26-29-29-32-35 sts remain on needle. Bind off. RIGHT FRONT PIECE: = 66-70-74-81-87-92 sts. Now bind off for armhole at beg of every row from the side as follows: bind off 3 sts 1 time, then 2 sts 1-1-1-3-4-4 times and 1 st 1-1-1-4-4-5 times = 60-64-68-68-72-76 sts. Then dec on next row from RS as follows: Dec 1 st before A.3 and 1 st after A.3 0-1-1-1-1-1 time = 60-60-64-64-68-72 sts on needle. When piece measures 75-77-79-81-83-85 cm / 29½"-30⅜"-31"-32"-32¾"-33½", dec 5 sts over A.2 by working 2 and 2 sts K tog and 3 sts over every A.4 and A.5 = 46-46-50-50-54-58 sts. Then bind off the first 26-26-29-29-32-35 sts for shoulder, work the rest of row = 20-20-21-21-22-23 sts. Then work shawl collar in garter st over the remaining sts, beg mid front (1st row = RS) as follows: * Work 2 rows back and forth over the first 12-12-13-13-14-15 sts, work 2 rows back and forth over all sts *, repeat from *-* until shawl collar measures 8-8-9-9-10-10 cm / 3⅛"-3⅛"-3½"-3½"-4"-4" at the shortest. Bind off. LEFT FRONT PIECE: Work as right front piece but reversed. Dec 5 sts over A.1 instead of A.2. Shawl collar beg from WS. SLEEVE: Worked in the round on double pointed needles. Cast on 48-50-52-54-54-56 sts on double pointed needles size 3.5 mm / US 4 with Karisma. Work 2 ridges in GARTER ST - see explanation above AT THE SAME TIME on last round inc 5 sts = 53-55-57-59-59-61 sts. Switch to double pointed needles size 4 mm / US 6. READ ALL OF THE FOLLOWING SECTION BEFORE CONTINUING! Work as follows: P 4-5-6-7-7-8, A.4, P 33, A.5, finish with P 4-5-6-7-7-8. Insert 1 marker at the beg of the round. On next round move A.4 and A.5 1 st towards the middle as follows: P 4-5-6-7-7-8, 1 YO, A.4, P 2 tog, P 29, P 2 tog, A.5, 1 YO, finish with P 4-5-6-7-7-8. P YO twisted on next round. Move A.4 and A.5 towards the middle 1 st every other round until 1 st remains between A.4 and A.5. Piece measures approx. 12 cm / 4¾". Continue to work P and A.4/A.5 with 1 P st between until finished measurements. AT THE SAME TIME when piece measures 10 cm / 4", inc 1 st on each side of marker. Repeat inc every 4-3½-2½-2½-2-1½ cm / 1½"-1¼"-⅞"-7/"-¾"-½" 9-10-12-13-16-17 more times = 73-77-83-87-93-97 sts. When piece measures 49-49-47-47-46-43 cm / 19¼"-19¼"-18½"-18½"-18"-17" (shorter measurements in the larger sizes because of longer sleeve cap and wider shoulders) bind off for sleeve cap at beg of every row in each side: bind off 4 sts 1 time, 2 sts 3 times and 1 st 6 times, then bind off 2 sts in each side until piece measures 56-57-56-57-56-55 cm/22"-22½"-22"-22½"-22"-21½", then bind off 3 sts 1 time in each side AT THE SAME TIME dec 2 sts over every cable. Bind off the remaining sts, piece measures approx. 57-58-57-58-57-56 cm / 22½"-22¾"-22½"-22¾"-22½"-22". Make another sleeve. ASSEMBLY: Sew the shoulder seams. Sew in sleeves. Sew the collar tog mid back and sew it to the neckline. Sew the buttons on to left band. SHAPING: Moisten piece and place it on a carpet or mattress - carefully stretch it out to measurements. Leave to dry. |
|||||||||||||||||||||||||
Diagram explanations |
|||||||||||||||||||||||||
|
|||||||||||||||||||||||||
 |
|||||||||||||||||||||||||
 |
|||||||||||||||||||||||||
Have you finished this pattern?Tag your pictures with #dropspattern #morningglorycardigan or submit them to the #dropsfan gallery. Do you need help with this pattern?You'll find 30 tutorial videos, a Comments/Questions area and more by visiting the pattern on garnstudio.com. © 1982-2026 DROPS Design A/S. We reserve all rights. This document, including all its sub-sections, has copyrights. Read more about what you can do with our patterns at the bottom of each pattern on our site. |
|||||||||||||||||||||||||


With over 40 years in knitting and crochet design, DROPS Design offers one of the most extensive collections of free patterns on the internet - translated to 17 languages. As of today we count 324 catalogs and 12245 patterns - 12235 of which are translated into English (US/in).
We work hard to bring you the best knitting and crochet have to offer, inspiration and advice as well as great quality yarns at incredible prices! Would you like to use our patterns for other than personal use? You can read what you are allowed to do in the Copyright text at the bottom of all our patterns. Happy crafting!
Post a comment to pattern DROPS 158-1
We would love to hear what you have to say about this pattern!
If you want to leave a question, please make sure you select the correct category in the form below, to speed up the answering process. Required fields are marked *.