
Popular categories
Looking for a yarn?


Comments / Questions (23)
![]() Patricia wrote:
Patricia wrote:
Désolée, je n'ai rien compris, vos explications ne sont pas claires. Que faut il comprendre que sur 1 rang on diminue 1 m au début et 1 m à la fin du rang, que le rang suivant est normal et que le suivant on recommence les diminutions. Ce qui ferait cinq fois des diminutions et 10 diminutions au total ?
17.05.2017 - 16:28
![]() Patricia wrote:
Patricia wrote:
Désolée de vous solliciter à nouveau mais je ne comprends pas grand chose dans vos explications pour le rabat ! après avoir fait les rayures sans augmentation et avoir placer le marqueur, vous dites continuer les rayures et EN MÊME TEMPS, au 1er rang sur l'endroit, diminuer pour le rabart1m de chaque côté, en tricotant 2m ensemble à 1 m lisière du bord. Répétez ces diminutionsencore de chaque côté tous les 4 rangs (c'est à dire tous les 2 rangs à l'endroit) 10 fois au total !
17.05.2017 - 16:26DROPS Design answered:
Bonjour Patricia, après la dernière rayure en écru (= rayures sans augmentations), on diminue 10 fois au total tous les 4 rangs (= tous les 2 rangs sur l'endroit). On termine ensuite la dernière rayure (= 2 côtes mousse), en taille 6/9 mois, on arrête après 2 côtes mousse écru. Puis, on continue en écru, on continue les diminutions de chaque côté comme avant (2 fois au total, 1 fois au 1er rang puis 1 fois 4 rangs après) et on ouvre les boutonnières au 1er rang. Bon tricot!
17.05.2017 - 16:34
![]() Patricia wrote:
Patricia wrote:
Merci bien.
17.05.2017 - 11:14
![]() Patricia wrote:
Patricia wrote:
Bonjour, j'en suis au niveau des rayures, après les premières augmentations vous dites "montez ensuite 2 m à la fin des huit rangs suivants = 52 mailles. que faut t'il faire exactement , 2 mailles à la fin d'un rang ou 1 maille à la fin de chaque rang ? Ce qui reviendrait au même qu'à l'étape précédente ! je ne comprends pas vraiment ! merci
16.05.2017 - 20:03DROPS Design answered:
Bonjour Patricia, vous montez d'abord 1 m de chaque côté jusqu'à ce que vous ayez un total de 36 m (= 11 m montées de chaque côté), puis vous montez 2 m à la fin des 8 rangs suivants (= vous aurez monté 4 x 2 m de chaque côté) = 52 m. Bon tricot!
17.05.2017 - 09:17
![]() Patricia wrote:
Patricia wrote:
Bonjour, je trouve parfois des noeuds (fils reliés) dans les pelotes de laine, est-ce normal ?
16.05.2017 - 13:38
![]() Patricia wrote:
Patricia wrote:
Merci beaucoup.
16.05.2017 - 11:31
![]() Patricia wrote:
Patricia wrote:
Bonjour, j'en suis arrivée au niveau du dos. Il s'avère que le dos est moins grand que les deux devants, est-ce normal ? Merci d'avance
15.05.2017 - 18:36DROPS Design answered:
Bonjour Patricia, c'est vrai, le dos est legerement moins grand que les deux devants. C'est tout a fait normal. Bon tricot!
15.05.2017 - 19:05
![]() Patricia wrote:
Patricia wrote:
Merci pour votre réponse rapide, j'espère que je n'aurai pas trop à vous embêter !
09.05.2017 - 12:36DROPS Design answered:
Chere Paricia, contactez-nous a chaque fois que vous avez un probleme. Cordialement
09.05.2017 - 12:57
![]() Patricia wrote:
Patricia wrote:
Bonjour, je souhaite faire ce modèle en 6/9 mois et je suis un peux perdue dans les explications. Pouvez-vous m'éclairer La 1ère maille de chaque rang est elle tricotée ? Pour les devants, vous dites de monter 31 mailles (y compris 5 mailles de bordure devant). Dois-je comprendre que c'est 26 mailles + 5 mailles pour bordure ou bien faut-il 31 mailles + 5 mailles bordure ce qui ferait un total de 36 mailles ? Merci pour votre réponse.
09.05.2017 - 11:28DROPS Design answered:
Chere Patricia, 1. la 1ère maille de chaque rang est tricotée. 2-me question: 31 mailles montees = 26 mailles + 5 mailles de bordure devant. Bon tricot!
09.05.2017 - 11:47
![]() Helle Flesjå wrote:
Helle Flesjå wrote:
I oppskriften (og mange andre) står det "sett merke midt oppå skulderen", hva menes med midt oppå? Er det der hvor halsen begynner? Eller kanskje på skulderen rett opp fra der man begynner å legge opp til ermet?
06.12.2015 - 02:45DROPS Design answered:
Hej Helle, Når du er kommet til midt ovenpå skulderen, sætter du et mærke, fortsætter ned over rygstykket og måler arbejdet fra mærket og nedad. God fornøjelse!
07.12.2015 - 10:26
|
||||
First Impression#firstimpressiononesie |
||||
|
|
||||
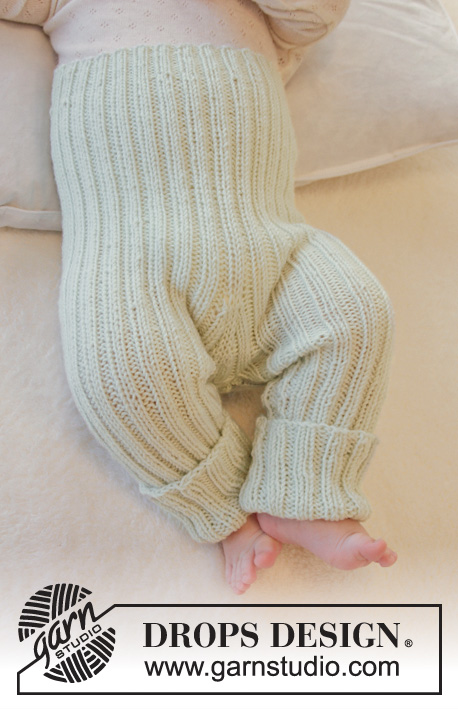
Knitted baby body in garter st with crochet edge in DROPS BabyMerino. Size premature - 4 years.
DROPS Baby 25-26 |
||||
|
GARTER ST (back and forth on circular needle): K all rows. 1 ridge = K2 rows. BUTTONHOLES: Dec for buttonholes on right band. 1 buttonhole = K tog second and third st from edge and make 1 YO. Dec for buttonholes when piece measures: (premature): 4, 10 and 16 cm / 1½", 4" and 6¼". 0/1 months: 6, 11, 16 and 20 cm / 2⅜",4⅜",6 ¼" and 8". 1/3 months: 7, 12, 18 and 24 cm / 2¾",4¾",7" and 9½". 6/9 months: 8, 14, 20 and 25 cm / 3⅛",5½",8" and 9¾". 12/18 months: 10, 16, 22 and 28 cm / 4",6¼",8¾" and 11". (2 years): 10, 15, 20, 25 and 30 cm / 4",6",8",9¾" and 11¾" (3/4 years): 12, 17, 23, 28 and 34 cm / 4¾",6¾",9",11" and 13⅜" STRIPES: * 2 ridges (i.e K4 rows) in garter st in off white, 2 ridges in garter st in light mint *, repeat from *-*. ---------------------------------------------------------- ONESIE: Worked back and forth on circular needle. Beg on front piece, cast on sts for sleeve and work up to the shoulder. Work the other front piece the same way, place the 2 front pieces tog and work down the back piece, bind off for leg opening, inc out again and work flap. RIGHT FRONT PIECE: LOOSELY cast on (24) 27-29-31-34 (36-39) sts (includes 5 band sts towards mid front) on circular needle size 3 mm / US 2.5 with light mint. READ ALL OF THE FOLLOWING SECTION BEFORE CONTINUING! Work in GARTER ST - see explanation above (1st row = RS). When piece measures (4) 6-7-8-10 (10-12) cm / (1½") 2⅜"-2¾"-3⅛"-4" (4"-4¾"), bind off for first BUTTONHOLE on band – see explanation above. When piece measures (12) 15-18-20-22 (24-27) cm / (4¾") 6"-7"-8"-8¾" (9½"-10⅝") (make sure that next row is worked from RS), cast on new sts at the end of every row towards the side for sleeve as follows 2 sts (5) 5-5-4-4 (4-5) times in total, 4 sts (2) 2-2-3-3 (4-5) times in total and then (13) 22-30-33-40 (46-51) sts 1 time = (55) 67-77-84-94 (106-120) sts. When piece measures (17) 21-25-26-29 (31-35) cm / (6¾") 8¼"-9¾"-10¼"-11⅜" (12¼"-13¾"), bind off the outermost 8 sts towards mid front for neck. Then bind off at beg of every row from neck as follows: bind off 2 sts 2 times in total and then 1 st (3) 3-3-3-4 (4-4) times in total = (40) 52-62-69-78 (90-104) sts. Continue in garter st until piece measures (20) 24-28-30-33 (36-40) cm / (8") 9½"-11"-11¾"-13" (14¼"-15¾"). Insert 1 marker = mid on top of shoulder – AT THE SAME TIME cast on 2 new sts at the end of next row towards the neck = (42) 54-64-71-80 (92-106) sts (last row = WS). Put all sts on a stitch holder. LEFT FRONT PIECE: NOTE: Do not dec for buttonholes on left band. Cast on and work as right front piece but reversed (i.e. cast on new sts for sleeve at the end of every row from WS (instead of at the end of every row from RS). In addition K 1 row from WS at the end of front piece after casting on 2 sts towards the neck so that last row on both right and left front piece is worked from WS. BACK PIECE: Work left front piece on to circular needle (= K from RS), cast on (16) 16-16-16-18 (18-18) new sts (= back of neck) and work right front piece on to circular needle (= K from RS) = (100) 124-144-158-178 (202-230) sts. NOW MEASURE PIECE FROM MARKERS ON SHOULDERS. Continue to work in garter st back and forth on needle. When piece measures (5) 6-7-7-8 (8-8) cm / (2") 2⅜"-2¾"-2¾"-3⅛" (3⅛"-3⅛"), bind off sleeve sts at beg of every row in each side as follows: bind off (13) 22-30-33-40 (46-51) sts 1 time, 4 sts (2) 2-2-3-3 (4-5) times in total and 2 sts (5) 5-5-4-4 (4-5) times in total = (38) 44-48-52-58 (62-68) sts remain on row. Continue until piece measures approx. (20) 24-28-30-33 (36-40) cm / (8") 9½"-11"-11¾"-13" (14¼"-15¾") – fold piece double at markers on shoulders and make sure that front and back pieces are the same length. Insert another marker. THEN MEASURE PIECE FROM THIS MARKER. Continue in garter st while AT THE SAME TIME dec for leg opening as follows: Dec 1 st at beg of row by K 2 tog inside 1 edge st. Repeat dec at beg of every row (both from RS and from WS) until there are (14) 14-14-14-16 (16-16) sts remain on row ((12) 15-17-19-21 (23-26) sts are now dec in each side and piece measures approx. (5) 6-7-8-9 (10-11) cm / (2") 2⅜"-2¾"-3⅛"-3½" (4"-4⅜") from marker). Then work STRIPES - see explanation above. When 1 repetition with stripes has been worked (= 4 ridges in garter st), beg inc for leg opening (continue stripes as before) and inc as follows: Cast on 1 new st at the end of every row (both from RS and from WS) until there are (22) 28-32-36-42 (46-52) sts on row (= (4) 7-9-11-13 (15-18) inc in each side). Then cast on 2 new sts at the end of the next 8 rows = (38) 44-48-52-58 (62-68) sts on row. READ ALL OF THE FOLLOWING SECTION BEFORE CONTINUING! Work without inc until 2 ridges have been worked with off white after 2 ridges with light mint. Insert another marker. Continue stripes as before while AT THE SAME TIME on 1st row from RS dec 1 st at the edge in each side for flap by K the 2 sts tog inside 1 edge st. Repeat dec at the edge in each side every 4th row (i.e. every other row from RS) (4) 6-8-9-11 (11-14) more times (= (5) 7-9-10-12 (12-15) times in total). Finish last stripe (i.e. in size premature + 0/1 month + 1/3 months + 3/4 years stop after 2 ridges with light mint, and in size 6/9 months + 12/18 months + 2 years stop after 2 ridges with off white). Then work in garter st with off white in all sizes while AT THE SAME TIME on 1st row from RS dec 1 st at the edge in each side for flap as before and dec for 3 buttonholes evenly - 1 buttonhole should be 2 cm / ¾" in from each side and 1 buttonhole in the middle. Repeat dec at the edge in each side on 4th row 1 more time. After last dec at the top of flap there are (24) 26-26-28-30 (34-34) sts on row, (4) 4-4-6-6 (6-4) ridges at the top in off white have been worked in total and flap measures approx. (6) 8-9-10-12 (12-14) cm / (2⅜") 3⅛"-3½"-4"-4¾" (4¾"-5½") from last marker. Bind off. ASSEMBLY: Sew underarm and side seams tog edge to edge in outer loops of edge sts. CROCHET EDGE: Crochet on hook size 2.5 mm/C with off white around the entire opening on body as follows (i.e. along bottom edge on right front piece, up along front piece, around the neck, down along the other front piece, along bottom edge on left front piece and then along leg opening, flap and the other leg opening): ROUND 1: 1 sc in first st, * ch 1, skip 1 st, 1 sc in next st *, repeat from *-* and finish with 1 sl st in first sc. ROUND 2: 1 sc in first ch, * ch 2, 1 sc in next ch *, repeat from *-* and finish with 1 sl st in first sc. Fasten off. Work the same way at the bottom around both sleeves. MORE ASSEMBLY: Fold the flap over to RS. Sew on buttons on front pieces (button the middle button on flap through both flap and right front edge). Sew a small stitch or a snap button in each side where leg opening meets side on body so that flap is kept in place (marked by a star on chart). |
||||
Diagram explanations |
||||
|
||||
 |
||||
 |
||||
Have you finished this pattern?Tag your pictures with #dropspattern #firstimpressiononesie or submit them to the #dropsfan gallery. Do you need help with this pattern?You'll find 18 tutorial videos, a Comments/Questions area and more by visiting the pattern on garnstudio.com. © 1982-2026 DROPS Design A/S. We reserve all rights. This document, including all its sub-sections, has copyrights. Read more about what you can do with our patterns at the bottom of each pattern on our site. |
||||


With over 40 years in knitting and crochet design, DROPS Design offers one of the most extensive collections of free patterns on the internet - translated to 17 languages. As of today we count 324 catalogs and 12290 patterns - 12280 of which are translated into English (US/in).
We work hard to bring you the best knitting and crochet have to offer, inspiration and advice as well as great quality yarns at incredible prices! Would you like to use our patterns for other than personal use? You can read what you are allowed to do in the Copyright text at the bottom of all our patterns. Happy crafting!
Post a comment to pattern DROPS Baby 25-26
We would love to hear what you have to say about this pattern!
If you want to leave a question, please make sure you select the correct category in the form below, to speed up the answering process. Required fields are marked *.