
Popular categories
Looking for a yarn?


Comments / Questions (195)
![]() Klára wrote:
Klára wrote:
Dobrý den, mám problém se sešitím celého svetru dohromady. Nedaří se mi zakomponovat trup ke zbytku dílů. Sešila jsem náramenice předního a zadního dílu a na zátylku jsem sešila légu. Zbyl mi trup, který zdánlivě nikam nepatří. Doufám, že není špatně upletený. Prosím o názornější návod případně lepší fotografie výsledného produktu i zezadu. Děkuji za odpověď
02.08.2017 - 14:28DROPS Design answered:
Dobrý den, svetr se plete téměř vcelku - tělo jako jeden díl rozdělený u průramků na 2 přední + záda a pak samostatně 2x rukáv. Máte-li sešité náramenice i légu, máte trup komplet :-) Zbývá vsadit rukávy. Hodně zdaru! Hana
03.08.2017 - 13:01
![]() Paola wrote:
Paola wrote:
Buongiorno!! Vorrei sapere se la misura della larghezza segnata sul modello (48cm per la taglia s) va raddoppiata per controllare la larghezza totale o se la banda traforata si sovrappone, per cui vanno aggiunti i cm corrispondenti. Grazie!!
29.06.2017 - 15:09DROPS Design answered:
Buongiorno Paola. La banda traforata sul davanti è sovrapposta. La larghezza indicata, quindi 48 cm, è la larghezza del dietro. Buon lavoro!
29.06.2017 - 15:46
![]() Dajana wrote:
Dajana wrote:
Hallo, wie muss man das mit dem Linken Vorderteil gemeint? fange ich vorne bei dem Muster an oder bei glatt rechts? weil eine absatz später soll man ja die Maschen für die Schluter abnehmen aber das is ja in der Hinreihe die ja rechts gestrickt wird wäre schön, wenn Sie mir helfen könnten lg :)
22.02.2017 - 20:50DROPS Design answered:
Liebe Dajana, für das linke Vorderteil stricken Sie glatt mit 1 Randm an der Seite und die Blendemaschen wie zuvor bis die Arbit misst 62-72cm (siehe Größe), dann die Maschen für die Schulter abketten (am Anfang einer Hinreihe). Viel Spaß beim stricken!
23.02.2017 - 09:54
![]() Mariette wrote:
Mariette wrote:
Hallo,Als ik met patroon A1 begin en heb nog 21 steken op de naald begin ik dan weer met een omslag ? Of bewaar ik die omslag tot voor de laatste kantsteek?
16.02.2017 - 15:58DROPS Design answered:
Hoi Mariette. Je breit het telpatroon zoals eerst (van de goede kant): 1 omsl, 2 r samen tot aan de kantsteek.
22.02.2017 - 12:32
![]() June wrote:
June wrote:
Hi, I'm having the same problem as Jo re the front neck edge and working it into the back. Seems like too much "edging" to fit !!!
13.08.2016 - 19:59DROPS Design answered:
Dear June, the 9-10-11 cm (see size) you are working on each collar sts will be sewn along neckline on back piece and the sts on collar on left front piece and on right front piece will be sewn tog. Happy knitting!
15.08.2016 - 10:55Jo wrote:
I am having a lot of trouble with the band at the neck join of the L and R front pieces...It is too long. Do you only cast off the 5 stitches on the R side? And is it right that the join is in a point? Thanking you in anticipation. I don't think I can bear unpicking it again.
12.08.2016 - 02:40DROPS Design answered:
Dear Jo, when working on left front piece, you will cast off the 5 sts at the beg of next 3 row from RS + cast off the remaining 5-7 sts. These 20-22 sts will be sewn tog to the collar sts on right front piece to shape collar. The collar (beg/end of rows) will then be sewn along neckline on back piece (sts cast off for neckline). Happy knitting!
15.08.2016 - 10:30
![]() June wrote:
June wrote:
In the pattern it shows 2 rows for A1, different instructions. When I watch the tutorial, it was one row repeated (knit row). When is the 2nd row used??
27.07.2016 - 01:19DROPS Design answered:
Dear June, A.1 is worked over 2 sts and 4 rows, Row 1 (from RS): YO, slip 1, K1, psso Row 2 (from WS): P2 Row 3: K2 tog, YO Row 4: P2 Happy knitting!
27.07.2016 - 08:09
![]() Sara wrote:
Sara wrote:
When completing the band at front where it says to bind off 5 stitches on each of the right side row 3 times then bind off last 5 stitches when you begin these bind offs are you working in the pattern stitches of A1or do you switch to stockinette at this point?
06.05.2016 - 22:07DROPS Design answered:
Dear Sara, continue working the sts in A.1 as before when shaping the collar. Happy knitting!
09.05.2016 - 09:14
![]() Gaby wrote:
Gaby wrote:
Ik begin en eindig iedere naald van het lijf met een kantsteek, toch zien de zijkanten van linker en rechter voorbies er anders uit. Hoe krijg ik deze hetzelfde?
17.04.2016 - 15:34DROPS Design answered:
Hoi Gaby. Hoe brei je de kantsteek? Brei je de kantsteek r in elke naald? Dan zou de steken aan beide zijkanten ook gelijk zijn.
18.04.2016 - 14:15
![]() Doris wrote:
Doris wrote:
Liebes Drops, Zum einen wollte ich bemerken, dass auch ich wie so viele andere nicht auf 16 M auf 10 cm komme. Ich nehme trotzdem 5,5 Nadeln und hab es umgerechnet. Bei mir sind es 13,5 M auf 10 cm. Meine Frage nun ist: wie breit ist das halbe Rumpfteil wirklich, inkl. Blenden, das Mass bei Ihnen ist 48 cm für Größe S. Ich vermute, dass die Blenden doppelt gelegt sind im Schaubild/Diagramm. Und: wie breit ist die Blende? Danke schoen und viele Gruesse Doris
04.02.2016 - 20:44DROPS Design answered:
Sie sollten es vielleicht noch einmal mit einer kleineren Nadel versuchen. Das ganze Rumpfteil misst ca. 116 cm, davon entfallen ca. 17 cm auf jede Blende.
06.02.2016 - 09:08
|
||||||||||||||||
Nathalie#nathaliecardigan |
||||||||||||||||
 |
 |
|||||||||||||||
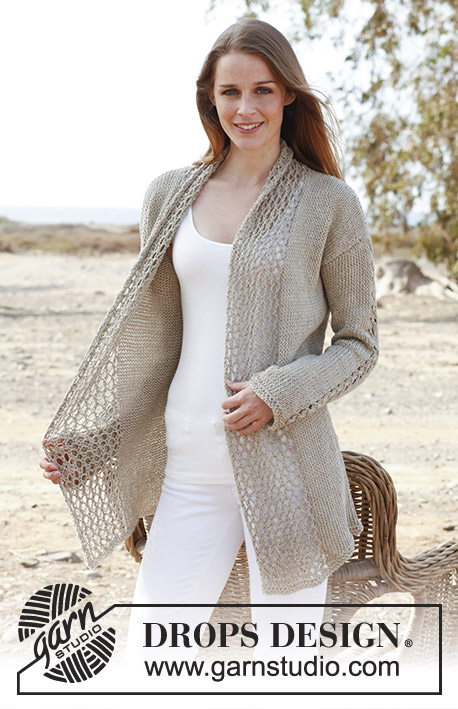
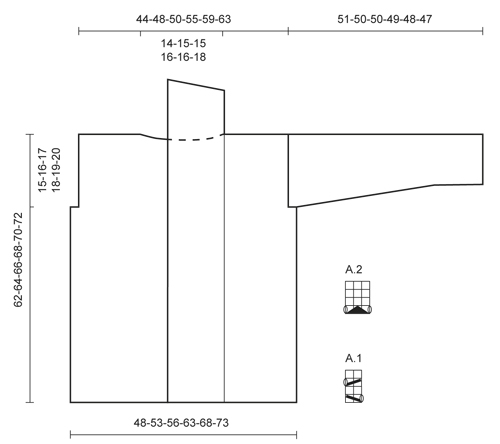
Knitted DROPS jacket in "Bomull Lin" or "Paris". Size: S - XXXL.
DROPS 146-1 |
||||||||||||||||
|
GARTER ST: K back and forth on all rows. 1 ridge = 2 rows K. PATTERN: See diagrams A.1 and A.2. Diagrams show all rows in 1 pattern repetition seen from RS. INCREASE TIP: Inc 1 st by making 1 YO, on next row work YO twisted (i.e. work in the back loop of st instead front) to avoid holes. -------------------------------------------------------- BODY: Worked back and forth on circular needle from mid front. Loosely cast on 170-184-196-218-234-248 sts on circular needle size 6 mm / US 10 with Bomull-Lin. Work 4 rows in garter st - read explanation above. Work next row (= RS) as follows: 1 edge st in garter st, work A.1 9-9-9-10-10-10 times in total (= 19-19-19-21-21-21 sts on right band), work in stockinette st until 19-19-19-21-21-21 sts remain, work A.1 9-9-9-10-10-10 times in total, finish with 1 edge st in garter st (= 19-19-19-21-21-21 sts on left band). Continue with A.1 on band in each side and in stockinette st over the middle sts. REMEMBER THE GAUGE! When piece measures 47-48-49-50-51-52 cm / 18½"-19"-19¼"-19¾"-20"-20½", insert 2 markers; 47-50-53-59-63-66 sts in from each side (= 76-84-90-100-108-116 sts between markers on back piece). On next row bind off 3-4-5-6-7-8 sts for armholes on each side of both markers (= 6-8-10-12-14-16 bind off sts in each side). Now divide the piece and finish each part separately. BACK PIECE: = 70-76-80-88-94-100 sts. Continue in stockinette st with 1 edge st in garter st in each side until piece measures 60-62-64-66-68-70 cm / 23⅝"-24⅜"-25¼"-26"-26¾"-27½". Then bind off the middle 20-22-22-24-24-26 sts for neck and finish each shoulder separately. Continue to bind off 1 st on next row from neck = 24-26-28-31-34-36 sts remain on the shoulder. Bind off when piece measures 62-64-66-68-70-72 cm / 24½"-25¼"-26"-26¾"-27½"-28½". LEFT FRONT PIECE: = 44-46-48-53-56-58 sts. Continue in stockinette st with 1 edge st in garter st in the side and 19-19-19-21-21-21 band sts mid front until piece measures 62-64-66-68-70-72 cm / 24½"-25¼"-26"-26¾"-27½"-28½". On beg of next row from RS bind off the first 24-26-28-31-34-36 sts for shoulder = 20-20-20-22-22-22 sts remain on band. Continue with A.1 with 1 edge st in garter st in each side until band measures 9-10-10-10-10-11 cm / 3½"-4"-4"-4"-4"-4½" from shoulder. At the beg of the next 3 rows from RS bind off the first 5 sts = 5-5-5-7-7-7 sts remain. Loosely bind off these sts on next row from RS. RIGHT FRONT PIECE: Work as left front piece but reversed. SLEEVE: Worked back and forth on needle. Loosely cast on 35-37-39-39-41-43 sts and work 4 rows in garter st. Work next row (= RS) as follows: 1 edge st in garter st, K 15-16-17-17-18-19, work A.2 over the next 3 sts, K 15-16-17-17-18-19, finish with 1 edge st in garter st. Continue in stockinette st with A.2 over the middle 3 sts until finished measurements. When piece measures 8 cm / 3⅛", inc 1 st inside 1 edge st in each side - Read INCREASE TIP above. Repeat inc every 6½-5½-4½-4-3½-3½ cm / 2½"-2¼"-1¾"-1½"-1¼"-1¼" 6-7-8-9-10-10 more times (7-8-9-10-11-11 times in total) = 49-53-57-59-63-65 sts. When piece measures 49-48-47-45-44-42 cm / 19¼"-19"-18½"-17 ¾"-17¼"-16½", insert a marker in each side of sleeve (for assembly). When piece measures 51-50-50-49-48-47 cm / 20"-19¾"-19¾"-19¼"-19"-18½" (shorter measurements in the larger sizes because of wider shoulders), loosely bind off all sts. ASSEMBLY: Sew shoulder seams inside bind off edges. Sew bind off edge on bands tog, WS against WS. Sew bands along neckline in the back of neck. Sew in sleeves, sew sleeve seams inside 1 edge st - NOTE: The section worked after the marker at the top of sleeve, should fit the bind off for armhole. |
||||||||||||||||
Diagram explanations |
||||||||||||||||
|
||||||||||||||||
 |
||||||||||||||||
Have you finished this pattern?Tag your pictures with #dropspattern #nathaliecardigan or submit them to the #dropsfan gallery. Do you need help with this pattern?You'll find 23 tutorial videos, a Comments/Questions area and more by visiting the pattern on garnstudio.com. © 1982-2026 DROPS Design A/S. We reserve all rights. This document, including all its sub-sections, has copyrights. Read more about what you can do with our patterns at the bottom of each pattern on our site. |
||||||||||||||||


With over 40 years in knitting and crochet design, DROPS Design offers one of the most extensive collections of free patterns on the internet - translated to 17 languages. As of today we count 324 catalogs and 12290 patterns - 12280 of which are translated into English (US/in).
We work hard to bring you the best knitting and crochet have to offer, inspiration and advice as well as great quality yarns at incredible prices! Would you like to use our patterns for other than personal use? You can read what you are allowed to do in the Copyright text at the bottom of all our patterns. Happy crafting!
Post a comment to pattern DROPS 146-1
We would love to hear what you have to say about this pattern!
If you want to leave a question, please make sure you select the correct category in the form below, to speed up the answering process. Required fields are marked *.