
Popular categories
Looking for a yarn?


Comments / Questions (195)
![]() Susann Schultz wrote:
Susann Schultz wrote:
Hallo, leider sehe ich bei der Anleitung nicht die dazugehörigen Diagramme. Kann man mir diese zukommen lassen oder noch auf der Internetseite zur Verfügung stellen? Gruß Susann
16.02.2022 - 16:18DROPS Design answered:
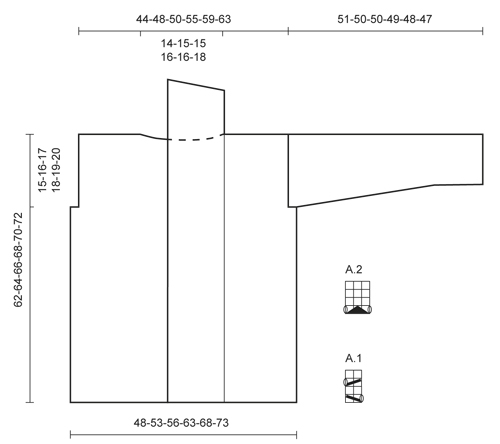
Liebe Frau Schultz, beide Diagramme A.1 und A.2 sehen Sie bei der Maßskizze, es sind kleine Diagramme: A.1 über 2 Maschen und 4 Reihen und A.2 über 3 Maschen und 4 Reihen. Viel Spaß beim stricken!
16.02.2022 - 17:05
![]() Ruanna wrote:
Ruanna wrote:
Hi there. I’m flying through this lovely pattern and as I’m binding off the back at 66cm (L), I’m wondering if it might be good to know what height the model in the photo is and which size garment she’s wearing ? I ask, as I’m unsure the finished garment will be long enough for the person I’m knitting it for. Thank you!
25.05.2021 - 21:24DROPS Design answered:
Dear Ruanna, unfortunately we do not know the exact height of the modell, but she is most probably wears a sime M. However, you can find the measurements of the finished item (in cm-s) on the schematic drawing at the bottom of the pattern. You might want to compare those numbers to an existing, well finning item. Happy Knitting.
25.05.2021 - 21:53
![]() Marina wrote:
Marina wrote:
Bonjour. Taille M: partie dos/devant: quand on arrive à 48cm hauteur totale, on place 2 marqueurs à 50m. Puis au rang suivant rabattre les 4 mailles pour les emmanchures avant de diviser l’ouvrage. Je ne comprends pas ce que signifie ici « au rang suivant », faire un rang comme jusqu’à présent et rabattre sur l’envers ?
14.04.2021 - 13:36DROPS Design answered:
Bonjour Marina, l'ouvrage doit mesurer 48 cm lorsque l'on rabat les mailles des emmanchures, autrement dit, mesurez, placez vos marqueurs et lorsque vous tricotez le rang suivant (comme avant, sur l'endroit ou sur l'envers, peu importe), rabattez les mailles des emmanchures et terminez chaque partie séparément. Bon tricot!
14.04.2021 - 15:14
![]() Lucie wrote:
Lucie wrote:
Bonjour, Pour la bande de devant gauche j'ai rabattu 4 fois 5 m côté épaule. Pour le devant droit aussi. Sauf que maintenant pour l'assemblage j'ai 2 pointes en plus de 3 cms de chaque côté des bandes. De plus, l'encolure est de 15 cms et chaque bordure est de 10 cms (et 13 cms avec la pointe) soit 20 cms côté encolure et 26 cms côté extérieur.? Pouvez vous svp me donner quelques explications. Merci
20.02.2021 - 15:00DROPS Design answered:
Bonjour Lucie, les mailles rabattues du col côté gauche et droit vont être assemblées entre elles, puis vous allez pouvoir coudre le côté (épaule) du col le long de l'encolure dos. cette vidéo montre un col châle simple, mais devrait vous aider à visualiser comment procéder, car la technique sera ici la même. Bon tricot!
22.02.2021 - 08:01
![]() Ulrike Hartmannschott wrote:
Ulrike Hartmannschott wrote:
Danke für die schnelle Antwort. Ich werde es ausprobieren wenn die Jacke fertig ist. Mit freundlichen Grüssen U. Hartmannschott
28.02.2020 - 10:07
![]() Ulrike Hartmannschott wrote:
Ulrike Hartmannschott wrote:
Hallo, meine Kante in 2 Krausrippen kippt ständig nach oben um. Woran liegt das? Wie kann ich das beheben? Danke für Ihre Antwort. U. Hartmannschott
27.02.2020 - 17:11DROPS Design answered:
Liebe Frau Hartmannschott, stimmt Ihre Maschenprobe auch mit Krausrippen? Sie können die fertige Jacke mit Stecknadeln auf einer geeigneten Unterlage spannen, anfeuchten (z.B. mit einer Sprühflasche für Blumen) und trocknen lassen, danach entfernen Sie die Stecknadeln, dann sollte sich der Rand nicht mehr rollen. Viel Spaß beim stricken!
28.02.2020 - 07:45
![]() Belén wrote:
Belén wrote:
Cuando acabamos los aumentos de las mangas,se especifica poner dos marcadores y se intuye que hay que seguir tejiendo,pero la verdad es que no termino de entender...la pregunta es,como continuo una vez llegado a ese punto?.Muchisimas Gracias de antemano y un salido
05.12.2019 - 19:32DROPS Design answered:
Hola Belen. Hasta los marcapuntos se trabaja el cuerpo entero. A partir de los marcapuntos se cierran los puntos para la sisas ( ver en el patrón el número de puntos según la talla) y se terminan los delanteros y la espalda por separado.
15.12.2019 - 19:27
![]() Cécile wrote:
Cécile wrote:
Bonjour, je voudrais tricoter la veste 146 .1 mais je ne sais pas quoi choisir entre les 2 laines. Pourriez vous m'aider SVP. Merci d'avance
08.08.2019 - 17:07DROPS Design answered:
Bonjour Cécile, vous pouvez consulter le nuancier de chaque qualité pour voir la composition; pour toute aide au choix d'un fil, contactez votre magasin DROPS, même par mail ou téléphone. Bon tricot!
09.08.2019 - 08:10
![]() Kim Sprout wrote:
Kim Sprout wrote:
I cant figure out the pattern diagram for Nathalie. A1 makes no sense. I took the pattern to my local yarn shop and 2 ladies there couldn't figure it out either.
31.07.2019 - 17:38DROPS Design answered:
Hi Kim, A.1 consists of: Row 1: 1 yarn over, slip 1 stitch as if to knit, knit 1 and pass the slipped stitch over. Row 2: Knit Row 3: Knit 2 together, 1 yarn over Row 4: Knit I hope this helps and happy knitting!
01.08.2019 - 12:34
![]() Karen Bredenhann wrote:
Karen Bredenhann wrote:
What type of wool is this, eg DK, chunky, Aran? This brand of wool is not available in South Africa and I need to know the thickness so I can search for the closest substitute. Thank you so much.
17.06.2019 - 20:05DROPS Design answered:
Dear Mrs Bredenhann, you will find all informations about our yarns here and find all DROPS stores shipping worldwide here 18.06.2019 - 08:32
|
||||||||||||||||
Nathalie#nathaliecardigan |
||||||||||||||||
 |
 |
|||||||||||||||
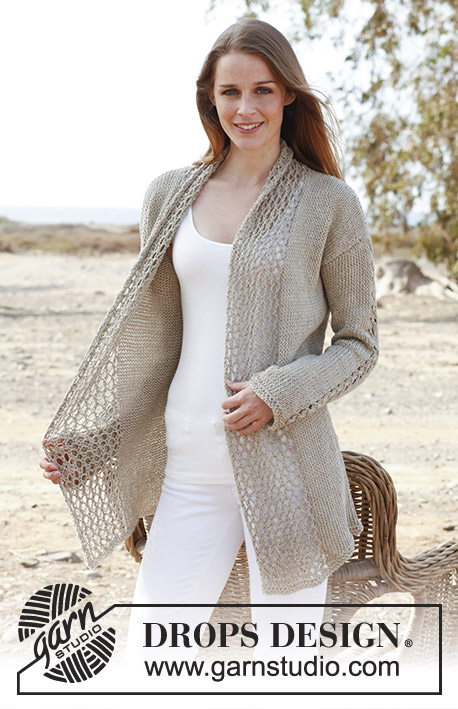
Knitted DROPS jacket in "Bomull Lin" or "Paris". Size: S - XXXL.
DROPS 146-1 |
||||||||||||||||
|
GARTER ST: K back and forth on all rows. 1 ridge = 2 rows K. PATTERN: See diagrams A.1 and A.2. Diagrams show all rows in 1 pattern repetition seen from RS. INCREASE TIP: Inc 1 st by making 1 YO, on next row work YO twisted (i.e. work in the back loop of st instead front) to avoid holes. -------------------------------------------------------- BODY: Worked back and forth on circular needle from mid front. Loosely cast on 170-184-196-218-234-248 sts on circular needle size 6 mm / US 10 with Bomull-Lin. Work 4 rows in garter st - read explanation above. Work next row (= RS) as follows: 1 edge st in garter st, work A.1 9-9-9-10-10-10 times in total (= 19-19-19-21-21-21 sts on right band), work in stockinette st until 19-19-19-21-21-21 sts remain, work A.1 9-9-9-10-10-10 times in total, finish with 1 edge st in garter st (= 19-19-19-21-21-21 sts on left band). Continue with A.1 on band in each side and in stockinette st over the middle sts. REMEMBER THE GAUGE! When piece measures 47-48-49-50-51-52 cm / 18½"-19"-19¼"-19¾"-20"-20½", insert 2 markers; 47-50-53-59-63-66 sts in from each side (= 76-84-90-100-108-116 sts between markers on back piece). On next row bind off 3-4-5-6-7-8 sts for armholes on each side of both markers (= 6-8-10-12-14-16 bind off sts in each side). Now divide the piece and finish each part separately. BACK PIECE: = 70-76-80-88-94-100 sts. Continue in stockinette st with 1 edge st in garter st in each side until piece measures 60-62-64-66-68-70 cm / 23⅝"-24⅜"-25¼"-26"-26¾"-27½". Then bind off the middle 20-22-22-24-24-26 sts for neck and finish each shoulder separately. Continue to bind off 1 st on next row from neck = 24-26-28-31-34-36 sts remain on the shoulder. Bind off when piece measures 62-64-66-68-70-72 cm / 24½"-25¼"-26"-26¾"-27½"-28½". LEFT FRONT PIECE: = 44-46-48-53-56-58 sts. Continue in stockinette st with 1 edge st in garter st in the side and 19-19-19-21-21-21 band sts mid front until piece measures 62-64-66-68-70-72 cm / 24½"-25¼"-26"-26¾"-27½"-28½". On beg of next row from RS bind off the first 24-26-28-31-34-36 sts for shoulder = 20-20-20-22-22-22 sts remain on band. Continue with A.1 with 1 edge st in garter st in each side until band measures 9-10-10-10-10-11 cm / 3½"-4"-4"-4"-4"-4½" from shoulder. At the beg of the next 3 rows from RS bind off the first 5 sts = 5-5-5-7-7-7 sts remain. Loosely bind off these sts on next row from RS. RIGHT FRONT PIECE: Work as left front piece but reversed. SLEEVE: Worked back and forth on needle. Loosely cast on 35-37-39-39-41-43 sts and work 4 rows in garter st. Work next row (= RS) as follows: 1 edge st in garter st, K 15-16-17-17-18-19, work A.2 over the next 3 sts, K 15-16-17-17-18-19, finish with 1 edge st in garter st. Continue in stockinette st with A.2 over the middle 3 sts until finished measurements. When piece measures 8 cm / 3⅛", inc 1 st inside 1 edge st in each side - Read INCREASE TIP above. Repeat inc every 6½-5½-4½-4-3½-3½ cm / 2½"-2¼"-1¾"-1½"-1¼"-1¼" 6-7-8-9-10-10 more times (7-8-9-10-11-11 times in total) = 49-53-57-59-63-65 sts. When piece measures 49-48-47-45-44-42 cm / 19¼"-19"-18½"-17 ¾"-17¼"-16½", insert a marker in each side of sleeve (for assembly). When piece measures 51-50-50-49-48-47 cm / 20"-19¾"-19¾"-19¼"-19"-18½" (shorter measurements in the larger sizes because of wider shoulders), loosely bind off all sts. ASSEMBLY: Sew shoulder seams inside bind off edges. Sew bind off edge on bands tog, WS against WS. Sew bands along neckline in the back of neck. Sew in sleeves, sew sleeve seams inside 1 edge st - NOTE: The section worked after the marker at the top of sleeve, should fit the bind off for armhole. |
||||||||||||||||
Diagram explanations |
||||||||||||||||
|
||||||||||||||||
 |
||||||||||||||||
Have you finished this pattern?Tag your pictures with #dropspattern #nathaliecardigan or submit them to the #dropsfan gallery. Do you need help with this pattern?You'll find 23 tutorial videos, a Comments/Questions area and more by visiting the pattern on garnstudio.com. © 1982-2026 DROPS Design A/S. We reserve all rights. This document, including all its sub-sections, has copyrights. Read more about what you can do with our patterns at the bottom of each pattern on our site. |
||||||||||||||||


With over 40 years in knitting and crochet design, DROPS Design offers one of the most extensive collections of free patterns on the internet - translated to 17 languages. As of today we count 324 catalogs and 12290 patterns - 12280 of which are translated into English (US/in).
We work hard to bring you the best knitting and crochet have to offer, inspiration and advice as well as great quality yarns at incredible prices! Would you like to use our patterns for other than personal use? You can read what you are allowed to do in the Copyright text at the bottom of all our patterns. Happy crafting!
Post a comment to pattern DROPS 146-1
We would love to hear what you have to say about this pattern!
If you want to leave a question, please make sure you select the correct category in the form below, to speed up the answering process. Required fields are marked *.