
Popular categories
Looking for a yarn?


Comments / Questions (22)
![]() Grammatico wrote:
Grammatico wrote:
Pourquoi ne pas mettre en Français s'il vous plait. Ce serait déjà plus facile, votre modèle est magnifique et j'aimerais pouvoir le faire.
07.06.2018 - 10:37DROPS Design answered:
Bonjour Mme Grammatico, tous nos modèles sont disponibles en français, changez simplement la langue en cliquant sur la flèche sous la photo et sélectionnez "français". Bon tricot!
07.06.2018 - 10:56
![]() Evelyn wrote:
Evelyn wrote:
Hallo, ich habe eine Frage zum Rückenteil: "GLEICHZEITIG auf beiden Seite für das Armloch abk.: 0-1-2-2-3-4 Mal 3 M., 1-1-1-3-3-4 Mal 2 M. und 3-2-1-2-1-1 Mal 1 M." Verstehe ich es richtig, dass ich für Größe L so vorgehe: 1. und 2. R.: die ersten 3 M und die letzten 3 M abketten. 3. R.: die ersten 2 M und die letzten 2 M abketten. 4. R.: die erste und letzte M abketten. Vielen Dank vorab!
11.04.2018 - 10:55DROPS Design answered:
Liebe Evelyn, in der Größe L sollen Sie: 3 M 2 x, 2 M x 1 und 1 Mx 1 auf beiden Seiten abketten, dh Reihe 1 bis 4: die ersten 3 M abketten, R 5 + 6: die ersten 2 M abketten und R 7 + 8: die erste Masche abketten = 18 M werden insgesamt abgekettet (= 9 auf beiden Seiten), es waren 85 M - 18 = 67 M bleiben übrig. Viel Spaß beim stricken!
11.04.2018 - 13:42
![]() Evelyn wrote:
Evelyn wrote:
Hallo, ich habe eine Frage zum Rückenteil: "GLEICHZEITIG auf beiden Seite für das Armloch abk.: 0-1-2-2-3-4 Mal 3 M., 1-1-1-3-3-4 Mal 2 M. und 3-2-1-2-1-1 Mal 1 M." Verstehe ich es richtig, dass ich für Größe L so vorgehe: 1. und 2. R.: die ersten 3 M und die letzten 3 M abketten. 3. R.: die ersten 2 M und die letzten 2 M abketten. 4. R.: die erste und letzte M abketten. Vielen Dank vorab!
11.04.2018 - 10:54
![]() Jenny wrote:
Jenny wrote:
Hello again, i have finished knitting the cardigan and it fits everywhee apart from the A1 pattern on the arms and body. It is alot tighter in the pattern places. What do you think has gone wrong? I didn't think my tension had changed. Thanks you
24.11.2015 - 14:43DROPS Design answered:
Dear Jenny, when working stranded pattern, your work may look tighter if the strands were a bit tight from WS - blocking your piece may help - Contact your DROPS store, they will give you tips & advices for individidual finishing. Happy knitting!
24.11.2015 - 15:20
![]() Sarah wrote:
Sarah wrote:
Hi drops, i have reached 20cm on sleeve, i am just curious how to work the pattern and increases? Surely increasing will throw the pattern out?
18.11.2015 - 20:35DROPS Design answered:
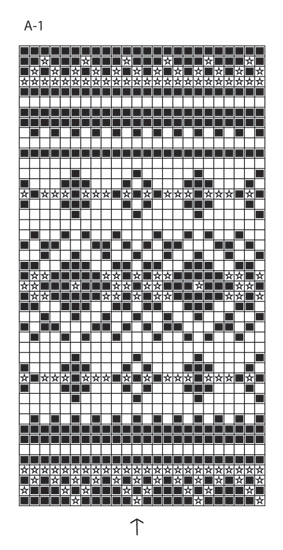
Dear Sarah, the st with the arrow in diagram should be the middle st of the sleeve (mid on top). Count from this st/square in diagram where to start diagram for your size. And work the inc st on mid under sleeve following diagram. Happy knitting!
19.11.2015 - 09:16
![]() Jenny wrote:
Jenny wrote:
Hello again, I am completely confused about how to knit the shawl collar, i've read and re read and still no clue, please help. Thank you.
18.11.2015 - 12:43DROPS Design answered:
Dear Jenny, pick up sts from RS along neck from marker on right front piece, along neck to marker on left front piece, adjust number of sts and work in rib K2/P2 with 2 sts in garter sts on each side until collar measures 5 cm. Then inc 1 st in each of the middle P2 sections seen from RS (you will have rib K2/P2 on each side and K2/P3 x 12 in the middle of collar. Then work some short rows (leave 10 sts unworked at the end of each row until there are 40 sts unworked each side) then work 1 row over all sts and cast off. Happy knitting!
18.11.2015 - 17:32
![]() Jenny wrote:
Jenny wrote:
Hello, I have reached A1 and I need to know what to do on the WS. Do I just read the pattern as row 1 RS row 2 WS row 3 RS row 4 WS? Or do I just purl the WS like I have from the start? Thank you
14.11.2015 - 22:18DROPS Design answered:
Dear Jenny, see answer below to read more about diagrams. 1 square in diagram = 1 st x 1 row, you will also work pattern from WS. Happy knitting!
16.11.2015 - 09:33
![]() Jenny wrote:
Jenny wrote:
Hello, this is my first pattern with a chart. What do I do on the WS? Thanks.
14.11.2015 - 17:15DROPS Design answered:
Dear Jenny, please click here to read more about diagram. Happy knitting!
16.11.2015 - 09:20
![]() Agnieszka wrote:
Agnieszka wrote:
So schön der Pulli ist, ich komme leider mit dem Ärmel nicht weiter :-( fange ich nach 20 cm Gesamtlänge schon mit dem Muster an, während ich noch die Zunahmen mache? Oder mache ich erst die Zunahmen fertig und mache DANN das Muster? Es mag an mir liegen, aber die Anleitung ist zum Teil nicht einfach zu verstehen. Vielen Dank schon mal für die Antwort!
12.03.2014 - 16:58DROPS Design answered:
Liebe Agnieszka, Sie beginnen bei 20 cm mit dem Muster und stricken gleichzeitig die Zunahmen weiter. Die Anleitung wurde an dieser Stelle gerade etwas umformuliert, damit es etwas eindeutiger wird. Viel Spaß beim Weiterstricken!
13.03.2014 - 09:27Carmen wrote:
Hello, I'm not sure I undestand how to decrease for the neck in the right front piece: The instr. say: when piece measures 48-49-50-51-52-53 cm, dec 1 st towards the neck - SEE DECREASE TIP! Repeat dec on every 4th row a total of 2 times, and on every 8th row a total of 2 times. Does this mean the following? Dec 1 st, knit 3 rows, dec 1st,knit 3 rows, dec 1 st, knit 7 rows, dec 1 . Thanks in advance, Carmen
12.12.2013 - 18:43DROPS Design answered:
Dear Carmen, you are correct, you will *work 1 row and dec 1 st, then work 3 rows*, repeat one more time from *-*, then *work 1 row and dec 1 st, work 7 rows*, repeat one more time from *-* (size S). Happy knitting!
12.12.2013 - 20:51
|
||||||||||
Blue Mountain#bluemountainjacket |
||||||||||
|
|
||||||||||
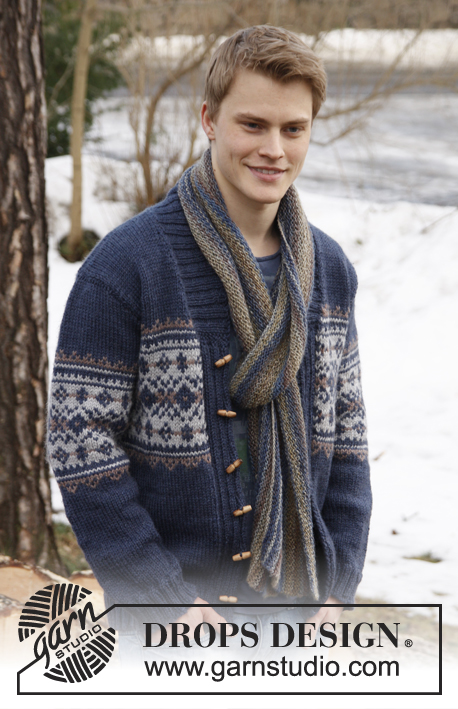
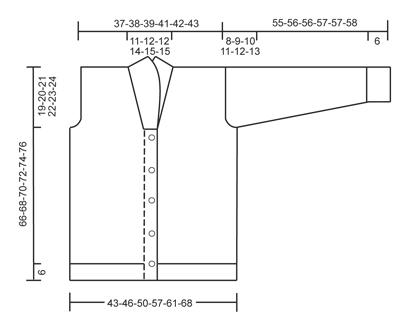
Knitted DROPS jacket with pattern and shawl collar in ”Alaska”. Size: S - XXXL.
DROPS Extra 0-817 |
||||||||||
|
GARTER ST (back and forth on needle): K all rows. BUTTON HOLES: Bind off for 6 button holes on right band, all bind offs are done from RS. 1 button hole = P tog 5th and 6th st from mid front and make 1 YO. On next row K the YO. Bind off for button holes when piece measures: SIZE S: 6, 14, 22, 30, 38 and 46 cm / 2⅜",5½",8¾",11¾",15",18". SIZE M: 6, 15, 23, 31, 39 and 47 cm / 2⅜",6",9",12¼",15¼",18½". SIZE L: 6, 15, 24, 32, 40 and 48 cm / 2⅜",6",9½",12½",15¾",19". SIZE XL: 6, 15, 24, 33, 41 and 49 cm / 2⅜",6",9½",13",16⅛",19¼". SIZE XXL: 6, 15, 24, 33, 42 and 50 cm / 2⅜",6",9½",13",16½",19¾". SIZE XXXL: 6, 15, 24, 33, 42 and 51 cm / 2⅜",6",9½",13",16½",20". PATTERN: See diagram A-1 – the diagram shows 2 repetitions in width. Work entire pattern in stockinette st. DECREASE TIP (applies to neckline at the front): Dec inside 1 edge st in garter st. All dec are done from RS. Dec after 1 edge st as follows: Slip 1 st as if to K, K 1, psso. Dec before 1 edge st as follows: K 2 tog. -------------------------------------------------------- BODY: Worked back and forth on circular needle from mid front. Cast on 210-226-242-270-286-314 sts on circular needle size 4 mm / US 6 with dark blue Alaska. P 1 row from WS. Then work next row as follows from RS: 2 edge sts in GARTER ST - see explanation above - * K 2/P 2 *, repeat from *-* until 4 sts remain and finish with K 2 and 2 edge sts in GARTER ST. Continue rib like this until piece measures 6 cm / 2⅜". AT THE SAME TIME when piece measures 6 cm / 2⅜", beg to bind off for BUTTON HOLES on right band – see explanation above! After rib, switch to circular needle size 5 mm / US 8 and work next row from RS as follows: 2 sts in garter st, K 2, P 2, K 2, P 2, K 2, P 2 (= 14 band sts), work in stockinette st until 14 sts remain while AT THE SAME TIME dec 49-53-57-61-65-69 sts evenly (do not dec over bands), finish with P 2, K 2, P 2, K 2, P 2, K 2 and 2 sts in garter st = 161-173-185-209-221-245 sts. Insert a marker 44-47-50-56-59-65 sts in from each side (= 73-79-85-97-103-115 sts between markers on back piece). Move the markers upwards when working. Then work in stockinette st with 14 band sts in each side towards mid front as before. REMEMBER THE GAUGE! When piece measures 30-31-32-33-34-35 cm / 11¾"-12¼"-12½"-13"-13⅜"-13¾" work chart A-1 as follows: Work 14 band sts as before with dark blue, work A-1 until 15 sts remain, work 1st st in A-1 (so that pattern beg and ends the same way on each side of band) and finish with 14 band sts in dark blue as before. When piece measures 47-48-49-50-51-52 cm / 18½"-19"-19¼"-19¾"-20"-20½", work next row from RS as follows: bind off the first 13 sts, insert a marker (this marks where to beg the pick up for collar), work the rest of row. Turn and bind off the first 13 sts, insert a marker (this marks where to end the pick up for collar), work the rest of row = 135-147-159-183-195-219 sts. Now divide the piece at the markers in the sides and finish each part separately. BACK PIECE: = 73-79-85-97-103-115 sts. Continue A-1 (when A-1 has been worked 1 time vertically, continue with dark blue until finished measurements) – AT THE SAME TIME bind off for armholes at beg of every row in each side: 3 sts 0-1-2-2-3-4 times, 2 sts 1-1-1-3-3-4 times and 1 st 3-2-1-2-1-1 times = 63-65-67-69-71-73 sts remain on needle. When piece measures 64-66-68-70-72-74 cm / 25¼"-26"-26¾"-27½"-28⅜"-29⅛", bind off the middle 17-19-19-21-23-23 sts for neck. Now finish each shoulder separately. Continue to bind off 1 st on next row from neck = 22-22-23-23-23-24 sts remain on the shoulder. Bind off when piece measures 66-68-70-72-74-76 cm / 26"-26¾"-27½"-28⅜"-29⅛"-30". RIGHT FRONT PIECE: = 31-34-37-43-46-52 sts. Continue A-1 as on back piece with 1 edge st in garter st towards mid front - AT THE SAME TIME bind off for armhole in the side as on back piece. AT THE SAME TIME when piece measures 48-49-50-51-52-53 cm / 19"-19¼"-19¾"-20"-20½"-21", dec 1 st towards the neck - SEE DECREASE TIP! Repeat dec on every 4th row a total of 2-2-3-3-4-4 times, and on every 8th row a total of 2-3-2-3-3-3 times. After all bind offs and dec are done, 22-22-23-23-23-24 sts remain on shoulder. Bind off when piece measures 66-68-70-72-74-76 cm / 26"-26¾"-27½"-28⅜"-29⅛"-30". LEFT FRONT PIECE: Work as right front piece but reversed. SLEEVE: Worked in the round on double pointed needles, switch to circular needle when needed. Cast on 48-48-52-52-56-56 sts on double pointed needles size 4 mm / US 6 with dark blue. K 1 round, then work rib = K 2/P 2. When piece measures 6 cm / 2⅜", switch to double pointed needles size 5 mm / US 8. K 1 round while AT THE SAME TIME dec 9-7-9-7-9-9 sts evenly = 39-41-43-45-47-47 sts. Insert a marker at beg of round (= mid under sleeve). Then work in stockinette st. When piece measures 7 cm / 2¾", inc 1 st on each side of marker mid under sleeve. Repeat inc every 4½-4-3½-3-3-2½ cm / 1¾"-1½"-1¼"-1⅛"-⅞" a total of 9-10-11-12-13-15 times = 57-61-65-69-73-77 sts. AT THE SAME TIME when piece measures 20 cm / 8", insert a marker in the middle st on round (= mid on top of sleeve). Work chart A-1. NOTE: St marked with arrow in chart should be the st with marker mid on top of sleeve. When A-1 has been worked 1 time vertically, continue with dark blue until finished measurements. AT THE SAME TIME when piece measures 47-47-46-46-45-45 cm / 18½"-18½"-18"-18"-17¾"-17¾" (shorter measurements in the larger sizes because of longer sleeve cap), bind off 4-6-6-6-6-6 sts mid under sleeve. Then work back and forth on needle until finished measurements. AT THE SAME TIME bind off for sleeve cap at beg of every row in each side: 2 sts 0-2-3-3-3-4 times and 1 st 3-3-4-4-5-6 times. Then bind off 2 sts in each side until piece measures 54-55-55-56-56-57 cm / 21¼"-21⅝"-21⅝"-22"-22"-22½", then bind off 3 sts 1 time in each side. Bind off the remaining sts, piece measures approx. 55-56-56-57-57-58 cm / 21⅝"-22"-22"-22½"-22½"-22¾". ASSEMBLY: Sew shoulder seams and sew in sleeves. SHAWL COLLAR: Worked back and forth on circular needle size 4 mm / US 6 with dark blue. Pick up sts from RS inside 1 edge st along the neck as follows: Start mid front at the marker on right front piece, pick up sts up to shoulder, then along the neck and down along left front piece until marker = approx. 90 to 110 sts. K 1 row from WS while AT THE SAME TIME inc no of sts to 118-122-126-130-138-146. Then work rib as follows (seen from RS): 2 sts in garter st, * K 2, P 2 *, repeat from *-* and finish with K 2 and 2 sts in garter st. Continue like this until collar measures approx. 5 cm / 2". Now inc 1 st in each of the middle 12 P-sections, seen from RS (= back of neck) = 130-134-138-142-150-158 sts. Then work K over K and P over P until collar measures approx. 7 cm / 2¾". Now work as follows: Work 1 row on all sts as before and then slip the first 10 sts worked on a stitch holder, turn piece, work the next row and then slip the first 10 sts worked at the beg of row on another stitch holder. Turn piece, work the next row and then slip the first 10 sts worked at the beg of row on the first stitch holder, turn piece, work the next row and then slip the first 10 sts worked at the beg of row on the other stitch holder. Continue like this until there are a total of 40 sts on the stitch holders in each side. Then slip sts from stitch holders back on needle and work 1 row as before over all 130-134-138-142-150-158 sts. NOTE: To avoid holes in every transition where sts where put on holders, slip bar before next st twisted on to left needle and work tog with first st on needle. Bind off with K over K and P over P. Neatly fasten collar with stitches in each side towards band – sew edge to edge to avoid a chunky seam. Sew on buttons. |
||||||||||
Diagram explanations |
||||||||||
|
||||||||||
 |
||||||||||
 |
||||||||||
Have you finished this pattern?Tag your pictures with #dropspattern #bluemountainjacket or submit them to the #dropsfan gallery. Do you need help with this pattern?You'll find 19 tutorial videos, a Comments/Questions area and more by visiting the pattern on garnstudio.com. © 1982-2026 DROPS Design A/S. We reserve all rights. This document, including all its sub-sections, has copyrights. Read more about what you can do with our patterns at the bottom of each pattern on our site. |
||||||||||


With over 40 years in knitting and crochet design, DROPS Design offers one of the most extensive collections of free patterns on the internet - translated to 17 languages. As of today we count 324 catalogs and 12291 patterns - 12281 of which are translated into English (US/in).
We work hard to bring you the best knitting and crochet have to offer, inspiration and advice as well as great quality yarns at incredible prices! Would you like to use our patterns for other than personal use? You can read what you are allowed to do in the Copyright text at the bottom of all our patterns. Happy crafting!
Post a comment to pattern DROPS Extra 0-817
We would love to hear what you have to say about this pattern!
If you want to leave a question, please make sure you select the correct category in the form below, to speed up the answering process. Required fields are marked *.