
Popular categories
Looking for a yarn?


Comments / Questions (61)
![]() Adrienne Garriepy wrote:
Adrienne Garriepy wrote:
What is the gauge for body sleeves and collar?
13.10.2018 - 06:18DROPS Design answered:
Dear Mrs Garriepy, gauge for this pattern is 21 sts x 28 rows in stockinette stitch = 4"x4" - if you have the correct tension in stockinette stitch, you should have correct tension for the jumper and the double seed st. Happy knitting!
15.10.2018 - 08:13
![]() Adrienne M Garriepy wrote:
Adrienne M Garriepy wrote:
What is the gauge on body and on collar?
13.10.2018 - 06:17Natalie wrote:
A beautiful pattern. I made one for myself in S and one in XL for my very tall boyfriend - both GORGEOUS. I used drops Lima in a single colour (off white - no stripes). Just divine. Looooove them.
18.08.2018 - 07:33
![]() Heike Ortlieb-Meinert wrote:
Heike Ortlieb-Meinert wrote:
Zum Kragen: Die M. für den rechten Kragen werden hinter den Hilfsfadenmaschen aufgenommen. Warum liegen die M. für den linken Kragen dann hinter dem rechten Kragen und nicht davor?
05.08.2018 - 11:15DROPS Design answered:
Liebe Frau Ortlieb-Meinert, der linke Kragen liegt (= beginnt) unter den rechten Kragen. Wenn Sie den rechten Kragen gestrickt haben, legen Sie die Maschen vom Hilfsnadel (= die, Sie schon beim rechten Kragen gestrickt haben) auf eine Nadel und dann wie der rechte Kragen stricken. Viel Spaß beim stricken!
06.08.2018 - 09:20
![]() Heike Ortlieb-Meinert wrote:
Heike Ortlieb-Meinert wrote:
Zum Kragen: Die Maschen für den rechten Kragen werden von den von den M. hinter dem Hilfsfaden aufgenommen. Warum liegen die M. vom linken Kragen dann hinter dem rechten Kragen und nicht davor?
05.08.2018 - 11:13
![]() Estelita wrote:
Estelita wrote:
The collar instructions talk about a second marker for the short side. There is no instruction where to place the second marker.
09.04.2018 - 01:03DROPS Design answered:
Dear Estelita, you insert a marker at the end of 1st row from S, and you work short rows until piece measures 8-9-10-11 cm from marker (measured from the marker which is now on the shorter side of the collar). Happy knitting!
09.04.2018 - 11:03
![]() Angela wrote:
Angela wrote:
I don't understand the collar instructions. If the length of the collar to the back neck is 22 cm where do I begin the short rows. Thank you.
14.03.2018 - 01:51DROPS Design answered:
Hi Angela, You start the short rows when the collar measures 19-20-21-22-23-24 cm / 7½''-8''-8¼''-8¾''-9''-9½'', beginning on the next row from the right side as follows: Working now in garter stitch, work 2 rows over all sts, work 2 rows over the outermost 20 sts towards mid front *, repeat from *-* until piece measures 8-9-9-10-10-11 cm / 3 1/8"-3½"-3½"-4"-4"-4 3/8" from marker (in the shorter side). Bind off. I hope this helps and happy knitting!
14.03.2018 - 08:03
![]() Wiki wrote:
Wiki wrote:
Przepraszam, znalazłam już ten punkt, umknęło mi to zdanie przy pierwszym pytaniu, natomiast mam inne, napisane jest "zostawić oczka na drucie na lewą stronę dekoltu" ale odjętych oczek zostaje zero, więc nie mamy co przenosić na drut pomocniczy, natomiast w lewej stronie wzoru napisane jest że mamy nabrać oczka za prawą stroną, czyli notabene nabieramy je od nowa. We wzorze wkradł się więc błąd?
24.09.2017 - 16:18DROPS Design answered:
Witaj Wiki, na drucie pomocniczym jest 26-28-30-32-34-36 o. środkowych na dekolt. Na prawą część kołnierza należy nabrać ponownie 26-28-30-32-34-36 o. (ponad oczkami na drucie pomocniczym) – ta część kołnierza będzie na wierzchu. Na lewą część kołnierza bierzemy z powrotem oczka (te od spodu) z drutu pomocniczego i przerabiamy jak prawą część tylko w odwrotnym układzie. Na końcu doszywamy kołnierz do przodu swetra i zszywamy go na środku tyłu. Opis faktycznie nie jest zbyt jasny. Postaramy się go jaśniej sformułować. Powodzenia!
24.09.2017 - 23:17
![]() Wiki wrote:
Wiki wrote:
"PRAWA STRONA KOŁNIERZA: Nabrać ponownie i przer. na lewej stronie robótki oczka z drutu pomocniczego na środku przodu (zostawić o. na lewą część kołnierza na drucie pomocniczym)" -Ale przecież wcześniej robiąc przód i tył zamykaliśmy oczka na dekolt i nie mam nic na żadnym drucie pomocniczym? Skąd się te oczka wzięły?
23.09.2017 - 15:18DROPS Design answered:
Witaj Wiki, cieszę się, że jest to jasne. Miłej pracy. Pozdrawiamy
24.09.2017 - 23:05
![]() Françoise wrote:
Françoise wrote:
Bonjour, ma belle fille avait commencé ce modèle et je suis en train de lui terminer... par contre, si possible, comme je ne tricote pas en rond (problème d'articulations), j'ai dû modifier pour faire le modèle avec deux aiguilles... j'en arrive aux manches pour lesquelles je n'ai pas de dimensions sur le patron en dehors de la longueur sous emmanchure... serait il possible de les obtenir svp ? merci
19.09.2016 - 10:54DROPS Design answered:
Bonjour Françoise, quand vous tricotez un modèle en allers et retours au lieu d'en rond, vous pouvez simplement suivre ces indications en ajustant les explications. Vous trouverez toutes les mesures pour chaque taille dans le schéma en bas de page, soit longueur avant emmanchure = longueur totale - hauteur d'emmanchures = la hauteur indiquée sous "Dos & devant" pour rabattre les m des emmanchures. Bon tricot!
19.09.2016 - 11:37
|
|
Anna#annasweater |
|
|
|
|
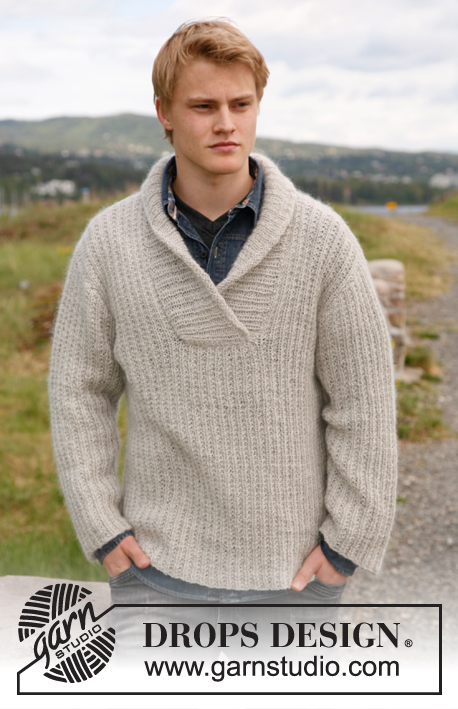
Knitted sweater with shawl collar, stripes and seed stitch in DROPS Karisma. Sizes S to XXXL.
DROPS 135-25 |
|
|
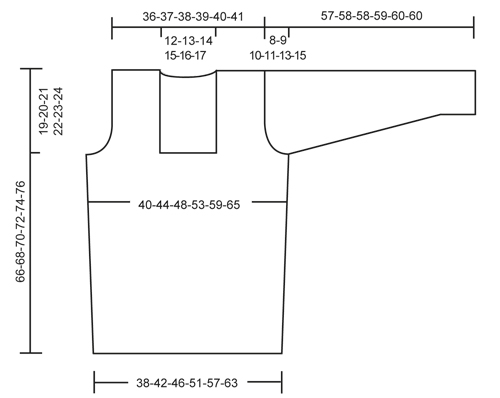
DOUBLE SEED ST: 1st round: * K 1, P 1 *, repeat from *-*. 2nd round: K over K and P over P. 3rd round: * P 1, K 1 *, repeat from *-*. 4th round: P over P and K over K. Repeat rounds 1-4. STRIPES 1 (applies to body): Work medium gray and light gray alternately every 11-11-11½-12-12-12½ cm / 4⅜"-4⅜"-4½"-4¾"-4¾"-4⅞". NOTE: Measure first stripe from cast on edge. Work medium gray in the last stripe until finished measurements. STRIPES 2 (applies to sleeve): Work medium gray and light gray alternately every 10 cm / 4". NOTE: Measure first stripe from cast on edge. Work medium gray in the last stripe until finished measurements. INCREASE TIP: Inc 1 st by making 1 YO, on next round K YO twisted (i.e. work in back loop of st instead front) to avoid holes. PATTERN 1: Row 1 (= from RS): K all sts. Row 2 (= from WS): * K 1, P 1 *, repeat from *-*. Repeat 1st and 2nd row. GARTER ST (back and forth on needle): K all rows. -------------------------------------------------------- BODY: Worked in the round on circular needle. Cast on 213-234-255-288-318-351 sts on circular needle size 3.5 mm / US 4 with light gray. Work rib as follows: * K 1, P 2 *, repeat from *-*. When piece measures 4 cm / 1½", K 1 round while AT THE SAME TIME dec 53-58-63-72-78-87 sts evenly (dec by K tog approx. every 3rd and 4th st) = 160-176-192-216-240-264 sts. Then switch to circular needle size 4 mm / US 6 and continue in the round with DOUBLE SEED ST and STRIPES 1 - See explanation above. REMEMBER THE GAUGE! When piece measures 15-15-16-16-17-17 cm / 6"-6"-6¼"-6¼"-6¾"-6¾", insert 2 markers in the piece; 1 at beg of round and 1 after 80-88-96-108-120-132 sts (marks the sides). On next round, inc 1 st on each side of every marker - Read INCREASE TIP above = 4 new sts on round. NOTE: Work the new sts in double seed st. Repeat inc one more time when piece measures 30-30-32-32-34-34 cm / 11¾"-11¾"-12½"-12½"-13½"-13½" = 168-184-200-224-248-272 sts. Continue until piece measures 47-48-49-50-51-52 cm / 18½"-19"-19¼"-19¾"-20"-20½" (adjust so that last round is 2nd or 4th round in seed st). Then divide the piece at the markers and finish each part separately. BACK PIECE: = 84-92-100-112-124-136 sts (1st row = WS). Continue with STRIPES 1 and DOUBLE SEED ST - while AT THE SAME TIME casting/binding off for armholes in each side on every other row as follows: bind off 3 sts 1 time, 2 sts 0-1-2-4-6-8 times and 1 st 1-2-3-4-5-6 times = 76-78-80-82-84-86 sts. When piece measures 64-66-68-70-72-74 cm / 25¼"-26"-26¾"-27½"-28⅜"-29⅛", bind off the middle 24-26-28-30-32-34 sts for neck and finish each shoulder separately. Then dec 1 st on next row from neck (dec by working the outermost 2 sts towards the neck tog) = 25 sts remain on shoulder in all sizes. Loosely bind off all sts when piece measures 66-68-70-72-74-76 cm / 26"-26¾"-27½"-28⅜"-29⅛"-30". FRONT PIECE: = 84-92-100-112-124-136 sts. Continue with STRIPES 1 and DOUBLE SEED ST. Start bind offs for armholes as on back piece on 1st row (= RS) - AT THE SAME TIME slip the middle 26-28-30-32-34-36 sts on a stitch holder for neck at the front, now finish each part separately. Bind off for armholes in each side as on back piece. When all bind offs are done, 25 sts remain on each shoulder. Continue with STRIPES 1 and DOUBLE SEED ST. When piece measures 66-68-70-72-74-76 cm / 26"-26¾"-27½"-28⅜"-29⅛"-30", loosely bind off all sts. SLEEVE: Worked in the round on double pointed needles. Cast on 63-66-69-72-75-78 sts on double pointed needles size 3.5 mm / US 4 with light gray. Work rib as follows: * K 1, P 2 *, repeat from *-*. When piece measures 4 cm / 1½", K 1 round while AT THE SAME TIME dec 15-16-17-18-19-20 sts evenly (dec by K tog approx. every 3rd and 4th st) = 48-50-52-54-56-58 sts. Switch to double pointed needles size 4 mm / US 6 and insert a marker at beg of round. Then continue in the round with DOUBLE SEED ST and STRIPES 2 - See explanation above. When piece measures 8-8-7-7-8-7 cm / 3⅛"-3⅛"-2¾"-2¾"-3⅛"-2¾", inc 1 st on each side of marker = 2 new sts. Repeat inc every 4-3½-3-2½-2-2 cm / 1½"-1¼"-1⅛"-⅞"-¾"-¾" a total of 10-11-13-15-17-18 times = 68-72-78-84-90-94 sts. When piece measures 49-49-48-48-47-45 cm / 19¼"-19¼"-19"-19"-18½"-17¾" (shorter measurements in the larger sizes because of longer sleeve cap and broader shoulder width) bind off 3 sts on each side of marker (= 6 sts mid under sleeve). Then work back and forth on circular needle. Continue to bind off for sleeve cap in each side on every other row as follows: bind off 2 sts 2-2-3-3-5-5 times, and then 1 st 3-4-4-5-5-6 times. Then bind off 2 sts in each side until piece measures 56-57-57-58-59-59 cm / 22"-22½"-22½"-22¾"-23¼"-23¼", then bind off 3 sts 1 time in each side. Loosely bind off all sts. Piece measures approx. 57-58-58-59-60-60 cm / 22½"-22¾"-22¾"-23¼"-23⅝"-23⅝". ASSEMBLY: Sew the shoulder seams tog. Sew in the sleeves. RIGHT COLLAR: Worked back and forth on circular needle size 4 mm / US 6 with medium gray. Knit up from WS sts from stitch holder mid front (leave sts on the stitch holder for left collar) = 26-28-30-32-34-36 sts. Then work PATTERN 1 - See explanation above, beg from next row (= RS). NOTE: Insert a marker at the end of 1st row from RS. When collar measures 19-20-21-22-23-24 cm / 7½"-8"-8¼"-8¾"-9"-9½", continue in GARTER ST - See explanation above - until finished measurements - while at the same time working short rows (beg from next row from RS) as follows: * Work 2 rows over all sts, work 2 rows over the outermost 20 sts towards mid front *, repeat from *-* until piece measures 8-9-9-10-10-11 cm / 3⅛"-3½"-3½"-4"-4"-4⅜" from marker (in the shorter side). Bind off. LEFT COLLAR: Pick up the sts from stitch holder from WS behind right collar = left collar is underneath right collar. Work the same way as on right collar but reversed (work short rows over the outermost 20 sts towards mid front). ASSEMBLY: Sew right collar to right front piece and left collar to left front piece in outermost sts. Sew collar tog mid back and sew the neck on back piece. STRAP: Make 1 strap as follows: Twine 2 strands of 40 cm / 16" medium gray and fold them double. Make another strap the same way. Fasten the straps approx. 4 and 11 cm / 1½" and 4½" up from bottom edge on right collar (approx. 1 cm / ½" from edge mid front). Pull the yarn ends through the collar and fasten the ends on the back. Sew button on left collar approx. 2 and 4 cm / ¾" and 1½" in from seam for left front piece. |
|
 |
|
Have you finished this pattern?Tag your pictures with #dropspattern #annasweater or submit them to the #dropsfan gallery. Do you need help with this pattern?You'll find 14 tutorial videos, a Comments/Questions area and more by visiting the pattern on garnstudio.com. © 1982-2026 DROPS Design A/S. We reserve all rights. This document, including all its sub-sections, has copyrights. Read more about what you can do with our patterns at the bottom of each pattern on our site. |


With over 40 years in knitting and crochet design, DROPS Design offers one of the most extensive collections of free patterns on the internet - translated to 17 languages. As of today we count 324 catalogs and 12284 patterns - 12274 of which are translated into English (US/in).
We work hard to bring you the best knitting and crochet have to offer, inspiration and advice as well as great quality yarns at incredible prices! Would you like to use our patterns for other than personal use? You can read what you are allowed to do in the Copyright text at the bottom of all our patterns. Happy crafting!
Post a comment to pattern DROPS 135-25
We would love to hear what you have to say about this pattern!
If you want to leave a question, please make sure you select the correct category in the form below, to speed up the answering process. Required fields are marked *.