
Popular categories
Looking for a yarn?


Comments / Questions (216)
![]() Laura wrote:
Laura wrote:
Hei! Ohjeessa neuvotaan luomaan 10s ja jakamaan ne tasan 4:lle puikolle, onko virhe vai miten se tapahtuu?
10.02.2011 - 20:44
![]() Kapkamore wrote:
Kapkamore wrote:
Je nádherný, upletu si jej...
09.01.2011 - 11:17
![]() DROPS Deutsch wrote:
DROPS Deutsch wrote:
Die Krausrippe wird rund gestrickt und da strickt man 1 R. re., 1 R. li.
28.12.2010 - 19:15M. Weis wrote:
In der Strickanleitung steht: 1 Krausrippe = 1 Runde re, 1 Runde li. Ich glaube das sollte heissen: 1 R re, 1 R re Gruss M
27.12.2010 - 01:00
![]() Elin wrote:
Elin wrote:
Det ser ut som ärmarna är stickade i rätstickning och inte avig slätstickning. Om man har avig slätstickning och syr fast på rätstickningen ser det väl lite konstigt ut?
17.12.2010 - 10:55
![]() Anette wrote:
Anette wrote:
Jeg har lige strikket jakken (som komplet nybegynder) og den er blevet SÅ flot, men som Susanne er jeg endt op i ca 420 masker og den rette størrelse, men tror måske jeg skulle have taget ud lidt oftere, den er lidt stram i omkredsen. Dog ikke noget lidt stræk i våd tilstand ikke kan rette på. Den er fantastisk flot :-)
10.12.2010 - 08:58
![]() DROPS Design wrote:
DROPS Design wrote:
Det kan lønne seg å legge opp på 5 pinner og strikke med en 6. pinne. Da får man en rapport per pinne og det er letter å telle.
22.11.2010 - 13:01
![]() Elin wrote:
Elin wrote:
Det borde stå rundsticka 60cm istället för 40cm för att 40 blir för liten. Jag började på strumpstickor och jag kunde gå direkt till 60cm.
23.10.2010 - 20:09
![]() Drops Design wrote:
Drops Design wrote:
Det er svært at vide hvad der er gået galt. Det lyder som om at du muligvis ikke har fået strikkefastheden helt nøjagtig... ? Men hvis du stopper nu ved 420 m vil jakken da passe dig? Så kan du jo bare følge den første størrelse. God fornøjelse!
11.10.2010 - 09:56
![]() Susanne wrote:
Susanne wrote:
Strikker str l skal tage ud til 520m har strikket til 420m og har kun 4 nøgler tilbage, som skal bruges til ærmer, hvad er der galt, kan læse her at opskriften passer, men jeg kan ikke få det til at passe, skal der være udt til 520m, for så bliver den for stor og jeg vil ikke ha nok garn.
09.10.2010 - 08:09
|
|||||||||||||||||||||||||
Fleur du Népal#fleurdunepaljacket |
|||||||||||||||||||||||||
 |
 |
||||||||||||||||||||||||
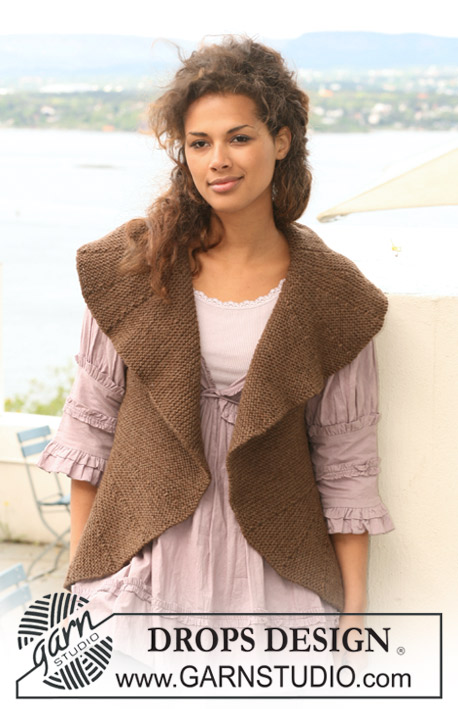
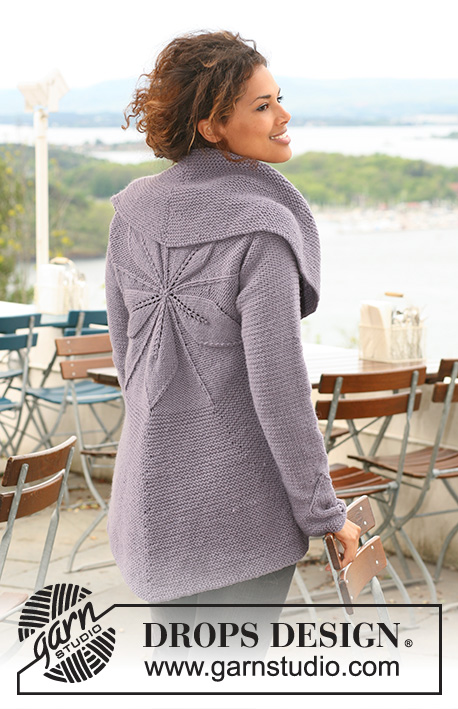
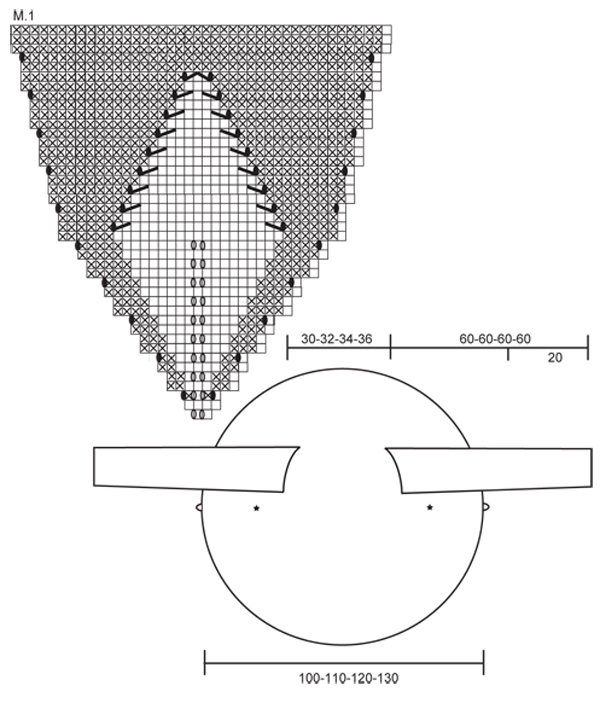
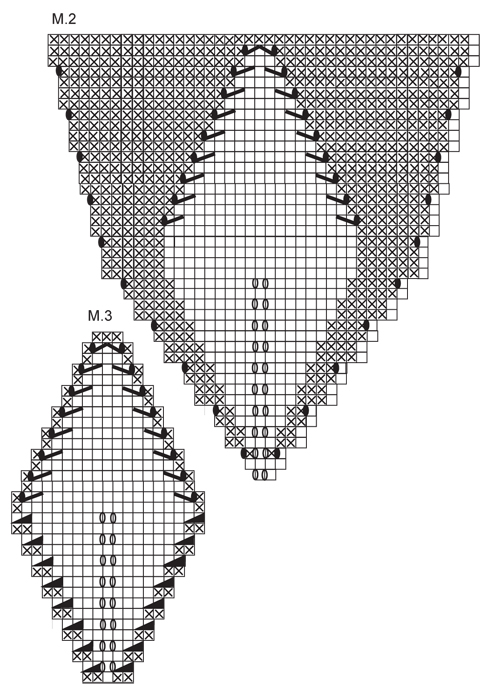
DROPS jacket knitted in a circle in ”Nepal” with leaf pattern. Size S to XXXL
DROPS 126-1 |
|||||||||||||||||||||||||
|
PATTERN: See diagram M.1, M.2 and M.3 - diagrams show 1 pattern repeat from RS. GARTER ST (in the round): K 1 round, P 1 round. INCREASING TIP (applies to after M.1 and M.2): Inc 1 st by each marker per inc (i.e. inc 10 sts per round) – inc alternately to the left and to the right of all markers by making 1 YO – on next round work YO into back of loop to avoid a hole. -------------------------------------------------------- BODY PIECE: Worked in the round as a circle from mid back. Cast on 10 sts with Nepal and distribute them on 4 double pointed needles size 5 mm / US 8. Insert a marker at beg of round = mid piece towards the neck. Continue as follows in the round: M.1, M.2, M.2, M.2 and M.1 (= a total of 5 repeats across the round). Change to circular needle as you inc sts. REMEMBER THE GAUGE! When M.1/M.2 is complete piece measures approx 19 cm / 7½" from the middle and there are 210 sts on needle. Now insert a marker in each of the 5 stockinette sts in the middle of pattern repeat (the inc were made each side of this st), and a marker in st mid between the first 5 markers (= a total of 10 markers). READ ALL OF THE FOLLOWING SECTION BEFORE CONTINUING! PATTERN: Continue in GARTER ST – see above – at the same time on first round after M.1/M.2 inc by all markers - SEE INCREASING TIP - and repeat the inc on every 4th round as you go along. ARMHOLE: At the same time after 2-6-10-14 rows garter st (= 220-230-240-250 sts on needle) work next round as follows (this is a round without inc): Work 25-27-29-31 sts, bind off 32-34-37-40 sts (= armhole), work 106-108-108-108 sts, bind off 32-34-37-40 sts (= armhole) and work 25-27-29-31 sts. On next round cast on 32-34-37-40 new sts over each armhole. Continue and inc as before until there is a total of 480-520-560-600 sts on needle – piece now measures approx 50-55-60-65 cm / 19½"-21½"-23½"-25½"" from the middle, finish after a P round and bind off LOOSELY with K sts. SLEEVE: Worked back and forth on needle. Cast on 45-47-49-51 sts (includes 1 edge st each side) on needle size 5 mm / US 8 with Nepal, K 6 rows (first row = WS). Continue as follows (first row = WS): 1 edge st, 19-20-21-22 sts in reverse stockinette st , M.3, 19-20-21-22 sts in reverse stockinette st and 1 edge st. Continue in pattern like this. After M.3 continue in reverse stockinette st on all sts. AT THE SAME TIME when piece measures 20 cm / 8" inc 1 st each side, repeat the inc on every 4-3.5-3-2.5 cm / 1½"-1¼"-1⅛"-⅞" a total of 8-9-11-13 times = 61-65-71-77 sts. When piece measures 52 cm / 20½" for all sizes bind off for sleeve cap at beg at beg of every row each side: 4 sts 1 time, then 2 sts each side until piece measures approx 60 cm / 23½". Bind off remaining sts. ASSEMBLY: Sew sleeve seams inside 1 edge st. Set in sleeves placing the middle of sleeve cap where the distance between armholes is shortest (i.e. where the first st was bind off on the first armhole and the last st was bind off on the other sleeve) and with the sleeve seams where the distance between the armholes is longest (i.e. the opposite side). BUTTONS: Place the jacket as shown in chart with RS facing up. Measure approx 5 cm / 2" down from the bottom of armhole on the left side of piece and then 10 cm / 4" out in a 90 degree angle and sew 1 button on here from RS – see the marking. Sew on the other button on the other side in the same position, but sew it on from WS. BUTTONHOLE LOOPS: Crochet 1 buttonhole loop with hook size 4 mm / G/6 in bind off row each side to fit the buttons (see chart). 1 LOOP = 1 sc in bind off row on jacket, ch 5, skip approx 1 cm / ⅜" and fasten with 1 sc in bind off row. |
|||||||||||||||||||||||||
Diagram explanations |
|||||||||||||||||||||||||
|
|||||||||||||||||||||||||
 |
|||||||||||||||||||||||||
 |
|||||||||||||||||||||||||
Have you finished this pattern?Tag your pictures with #dropspattern #fleurdunepaljacket or submit them to the #dropsfan gallery. Do you need help with this pattern?You'll find 26 tutorial videos, a Comments/Questions area and more by visiting the pattern on garnstudio.com. © 1982-2026 DROPS Design A/S. We reserve all rights. This document, including all its sub-sections, has copyrights. Read more about what you can do with our patterns at the bottom of each pattern on our site. |
|||||||||||||||||||||||||


With over 40 years in knitting and crochet design, DROPS Design offers one of the most extensive collections of free patterns on the internet - translated to 17 languages. As of today we count 324 catalogs and 12284 patterns - 12274 of which are translated into English (US/in).
We work hard to bring you the best knitting and crochet have to offer, inspiration and advice as well as great quality yarns at incredible prices! Would you like to use our patterns for other than personal use? You can read what you are allowed to do in the Copyright text at the bottom of all our patterns. Happy crafting!
Post a comment to pattern DROPS 126-1
We would love to hear what you have to say about this pattern!
If you want to leave a question, please make sure you select the correct category in the form below, to speed up the answering process. Required fields are marked *.