
Popular categories
Looking for a yarn?


Comments / Questions (216)
![]() Maureen wrote:
Maureen wrote:
Het spijt me maar ik heb problemen met M3 we starten met 5 steken, dan moet je er 2 samen av breien een lus een r nog een lus en dan opnieuw 2 av samen: dat blijft toch 5 steken? jullie hebben er dan plots 2 steken bij in de volgende rij... misschien moeten er nog lussen gezet worden na het samenbreien van de av steken? mvg maureen
28.10.2013 - 22:34DROPS Design answered:
Hoi Maureen. Ja, dat klopt, maar je breit maar meer steken mee in het patroon. Bijvoorbeeld (maat S/M) nld 3: 1 kant st, 18 st in averechte tricotst, M.3 (= 2 av, 3 r, 2 av), 18 st in averechte tricotst en 1 kant st. Ik hoop dat het zo duidelijk is.
29.10.2013 - 14:56
![]() Carol wrote:
Carol wrote:
I want to knit this pattern but have neve used a chart before, dose M1,M2,M3 mean the different sizes or different parts of the pattern? im alittle confused and any help would be great thanks x
19.10.2013 - 11:00DROPS Design answered:
Dear Carol, M1, M2, M3 are the diagram for each pattern to be repeated as stated under written explanation, in diag, 1 square=1 st x 1 round. Start reading on the bottom right corner towards the left every round. Happy knitting!
21.10.2013 - 10:42
![]() Cornelia wrote:
Cornelia wrote:
Das runde Jackenteil samt Blätter ist schnell fertig geworden - aber - der Ärmel(52cm, dann 62cm lang) will nicht so recht gelingen! wie hoch und breit in cm sollte er nach 4M abn. sein damit er ins "Armloch" paßt? Danke für die Hilfe
23.06.2013 - 13:03DROPS Design answered:
Liebe Cornelia, die Masse des Ärmel können Sie anhand der Maschenprobe an jeder belieben Stelle ausrechnen – aber eigentlich ist das nicht nötig, denn wenn die Maschenprobe gestimmt hat, sollte er perfekt passen. Zur Höhe: sie beginnen nach 52 cm mit der Abn für die Armkugel, also mit den 1 x 4 M abn. Dann über 8 cm (also bis zu einer Höhe von 60 cm) an jedem R-Anfang 2 M abn.
24.06.2013 - 10:56
![]() Aurelie wrote:
Aurelie wrote:
Bonjour il est indiqué "AIGUILLES DROPS DROITES, DOUBLES POINTES et CIRCULAIRES (40 et 80 cm) n° 5 " : je ne comprends pas bien. Combien de jeux d'aiguilles faut-il exactement? les double-pointes sont n°5 et de 40 cm? je n'en trouve pas dans vre catalogue (il n'y a que 20 cm) ni en magasin en ligne drops... merci de m'éclairer... amicalement
27.05.2013 - 22:15DROPS Design answered:
Bonjour Aurélie, pour réaliser ce modèle, il vous faut des aiguilles 5 (ou la taille adéquate pour obtenir l'échantillon) en version : aiguilles droites + aiguilles doubles pointes (= jeu d'aiguilles à chaussettes traditionnellement de 20 cm) + aiguilles circulaires : 1 de 40 cm et 1 autre de 80 cm. Bon tricot!
28.05.2013 - 09:18
![]() Lois wrote:
Lois wrote:
I am trying to knit this pattern but am stuck at the beginning. I get to row 3 and can't get the p yo into back of loop, what stitch is this to purl into as it doesn't work for the 2nd one in each pattern. Help please. I think this is gorgeous and have done a lot of knitting, and do not like to be defeated. Thanks.
03.03.2013 - 22:48DROPS Design answered:
Dear Lois, look at the links to the videos on the right side of the picture, you'll find one called :"Increase - with yo (yarn over)", this will show you how to work a yo into back of loop. Happy knitting!
04.03.2013 - 10:08
![]() SUSANA HERRERA wrote:
SUSANA HERRERA wrote:
No entiendo el patrón para poder realizar esta chaqueta, no se si podríais echar una mano para entenderlo y poder realizar esta labor. Gracias de antemano por la colaboración prestada.
26.02.2013 - 14:06
![]() Mains Agiles wrote:
Mains Agiles wrote:
Je me la suis faite en gris , elle est magnifique! mise sur mon blog aujourd'hui ;-)
20.01.2013 - 15:11
![]() Rosie wrote:
Rosie wrote:
I bought yarn to knit this pattern....before reading through the pattern! I hate charts!!!!! Is this written out instead of in charts somewhere?!
17.01.2013 - 20:54
![]() Marchellier wrote:
Marchellier wrote:
Je suis débutante en tricot et j'adore ce gilet! a la place des diagrammes ni a-t-il pas une explication ecrite?
24.09.2012 - 22:05DROPS Design answered:
Bonjour Madame Marchellier, dans le diagramme, 1 case = 1 m x 1 tour(rang). Tricotez bien en suivant la légende et les explications. Pour toute aide personnalisée, je vous invite à prendre contact avec votre magasin DROPS ou sur le forum DROPS. Bon tricot !
25.09.2012 - 09:58
![]() Kim wrote:
Kim wrote:
Ich habe nun schon 5 Mal wieder neu angefangen, weil es einfach nicht hinkommt. Ich glaube, ich mache irgendwas falsch. Man muss doch 5 Mal die erste Reihe, dann 5 Mal die zweite Reihe, 5 Mal die dritte usw. stricken. Bei der 8. Reihe von unten kommt es mit den Umschlägen der Vorreihe nie hin ! Ich würde mich sehr freuen, wenn mir da jemand einen Tipp hätte.
13.05.2012 - 14:09DROPS Design answered:
Sie stricken nicht 5 x die erste Reihe, sondern pro Runde die Rapporte M1, M2, M2, M2 und M1. Dies ergibt 5 Blätter. Jede Kästchenreihe entspricht einer gestrickten Reihe.
14.05.2012 - 15:01
|
|||||||||||||||||||||||||
Fleur du Népal#fleurdunepaljacket |
|||||||||||||||||||||||||
 |
 |
||||||||||||||||||||||||
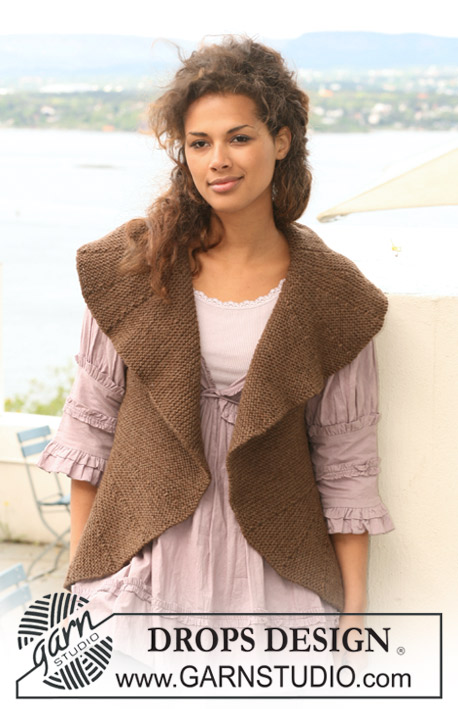
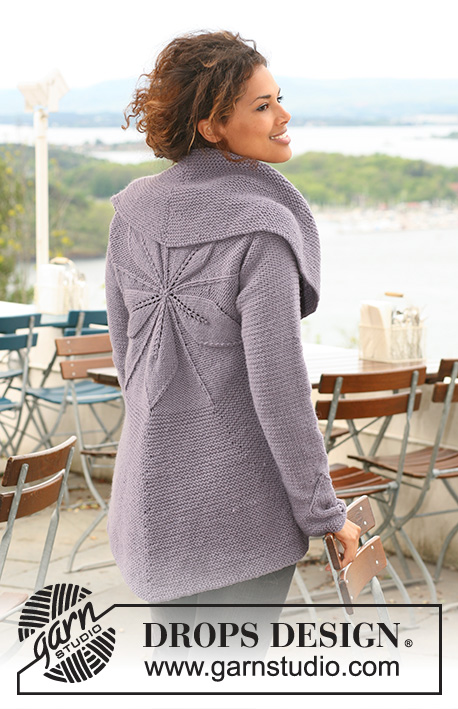
DROPS jacket knitted in a circle in ”Nepal” with leaf pattern. Size S to XXXL
DROPS 126-1 |
|||||||||||||||||||||||||
|
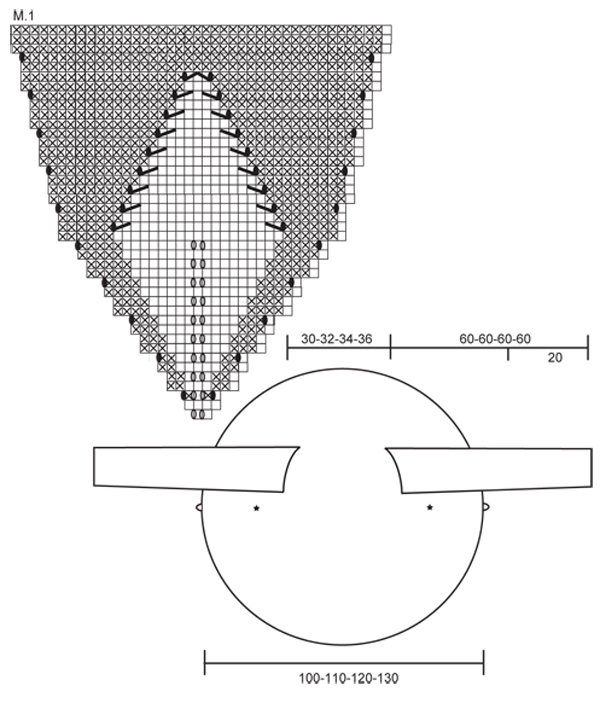
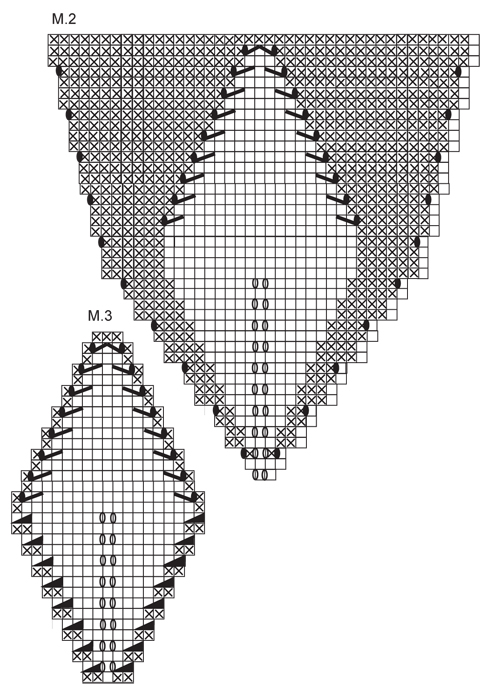
PATTERN: See diagram M.1, M.2 and M.3 - diagrams show 1 pattern repeat from RS. GARTER ST (in the round): K 1 round, P 1 round. INCREASING TIP (applies to after M.1 and M.2): Inc 1 st by each marker per inc (i.e. inc 10 sts per round) – inc alternately to the left and to the right of all markers by making 1 YO – on next round work YO into back of loop to avoid a hole. -------------------------------------------------------- BODY PIECE: Worked in the round as a circle from mid back. Cast on 10 sts with Nepal and distribute them on 4 double pointed needles size 5 mm / US 8. Insert a marker at beg of round = mid piece towards the neck. Continue as follows in the round: M.1, M.2, M.2, M.2 and M.1 (= a total of 5 repeats across the round). Change to circular needle as you inc sts. REMEMBER THE GAUGE! When M.1/M.2 is complete piece measures approx 19 cm / 7½" from the middle and there are 210 sts on needle. Now insert a marker in each of the 5 stockinette sts in the middle of pattern repeat (the inc were made each side of this st), and a marker in st mid between the first 5 markers (= a total of 10 markers). READ ALL OF THE FOLLOWING SECTION BEFORE CONTINUING! PATTERN: Continue in GARTER ST – see above – at the same time on first round after M.1/M.2 inc by all markers - SEE INCREASING TIP - and repeat the inc on every 4th round as you go along. ARMHOLE: At the same time after 2-6-10-14 rows garter st (= 220-230-240-250 sts on needle) work next round as follows (this is a round without inc): Work 25-27-29-31 sts, bind off 32-34-37-40 sts (= armhole), work 106-108-108-108 sts, bind off 32-34-37-40 sts (= armhole) and work 25-27-29-31 sts. On next round cast on 32-34-37-40 new sts over each armhole. Continue and inc as before until there is a total of 480-520-560-600 sts on needle – piece now measures approx 50-55-60-65 cm / 19½"-21½"-23½"-25½"" from the middle, finish after a P round and bind off LOOSELY with K sts. SLEEVE: Worked back and forth on needle. Cast on 45-47-49-51 sts (includes 1 edge st each side) on needle size 5 mm / US 8 with Nepal, K 6 rows (first row = WS). Continue as follows (first row = WS): 1 edge st, 19-20-21-22 sts in reverse stockinette st , M.3, 19-20-21-22 sts in reverse stockinette st and 1 edge st. Continue in pattern like this. After M.3 continue in reverse stockinette st on all sts. AT THE SAME TIME when piece measures 20 cm / 8" inc 1 st each side, repeat the inc on every 4-3.5-3-2.5 cm / 1½"-1¼"-1⅛"-⅞" a total of 8-9-11-13 times = 61-65-71-77 sts. When piece measures 52 cm / 20½" for all sizes bind off for sleeve cap at beg at beg of every row each side: 4 sts 1 time, then 2 sts each side until piece measures approx 60 cm / 23½". Bind off remaining sts. ASSEMBLY: Sew sleeve seams inside 1 edge st. Set in sleeves placing the middle of sleeve cap where the distance between armholes is shortest (i.e. where the first st was bind off on the first armhole and the last st was bind off on the other sleeve) and with the sleeve seams where the distance between the armholes is longest (i.e. the opposite side). BUTTONS: Place the jacket as shown in chart with RS facing up. Measure approx 5 cm / 2" down from the bottom of armhole on the left side of piece and then 10 cm / 4" out in a 90 degree angle and sew 1 button on here from RS – see the marking. Sew on the other button on the other side in the same position, but sew it on from WS. BUTTONHOLE LOOPS: Crochet 1 buttonhole loop with hook size 4 mm / G/6 in bind off row each side to fit the buttons (see chart). 1 LOOP = 1 sc in bind off row on jacket, ch 5, skip approx 1 cm / ⅜" and fasten with 1 sc in bind off row. |
|||||||||||||||||||||||||
Diagram explanations |
|||||||||||||||||||||||||
|
|||||||||||||||||||||||||
 |
|||||||||||||||||||||||||
 |
|||||||||||||||||||||||||
Have you finished this pattern?Tag your pictures with #dropspattern #fleurdunepaljacket or submit them to the #dropsfan gallery. Do you need help with this pattern?You'll find 26 tutorial videos, a Comments/Questions area and more by visiting the pattern on garnstudio.com. © 1982-2026 DROPS Design A/S. We reserve all rights. This document, including all its sub-sections, has copyrights. Read more about what you can do with our patterns at the bottom of each pattern on our site. |
|||||||||||||||||||||||||


With over 40 years in knitting and crochet design, DROPS Design offers one of the most extensive collections of free patterns on the internet - translated to 17 languages. As of today we count 324 catalogs and 12284 patterns - 12274 of which are translated into English (US/in).
We work hard to bring you the best knitting and crochet have to offer, inspiration and advice as well as great quality yarns at incredible prices! Would you like to use our patterns for other than personal use? You can read what you are allowed to do in the Copyright text at the bottom of all our patterns. Happy crafting!
Post a comment to pattern DROPS 126-1
We would love to hear what you have to say about this pattern!
If you want to leave a question, please make sure you select the correct category in the form below, to speed up the answering process. Required fields are marked *.