
Popular categories
Looking for a yarn?


Comments / Questions (216)
![]() Gisela wrote:
Gisela wrote:
Hallo, hat jemand die Jacke schon gestrickt? Komme mit Runde 3 des Blattmusters nicht klar. Wie ist die Maschenfolge? Vielen Dank für eine Antwort.
20.02.2016 - 19:21DROPS Design answered:
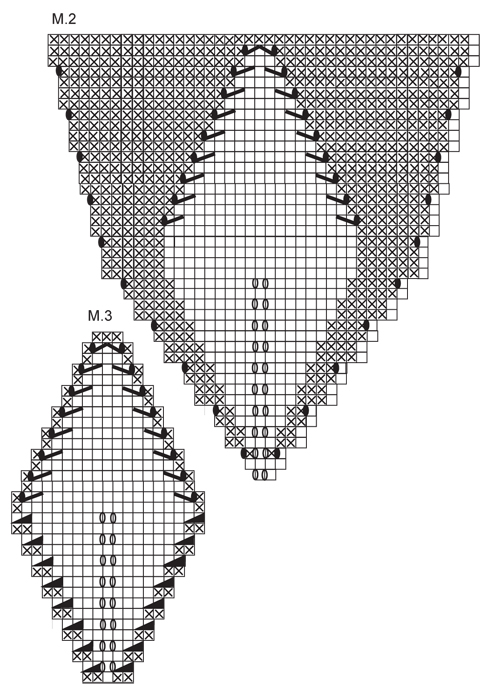
Der Rapport in der 3. Rd besteht aus: 1 M re, 1 Umschlag, 1 M li, 1 Umschlag, 1 M re, 1 Umschlag, 1 M li, 1 Umschlag. Der 1. und letzte Umschlag werden jeweils in der nächsten Rd verschränkt gestrickt (beim Rumpfteil), die beiden mittleren werden unverschränkt abgestrickt.
21.02.2016 - 15:30
![]() Gisela wrote:
Gisela wrote:
Ich finde dieses Jackenmodell sehr schön. Leider ist die Anleitung sehr verwirrend. Würde mir für die Zukunft Anleitungen wünschen, wie sie in Strickzeitschriften veröffentlicht werden oder zumindest eine umfangreichere Erläuterung, was den Rapport betrifft. Wenn man den Kragen in einer anderen Farbe stricken möchte, wo setzt man dann die andere Farbe an? Vielen Dank für einen Rat.
20.02.2016 - 18:39DROPS Design answered:
Der Kragen ist Teil der Jacke, er wird nicht separat gestrickt. Die Jacke wird ja rund gestrickt und der Kragen ist ein Stück des äußeren Randes, der umgeschlagen wird.
21.02.2016 - 15:33
![]() Christine Seikel wrote:
Christine Seikel wrote:
Wer hat die Jacke schon gestrickt? Habe Blüte gestrickt, zum Testen, allerdings nicht mit DROPS, und total gewellt. Der Anfang wollte auch nicht so recht gelingen. Darf ja kein oder sollte kein Loch sein
26.12.2015 - 20:22
![]() Barbara wrote:
Barbara wrote:
25 pelotes.
28.06.2014 - 19:15
![]() Isalisse wrote:
Isalisse wrote:
Bonjour, pour réaliser ce trés beau gilet en taille XL combien me faut-il de pelotes ? Isalisse
28.06.2014 - 18:30DROPS Design answered:
Bonjour Isalisse, en taille XL/XXL, il vous faut 1250 g en DROPS Nepal, soit 1250/50 g la pelote Nepal= 25 pelotes, sur la base de l'échantillon indiqué. Bon tricot!
30.06.2014 - 09:04
![]() Mari wrote:
Mari wrote:
Mikähän lanka sopisi tähän vaihtoehdoksi, jotta lopputulos olisi vähän kevyempi?
26.02.2014 - 09:36DROPS Design answered:
Lankavaihtoehdot löytyvät klikkaamalla kuvan vieressä olevaa lankavaihtoehto-linkkiä. Esim. Bomull-Lin- ja Paris-langat ovat kevyempiä lankoja.
28.02.2014 - 12:25
![]() Mari wrote:
Mari wrote:
Mikä lanka sopisi tähän malliin vaihtoehdoksi, jotta lopputulos olisi vähän kevyempi?
26.02.2014 - 09:35
![]() Alix Hughes wrote:
Alix Hughes wrote:
Hello,I am new to charts and just want to make sure I"m understanding how to read them. When I start knitting against the charts in the round, I should knit row 1 of M1 followed by row 1 of M2 and so on around the pattern before coming back to the start of the round to start row 2 of M1?
12.01.2014 - 02:54DROPS Design answered:
Dear Mrs Hughes, each diagram is different, when working M.1 you work all rows in M.1 from the beg to the end, and same for M.2, work all rows in M.2 from the beg to the end. You'll find some more informations about diagrams here. Happy knitting!
13.01.2014 - 09:10Saadat wrote:
Plies send
09.12.2013 - 19:51
![]() Giovanna wrote:
Giovanna wrote:
Bellissimo! Ho realizzato questo modello ed è venuto benissimo. Le spiegazioni sono molto esaurienti. Grazie
11.11.2013 - 08:31
|
|||||||||||||||||||||||||
Fleur du Népal#fleurdunepaljacket |
|||||||||||||||||||||||||
 |
 |
||||||||||||||||||||||||
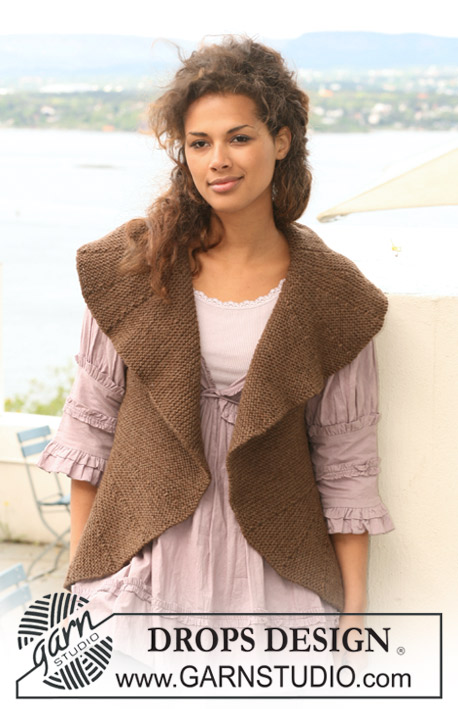
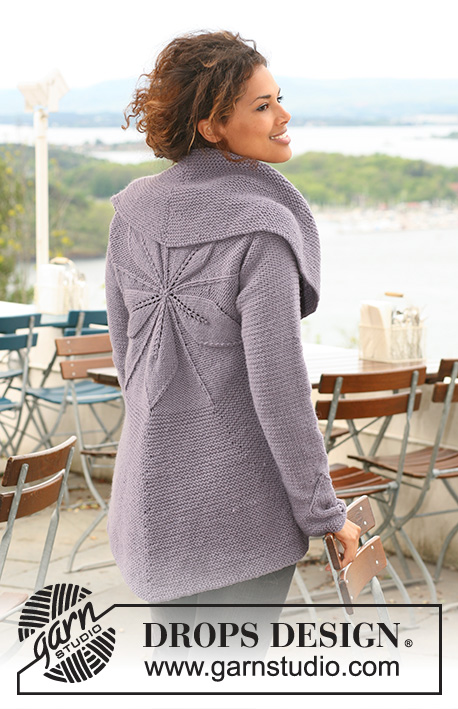
DROPS jacket knitted in a circle in ”Nepal” with leaf pattern. Size S to XXXL
DROPS 126-1 |
|||||||||||||||||||||||||
|
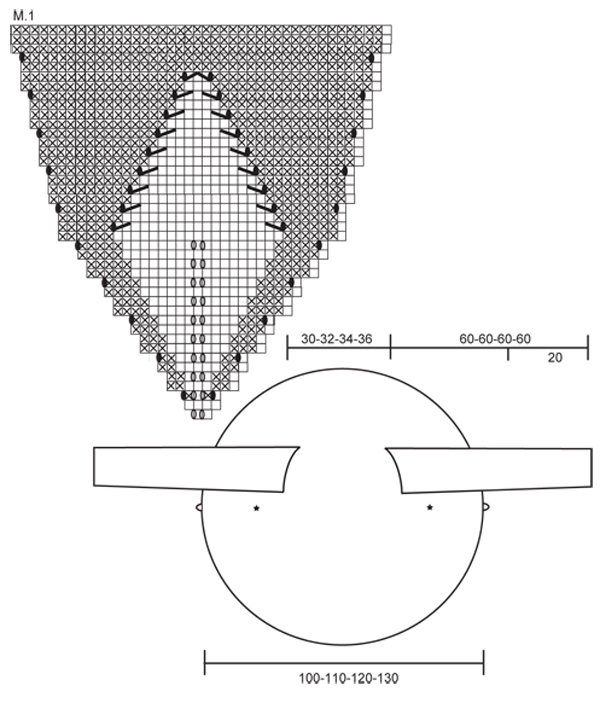
PATTERN: See diagram M.1, M.2 and M.3 - diagrams show 1 pattern repeat from RS. GARTER ST (in the round): K 1 round, P 1 round. INCREASING TIP (applies to after M.1 and M.2): Inc 1 st by each marker per inc (i.e. inc 10 sts per round) – inc alternately to the left and to the right of all markers by making 1 YO – on next round work YO into back of loop to avoid a hole. -------------------------------------------------------- BODY PIECE: Worked in the round as a circle from mid back. Cast on 10 sts with Nepal and distribute them on 4 double pointed needles size 5 mm / US 8. Insert a marker at beg of round = mid piece towards the neck. Continue as follows in the round: M.1, M.2, M.2, M.2 and M.1 (= a total of 5 repeats across the round). Change to circular needle as you inc sts. REMEMBER THE GAUGE! When M.1/M.2 is complete piece measures approx 19 cm / 7½" from the middle and there are 210 sts on needle. Now insert a marker in each of the 5 stockinette sts in the middle of pattern repeat (the inc were made each side of this st), and a marker in st mid between the first 5 markers (= a total of 10 markers). READ ALL OF THE FOLLOWING SECTION BEFORE CONTINUING! PATTERN: Continue in GARTER ST – see above – at the same time on first round after M.1/M.2 inc by all markers - SEE INCREASING TIP - and repeat the inc on every 4th round as you go along. ARMHOLE: At the same time after 2-6-10-14 rows garter st (= 220-230-240-250 sts on needle) work next round as follows (this is a round without inc): Work 25-27-29-31 sts, bind off 32-34-37-40 sts (= armhole), work 106-108-108-108 sts, bind off 32-34-37-40 sts (= armhole) and work 25-27-29-31 sts. On next round cast on 32-34-37-40 new sts over each armhole. Continue and inc as before until there is a total of 480-520-560-600 sts on needle – piece now measures approx 50-55-60-65 cm / 19½"-21½"-23½"-25½"" from the middle, finish after a P round and bind off LOOSELY with K sts. SLEEVE: Worked back and forth on needle. Cast on 45-47-49-51 sts (includes 1 edge st each side) on needle size 5 mm / US 8 with Nepal, K 6 rows (first row = WS). Continue as follows (first row = WS): 1 edge st, 19-20-21-22 sts in reverse stockinette st , M.3, 19-20-21-22 sts in reverse stockinette st and 1 edge st. Continue in pattern like this. After M.3 continue in reverse stockinette st on all sts. AT THE SAME TIME when piece measures 20 cm / 8" inc 1 st each side, repeat the inc on every 4-3.5-3-2.5 cm / 1½"-1¼"-1⅛"-⅞" a total of 8-9-11-13 times = 61-65-71-77 sts. When piece measures 52 cm / 20½" for all sizes bind off for sleeve cap at beg at beg of every row each side: 4 sts 1 time, then 2 sts each side until piece measures approx 60 cm / 23½". Bind off remaining sts. ASSEMBLY: Sew sleeve seams inside 1 edge st. Set in sleeves placing the middle of sleeve cap where the distance between armholes is shortest (i.e. where the first st was bind off on the first armhole and the last st was bind off on the other sleeve) and with the sleeve seams where the distance between the armholes is longest (i.e. the opposite side). BUTTONS: Place the jacket as shown in chart with RS facing up. Measure approx 5 cm / 2" down from the bottom of armhole on the left side of piece and then 10 cm / 4" out in a 90 degree angle and sew 1 button on here from RS – see the marking. Sew on the other button on the other side in the same position, but sew it on from WS. BUTTONHOLE LOOPS: Crochet 1 buttonhole loop with hook size 4 mm / G/6 in bind off row each side to fit the buttons (see chart). 1 LOOP = 1 sc in bind off row on jacket, ch 5, skip approx 1 cm / ⅜" and fasten with 1 sc in bind off row. |
|||||||||||||||||||||||||
Diagram explanations |
|||||||||||||||||||||||||
|
|||||||||||||||||||||||||
 |
|||||||||||||||||||||||||
 |
|||||||||||||||||||||||||
Have you finished this pattern?Tag your pictures with #dropspattern #fleurdunepaljacket or submit them to the #dropsfan gallery. Do you need help with this pattern?You'll find 26 tutorial videos, a Comments/Questions area and more by visiting the pattern on garnstudio.com. © 1982-2026 DROPS Design A/S. We reserve all rights. This document, including all its sub-sections, has copyrights. Read more about what you can do with our patterns at the bottom of each pattern on our site. |
|||||||||||||||||||||||||


With over 40 years in knitting and crochet design, DROPS Design offers one of the most extensive collections of free patterns on the internet - translated to 17 languages. As of today we count 324 catalogs and 12284 patterns - 12274 of which are translated into English (US/in).
We work hard to bring you the best knitting and crochet have to offer, inspiration and advice as well as great quality yarns at incredible prices! Would you like to use our patterns for other than personal use? You can read what you are allowed to do in the Copyright text at the bottom of all our patterns. Happy crafting!
Post a comment to pattern DROPS 126-1
We would love to hear what you have to say about this pattern!
If you want to leave a question, please make sure you select the correct category in the form below, to speed up the answering process. Required fields are marked *.