
Popular categories
Looking for a yarn?


Comments / Questions (15)
![]() Levray wrote:
Levray wrote:
Bonjour Pour le point fantaisie il est inscrit "crocheter dans chaque maille pas entre les mailles" cela veut dire dans les deux brins de chaque ? Merci
04.02.2025 - 21:07DROPS Design answered:
Bonjour Mme Leray, tout à fait, piquez bien le crochet sous les 2 brins de la maille du rang précédent, comme c'est l'usage habituellement; il ne faut pas ici piquer le crochet entre les mailles (plus bas que ces 2 brins, entre 2 mailles). Bon crochet!
05.02.2025 - 08:06
![]() Levray wrote:
Levray wrote:
Bonjour Comment rendre plus Long ce modèle Merci
27.01.2025 - 10:41
![]() Levray wrote:
Levray wrote:
Bonjour Comment rendre plus Long ce modèle Merci
27.01.2025 - 10:40DROPS Design answered:
Bonjour Mme Levray, nous ne sommes malheureusement pas en mesure de pouvoir adapter chacun de nos modèles à chaque demande, vous pouvez vous inspirer d'un modèle similaire de même tension et dans la longueur souhaitée ou demander de l'aide à votre magasin, même par mail ou téléphone. Merci pour votre compréhension. Bon crochet!
27.01.2025 - 17:27
![]() Levray wrote:
Levray wrote:
Bonjour Comment faire pour réaliser ce gilet plus long ? Merci
27.01.2025 - 01:31
![]() Levray wrote:
Levray wrote:
Comment faire pour réaliser ce gilet plus long ? Merci
27.01.2025 - 01:30DROPS Design answered:
Bonjour Mme Leray, en fonction de la taille et de la longueur souhaitée, il faudra probablement ajouter quelques rangs, attention à bien respecter l'arrondi du devant en même temps. Bon crochet!
27.01.2025 - 09:57
![]() Aneesa wrote:
Aneesa wrote:
I'm a beginner and I'm hoping to make this for my mum. She wants it longer so I'm wondering if I can add rows at the beginning of the panels as this seems to be worked from the bottom up?
04.03.2024 - 17:15DROPS Design answered:
Hi Aneesa, Yes, you can continue the structured pattern for the desired length before beginning to increase for the chest and armholes. Happy crocheting!
05.03.2024 - 08:18
![]() Genevi wrote:
Genevi wrote:
Je viens de le terminer et il est super , moi qui suis une adepte du crochet je suis très satisfaite du résultat , merci .
14.04.2009 - 17:35
![]() Satu wrote:
Satu wrote:
Mahtava, täydellinen tweediin...
08.08.2008 - 08:34
![]() Linda Moore wrote:
Linda Moore wrote:
Too cute! Gotta have it!
04.08.2008 - 00:04
![]() Ruth Snodgrass wrote:
Ruth Snodgrass wrote:
I agree...a lovely "carry-along" crochet project. A great gift idea, too.
14.07.2008 - 23:05
|
|
DROPS 110-27 |
|
|
|
|
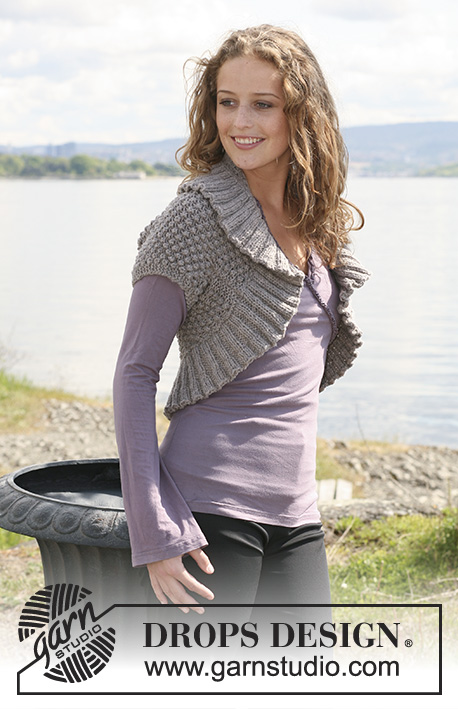
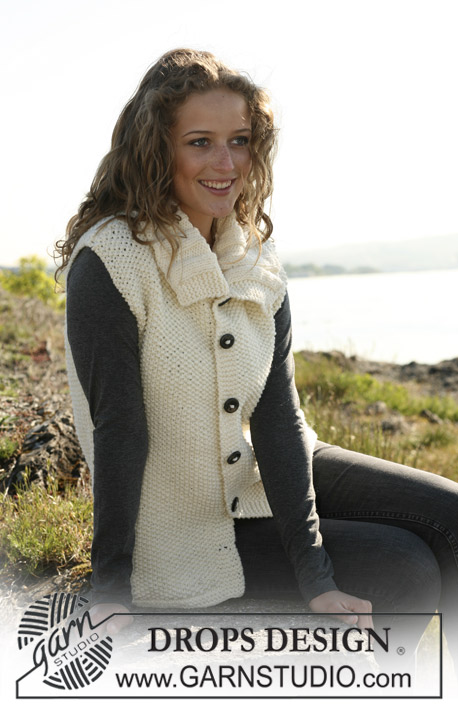
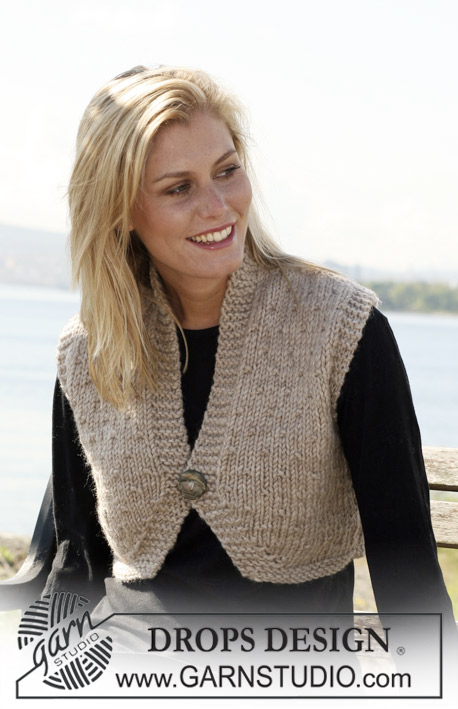
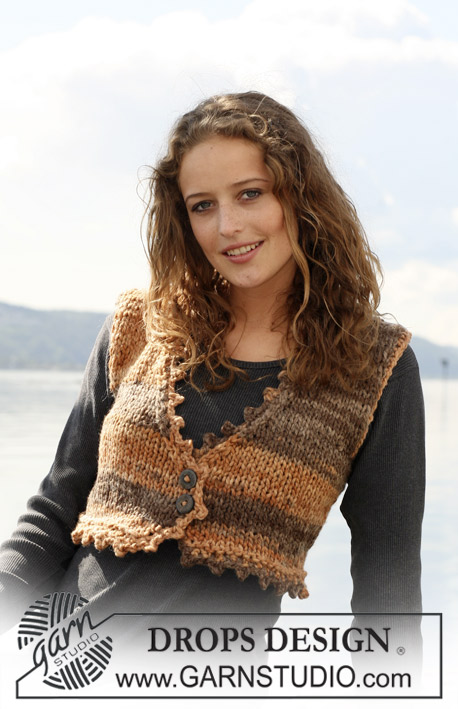
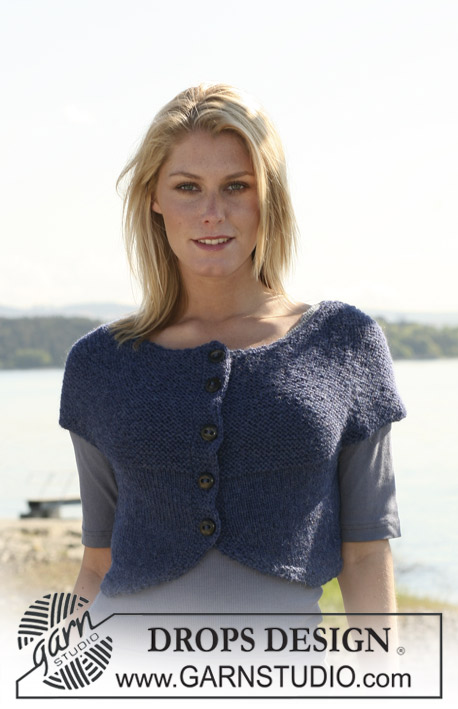
Crochet DROPS waistcoat in ”Karisma” with borders in ”Snow”. Yarn alternative ”Merino” and ”Snow”. Size S - XXXL.
DROPS 110-27 |
|
|
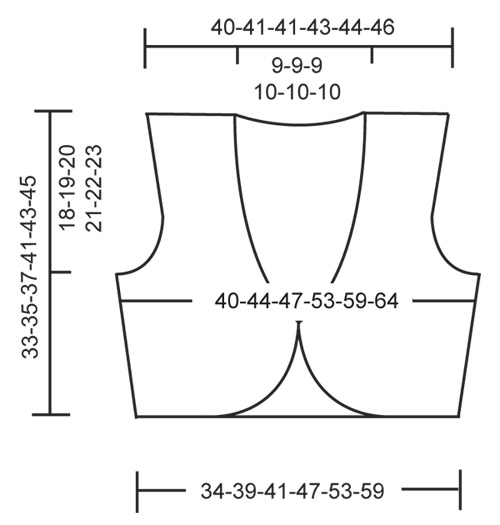
Crochet info: Replace first sc on every row with sc with 1 ch and first tr on every row with tr with 4 ch. Finish every row with sc with 1 sc in 4th ch from beg of previous row and every row with tr with 1 tr in first ch from beg of previous row. Pattern: * 1 row sc, 1 row tr *, repeat from *-* - Note: crochet in each sc/tr from previous row and not in between them. Increasing tip: Inc 1 tr by working 1 extra tr in second but last sc. Decreasing tip: Note: Only dec on rows with tr. Dec as follows at beg of row: Replace 1 tr with 1 sl st. Dec as follows at the end of row: Turn piece when no of tr to be dec remain and work return row. BACK PIECE Work 62-70-75-85-95-105 loose ch (incl 4 ch to turn with) with crochet hook size 4.5 mm [US 7] and Karisma. Work first row as follows: 1 tr in 5th ch from hook, 1 tr in each of the next 2 ch, then continue as follows: * skip 1 ch, 1 tr in each of the next 4 ch *, repeat from *-* until 0-3-3-3-3-3 ch remain, skip 1 ch, 1 tr in each of the remaining 0-2-2-2-2-2 ch = 48-54-58-66-74-82 tr, turn the piece. Now continue in Pattern – see above. Remember the crochet gauge! When piece measures approx 3 cm [1⅛"], 6 cm [2⅜"], 9 cm [3½"] and 12 cm [4¾"] – adjust so that next row is a row with tr – inc 1 tr each side – see Increasing tip = 56-62-66-74-82-90 sc/tr. When piece measures approx 15-16-17-20-21-22 cm [6"-6¼"-6¾"-8"-8¼"-8¾"] dec for armhole each side on every row with tr as follows – see Decreasing tip: 3 tr 0-1-1-1-2-3 times, 2 tr 1-0-1-3-3-3 times and 1 tr 0-1-1-0-0-0 times = 52-54-54-56-58-60 sc/tr. When piece measures approx 25-27-29-33-35-37 cm [9 ¾"-10⅝"-11⅜"-13"-13¾"-14½"] inc for wide shoulder each side on every row with tr: 1 tr 2 times = 56-58-58-60-62-64 tr/sc. At the same time when piece measures approx 30-32-34-38-40-42 cm [11¾"-12½"-13⅜"-15"-15¾"-16½"] (only 1 row with sc + 1 row with tr left) work 1 row with only 22-23-23-23-24-25 tr/sc each side (do not work the middle 12-12-12-14-14-14 sc/tr = neckline). Work return row and cut the thread, piece measures approx 33-35-37-41-43-45 cm [13"-13¾"-14½"-16⅛"-17"-17¾"]. LEFT FRONT PIECE Crochet 34-37-40-45-50-55 loose ch (includes 4 ch to turn with) with crochet hook size 4.5 mm [US 7] and Karisma. First row: Work 1 tr in 5th ch from hook, 1 tr in the next 2 ch, and continue as follows: * skip 1 ch, 1 tr in each of the next 4 ch *, repeat from *-* until 2-0-3-3-3-3 ch remain, skip 1 ch, 1 tr in each of the remaining 1-0-2-2-2-2 ch = 24-27-29-33-37-41 tr, turn the piece. Continue in pattern as described for back piece. At the same time beg to inc towards mid front on every row with tr: 1 tr 3-3-3-4-4-4 times. At the same time when piece measures approx 3 cm [1⅛"], 6 cm [2⅜"], 9 cm [3½"] and 12 cm [4¾"] inc at side as described for back piece. At the same time when piece measures approx 12-12-12-14-14-14 cm [4¾"-4¾"-4¾"-5½"-5½"-5½"] dec for neckline towards mid front on every row with tr: 1 tr 9-9-9-11-11-11 times. At the same time when piece measures approx 15-16-17-20-21-22 cm [6"-6¼"-6¾"-8"-8¼"-8¾"] – adjust to back piece – dec for armhole at side as described for back piece and when piece measures approx 25-27-29-33-35-37 cm [9¾"-10⅝"-11⅜"-13"-13¾"-14½"] inc for wide shoulder at side as described for back piece. When all inc and dec are complete there are 22-23-23-23-24-25 tr/sc on row. Continue until piece measures approx 33-35-37-41-43-45 cm [13"-13¾"-14½"-16⅛"-17"-17¾"] – adjust to back piece – cut the thread. RIGHT FRONT PIECE Like left front piece, but mirrored. ASSEMBLY Sew shoulder seam, edge to edge with neat sts. Sew side seams in the same way. Border round armhole: Beg mid under arm. Crochet with crochet hook size 7 mm [K10½] and Snow: 1 sc, * 1 ch, skip approx 2 cm [3/4"], 1 sc in next st *, repeat from *-* and finish with 1 sl st in sc from beg of round. Border round the opening: Beg mid back and crochet along left front piece, along bottom edge and up along right front piece, with crochet hook size 7 mm [K10½] and Snow as follows: Round 1: 1 sc, * 1 ch, skip approx 2 cm [3/4"], 1 sc in next st *, repeat from *-* and finish with 1 sl st in sc from beg of round. Round 2: 4 ch, 1 dc in the first ch-loop from previous round, * 1 ch, 1 dc in the same ch-loop, 1 ch, 1 dc in the next ch-loop * repeat from *-* and finish with 1 ch and 1 sl st in 3rd ch from beg of round. ASSEMBLY Sew on buttons to left front piece inside the Snow border. Place the lower button approx 5 cm [2"] from bottom edge and the other approx 11-11-11-13-13-13 cm [4⅜"-4⅜"-4⅜"-5⅛"-5⅛"-5⅛"] from cast on row. Use crochet border as buttonhole loops. |
|
 |
|
Have you finished this pattern?Tag your pictures with #dropspattern or submit them to the #dropsfan gallery. Do you need help with this pattern?You'll find 6 tutorial videos, a Comments/Questions area and more by visiting the pattern on garnstudio.com. © 1982-2026 DROPS Design A/S. We reserve all rights. This document, including all its sub-sections, has copyrights. Read more about what you can do with our patterns at the bottom of each pattern on our site. |


With over 40 years in knitting and crochet design, DROPS Design offers one of the most extensive collections of free patterns on the internet - translated to 17 languages. As of today we count 324 catalogs and 12290 patterns - 12280 of which are translated into English (US/in).
We work hard to bring you the best knitting and crochet have to offer, inspiration and advice as well as great quality yarns at incredible prices! Would you like to use our patterns for other than personal use? You can read what you are allowed to do in the Copyright text at the bottom of all our patterns. Happy crafting!
Post a comment to pattern DROPS 110-27
We would love to hear what you have to say about this pattern!
If you want to leave a question, please make sure you select the correct category in the form below, to speed up the answering process. Required fields are marked *.