
Popular categories
Looking for a yarn?


Comments / Questions (12)
![]() Juliane wrote:
Juliane wrote:
"Wenn die Arb 20 cm misst, 1 Ndl Glattstr stricken (Blende, wie oben erklärt) und gleichzeitig 20 M gleich verteilt auf der Ndl abketten" - Muss es hier nicht eher heißen: "abnehmen"? Viele Grüße!
16.01.2026 - 23:12DROPS Design answered:
Liebe Juliane, ja genau, hier meint man eher "abnehmen", danke für den Hinweis. Viel Spaß beim Stricken!
19.01.2026 - 08:11
![]() M. Ángeles Díez Forcada wrote:
M. Ángeles Díez Forcada wrote:
El diagrama no aparece en el patrón en español?. Y la lana que aparece ¿es la correcta?
29.03.2016 - 11:57DROPS Design answered:
Hola M.Angeles. Había un problema con este patrón. Ya esta corregido y el diagrama esta publicado en español.
29.03.2016 - 15:54
![]() DROPS Design wrote:
DROPS Design wrote:
The pattern 1 and 2 are right next to the measure chart at the bottom.
06.06.2011 - 19:33
![]() Carla Peterson wrote:
Carla Peterson wrote:
I cannot understand what pattern 1 and pattern 2 are. The directions say "see charts". What charts?
05.06.2011 - 04:58
![]() DROPS Deutsch wrote:
DROPS Deutsch wrote:
Man strickt 3 M. li. zusammen, danac die gleichen Maschen re. zusammen stricken zum Schluss nochmals li. zusammen stricken.
18.11.2010 - 07:56
![]() Regine wrote:
Regine wrote:
Moin! Leider verstehe ich die Anleitung für die "Knoten" nicht...kann mir jemand bitte helfen? Vielen Dank im Voraus
17.11.2010 - 19:29
![]() DROPS Design wrote:
DROPS Design wrote:
Hej! Det er de samme 3 masker du strikker sammen som du beskriver.
10.03.2008 - 13:34
![]() Kirsten wrote:
Kirsten wrote:
Hjælp til mønster 2, (knop) 3m på ve. pind, 3vr. sammen, 3 r sm. 3 vr sm, mangler 6 masker? hvordan gør jeg?
10.03.2008 - 13:10
![]() Scandinavian Knitting Design wrote:
Scandinavian Knitting Design wrote:
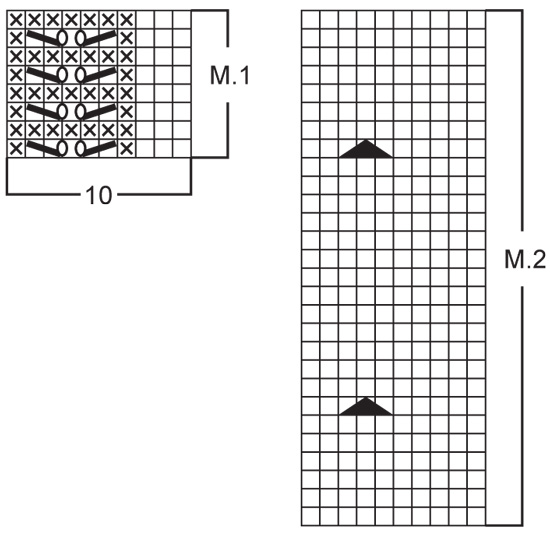
Hi again, The diagram translates as follows (the = symbols following the same order as in the Scandinavian explanation): = knit from the right side, purl from the wrong side = purl from the right side, knit from the wrong side = K2 tog, yo = yo, slip 1 st as if to knit, K1, psso = knit the following 3 sts as follows: purl them together without slipping them off left needle, now knit the same 3 sts tog without slipping off left needle and purl them tog. You now have 3 new sts on right needle and have to slip the 3 "old" sts off left needle. This creates a small bubble. Hope it makes sense! Birgitte & Karen Scandinavian Knitting Design
23.05.2006 - 21:26
![]() Scandinavian Knitting Design wrote:
Scandinavian Knitting Design wrote:
Hello Gale! We are asking Garnstudio for an explanation since we have some problems understanding the pattern too. Let you know ASAP. Best Wishes Birgitte Scandinavian Knitting Design
22.05.2006 - 16:33
|
||||||||||||||||
Morning Sunshine |
||||||||||||||||
 |
 |
|||||||||||||||
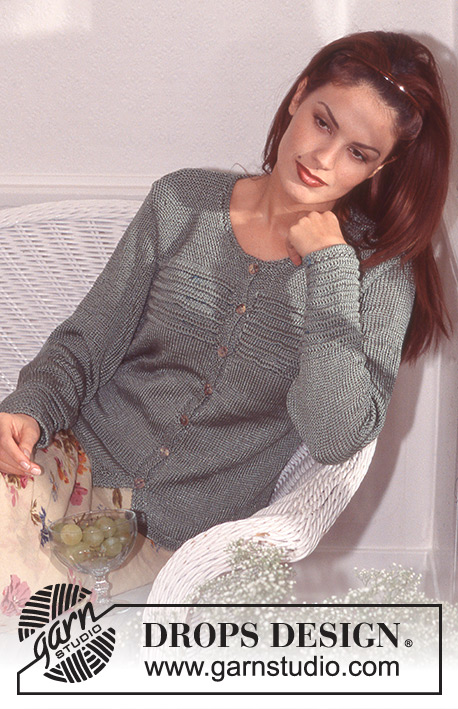
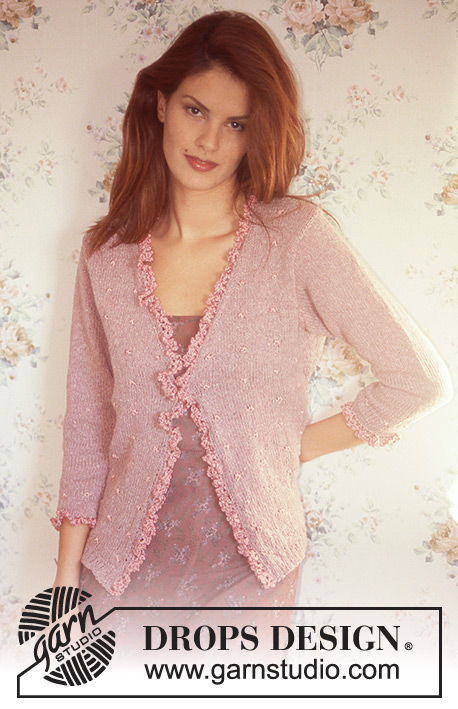
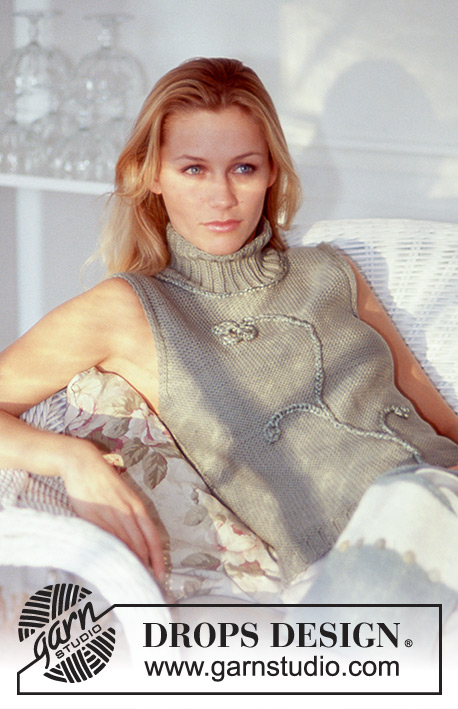
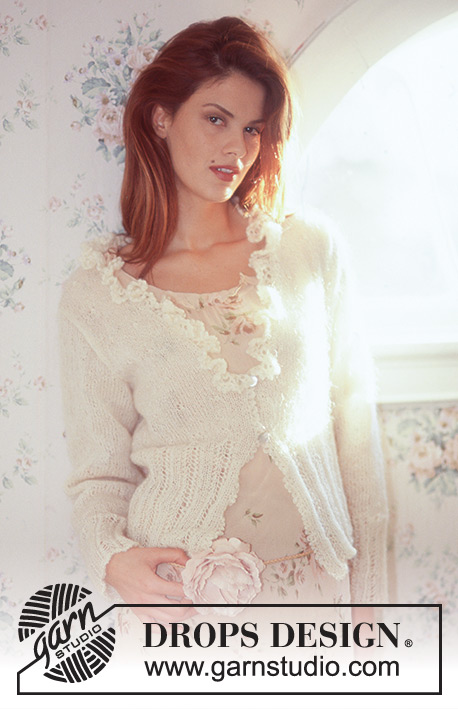
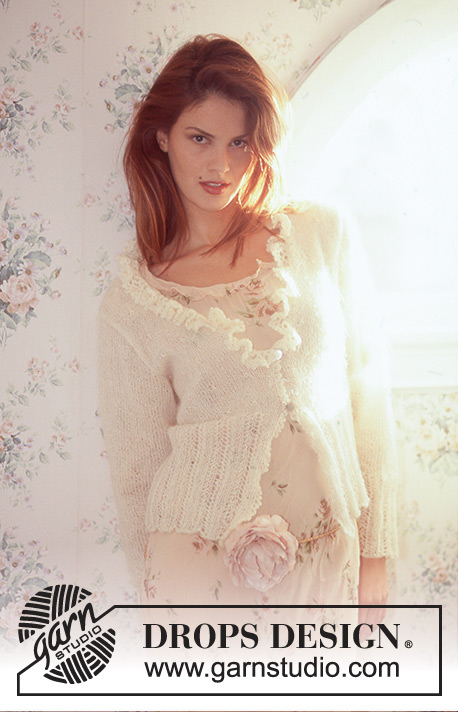
DROPS Cardigan in Vivaldi
DROPS 74-23 |
||||||||||||||||
|
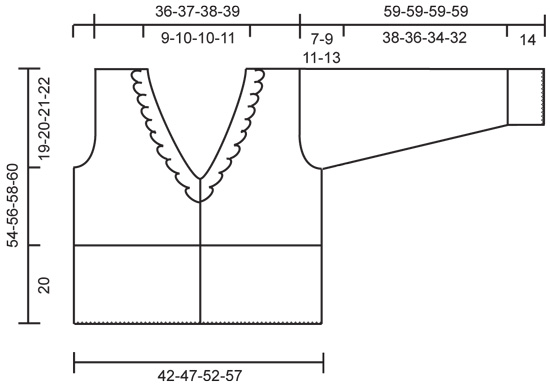
Gauge: 20 sts x 28 rows = 10 x 10 cm in stockinette st. Pattern: See charts. The pattern is seen from the right side. Garter st, when knitting flat: Knit all sts, all rows. Button band: Knit the 3 button band sts as follows from edge (seen from the right side): K 1 (edge st knit in garter st), K 1 and P 1 (2 sts knit in rib throughout). Knitting tips (for neckband): All decs are made from right side. Dec 1 st inside 3 sts knit as follows from edge: K 1 (edge st knit in garter st), K 1, P 1. After 3 edge sts: Slip 1 st as if to knit, K 1, psso. Before 3 edge sts: K 2 tog. --------------------------------------------------------------------- Body: Cast on 189-209-229-249 sts on circular needles with 2 strands Vivaldi. Take away one strand and knit 1 row (wrong side row). Establish pattern on the next row as follows: 3 sts buttonband (see instructions above), Pattern 1 over 183-203-223-243 sts, 3 sts buttonband (see instructions above). Knit in pattern as established until piece measures 20 cm, then knit 1 row stockinette st over Pattern 1 sts (keep buttonbands in rib and garter st as established), decreasing 20 sts evenly distributed on the row = 169-189-209-229 sts. Then knit Pattern 2 to finished measurements (buttonbands as before). Read the entire next section before knitting: Put a marker 44-49-54-59 sts in from each edge for sides – there will be 81-91-101-111 sts between markers (back). Neck: When the piece measures 30-31-32-33 cm dec 1 st at each center front edge for neck every 4 rows 13-14-14-15 times - see knitting tips. Armhole: At the same time when the piece measures 35-36-37-38 cm bind off 5 sts at each side for armhole (2 sts on front side of the marker and 3 sts on back side of the marker). Knit each piece separately from now on. Right front: Continue to dec for the neck and at the same time bind off for armhole at the side every other row: 2 sts 0-1-2-4 times and 1 st 2-4-6-6 times. After all armhole and neck shaping is complete, 27-27-28-28 sts remain on shoulder. Do not knit a bobble at armhole, there must be at least 4 sts stockinette st between a bobble and the armhole - at the neck the bobble will disappear in the neck shaping. Bind off the remaining sts when the piece measures 54-56-58-60 cm. Left front: Knit the same as the right front, reversing all shaping. Back: = 75-85-95-105 sts. Bind off for armhole at each side as on front = 71-73-75-77 sts remain. When the piece measures 52-54-56-58 cm bind off the center 13-15-15-17 sts for the neck. Then dec 1 st at each neck edge every other row 2 times - see knitting tips = 27-27-28-28 sts remain on each shoulder. Bind off the remaining sts when the piece measures 54-56-58-60 cm. Sleeve: Cast on 50-50-60-60 sts on double-pointed needles with 2 strands Vivaldi, join and place a marker at the join. Take away 1 strand and P 1 row, then knit Pattern 1 over all sts. When the piece measures 14 cm knit the first 7 rows of Pattern 2, then knit stockinette st. At the same time after Pattern 1 inc 1 st each side of marker 9-11-8-10 times: Sizes S and L: every 12 rows. Sizes M and XL: every 9 rows = 68-72-76-80 sts. When the piece measures 52-50-48-46 cm bind off 3 sts each side of marker and knit back and forth on needles. Bind off for sleeve cap at each side every other row: 3 sts 1 time, 2 sts 3-2-2-2 times, 1 st 0-5-7-10 times, then 2 sts at each side until the piece measures 58 cm and then bind off 3 sts 1 time. Bind off the remaining sts, the piece measures approx. 59 cm. Assembly: Sew shoulder seams. Crochet up along the buttonband, around the neck and down along the other buttonband inside of 1 edge st as follows: 1 sc, * ch 5, skip over 2 sts/rows around the neck and 4 rows along buttonbands, fasten with 1 sc in the next st *, repeat from * - *. Fasten off. Start crochet again where neckband begins on right front. Row 1: 1 sc in ch-loop, * ch 6, fasten with 1 sc in the next ch-loop *, repeat from * - *, finish with ch 1 where neckband begins on left front, turn the work. Row 2: sl st to center of 1st ch-loop, 1 sc, * ch 3, 1 sc in the next ch-loop, ch 3, 1 sc in the same ch-loop *, repeat from * - *, finish with ch 3, 1 sc in last ch-loop, ch 1, turn the work. Row 3: sl st to center of 1st ch-loop on previous row, then crochet picot-edge as follows: 1 sc, * ch 3, 1 sc in the first of the 3 ch, fasten with 1 sc in the same ch-loop from previous row, ch 3, 1 sc in the first of the 3 ch, fasten with 1 sc in the next ch-loop from previous row, ch 3, 1 sc in the first of the 3 ch, fasten with 1 sc in the next ch-loop from previous row *, repeat from * - *. Sew in sleeves. Sew on buttons evenly spaced along Pattern 2 up to where neckband starts. Use the crocheted loops on button bands as buttonholes. |
||||||||||||||||
Diagram explanations |
||||||||||||||||
|
||||||||||||||||
 |
||||||||||||||||
 |
||||||||||||||||
Have you finished this pattern?Tag your pictures with #dropspattern or submit them to the #dropsfan gallery. Do you need help with this pattern?You'll find 25 tutorial videos, a Comments/Questions area and more by visiting the pattern on garnstudio.com. © 1982-2026 DROPS Design A/S. We reserve all rights. This document, including all its sub-sections, has copyrights. Read more about what you can do with our patterns at the bottom of each pattern on our site. |
||||||||||||||||


With over 40 years in knitting and crochet design, DROPS Design offers one of the most extensive collections of free patterns on the internet - translated to 17 languages. As of today we count 324 catalogs and 12272 patterns - 12262 of which are translated into English (US/in).
We work hard to bring you the best knitting and crochet have to offer, inspiration and advice as well as great quality yarns at incredible prices! Would you like to use our patterns for other than personal use? You can read what you are allowed to do in the Copyright text at the bottom of all our patterns. Happy crafting!
Post a comment to pattern DROPS 74-23
We would love to hear what you have to say about this pattern!
If you want to leave a question, please make sure you select the correct category in the form below, to speed up the answering process. Required fields are marked *.