
Popular categories
Looking for a yarn?


Comments / Questions (21)
![]() Tania wrote:
Tania wrote:
Bonjour, Pour les augmentations il est dit "Répéter ces augmentations 6 fois au total tous les rangs sur l'endroit et 5 fois tous les 2 rangs sur l'endroit (= tous les 4 rangs) = 163 mailles." (taille S) : faut-il augmenter jusqu'à avoir la bonne taille de 23cm ou seulement 1 rang sur 4 ? Et au niveau des marqueurs seulement ou aussi ailleurs ? Je n'ai pas bien compris ce passage concernant que des rangs endroits. Merci par avance pour votre aide !
12.01.2021 - 08:34DROPS Design answered:
Bonjour Tania, en taille S vous devez augmenter 6 x tous les rangs sur l'endroit (= tous les 2 rangs = 1 rang d'augmentations sur l'endroit, 1 rang sans augmenter sur l'envers) et 5 fois tous les 2 rangs sur l'endroit (= tous les 4 rangs = 1 rang d'augmentation sur l'endroit, 3 rangs sans augmenter). Augmentez 8 m à chaque fois comme indiqué sous RAGLAN (= 1 m de chaque côté de chacun des 4 marqueurs = 2 m à chaque marqueur = 8 m au total). Si vous n'avez pas atteint les 23 cm quand toutes les augmentations sont terminées, tricotez jusqu'à ce que l'ouvrage mesure 23 cm, mais sans augmenter. Bon tricot!
12.01.2021 - 09:25
![]() Tania wrote:
Tania wrote:
Bonjour, Pour ce modèle, j’ai suivis les conseils d’association de fils de votre site, en prenant du Big Merino avec du Brushed Alpaga Silk (considérés tous deux comme des C, devant donner un échantillon de 10 mailles = à 10 cm en aiguilles n°9). Or, le fil Brushed Alpaga Silk est beaucoup plus fin que le Big Merino et quelque soit ma tension je n'arrive pas à obtenir la bonne taille d’échantillon. Auriez-vous des conseils à donner (e.g. changer de laine) ? Merci!
10.01.2021 - 22:16DROPS Design answered:
Bonjour Tania, effectivement, des fils de texture/composition différentes donneront un effet différent et une texture différente également. Vous trouverez ici tous les fils du groupe C (vous pouvez également remplacer 1 fil du groupe C par 2 fils du groupe A). Votre magasin saura vous conseiller si besoin, même par mail ou téléphone. Bon tricot!
11.01.2021 - 10:58
![]() Anne wrote:
Anne wrote:
Kann ich dieses Modell auch einfädig stricken, damit die Jacke nicht so warm wird? Falls das mit Air nicht geht, welches Garn käme alternativ in Frage? Danke schonmal und viele Grüße
10.01.2021 - 21:34DROPS Design answered:
Liebe Anne, 2 Fäden Air (= Garngruppe C) können Sie durch 1 Faden Garngruppe E ersetzen - versuchen Sie unseren Garnumrechner und hier lesen Sie mehr über Garnalternativen. Viel Spaß beim stricken!
11.01.2021 - 10:17
![]() Sonja Kohlberger wrote:
Sonja Kohlberger wrote:
Danke für die schöne Anleitung - was mir nicht klar ist, ist, wie ich die jeweils 7 neu angeschlagenen Maschen (Ärmelunterteil) mit den stillgelegten Maschen des Ärmels zusammenfügen muss. 33 M plus "je 1 M aus den 7 neu angeschlagenen M = 40 M. " verstehe ich nicht, da ich über diese 7 Maschen ja bereits hinweggestrickt habe. Wie nehme ich was genau auf? Danke für die Hilfe!
26.12.2020 - 12:17DROPS Design answered:
Liebe Frau Kohlberger, in dieser Lektion zeigen wir, wie man einen Pullover von oben nach unten strickt, im Foto 18-B) wird gezeigt, wie man 1 Masche aus den (7 in diese Jacke) neu angeschlagenen Maschen aufnimmt. Viel Spaß beim stricken!
04.01.2021 - 08:34
![]() Amélie wrote:
Amélie wrote:
Bonjour, Très joli modèle merci. Je suis en train de le faire et je ne comprends pas pourquoi le devant est supposé être plus court que le dos, puisqu'il n'y a pas de rang raccourci. C'est les augmentations raglan qui font ça ? Je vous remercie, bonne journée . Amélie
21.12.2020 - 13:52DROPS Design answered:
Bonjour Amélie, le dos et les devants auront la même longueur, c'est juste un effet 3D qui a été reproduit dans le schéma. Bon tricot!
21.12.2020 - 14:17
![]() Annika wrote:
Annika wrote:
Hej. Er det muligt at strikke almindelig patent strik i stedet for falsk patent? :)
05.12.2020 - 23:49DROPS Design answered:
Hej Annika, ja men da skal du beregne mere garn, hellere lidt for meget end for lidt. Sørg for at strikkefastheden i opskriften for at få de rigtige mål. God fornøjelse!
07.12.2020 - 11:48
![]() Sabine Jezyschek-Joeris wrote:
Sabine Jezyschek-Joeris wrote:
Ist die Maschenzahl für die Größe M richtig angegeben? Ich erhalte bei 65 Anschlag + 10 Zunahmen + 8 x 10 (5 Markierungen a' 2 Zunahmen) + 5 x 10 (5 Markierungen a' 2 Zunahmen) 205 statt der angegebenen 179 Gesamtmaschen. Wird beidseitig der Markierung der Rückenmitte nicht zugenommen? Dann erhalte ich eine 189 Maschen. Was verstehe ich hier falsch? MfG Sabine Jezyschek-Joeris
22.11.2020 - 11:48DROPS Design answered:
Liebe Frau Jezyschek-Joeris, es sind nur 4 Markierungen je für die Raglanlinien = 75 Maschen + 8 Maschen x (8 Mal in jeder Hinreihe +5 Mal in jeder 2. Hinreihe) = 179 Maschen. Viel Spaß beim stricken!
23.11.2020 - 09:25
![]() Elisabeth Larsen wrote:
Elisabeth Larsen wrote:
Hei! Jeg har kjøpt garn på nett ,til jakke, DROPS 215-28. Det står at man skal strikke falsk patent i 2 tråder DROPS Air. Syntes dette garnet er veldig tykt, og lurer på om det er rett at man skal strikke med dobbelt garn. Tror da det vil bli en veldig tykk jakke. Håper på et raskt svar. Med vennlig hilsen Elisabeth
16.11.2020 - 14:02DROPS Design answered:
Hei Elisabeth. Ja, jakken skal strikkes med 2 tråder DROPS Air. DROPS Air er et svært lett og luftig garn. Noen vil kanskje si at det vil bli tykk, mens andre ikke, det kommer an på hva man liker og hva man sammenligner med. mvh DROPS design
16.11.2020 - 15:12
![]() EchoCiel8 wrote:
EchoCiel8 wrote:
Bonjour, je ne trouve pas le nombre de pelottes à acheter dans chaque coloris. Combien en faut il pour faire une taille M s\'il vous plait?\r\nBonne journée
25.10.2020 - 11:58DROPS Design answered:
Bonjour EchoCiel8, vous trouverez toujours la quantité nécessaire pour chaque taille dans l'en-tête, avec les tailles, l'échantillon et les aiguilles, autrement dit, il vous faut en taille M 500 g DROPS Air/50 g la pelote = 10 pelotes. Bon tricot!
26.10.2020 - 08:26
![]() Isabelle GEST wrote:
Isabelle GEST wrote:
Bonjour, j'aime beaucoup ce modèle que j'aimerai tricoter en DROPS ANDES. Combien de pelotes me conseillez vous pour une taille L. Merci je suis réellement fan de vos modèles et de vos laines. isabelle
15.10.2020 - 17:24DROPS Design answered:
Bonjour Mme Gest, rappelez-vous qu'utiliser une autre laine que celle proposer donnera un résultat différent, car les laines n'ont pas les mêmes caractéristiques - vous trouverez plus d'infos ici - utilisez notre convertisseur pour avoir la nouvelle quantité. Bon tricot!
19.10.2020 - 09:14
|
|
Shout for Winter#shoutforwintercardigan |
|
 |
 |
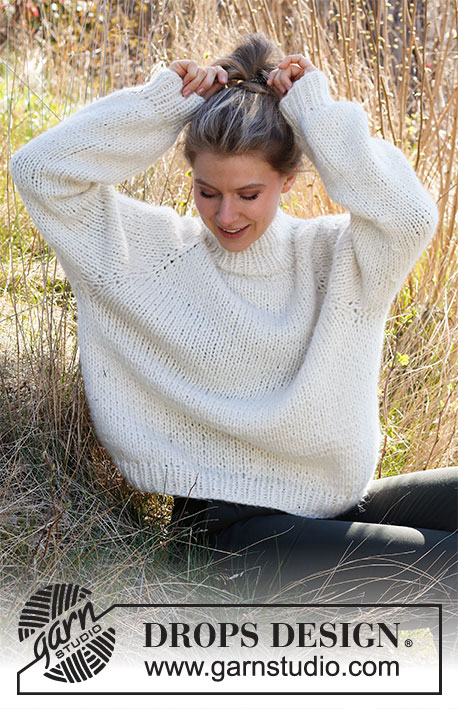
Knitted jacket with raglan and False English rib in 2 strands DROPS Air. Sizes S - XXXL.
DROPS 215-28 |
|
|
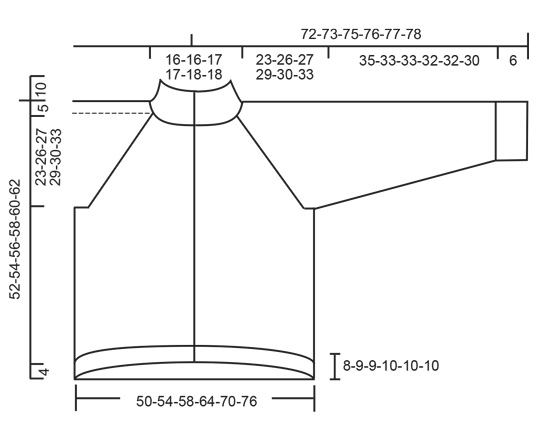
------------------------------------------------------- EXPLANATIONS FOR THE PATTERN: ------------------------------------------------------- INCREASE/DECREASE TIP (evenly spaced): To work out how to increase/decrease evenly, count the total number of stitches on needle (e.g. 65 stitches), minus the bands (e.g. 10 stitches) and divide the remaining stitches by the number of increases/decreases to be made (e.g. 10) = 5.5. In this example, increase by making 1 yarn over after alternately each 5th and 6th stitch. On the next row work the yarn overs twisted to avoid holes. When decreasing, knit together alternately each 4th and 5th stitch and each 5th and 6th stitch. Do not increase/decrease over the bands. RIDGE/GARTER STITCH (worked back and forth): Knit all rows. 1 ridge in height = Knit 2 rows. FALSE ENGLISH RIB (back and forth): ROW 1 (= right side): * Knit 1, 1 yarn over, slip 1 stitch as if to purl *, work from *-* until there is 1 stitch left, knit 1. ROW 2 (= wrong side): Knit 1, * purl together slipped stitch and yarn over from the previous row, knit 1 *, work from *-*. Repeat rows 1 and 2 onwards. RAGLAN: Increase 1 stitch on each side of the marker-stitch; the increased stitches on front pieces are worked into the False English rib and the increased stitches on back piece and sleeves are worked in stocking stitch. Work as far as the marker-stitch, make 1 yarn over, work the marker-stitch in stocking stitch, 1 yarn over. On the next row purl the yarn overs twisted to avoid holes. DECREASE TIP (for sleeves): Work until there are 2 stitches left before the marker-stitch, slip 1 stitch, knit 1 and pass the slipped stitch over the knitted stitch, knit 1 (marker-stitch), knit 2 together. BUTTONHOLES: Work buttonholes on the right band. 1 buttonhole = work until there are 4 stitches left on the row, knit 2 together, make 1 yarn over and 2 garter stitches. On the next row knit the yarn over to leave a hole. The first buttonhole is worked when the piece measures approx. 11 cm from the cast-on edge (remember that all measurements are taken on the back piece). The other 4-5-5-5-5-5 buttonholes are worked with approx. 10-8½-9-9-9½-10 cm between each one. ------------------------------------------------------- START THE PIECE HERE: ------------------------------------------------------- JACKET – SHORT OVERVIEW OF THE PIECE. The yoke is worked back and forth with circular needle, from mid front and top down. The yoke is divided for body and sleeves and the body continued back and forth with circular needle. The sleeves are worked in the round with double pointed needles/short circular needle, top down. The whole piece is worked with 2 strands. Due to the pattern on the front pieces, the piece will be shorter at the front than at the back; all measurements are taken on the back piece. NECK: Cast on 65-65-65-69-69-69 stitches with 2 strands Air and circular needle size 7 mm. Work rib back and forth as follows: 1 edge stitch in GARTER STITCH – read description above, * knit 1, purl 1 *, work from *-* until there are 2 stitches left, knit 1 and 1 edge stitch in garter stitch. Continue with knit over knit, purl over purl and garter stitch over garter stitch for 10 cm in all sizes – adjust so the next row is from the wrong side. Change to circular needle size 9 mm and purl 1 row from the wrong side with 5 band stitches in garter stitch on each side and increase AT THE SAME TIME 10-10-10-12-12-12 stitches evenly spaced – read INCREASE/DECREASE TIP in explanations above = 75-75-75-81-81-81 stitches. YOKE: Continue as follows from the right side: 5 band stitches in garter stitch, 11-11-11-13-13-13 stitches in FALSE ENGLISH RIB – see description above (= left front piece), 1 stitch in stocking stitch and insert marker-1 in this stitch. 9 stitches in stocking stitch (= sleeve), 1 stitch in stocking stitch and insert marker-2 in this stitch. 21-21-21-23-23-23 stitches in stocking stitch (= back piece), 1 stitch in stocking stitch and insert marker-3 in this stitch. 9 stitches in stocking stitch (= sleeve), 1 stitch in stocking stitch and insert marker-4 in this stitch. Work 11-11-11-13-13-13 stitches in False English rib, 5 band stitches in garter stitch (= right front piece). Insert a marker thread in the middle of the back piece; leave it there – the yoke is measured from this thread! Remember BUTTONHOLES on the right band – see description above. Continue the pattern and on the next row from the right side, begin to increase to RAGLAN – see description above. Repeat this increase on every row from the right side a total of 6-8-11-14-19-23 times, then every other row from the right side a total of 5-5-4-3-1-0 times = 163-179-195-217-241-265 stitches. REMEMBER THE KNITTING TENSION! Work until the piece measures 23-26-27-29-30-33 cm, measured from the marker thread on the back– adjust so the next row is from the right side. Now divide for the body and sleeves as follows: Work the first 27-29-31-35-38-41 stitches (= left front piece), place the next 33-37-41-45-51-57 stitches on a thread (= sleeve), cast on 7 new stitches under the sleeve, work the next 43-47-51-57-63-69 stitches (= back piece), place the next 33-37-41-45-51-57 stitches on a thread (= sleeve), cast on 7 new stitches under the sleeve, work the remaining 27-29-31-35-38-41 stitches (= right front piece). Body and sleeves are finished separately. BODY: = 111-119-127-141-153-165 stitches. Continue with 5 band stitches in garter stitch, False English rib on the front pieces and stocking stitch over the new stitches under the sleeves and on the back piece. Work until the piece measures approx. 48-50-52-54-56-58 cm from the shoulder down – adjust so the next row is from the right side. Change to circular needle size 7 mm and work 5 band stitches in garter stitch, * knit 1, purl 1*, work from *-* until there are 6 stitches left, knit 1 and 5 band stitches in garter stitch. Continue with knit over knit, purl over purl and garter stitch over garter stitch for 4 cm in all sizes. The jacket measures approx. 52-54-56-58-60-62 cm from the shoulder down; the front is approx. 8-9-9-10-10-10 cm shorter than the back. Loosely cast off. SLEEVE: Place the 33-37-41-45-51-57 stitches from the thread on the one side of the piece on short circular needle size 9 mm and knit up 1 stitch in each of the 7 stitches cast on under the sleeve = 40-44-48-52-58-64 stitches. Insert a marker thread in the middle of the new stitches under the sleeve. Work stocking stitch in the round. When the sleeve measures 4 cm, start to decrease under the sleeve – read DECREASE TIP in explanations above. Repeat the decrease every 6½-6-5-4-4-3 cm a total of 4-4-4-5-7-9 times = 32-36-40-42-44-46 stitches. Work until the sleeve measures approx. 35-33-33-32-32-30 cm. Change to double pointed needles size 7 mm and knit 1 round where you decrease 6-8-12-12-12-14 stitches evenly spaced = 26-28-28-30-32-32 stitches. Work rib (knit 1, purl 1) for 6 cm. Loosely cast off with knit over knit and purl over purl. Work the other sleeve in the same way. ASSEMBLY: Sew the buttons onto the left band. |
|
|
|
Have you finished this pattern?Tag your pictures with #dropspattern #shoutforwintercardigan or submit them to the #dropsfan gallery. Do you need help with this pattern?You'll find 29 tutorial videos, a Comments/Questions area and more by visiting the pattern on garnstudio.com. © 1982-2025 DROPS Design A/S. We reserve all rights. This document, including all its sub-sections, has copyrights. Read more about what you can do with our patterns at the bottom of each pattern on our site. |
|


With over 40 years in knitting and crochet design, DROPS Design offers one of the most extensive collections of free patterns on the internet - translated to 17 languages. As of today we count 314 catalogues and 11820 patterns translated into English (UK/cm). 11820
We work hard to bring you the best knitting and crochet have to offer, inspiration and advice as well as great quality yarns at incredible prices! Would you like to use our patterns for other than personal use? You can read what you are allowed to do in the Copyright text at the bottom of all our patterns. Happy crafting!
Post a comment to pattern DROPS 215-28
We would love to hear what you have to say about this pattern!
If you want to leave a question, please make sure you select the correct category in the form below, to speed up the answering process. Required fields are marked *.