
Popular categories
Looking for a yarn?


Comments / Questions (21)
![]() Crys wrote:
Crys wrote:
Bonjour Concernant le devant et dos il est écrit "Tricoter jusqu'à ce que l'ouvrage mesure 48-50-52-54-56-58 cm depuis l'épaule" Je ne saisis pas bien à partir de quelle hauteur mesurer. Depuis la fin du col à l'arrière ? Ou ? Merci d avance de votre aide
25.04.2024 - 15:16DROPS Design answered:
Bonjour Crys, posez la veste à plat comme dans le schéma, et mesurez à partir de l'épaule, à côté de l'encolure jusqu'aux mailles sur l'aiguille. Bon tricot!
25.04.2024 - 16:14
![]() Crys wrote:
Crys wrote:
Bonjour Je ne comprends pas les fausses côtes anglaises. L explication ne correspond pas à ce qui est montré dans la vidéo. Et comment faire avec les mailles que l on ajoute Merci d avance pour votre aide
06.04.2024 - 19:19DROPS Design answered:
Bonjour Crys, effectivement, il existe plusieurs façons de les tricoter, ici on a 1 maille point mousse entre chaque maille en côtes anglaises alors que dans la vidéo on va tricoter 1 maille jersey envers entre chaque maille en côtes anglaises, suivez attentivement les explications écrites, et tricotez à l'endroit tous les rangs la maille entre celle en côtes anglaises (alternativement glissée à l'envers avec son jeté sur l'endroit et tricotée ensemble à l'envers avec son jeté sur l'envers). Bon tricot!
08.04.2024 - 07:58
![]() Sarah wrote:
Sarah wrote:
Den falske patent er forkert i opskriften på pind 1... Det bør være: FALSK PATENT (frem og tilbage): 1.PIND (= retsiden): * 1 maske vrang, slå om, tag 1 maske løs af pinden som om den skulle strikkes vrang *, strik fra *-* til der er 1 maske tilbage, afslut med 1 maske vrang. 2.PIND (= vrangen): 1 maske ret, * strik den løse maske og omslaget fra forrige pind vrang sammen, 1 maske ret *, strik fra *-*. Gentag 1.og 2.pind.
08.02.2024 - 17:48
![]() Sally wrote:
Sally wrote:
What size is the model wearing in the photo? Thank you!
03.01.2024 - 06:01DROPS Design answered:
Dear Sally, most of the time our models are wearing either a size S or a size M; but as our bodies are all different, the best way to find your own size is to measure a similar garment you have and like the shape and compare these measurements to the ones in the chart (in cm - convert here). Read more here. Happy knitting!
03.01.2024 - 08:39
![]() Iwona wrote:
Iwona wrote:
''Dalej przerabiać tak samo, w tym samym czasie, w następnym rzędzie na prawej stronie robótki zacząć dodawanie oczek na REGLAN – patrz powyżej. Powtarzać dodawanie oczek w sumie 6-8-11-14-19-23 razy w każdym rzędzie na prawej stronie robótki i 5-5-4-3-1-0 razy co 2 rzędy na prawej stronie robótki (= co 4 rzędy) = 163-179-195-217-241-265 oczek. '' Nie rozumiem gdzie mają być dodane te oczka.
20.03.2023 - 17:53DROPS Design answered:
Witaj Iwono, na reglan dodajesz 1 oczko z każdej strony 4 oczek z markerem (to będą 4 linie reglanu), czyli jest dodanych 8 oczek w każdym rzędzie, w którym wg opisu dodajesz oczka. W tym modelu oczka na reglan są dodawane zawsze na prawej stronie robótki: najpierw co 2 rzędy, a następnie co 4 rzędy. Pozdrawiamy!
21.03.2023 - 08:32
![]() Lena Davidian wrote:
Lena Davidian wrote:
Hello, I would love to make this jacket but it suggests using circular needles. Can you please tell me how to adapt the pattern to straight needles? Thank you, lena
10.01.2022 - 22:21DROPS Design answered:
Dear Mrs Davidian, only sleeves are worked here in the round, you will find how to adapt a pattern into straight needles here. Happy knitting!
11.01.2022 - 09:09
![]() Else Lindberg-Nielsen wrote:
Else Lindberg-Nielsen wrote:
Når jeg klikker på rettelser til opskriften, står der blot, at rettelsen er foretaget online, men ikkehvad rettelsen går ud på. Hvordan får jeg svar på det?\r\nVenlig hilsen, Else Lindberg .
01.03.2021 - 16:43DROPS Design answered:
Hei Else. Jo, det står hva rettelsene går ut på og når det ble oppdatert (det er rettet i selve oppskriften og hva det er rettet står under rettelseknappen.: Opdateret online: 22.12.2020. Rettelse: Målene på bærestykket og ryg-& forstykke + måleskitse er opdateret. Opdateret online: 05.02.2021 Antal knaphuller og placeringen af dem er rettet. mvh DROPS design
03.03.2021 - 13:41
![]() Tania wrote:
Tania wrote:
Bonjour, Au moment de la division des différentes parties, il est indiqué de tricoter les 27 premières mailles (taille S) correspondant au devant gauche. Ces mailles incluant les 5 mailles bordures, on se retrouve avec un nombre pair pour les mailles en fausses côtes anglaises (22m.) alors que nous devons toujours finir par une maille endroit les fausses côtes donc avoir un nombre pair de mailles. Comment faire ? Faut-il ajouter une maille pour avoir un nombre pair ? Merci d'avance.
02.02.2021 - 00:20DROPS Design answered:
Bonjour Tania, vous tricotez les 22 mailles du devant en côtes anglaises, mais vous pouvez, si vous le souhaitez, terminer ces mailles par la 1ère maille des fausses côtes anglaises, autrement dit, tricotez la 1ère des mailles montées sous la 1ère manche et la dernière des mailles montées sous la 2ème manche comme la 1ère des mailles des fausses côtes anglaises. Bon tricot!
02.02.2021 - 10:37
![]() Mary wrote:
Mary wrote:
Could you help me with buttonhole placement? I see only 5buttons on the picture and when I reach the measurement to start the rib on the bottom I will have only 5 buttons as the front wil be about 8cm smaller than the back could you tell me where I am going wrong. I am doing the small size and I did a swatch and my tension is OK? Thank you
19.01.2021 - 13:30
![]() Tania wrote:
Tania wrote:
Bonjour, Pour les augmentations est-ce donc : - rang endroit = augmentations Raglan (+8 mailles) - rang envers = rien Répété 6 fois. Puis : - rang endroit = augmentations Raglan (+8 mailles) - rang envers = rien - rang endroit = rien - rang envers = rien Répété 5 fois. Puis on tricote normalement (sans augmenter) jusqu'à atteindre les 23 cm. Merci pour votre réponse !
17.01.2021 - 15:09DROPS Design answered:
Bonjour Tania, tout à fait, ceci correspond aux augmentations du raglan en taille S. Bon tricot!
18.01.2021 - 09:56
|
|
Shout for Winter#shoutforwintercardigan |
|
 |
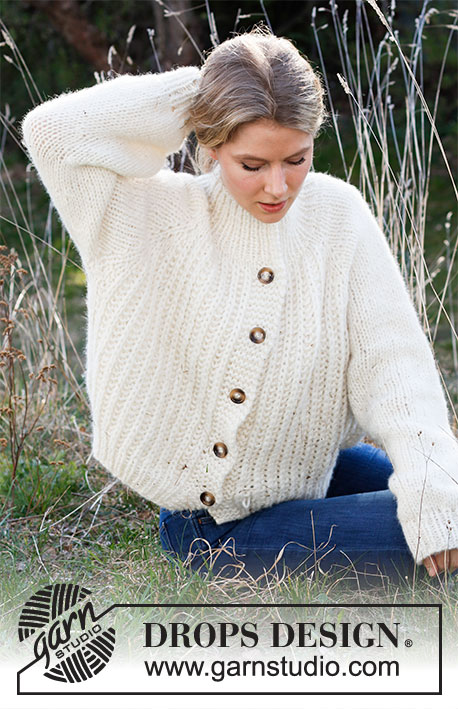 |
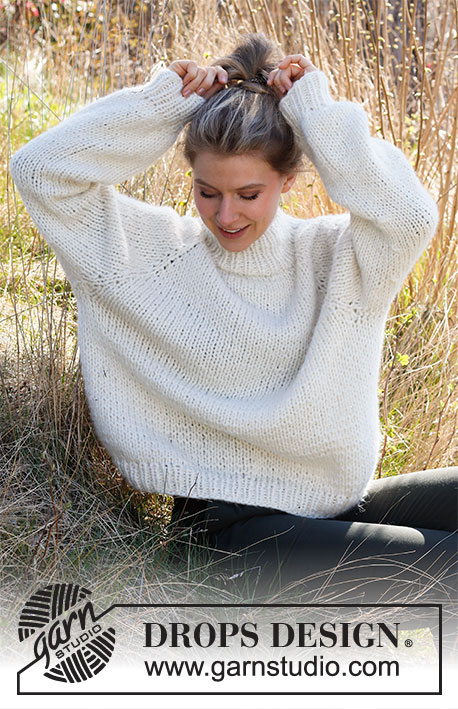
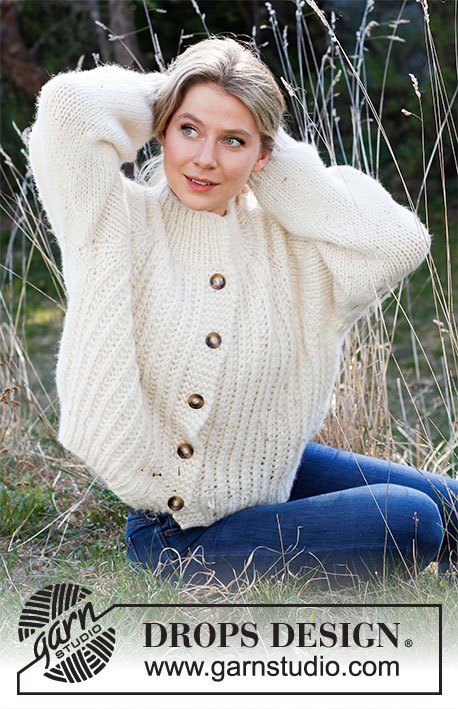
Knitted jacket with raglan and False English rib in 2 strands DROPS Air. Sizes S - XXXL.
DROPS 215-28 |
|
|
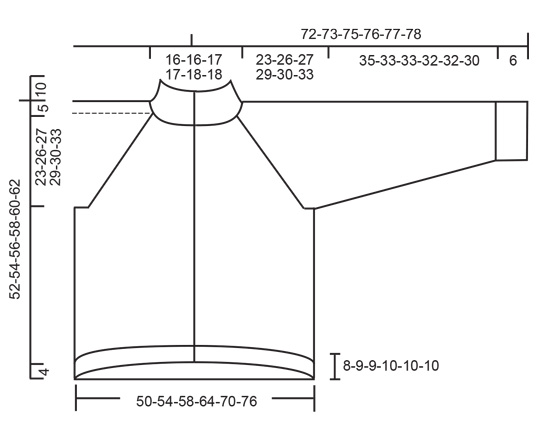
------------------------------------------------------- EXPLANATIONS FOR THE PATTERN: ------------------------------------------------------- INCREASE/DECREASE TIP (evenly spaced): To work out how to increase/decrease evenly, count the total number of stitches on needle (e.g. 65 stitches), minus the bands (e.g. 10 stitches) and divide the remaining stitches by the number of increases/decreases to be made (e.g. 10) = 5.5. In this example, increase by making 1 yarn over after alternately each 5th and 6th stitch. On the next row work the yarn overs twisted to avoid holes. When decreasing, knit together alternately each 4th and 5th stitch and each 5th and 6th stitch. Do not increase/decrease over the bands. RIDGE/GARTER STITCH (worked back and forth): Knit all rows. 1 ridge in height = Knit 2 rows. FALSE ENGLISH RIB (back and forth): ROW 1 (= right side): * Knit 1, 1 yarn over, slip 1 stitch as if to purl *, work from *-* until there is 1 stitch left, knit 1. ROW 2 (= wrong side): Knit 1, * purl together slipped stitch and yarn over from the previous row, knit 1 *, work from *-*. Repeat rows 1 and 2 onwards. RAGLAN: Increase 1 stitch on each side of the marker-stitch; the increased stitches on front pieces are worked into the False English rib and the increased stitches on back piece and sleeves are worked in stocking stitch. Work as far as the marker-stitch, make 1 yarn over, work the marker-stitch in stocking stitch, 1 yarn over. On the next row purl the yarn overs twisted to avoid holes. DECREASE TIP (for sleeves): Work until there are 2 stitches left before the marker-stitch, slip 1 stitch, knit 1 and pass the slipped stitch over the knitted stitch, knit 1 (marker-stitch), knit 2 together. BUTTONHOLES: Work buttonholes on the right band. 1 buttonhole = work until there are 4 stitches left on the row, knit 2 together, make 1 yarn over and 2 garter stitches. On the next row knit the yarn over to leave a hole. The first buttonhole is worked when the piece measures approx. 11 cm from the cast-on edge (remember that all measurements are taken on the back piece). The other 4-5-5-5-5-5 buttonholes are worked with approx. 10-8½-9-9-9½-10 cm between each one. ------------------------------------------------------- START THE PIECE HERE: ------------------------------------------------------- JACKET – SHORT OVERVIEW OF THE PIECE. The yoke is worked back and forth with circular needle, from mid front and top down. The yoke is divided for body and sleeves and the body continued back and forth with circular needle. The sleeves are worked in the round with double pointed needles/short circular needle, top down. The whole piece is worked with 2 strands. Due to the pattern on the front pieces, the piece will be shorter at the front than at the back; all measurements are taken on the back piece. NECK: Cast on 65-65-65-69-69-69 stitches with 2 strands Air and circular needle size 7 mm. Work rib back and forth as follows: 1 edge stitch in GARTER STITCH – read description above, * knit 1, purl 1 *, work from *-* until there are 2 stitches left, knit 1 and 1 edge stitch in garter stitch. Continue with knit over knit, purl over purl and garter stitch over garter stitch for 10 cm in all sizes – adjust so the next row is from the wrong side. Change to circular needle size 9 mm and purl 1 row from the wrong side with 5 band stitches in garter stitch on each side and increase AT THE SAME TIME 10-10-10-12-12-12 stitches evenly spaced – read INCREASE/DECREASE TIP in explanations above = 75-75-75-81-81-81 stitches. YOKE: Continue as follows from the right side: 5 band stitches in garter stitch, 11-11-11-13-13-13 stitches in FALSE ENGLISH RIB – see description above (= left front piece), 1 stitch in stocking stitch and insert marker-1 in this stitch. 9 stitches in stocking stitch (= sleeve), 1 stitch in stocking stitch and insert marker-2 in this stitch. 21-21-21-23-23-23 stitches in stocking stitch (= back piece), 1 stitch in stocking stitch and insert marker-3 in this stitch. 9 stitches in stocking stitch (= sleeve), 1 stitch in stocking stitch and insert marker-4 in this stitch. Work 11-11-11-13-13-13 stitches in False English rib, 5 band stitches in garter stitch (= right front piece). Insert a marker thread in the middle of the back piece; leave it there – the yoke is measured from this thread! Remember BUTTONHOLES on the right band – see description above. Continue the pattern and on the next row from the right side, begin to increase to RAGLAN – see description above. Repeat this increase on every row from the right side a total of 6-8-11-14-19-23 times, then every other row from the right side a total of 5-5-4-3-1-0 times = 163-179-195-217-241-265 stitches. REMEMBER THE KNITTING TENSION! Work until the piece measures 23-26-27-29-30-33 cm, measured from the marker thread on the back– adjust so the next row is from the right side. Now divide for the body and sleeves as follows: Work the first 27-29-31-35-38-41 stitches (= left front piece), place the next 33-37-41-45-51-57 stitches on a thread (= sleeve), cast on 7 new stitches under the sleeve, work the next 43-47-51-57-63-69 stitches (= back piece), place the next 33-37-41-45-51-57 stitches on a thread (= sleeve), cast on 7 new stitches under the sleeve, work the remaining 27-29-31-35-38-41 stitches (= right front piece). Body and sleeves are finished separately. BODY: = 111-119-127-141-153-165 stitches. Continue with 5 band stitches in garter stitch, False English rib on the front pieces and stocking stitch over the new stitches under the sleeves and on the back piece. Work until the piece measures approx. 48-50-52-54-56-58 cm from the shoulder down – adjust so the next row is from the right side. Change to circular needle size 7 mm and work 5 band stitches in garter stitch, * knit 1, purl 1*, work from *-* until there are 6 stitches left, knit 1 and 5 band stitches in garter stitch. Continue with knit over knit, purl over purl and garter stitch over garter stitch for 4 cm in all sizes. The jacket measures approx. 52-54-56-58-60-62 cm from the shoulder down; the front is approx. 8-9-9-10-10-10 cm shorter than the back. Loosely cast off. SLEEVE: Place the 33-37-41-45-51-57 stitches from the thread on the one side of the piece on short circular needle size 9 mm and knit up 1 stitch in each of the 7 stitches cast on under the sleeve = 40-44-48-52-58-64 stitches. Insert a marker thread in the middle of the new stitches under the sleeve. Work stocking stitch in the round. When the sleeve measures 4 cm, start to decrease under the sleeve – read DECREASE TIP in explanations above. Repeat the decrease every 6½-6-5-4-4-3 cm a total of 4-4-4-5-7-9 times = 32-36-40-42-44-46 stitches. Work until the sleeve measures approx. 35-33-33-32-32-30 cm. Change to double pointed needles size 7 mm and knit 1 round where you decrease 6-8-12-12-12-14 stitches evenly spaced = 26-28-28-30-32-32 stitches. Work rib (knit 1, purl 1) for 6 cm. Loosely cast off with knit over knit and purl over purl. Work the other sleeve in the same way. ASSEMBLY: Sew the buttons onto the left band. |
|
|
|
Have you finished this pattern?Tag your pictures with #dropspattern #shoutforwintercardigan or submit them to the #dropsfan gallery. Do you need help with this pattern?You'll find 29 tutorial videos, a Comments/Questions area and more by visiting the pattern on garnstudio.com. © 1982-2025 DROPS Design A/S. We reserve all rights. This document, including all its sub-sections, has copyrights. Read more about what you can do with our patterns at the bottom of each pattern on our site. |
|


With over 40 years in knitting and crochet design, DROPS Design offers one of the most extensive collections of free patterns on the internet - translated to 17 languages. As of today we count 314 catalogues and 11822 patterns translated into English (UK/cm).
We work hard to bring you the best knitting and crochet have to offer, inspiration and advice as well as great quality yarns at incredible prices! Would you like to use our patterns for other than personal use? You can read what you are allowed to do in the Copyright text at the bottom of all our patterns. Happy crafting!
Post a comment to pattern DROPS 215-28
We would love to hear what you have to say about this pattern!
If you want to leave a question, please make sure you select the correct category in the form below, to speed up the answering process. Required fields are marked *.