
Popular categories
Looking for a yarn?


Comments / Questions (110)
![]() Martine wrote:
Martine wrote:
Bonjour, \\r\\nJe remarque que le modèle femme est réalisé avec fil double et aiguilles N°9 alors que le modèle pour la fillette est réalisé avec le fil simple et aiguilles N°5. \\r\\nSerait il possible d\\\'avoir les explications du pull femme fait avec fil simple et aiguilles 5 ?
18.03.2020 - 18:15DROPS Design answered:
Bonjour Martine, vous trouverez ici, tous nos modèles en laine du groupe C avec 16 mailles de tension, comme le pull fille, ceci devrait pouvoir vous aider. Bon tricot!
19.03.2020 - 10:11
![]() Natasja wrote:
Natasja wrote:
Hebben jullie ook een telpatroon voor de andere kleurcombinaties of hoe tel ik het zelf uit?
11.02.2020 - 21:38DROPS Design answered:
Dag Natasja,
Nee, we hebben alleen een telpatroon voor de kleurencombinatie op de foto. Je kunt het telpatroon uitprinten en dan voor jezelf de andere kleuren bij de symbolen zetten.
12.02.2020 - 20:42
![]() LHOTE wrote:
LHOTE wrote:
Modèle 202-1: dans "empiècement" (et après col), pour la taille XXL, on commence l'empiècement avec 68 mailles. Mais, comment placer les marqueurs comme vous le préconisez, à savoir après 2 + 24 + 10 + 24 + 10 + = 70...Comment trouvez-vous encore "8 mailles avant la fin du tour, après le dernier marqueur" soit 78 mailles en tout alors qu'on en n'a que 68 au départ ????? Eclairez moi SVP! Merci
17.01.2020 - 17:09DROPS Design answered:
Bonjour Mme Lhote, il y avait effectivement une erreur dans les derniers marqueurs, merci pour votre retour, on a bien les 68 m requises maintenant - cf correction. Bon tricot!
20.01.2020 - 07:58
![]() Helle Faurskov Villadsen wrote:
Helle Faurskov Villadsen wrote:
Hvorfor er der 10m til det ene ærme og kun 8m til det andet?
16.01.2020 - 09:06DROPS Design answered:
Hej Helle, du har de andre 2 masker på den anden side af mærketråden, så du får ialt 10 masker på begge ærmer. God fornøjelse!
31.01.2020 - 08:42
![]() Helle Faurskov Villadsen wrote:
Helle Faurskov Villadsen wrote:
Der står i rettelser at start er mellem venstre ærme og bagstykke! Jeg forstår ikke. Hvordan starter p1 , p3 , p5 ? Jeg er helt forvirret, hjælp ønskes. Mvh Helle.
13.01.2020 - 17:57DROPS Design answered:
Hej Helle, Når du sætter de 4 mærketråde ifølge opskriften, så vil du automatisk få starten flyttet til mellem venstre ærme og bagstykket, det er også her du skifter farve fremover. God fornøjelse!
15.01.2020 - 15:11
![]() Mette Jacobsen wrote:
Mette Jacobsen wrote:
Hej. Kan jeg strikke denne model med Brushed Alpaca Silk med 2 tråde?
02.12.2019 - 19:30DROPS Design answered:
Hei Mette! Ja, det går fint, om ønskelig kan du lese mer om garngrupper her . Lykke til!
03.12.2019 - 08:27
![]() Anne Cesilie Nyborg wrote:
Anne Cesilie Nyborg wrote:
Hei, jeg har bestilt garn til en genser Str S. Hvordan kan jeg strikke med dobbel tråd når det bare er ett nøste i samme farge?
19.11.2019 - 08:55DROPS Design answered:
Hei Anne Cesilie, Når du strikker bare med en farge, kan du bruke tråden både fra innsida og utsida av nøstet. God fornøyelse!
19.11.2019 - 12:11
![]() Marita wrote:
Marita wrote:
Hvordan er genseren i str? Jeg bruker vanligvis str xxl, men liker at de er romslige. Blir str xxxl for liten?
18.11.2019 - 17:28DROPS Design answered:
Hei Marita! Om du er usikker på hvilken størrelse du vil strikke kan det være lurt å se på målskissen vår lengre nede på siden. Der er det en oversikt over de forskjellige målene for hver størrelse. Lykke til!
19.11.2019 - 12:07
![]() MONTSE wrote:
MONTSE wrote:
GOD MORGEN HAR DU MØNSTRE Å VEIE MED EN ENKELT TRÅD? TAKK VELDIG MYE
31.10.2019 - 12:41DROPS Design answered:
Hola Montse. Para este modelo no tenemos la cantidad de lana calculada si se trabaja con un solo color, pero en nuestra colección de jerseis puedes encontrar varios modelos similares trabajados con Air.
05.11.2019 - 00:21
![]() Bente wrote:
Bente wrote:
Jeg tror der en feil i oppskriften. Det står at det skal settes 10 masker til erme og deretter øke gradvis 16 m i hver side.( str XL) dvs: 16x2 = 32 + 10 = 42 ikke 38 etter mine kalkulasjoner. Tar jeg feil?
25.10.2019 - 16:19DROPS Design answered:
Hei Bente. Litt usikker på hva du mener. I str. XL skal man sette 38 masker på 1 tråd til erme og legge opp 6 nye masker på pinnen, les nederst under avsnittet til BÆRESTYKKET. Kan det være at du blander med merketråden som skal settes etter 10 masker og det skal økes til raglan 16 ganger- les øverst under BÆRESTYKKET? Mvh DROPS design
28.10.2019 - 11:09
|
||||||||||||||||||||||||||||
Happy Stripes#happystripessweater |
||||||||||||||||||||||||||||
 |
 |
|||||||||||||||||||||||||||
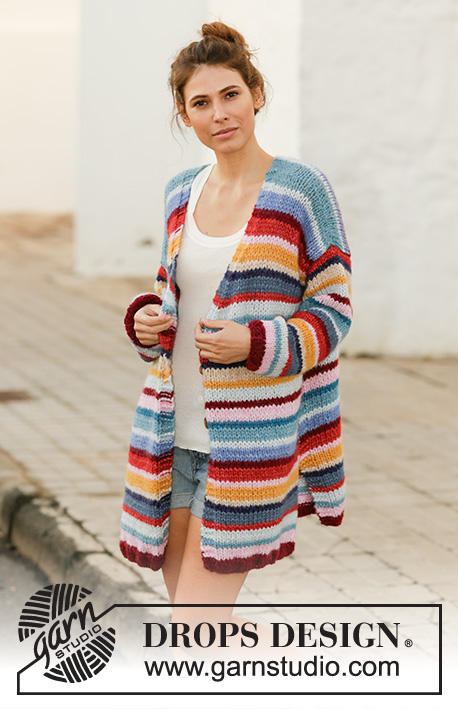
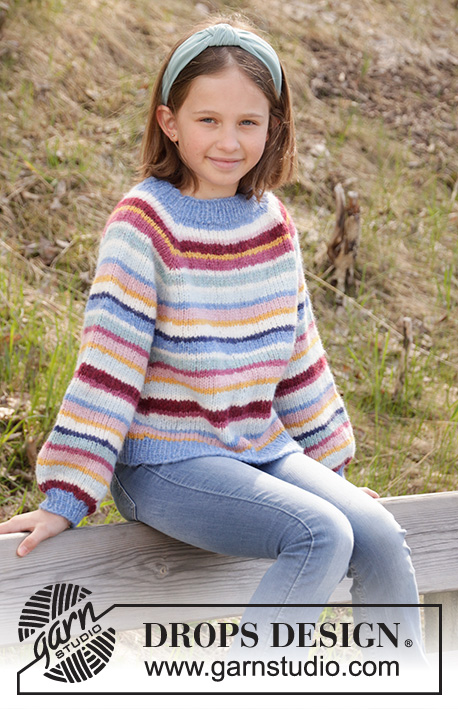
Knitted jumper with balloon sleeves in 2 strands DROPS Air. The piece is worked top down with raglan and stripes. Sizes S - XXXL.
DROPS 202-1 |
||||||||||||||||||||||||||||
|
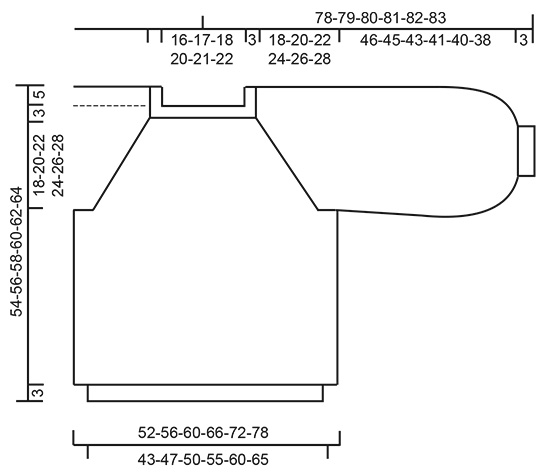
------------------------------------------------------- EXPLANATIONS FOR THE PATTERN: ------------------------------------------------------- RIDGE/GARTER STITCH (worked in the round): 1 ridge in height = 2 rounds; knit 1 round and purl 1 round. INCREASE TIP-1 (evenly spaced): To work out how to increase evenly, count the total number of stitches on the needle (e.g. 54 stitches) and divide by the number of increases to be made (e.g. 6) = 9. In this example increase by making 1 yarn over after each 9th stitch. On the next round knit the yarn overs twisted to avoid holes. STRIPES: See diagram A.1 and A.2. The stripes are worked in stocking stitch with 2 strands Air. Work A.1 once, then work A.2 to finished length (applies to both body and sleeves). RAGLAN: Increase to raglan on each side of the 4 marker threads as follows: Start 2 stitches before the marker thread, make 1 yarn over, knit 4 (marker thread sits in middle of these 4 stitches), 1 yarn over = 2 stitches increased and a total of 8 stitches increased on round. On the next round knit the yarn overs twisted to avoid holes. Then work the new stitches in stocking stitch. INCREASE TIP-2 (for mid under sleeve): Increase 2 stitches mid under sleeve as follows: Start 2 stitches before the marker thread, make 1 yarn over, knit 4 (marker thread sits in the middle of these 4 stitches), 1 yarn over = 2 stitches increased. On the next round knit the yarn overs twisted to avoid holes. Then work the new stitches in stocking stitch. ------------------------------------------------------- START THE PIECE HERE: ------------------------------------------------------- JUMPER - SHORT OVERVIEW OF THE PIECE: The neck, yoke and body are worked in the round with circular needle, top down. The yoke is divided for sleeves and body. The body is worked in the round with circular needle, top down to finished length. The sleeves are worked in the round with double pointed needles, top down. The whole garment is worked in 2 strands Air. NECK: Cast on 54-56-58-62-64-66 stitches with short circular needle size 7 mm and 2 strands blue. Work 3 RIDGES in the round – read description above. Knit 1 round where you increase 6-4-2-6-4-2 stitches evenly on round – read INCREASE TIP-1 = 60-60-60-68-68-68 stitches. Change to circular needle size 9 mm and work yoke as described below. YOKE: Insert 4 marker threads in the piece as follows (without working the stitches): Count 2 stitches, insert 1 marker thread before the next stitch (=sleeve), count 20-20-20-24-24-24 stitches, insert 1 marker thread before the next stitch (=back piece), count 10 stitches in all sizes, insert 1 marker thread before the next stitch (= sleeve), count 20-20-20-24-24-24 stitches, insert 1 marker thread before the next stitch (= front piece), count 8 stitches in all sizes (= sleeve). Then work as follows: Work STRIPES – read description above. AT THE SAME TIME on the first round increase to RAGLAN – read description above. Increase to raglan every 2nd round a total of 12-14-15-16-17-19 times. REMEMBER THE KNITTING TENSION! After the last increase to raglan there are 156-172-180-196-204-220 stitches on the needle. Continue with stripes until the piece measures 21-23-25-27-29-31 cm from the cast-on edge mid front. The next round is worked as follows: Work 48-52-54-60-64-70 stitches in stocking stitch (= back piece), place the next 30-34-36-38-38-40 stitches on 1 thread for sleeve, cast on 4-4-6-6-8-8 new stitches on the needle (= in side under sleeve), work 48-52-54-60-64-70 stitches in stocking stitch (= front piece), place the next 30-34-36-38-38-40 stitches on 1 thread for sleeve, cast on 4-4-6-6-8-8 new stitches on needle (= in side under sleeve). Body and sleeves are finished separately. THE PIECE IS NOW MEASURED FROM HERE! BODY: = 104-112-120-132-144-156 stitches. Work stocking stitch in the round and continue the stripes in A.1. When A.1 has been completed, work A.2 to finished length. When the piece measures 25 cm from the division, change to circular needle size 7 mm and 2 strands blue. Work garter stitch in the round for 3 cm and finish with a purled round. Loosely cast off with knit, but to avoid the cast-off edge being tight you can cast off with a larger needle. The jumper measures approx. 54-56-58-60-62-64 cm from the shoulder down. SLEEVE: Place the 30-34-36-38-38-40 stitches from the thread on the one side of the body on double pointed needles 9 mm and knit up 1 stitch in each of the 4-4-6-6-8-8 stitches cast on under the sleeve = 34-38-42-44-46-48 stitches. Insert 1 marker thread in the middle of the 4-4-6-6-8-8 stitches under the sleeve and allow it to follow your work onwards. The marker thread will be used when increasing mid under sleeve. Work stocking stitch in the round and continue the stripes in the same way as on the body (important to continue on the same round as on the body after the yoke). When the sleeve measures 4 cm from the division in all sizes, increase 2 stitches mid under sleeve – read INCREASE TIP-2. Increase like this every 4-5-5-5-4½-4½ cm a total of 8-7-6-6-6-6 times = 50-52-54-56-58-60 stitches. Continue working until the sleeve measures approx. 45-44-42-40-39-37 cm from the division (shorter measurements in larger sizes due to wider neck and longer yoke). Knit 1 round where you decrease 4 stitches evenly in all sizes = 46-48-50-52-54-56 stitches. On the next round knit all stitches together 2 and 2 = 23-24-25-26-27-28 stitches. Change to double pointed needles size 7 mm. Work garter stitch in the round for 3 cm and finish after a purled round. Cast off with knit, but make sure that the cast-off edge is not tight. The sleeve measures approx. 49-48-46-44-43-41 cm from the division. Work the other sleeve in the same way. |
||||||||||||||||||||||||||||
Diagram explanations |
||||||||||||||||||||||||||||
|
||||||||||||||||||||||||||||

|
||||||||||||||||||||||||||||
|
||||||||||||||||||||||||||||
Have you finished this pattern?Tag your pictures with #dropspattern #happystripessweater or submit them to the #dropsfan gallery. Do you need help with this pattern?You'll find 24 tutorial videos, a Comments/Questions area and more by visiting the pattern on garnstudio.com. © 1982-2025 DROPS Design A/S. We reserve all rights. This document, including all its sub-sections, has copyrights. Read more about what you can do with our patterns at the bottom of each pattern on our site. |
||||||||||||||||||||||||||||


With over 40 years in knitting and crochet design, DROPS Design offers one of the most extensive collections of free patterns on the internet - translated to 17 languages. As of today we count 314 catalogues and 11820 patterns translated into English (UK/cm). 11820
We work hard to bring you the best knitting and crochet have to offer, inspiration and advice as well as great quality yarns at incredible prices! Would you like to use our patterns for other than personal use? You can read what you are allowed to do in the Copyright text at the bottom of all our patterns. Happy crafting!
Post a comment to pattern DROPS 202-1
We would love to hear what you have to say about this pattern!
If you want to leave a question, please make sure you select the correct category in the form below, to speed up the answering process. Required fields are marked *.