
Popular categories
Looking for a yarn?


Comments / Questions (44)
![]() Christiane wrote:
Christiane wrote:
Ich habe diese Jacke gestrickt bis zu den Vorderteilen, bei mir passt die Proportion überhaupt nicht. Auf der Skizze sind die Ärmel im oberen Drittel bei mir in der Hälfte, obwohl ich das Abketten nach Anleitung gemacht habe. Gibt's dazu auch eine Korrektur?
22.11.2022 - 11:38DROPS Design answered:
Liebe Christiane, Stimmt Ihre Maschenprobe? Sie soll nicht nur in der Breite (24 Maschen) aber auch in der Höhe (32 Reihen glatt rechts) sein, so sollen Sie dieselbe Maßnahamen wie in der Skizze bekommen. Hier lesen Sie mehr. Viel Spaß beim stricken!
22.11.2022 - 16:05
![]() Jenny wrote:
Jenny wrote:
I printed the Seaside Dreamer pattern and saved to a PDF file. I then opened the file in Knit Companion. However chart 3 did not save. I tried to take a screenshot of chart 3and save that to a PDF file but the chart was not saved and the file was empty. Please could you look at why chart 3 did not save to PDF when the rest of the pattern did. P S, this is my second time at knitting this pattern and my first is in the #dropsfan gallery. Unfortunately I cannot find my original pattern.
20.11.2022 - 00:08DROPS Design answered:
Dear Jenny, our patterns can only be printed, try using a virtual printer to save them as a .PDF, and then you should have full pattern including symbols and text to diagrams. Happy knitting!
21.11.2022 - 10:53
![]() Jenny Jyrkänkallio-Mikkola wrote:
Jenny Jyrkänkallio-Mikkola wrote:
Hei, En pääse eteenpäin kohdasta, jossa A2 mallin silmukoita lisätään A1:n jälkeen. A1 kapenee, niin kuin pitääkin, mutta A1:n kummankin puolen olevat oikeat silmukat lisäävät A2:n leveyttä niin, että seuraavalla kerroksella siinä on liikaa silmukoita. Mitä teen väärin? Suuri kiitos avusta!
18.12.2020 - 15:16
![]() Jenny wrote:
Jenny wrote:
Hei, olen jäänyt jumiin kohtaan, jossa aloitetaan A2- mallin lisäykset A1n jälkeen. A1 kapenee, niin kuin pitääkin, mutta kavennusten ulkopuolelle jäävät oikeat silmukat kasvattavat A2 mallin leveyttä liikaa siten, ettei malli seuraavalla keralla enää toimi. Neulon muutaman kerroksen ja puran. Neulon ja puran, mutta ongelma pysyy. Saisinko tähän apua? Kovasti haluaisin työn tehdä. Kiitos
18.12.2020 - 07:08
![]() Jenny wrote:
Jenny wrote:
In order to make symmetrical front pieces, shouldn't there be considered 5 stitches of A1a when making start for 2nd front piece?: My suggestion: Cast off the first 54-56-58 stitches, work the next 162-168-174 stitches (= left front piece), cast off stitches until you have 221-229-237 stitches left, work the next 162-168-174 stitches (= right front piece), place these stitches on a thread and cast off the last 59-61-63 stitches.
23.08.2020 - 17:31
![]() Anne Linskill wrote:
Anne Linskill wrote:
Ah, thank you for the solution and the amazingly fast response. This garment is unusual and beautiful but it would be really helpful if the charts were side by side to save constant scrolling up and down and to clearly see how they line up. Thank you.
28.01.2020 - 12:35
![]() Anne Linskill wrote:
Anne Linskill wrote:
Hello. I have knitted to the point near the beginning of the design where the large arrow points to chart A1 then included the first three rounds including chart A2. Then chart A1 appears to reduce in width by two stitches every 2nd row thus reducing the number of stitches between the ssk & k2tog. BUT with the YO at each side of chart A1 cancelling out the ssk/k2tog, the same number of stitches remain, not reduce . Please explain how it should work. Thank you
27.01.2020 - 23:22DROPS Design answered:
Dear Mrs Linskill, you are right, but from the row with the arrow you will now work less stitches between the yarn over and the decrease (to make the top of leaf), so that there will be "extra" stitches outside from the leaf that will be worked in A.2. Happy knitting!
28.01.2020 - 10:42
![]() Fabienne Borel wrote:
Fabienne Borel wrote:
Bonsoir, j'ai vraiment des soucis avec ces diagrammes A1 et A2. Comme Françoise cela fait deux fois que je recommence en pensant que je suis correctement les diagrammes mais au niveau de * de A1 tout le motif est décalé vers la droite. Est-ce qu'un diagramme commun à partir de A2 ne serait pas plus facile à suivre ? J'exécute A1 puis A2 à la suite mais je ne retombe pas juste. Ce diagramme est spécialement dur à suivre en étant sur deux pages en plus. Merci d'avance de votre aide.
08.11.2019 - 17:55DROPS Design answered:
Bonjour Mme Borel, au tour avec l'étoile, vous décalez le début du tour: vous coupez le fil et glissez les 5 m de A.1 sur l'aiguille droite sans les tricoter, le début du tour est ici maintenant, commencez par la 1ère m de A.2 comme dans le diagramme et continuez les diagrammes comme avant, mais en tricotant maintenant A.2, A.1 au lieu de A.1, A.2. Bon tricot!
11.11.2019 - 09:55
![]() Fabienne Borel wrote:
Fabienne Borel wrote:
Bonjour, je suis au passage où l'on intègre A2 à A1 (ou l'inverse). Sur 8 tours comment dois-je tricoter A1, tout à l'endroit comme le tour avec la flèche ou je redescends de 8 tours dans le diagramme ou encore je continue le diagramme A1 ? Merci de votre attention et réponse.
05.11.2019 - 18:08DROPS Design answered:
Bonjour Mme Borel, à la fin du tour avant la flèche vous avez 16 m dans chaque A.1, au tour suivant, vous tricotez: le rang suivant de *A.1 (= 15 m end), A.2 (= 1 m env)* et répétez de *-* tout le tour, vous continuez ensuite les diagrammes: rang suivant de A.1 et 2ème rang de A.2 et ainsi de suite. Bon tricot!
06.11.2019 - 08:41
![]() Ingrid wrote:
Ingrid wrote:
Wat een mooi patroon! Ik brei het met plezier. Ik kom alleen niet goed uit bij de armsgaten. Ik heb in totaal 256 steken. Ik moet gewoon doormeerderen er komen dus 16 steken bij deze ronde. Als ik brei en afkant volgens het patroon (37 steken plus meerderingen; 44 steken plus meerderingen enzovoort) houd ik als laatste meer dan 37 steken (plus meerderingen) over. Maak ik een denkfout of hoe kan ik de steken anders verdelen?
31.07.2019 - 11:11DROPS Design answered:
Dag Ingrid,
Als je gaat afkanten voor de armsgaten, dan brei je gewoon verder in patroon. Dus je breit eerst de eerste 37 steken en over deze 37 steken ga je gewoon verder met meerderen. Dan de volgende 44 steken ga je ook gewoon verder in patroon, dus met meerderingen (die bovenop deze 44 steken komen), maar je kant deze 44 steken (plus hun meerderingen) af. Misschien helpt het dat je eerst die 44 steken uittelt en dan een markeerder aan het eind van die steken zet.
31.07.2019 - 18:03
|
|||||||||||||||||||||||||
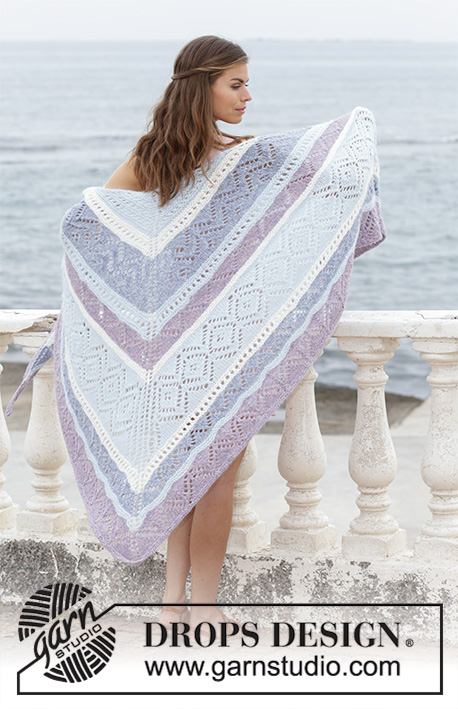
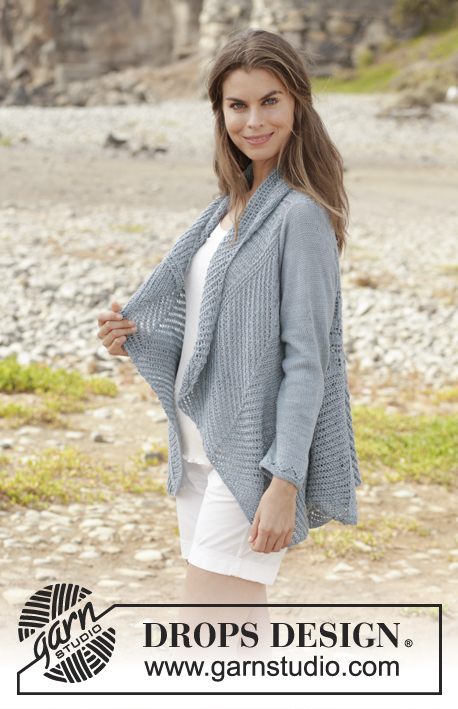
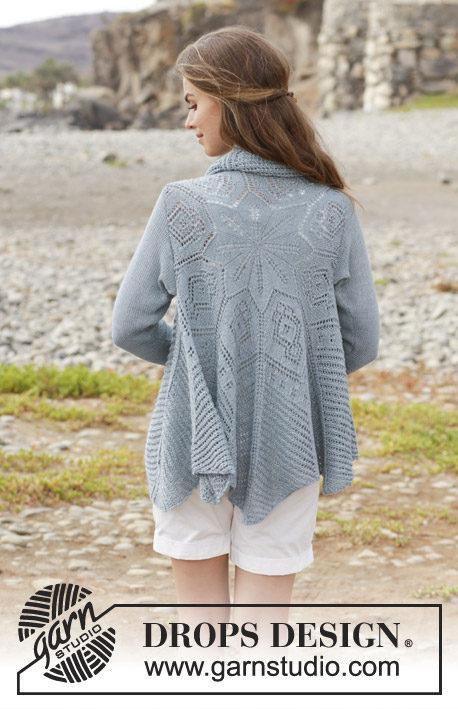
Seaside Dreamer#seasidedreamerjacket |
|||||||||||||||||||||||||
 |
 |
||||||||||||||||||||||||
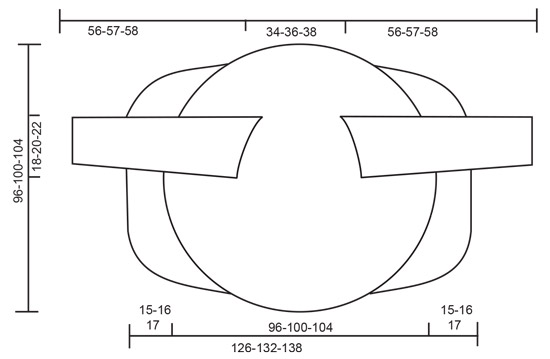
Knitted circle jacket with lace pattern. Sizes S - XXXL. The piece is worked in DROPS BabyAlpaca Silk.
DROPS 191-6 |
|||||||||||||||||||||||||
|
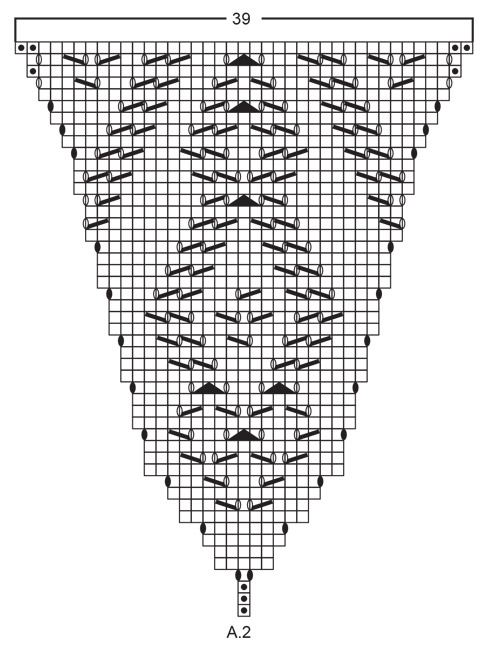
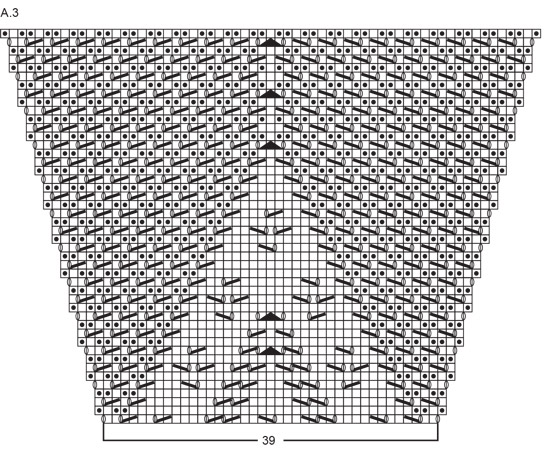
INFORMATION FOR THE PATTERN: PATTERN: See diagrams A.1 to A.4. The diagrams show all the rows in the pattern seen from the right side. RIDGE/GARTER STITCH (worked in the round): 1 ridge = 2 rounds. Knit 1 round and purl 1 round. INCREASE TIP: Start 1 stitch before the marker thread. Make 1 yarn over, knit 2 (the marker thread sits in the middle of these 2 stitches), 1 yarn over. On the next round knit the yarn overs twisted to avoid holes. ---------------------------------------------------------- CIRCLE JACKET: The jacket is worked in the round from the middle of the motif (the back), then back and forth in each side. The sleeves are worked separately and sewn on to finish. Cast on 8 stitches with BabyAlpaca Silk and divide them between 4 double pointed needles size 3 mm. Work according to A.1 (= 8 repeats of A.1 on the round). Insert a marker thread at the beginning of the round. Work up to and including the round before the arrow in A.1= 128 stitches on the needle. From the round with the arrow, work A.2 after each A.1 as follows: Work * A.1 over the first/next 15 stitches as before, work A.2 over the next stitch *, work from *-* a total of 8 times. Continue the pattern like this. The stitches in A.1 are worked into A.2 at the same time as you increase on each side of A.2 (the increases are drawn in the diagram). Work up to and including the round with a star in A.1. Now all the stitches in A.1, apart from the middle 5, have been worked into A.2. Cut the strand and begin the next round 5 stitches to the left, so that the first stitch in A.2 is the beginning of the round. Continue with A.1 and A.2; when A.1 has been worked 1 time in height, repeat A.1a to finished length. Change to circular needle when you have enough stitches. Continue until the piece measures a total of 34-36-38 cm in diameter, adjust so that next round is a round with increases. Now work armholes as follows (there are approx. 256-272-288 stitches on the needle): Increase as before, i.e. when casting off for armholes increase over these stitches, i.e. make yarn overs that are to be cast off. On next round cast on for the armhole, cast on the same amount of stitches as where cast off for armhole (including the increases), i.e count the stitches that where cast off. Work pattern as before over the first 37-39-42 stitches, cast off the next 44-48-52 stitches for armhole (the number of stitches is without the increases, these increases come in addition to the stitches), work pattern as before until there are 81-87-94 stitches left, cast off the next 44-48-52 stitches for armhole (the number of stitches is without the increases, these increases come in addition to the stitches), work pattern over the last 37-39-42 stitches. On the next round cast on the same amount of stitches that was cast off for armhole (i.e. 44-48-52 stitches + increases that come in addition to the stitches) over the cast-off stitches. Continue with pattern as before. When A.2 has been worked 1 time in height (there are now 352 stitches on the needle), continue with A.3 over A.2 (A.1a continued as before). When A.3 has been worked 1 time in height, repeat the top 12 rounds of A.3; you increase as before every 4th round and you continue working rows of holes and garter stitch. Continue with A.3 and A.1a until the piece measures 96-100-104 cm, there are approx. 672-696-720 stitches on the needle. Now divide for the front pieces as follows: Cast off the first 54-56-58 stitches, work the next 162-168-174 stitches (= left front piece), cast off stitches until you have 216-224-232 stitches left, work the next 162-168-174 stitches (= right front piece), place these stitches on a thread and cast off the last 54-56-58 stitches. Cut and fasten the strand. LEFT FRONT PIECE: Continue with pattern back and forth over the 162-168-174 stitches; adjust on row 1 so that the purled stitches in the ridges are now knitted from the wrong side. AT THE SAME TIME as the first 2 stitches at the beginning of each row are cast off (= 2 stitches cast off on each row). Continue the pattern and to cast off like this until the piece measures a total of 63-66-69 cm from the middle of the circle (i.e. the front piece measures approx. 15-16-17 cm). Cast off the remaining stitches. RIGHT FRONT PIECE: Work as for the left front piece. SLEEVE: The sleeve is worked in the round with double pointed needles/short circular needle. Cast on 48-56-64 stitches with double pointed needles size 3 mm and BabyAlpaca Silk. Work 3 RIDGES – see description above, then work A.4 over all stitches (= 6-7-8 repeats in width). When A.4 has been worked 1 time in height continue with stocking stitch over all stitches. Insert 1 marker thread at the beginning of the round (= mid under sleeve). When the piece measures 5 cm increase 1 stitch on each side of the marker thread - read INCREASE TIP. Increase every 6th round a total of 18-19-20 times = 84-94-104 stitches. When the piece measures 43-43-42 cm cast off 4 stitches on each side of the marker thread and continue working back and forth on circular needle = 76-86-96 stitches. Cast off for the sleeve cap at the beginning of each row in each side as follows: 2 stitches 7-7-8 times, 1 stitch 5-7-9 times and 2 stitches in each side until the piece measures 56-57-58 cm. Cast off the remaining stitches and work the other sleeve in the same way. ASSEMBLY: Gather together the 8 stitches at the beginning of the piece. Sew in the sleeves. |
|||||||||||||||||||||||||
Diagram explanations |
|||||||||||||||||||||||||
|
|||||||||||||||||||||||||
 |
|||||||||||||||||||||||||
 |
|||||||||||||||||||||||||
 |
|||||||||||||||||||||||||
 |
|||||||||||||||||||||||||
Have you finished this pattern?Tag your pictures with #dropspattern #seasidedreamerjacket or submit them to the #dropsfan gallery. Do you need help with this pattern?You'll find 26 tutorial videos, a Comments/Questions area and more by visiting the pattern on garnstudio.com. © 1982-2026 DROPS Design A/S. We reserve all rights. This document, including all its sub-sections, has copyrights. Read more about what you can do with our patterns at the bottom of each pattern on our site. |
|||||||||||||||||||||||||


With over 40 years in knitting and crochet design, DROPS Design offers one of the most extensive collections of free patterns on the internet - translated to 17 languages. As of today we count 325 catalogues and 12298 patterns translated into English (UK/cm). 12298
We work hard to bring you the best knitting and crochet have to offer, inspiration and advice as well as great quality yarns at incredible prices! Would you like to use our patterns for other than personal use? You can read what you are allowed to do in the Copyright text at the bottom of all our patterns. Happy crafting!
Post a comment to pattern DROPS 191-6
We would love to hear what you have to say about this pattern!
If you want to leave a question, please make sure you select the correct category in the form below, to speed up the answering process. Required fields are marked *.