
Looking for a yarn?


Comments / Questions (19)
![]() Deb Weber wrote:
Deb Weber wrote:
Under neck edge, it states cast on 125 stitches (including 5 band stitches). Do I cast on 125 or 135?
20.01.2019 - 22:29DROPS Design answered:
Dear Deb, you cast on 125 stitches. From these there will be 5 that will be knitted as the buttonband of the piece, but the number of the band stitches included in the given number that sou should cast on. Happy Knitting!
20.01.2019 - 22:39
![]() Jan Taraszkiewicz wrote:
Jan Taraszkiewicz wrote:
Confused on the neck band to I work in rib pattern on each row? My stitches don't line up
13.01.2019 - 22:24DROPS Design answered:
Dear Mrs Taraszkiewicz, from RS you will work: 5 sts in garter st, *K1, P2*, repeat from *-* and finish with K1, 5 sts in garter st. From WS work K over K and P over P, ie: 5 sts in garter st, P1, *K2,P1*, repeat from *-* and finish with 5 sts in garter st. Happy knitting!
14.01.2019 - 12:34
![]() Christine wrote:
Christine wrote:
Merci beaucoup pour votre réponse si rapide!
15.10.2018 - 10:50
![]() Christine wrote:
Christine wrote:
Bonjour, Vous écrivez en général et pour ce modèle également « tricoter la bordure au point mousse. Or, je vois sur les photos que les bordures sont toujours en côte 2/2 ou 3/3. Est-il possible d’utiliser des côtes plutôt que cet affreux point mousse non élastique ? Et pour faciliter le tricot du joli dessin ne serait-il pas possible de tricoter tout en rond et d’utiliser la technique du « steeking »? Merci d’avance!
13.10.2018 - 08:42DROPS Design answered:
Bonjour Christine, vous pouvez tout à fait modifier les côtes et les bordures des devants si vous le souhaitez. Si vous êtes habituée à la technique des mailles "steek", vous pouvez également adapter les explications comme vous le souhaitez. Bon tricot!
15.10.2018 - 08:14
![]() Annette Skipper wrote:
Annette Skipper wrote:
Skal der ikke skiftes til rundpind 2,5 i ribben nederst i ryg & forstykke efter at der er taget masker ud.
29.08.2018 - 13:53DROPS Design answered:
Hej Annette, Vi skal lige undersøge med design om det er regnet ud så ribben stemmer med antal masker, eller om vi skal skifte pind. Kommer der ingen rettelse her i løbet af nogle dage, så er det fordi det skal være som der står :)
30.08.2018 - 13:27
![]() Carola Michalski wrote:
Carola Michalski wrote:
In der Anleitung (Strickschema) ist, glaube ich ein Fehler. Der Stern ist als Umschlag angegeben, muss aber in Koralle gestrickt werden. Da ist einfach ein Tausch der Symbole passiert, der mich erst einmal überrascht hat.
28.02.2018 - 13:51DROPS Design answered:
Liebe Frau Michalski, Danke für den Hinweis, Text und Symbol wurden angepasst. Viel Spaß beim stricken!
01.03.2018 - 08:48
![]() Mona Lund wrote:
Mona Lund wrote:
Hei. Jeg er i gang med å strikke Mina Cardigan str. L, Drops 191-21. Jeg holder på med bærestykke, ferdig med Pil-2, mønster A.1A. Mangler det mønsterbeskrivelse mellom Pil-2 og Pil-3? Etter økning i Pil-2 har jeg 151 masker. Når jeg starter med Pil-3 skal jeg ha 291 masker. Hvor får jeg alle (291 m) disse masken fra? Fint med en tilbakemelding så snar som mulig, da jeg gjerne vil fortsette å strikke denne jakken. Mvh. Mona Lund.
28.02.2018 - 13:38DROPS Design answered:
Hei Mona. Pilene i diagrammet viser hvor det økes jevnt fordelt, men i selve diagrammet et det et ikon (oval sirkel). Når du kommer til dette ikonet skal du lage 1 kast om pinnen med lys grå = altså 1 økning. Etter PIL 2 har du 151 masker og nå skal du strikke 35 rapporter av A.1. Om du ser på diagrammet mellom PIL 2 og PIL 3 er det 4 omganger med den ovale sirkelen. 1 omgang med den ovale sirkelen gir 35 økte masker, du strikker 4 omganger med den ovale sirkelen før du kommer til PIL 3, altså 35 x 4 = 140 økte masker + 151 maskene du hadde etter PIL 2 = 151+140 = 191 masker når du starter på PIL 3. God Fornøyelse!
02.03.2018 - 08:58
![]() Conny wrote:
Conny wrote:
Schöne Anleitung aus Flora, farblich passt die Jacke immer gut zu Jeans, ein toller Begleiter für jede Jahreszeit!
20.12.2017 - 15:45
![]() Lisa wrote:
Lisa wrote:
These colors are so attractive to me. I love the pastels with grays, the colors are so sweet.
19.12.2017 - 22:07
|
||||||||||||||||||||||
Mina Cardigan#minacardigan |
||||||||||||||||||||||
 |
 |
|||||||||||||||||||||
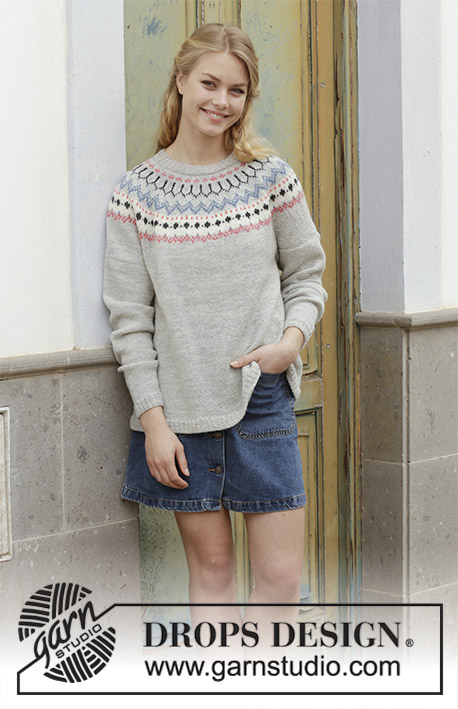
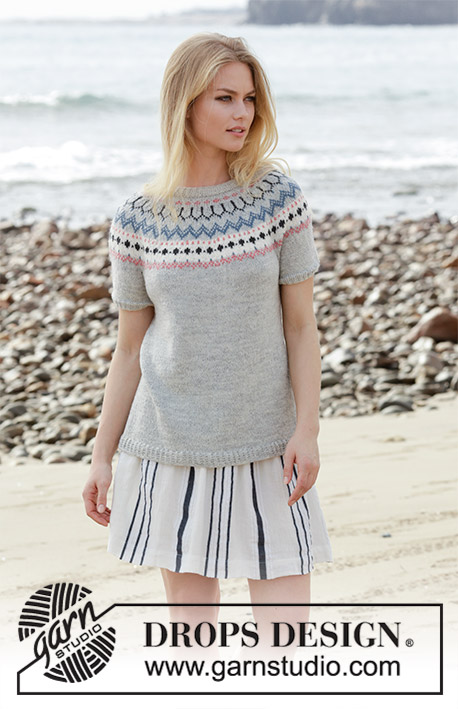
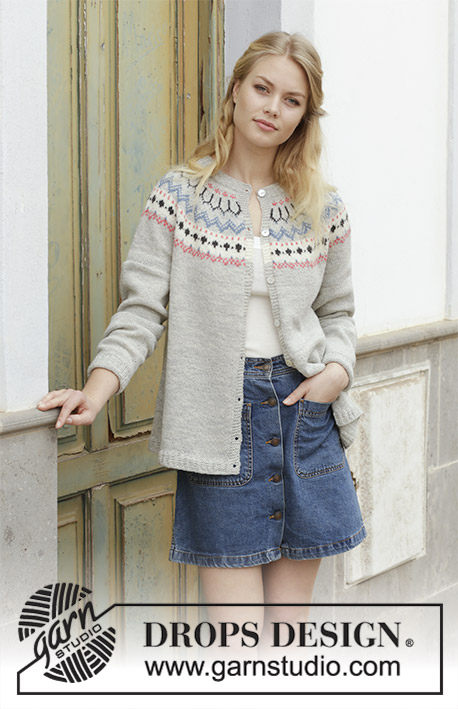
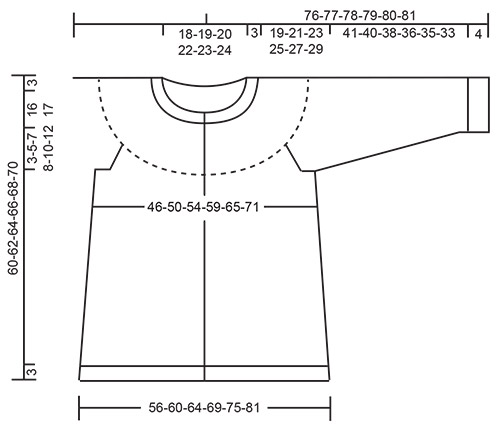
Jacket with round yoke, Norwegian pattern and A-shape, knitted top down. Size: S - XXXL Piece is knitted in DROPS Flora.
DROPS 191-21 |
||||||||||||||||||||||
|
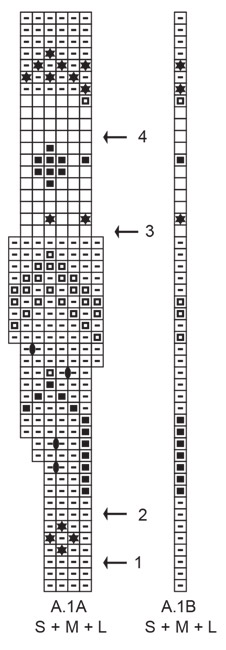
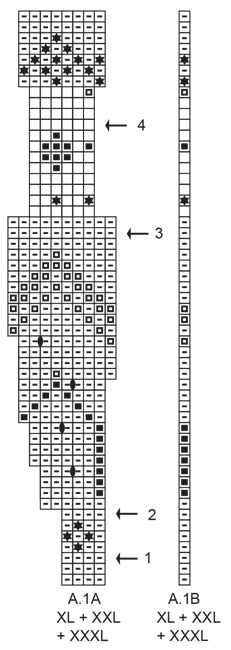
INFORMATION FOR PATTERN: GARTER STITCH (back and forth): 1 ridge = knit 2 rows. KNITTING TIP-1 (applies to bands): When working pattern border with two colours on yoke, also work with base colour in pattern border over the 5 band stitches in each side. KNITTING TIP-2: To avoid the knitting tension to tighten when working pattern, it is important not to tighten the strands on back side of piece. Use a larger needle size when working pattern if needed. PATTERN: See diagram A.1. Choose diagram for your size. Diagrams show all rows in pattern seen from the right side. DECREASE/INCREASE TIP (evenly): To calculate how to decrease/increase on needle, use the total number of stitches on row (e.g. 125 stitches), minus bands (e.g. 10 stitches) and divide the remaining stitches by number of decreases to be done (e.g. 10) = 11.5. In this example decrease by knitting alternately approx. every 10th and 11th stitch and every 11th and 12th stitch together. When increasing make 1 yarn over after alternately approx. every 11th and 12th stitch. On next row work yarn overs twisted to avoid holes. Do not increase/decrease over bands. RAGLAN: All increases are done from right side. Increase for raglan on each side of the 4 marker threads in every transition between sleeves and body. Work until 1 stitch remain before marker thread, make 1 yarn over, knit 2 (marker thread is in the middle of these 2 stitches), make 1 yarn over (= 2 stitches increased). On next row (wrong side) purl yarn overs twisted to avoid holes. Increase 8 stitches in total on every increase row. INCREASE TIP (applies to sides of body): Work until 8 stitches remain before marker thread in the side, make 1 yarn over, knit 16 (marker thread is in the middle of these 16 stitches), make 1 yarn over (= 2 stitches increased). On next row work yarn overs twisted to avoid holes. Work the increased stitches in stocking stitch. DECREASE TIP (applies to mid under sleeve): Begin 3 stitches before marker and knit 2 together, knit 2 (marker is between these 2 stitches), slip 1 stitch knitwise, knit 1, pass slipped stitch over stitch worked (= 2 stitches decreased). BUTTONHOLES: Decrease for buttonholes on right band (when garment is worn). 1 buttonhole = work from right side until 3 stitches remain on needle, make 1 yarn over, knit 2 together and finish by knitting 1. On next row (wrong side) knit the yarn over to make a hole. Decrease first buttonhole when neck edge measures 1½-2 cm. Then decrease the next 7-7-7-7-8-8 buttonholes, approx. 8-8-8½-8½-8-8 cm between each. ---------------------------------------------------------- JACKET: Work yoke and body back and forth on circular needle from mid front, work top down. Work sleeves in the round on double pointed needles/a short circular needle, top down. An elevation in the back of neck can be worked to get a better fit so that yoke is somewhat higher in the neck. This elevation can be skipped, to make the neck the same at the front and back - see explanation on elevation in pattern. NECK EDGE: Cast on 125-128-134-140-146-152 stitches (including 5 band stitches in each side towards mid front) on circular needle size 2.5 mm with light grey. Purl 1 row (= wrong side). Work next row as follows from right side: 5 band stitches in GARTER STITCH - see explanation above - * knit 1, purl 2 *, repeat from *-* until 6 stitches remain, knit 1 and finish with 5 band stitches on needle in garter stitch. Continue rib like this for 3 cm. Remember BUTTONHOLES on right band - see explanation above. When rib is done, knit 1 row from right side while at the same time decreasing 10-9-11-9-7-9 stitches evenly - read DECREASE/INCREASE TIP = 115-119-123-131-139-143 stitches. Switch to circular needle size 3 mm. Now work elevation in the back of neck or start to work the yoke if you don’t want an elevation. ELEVATION IN BACK OF NECK: Skip this paragraph if you do not want an elevation. Insert 1 marker in the middle stitch on needle = mid back. Begin from right side with light grey and knit 9-10-11-12-13-14 stitches past stitch with marker, turn, tighten yarn and purl 19-21-23-25-27-29. Turn, tighten yarn and knit 28-31-34-37-40-43, turn, tighten yarn and purl 37-41-45-49-53-57. Continue back and forth like this by working 9-10-11-12-13-14 stitches more every time until the middle 73-81-89-97-105-113 stitches have been worked and work last row from wrong side. Purl the rest of round (knit the band). YOKE: = 115-119-123-131-139-143 stitches. Read KNITTING TIP-1 AND KNITTING TIP-2! Work first row as follows from right side: 5 band stitches in garter stitch, work A.1A until 6 stitches remain on row (= 26-27-28-30-32-33 repetitions of 4 stitches), work A.1B (= 1 stitch) and finish with 5 band stitches in garter stitch. Continue pattern like this. AT THE SAME TIME on every row marked with arrow in A.1A increase evenly as explained below – remember DECREASE/INCREASE TIP and REMEMBER THE KNITTING TENSION! Arrow-1: Increase 20-20-20-32-32-36 stitches evenly = 135-139-143-163-171-179 stitches. Arrow-2: Increase 8-8-8-16-14-12 stitches evenly = 143-147-151-179-185-191 stitches. There is now room for 33-34-35-28-29-30 repetitions with A.1A of 4-4-4-6-6-6 stitches. Then increase as shown in A.1A. Arrow-3: There are now 275-283-291-291-301-311 stitches on needle and every repetition with A.1A goes over 8-8-8-10-10-10 stitches. Increase AT THE SAME TIME 18-16-20-26-28-30 stitches evenly on this row = 293-299-311-317-329-341 stitches. Arrow-4: Increase 6-6-6-14-10-6 stitches evenly = 299-305-317-331-339-347 stitches. Work until A.1 has been worked. Then purl 1 row from wrong side with light grey while increasing 0-0-4-6-6-4 stitches evenly (knit bands and do not increase over bands) = 299-305-321-337-345-351 stitches. Now insert 4 marker threads in the piece as follows (without working the stitches): Insert first marker thread after the first 50-51-53-57-60-63 stitches on row, insert 2nd marker thread after the next 55-56-60-60-58-55 stitches (= sleeve), insert 3rd marker thread after the next 89-91-95-103-109-115 stitches (= back piece) and insert fourth marker thread after the next 55-56-60-60-58-55 stitches (= sleeve). 50-51-53-57-60-63 stitches remain on row after last marker thread. Now work in stocking stitch back and forth in light grey and with 5 band stitches in garter stitch in each side towards mid front. AT THE SAME TIME on first row from right side increase for RAGLAN – see explanation above (= 8 stitches increased). Increase like this every other row (i.e. on every row from right side) 5-9-11-13-16-19 times in total on each side of the 4 marker threads = 339-377-409-441-473-503 stitches. Work without increases until piece measures 22-24-26-28-30-32 cm from cast-on edge mid front. Work next row as follows from wrong side: Work 55-60-64-70-76-82 stitches as before (= front piece), slip the next 65-74-82-86-90-93 stitches on 1 stitch holder for sleeve, cast on 10-10-12-12-14-16 new stitches on row (= in the side under sleeve), work 99-109-117-129-141-153 stitches (= back piece), slip the next 65-74-82-86-90-93 stitches on 1 stitch holder for sleeve, cast on 10-10-12-12-14-16 new stitches on row (= in the side under sleeve) and work the remaining 55-60-64-70-76-82 stitches as before (= front piece). Finish body and sleeves separately. NOW MEASURE THE PIECE FROM HERE! BODY: = 229-249-269-293-321-349 stitches. Insert 1 marker thread 60-65-70-76-83-90 stitches in from each side (there are now 109-119-129-141-155-169 stitches between marker threads on back piece). Continue with stocking stitch, light grey and 5 band stitches in garter stitch in each side towards mid front. Remember BUTTONHOLES on right band. When piece measures 3 cm from division, increase 2 stitches in each side - READ INCREASE TIP (= 4 stitches increased). Increase like this every 2½ cm 12 times in total in each side = 277-297-317-341-369-397 stitches. When piece measures 35 cm from division, purl 1 row from wrong side while increasing 55-59-63-66-74-79 stitches evenly (knit bands and do not increase over bands) = 332-356-380-407-443-476 stitches. Work next row as follows from right side: 5 band stitches in garter stitch, * knit 1, 2 stitches in garter stitch *, work from *-* until 6 stitches remain on row, knit 1 and finish with 5 band stitches in garter stitch. Continue rib like this for 3 cm. Cast off from right side with knit over knit and purl over purl. Jacket measures approx. 60-62-64-66-68-70 cm from shoulder and down. SLEEVE: Slip the 65-74-82-86-90-93 stitches from stitch holder in one side of piece on double pointed needles or a short circular needle size 3 mm and pick in addition up 1 stitch in each of the 10-10-12-12-14-16 new stitches cast on under sleeve = 75-84-94-98-104-109 stitches. Insert 1 marker thread in the middle of the 10-10-12-12-14-16 stitches mid under sleeve and begin round here. Work in stocking stitch in the round. When piece measures 2-2-3-2-3-2 cm from division, decrease 2 stitches mid under sleeve - read DECREASE TIP. Decrease like this every 10th-7th-5th-5th-4th-4th round 13-17-21-22-23-24 times in total = 49-50-52-54-58-61 stitches. Continue until piece measures 41-40-38-36-35-33 cm from division (shorter measurements in the larger sizes because of wider neck and longer yoke). Knit 1 round while increasing 8-10-11-12-11-11 stitches evenly = 57-60-63-66-69-72 stitches. Switch to double pointed needles size 2.5 mm. Work rib in the round = knit 1/purl 2 for 3 cm. Cast off with knit over knit and purl over purl but to avoid at tight cast-off edge make 1 yarn over after every 6th stitch at the same time cast off (cast off yarn overs as stitches). Work the other sleeve the same way. ASSEMBLY: Sew the buttons on to the left band. |
||||||||||||||||||||||
Diagram explanations |
||||||||||||||||||||||
|
||||||||||||||||||||||
 |
||||||||||||||||||||||
 |
||||||||||||||||||||||
 |
||||||||||||||||||||||
Have you finished this pattern?Tag your pictures with #dropspattern #minacardigan or submit them to the #dropsfan gallery. Do you need help with this pattern?You'll find 30 tutorial videos, a Comments/Questions area and more by visiting the pattern on garnstudio.com. © 1982-2025 DROPS Design A/S. We reserve all rights. This document, including all its sub-sections, has copyrights. Read more about what you can do with our patterns at the bottom of each pattern on our site. |
||||||||||||||||||||||


With over 40 years in knitting and crochet design, DROPS Design offers one of the most extensive collections of free patterns on the internet - translated to 17 languages. As of today we count 320 catalogues and 12092 patterns translated into English (UK/cm). 12092
We work hard to bring you the best knitting and crochet have to offer, inspiration and advice as well as great quality yarns at incredible prices! Would you like to use our patterns for other than personal use? You can read what you are allowed to do in the Copyright text at the bottom of all our patterns. Happy crafting!
Post a comment to pattern DROPS 191-21
We would love to hear what you have to say about this pattern!
If you want to leave a question, please make sure you select the correct category in the form below, to speed up the answering process. Required fields are marked *.