
Looking for a yarn?


Comments / Questions (48)
![]() Marianne Kenny wrote:
Marianne Kenny wrote:
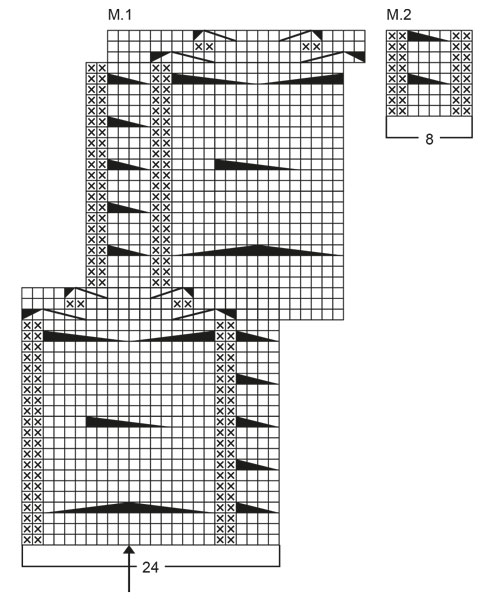
Hi are rows 21, 22 and 23 repetitions of 30 stitches or do you just do the extra 6 stitches at the beginning? Can’t understand how the cabled stitches in row 21 correspond with the 2 purl stitches if you put 6 extra stitches in at the beginning of the repetition?
22.01.2023 - 16:03DROPS Design answered:
Dear Mrs Kenny, there are 16 sts in this section and you will make 2 cables over each 8 sts: put 4 sts on a cable needle behind the work, K 4, K 4 from the cable needle. then put 4 sts on a cable needle in front of the work, K 4, K 4 from the cable needle. Happy knitting!
23.01.2023 - 09:56
![]() Mie wrote:
Mie wrote:
Hvilken længde skal rundpinden have?
08.05.2022 - 14:24DROPS Design answered:
Hei Mie. Når du strikker rundt på bolen er det best med 80 cm lengde. 50 eller 60 cm når du strikker rundt på halskanten og ønsker du å strikke rundt på erme når du har nok masker, kan du bruke 50 cm. mvh DROPS Design
09.05.2022 - 12:46
![]() Hilde Jenny Sørensen wrote:
Hilde Jenny Sørensen wrote:
Jeg har strikket genseren i oppgitt garn, men ønsker nå å bruke Rainbow Cotton 8/6 fordi jeg ikke finner ønsker farge i oppgitt garn. Jeg prøver å skjønne hvordan jeg skal regne om slik at genseren får samme mål - 2 tråder? større str. for å få riktig mål?
24.04.2022 - 09:24DROPS Design answered:
Hei Hilde Jenny. Rainbow Cotton 8/6 er ikke et DROPS garn, så det garnet har vi ikke noen informasjon om. Om du ønsker å bruke et annet DROPS garn, kan du bruke vår garnkalkulator og du vil få opp 15 forslag på DROPS kvaliteter du enten strikker med 1 tråd eller 2 tråder. mvh DROPS Design
25.04.2022 - 11:38
![]() Eva Johnsen wrote:
Eva Johnsen wrote:
Hei. Er det tilfelle at S/M skal ha 336 m i bolen? Etter rillen, skal det økes fra 210 m til 336? For meg set det ut som dette blir en veldig stor genser. Ser at strikkfastheten er 20 m =10 cm. Håper jeg kan få svar på dette?
28.03.2022 - 15:45DROPS Design answered:
Hei Eva. Ja, i str S/M skal det være 336 masker på bolen. Strikkefastheten er oppgitt i glattstrikk, men hele genseren er strikker i strukturmønster (maskene vil trekke seg mye sammen). Om du ser målene på målskissen er det den størrelsen genseren vil få. mvh DROPS Design
04.04.2022 - 11:27
![]() Michelle Plettau wrote:
Michelle Plettau wrote:
Can you please explain exactly how to read and knit diagrams for 64-11 cabled jumper. I know to start in bottom right and work to left of diagram M. 1. Is diagram M. 1 24 stitches repeated over 24 or 48 rows? Also why is the top half of M. 1 shifted to the right? When do I knit diagram M. 2?
22.10.2021 - 18:36DROPS Design answered:
Dear Michelle, the pattern itself is 48 wor high, however, the second 24 rows unit is just about the same as the first one, only moved half a repeat to the right (that is is why the to half is shifted as well). Happy Stitching!
24.10.2021 - 02:46
![]() Michelle Plettau wrote:
Michelle Plettau wrote:
I would like to knit drops 64-11 cabled sweater. Can you please explain \'exactly\' how to read the diagrams. I know to read from bottom right to left of diagram M. 1 but is the diagram 24 stitches repeated over 24 rows or 48 rows?? Also why is the top part of diagram M. 1 shifted to the right? Also don\'t know when I am supposed to be knitting diagram M. 2 as this isn\'t explained in instructions
22.10.2021 - 18:20
![]() Rita wrote:
Rita wrote:
Buongiorno, per favore mi spiegate in maniera più semplice questi due passaggi: motivo: Nota! Nel diagramma M.1 6 m del lato destro devono essere prima spostate quando le 6 m vengono spostate nel lato sinistro. manica: motivo 2 su 8 m (4 m a ogni lato del segnapunti), e motivo 1 sulle 72 m rimaste. grazie
07.10.2021 - 08:51
![]() Møyla Aannestad wrote:
Møyla Aannestad wrote:
Model 64-11. Have Menes Med rettingen ?
24.07.2021 - 12:48DROPS Design answered:
Hei Møyla, Når Drops Team har fått varsel om feil i oppskriftene, blir de rettet på. Ha en fortsatt fin sommer.
26.07.2021 - 09:09
![]() Bixel wrote:
Bixel wrote:
Habe den Pullover angefangen zu stricken und eine Frage stellt sich mir: Das Muster zeigt die rechte Seite. Das Zopfmuster ist immer in den geraden Reihen. Wenn ich die Vorder- und Rückseite ab Ärmel getrennt weiterstricke, habe ich das Zopfmuster dadurch in den Rückreihen, also auf der Innenseite. Wo sit mein Denkfehler? Danke für die Antwort.
23.04.2021 - 08:46DROPS Design answered:
Liebe Frau Bixel, die Diagramme zeigen alle Reihen, dh wenn Sie zuerst in Runden stricken, lesen Sie alle Reihen rechts nach links, wenn Sie dannach in Hin- und Rückreihen stricken, lesen Sie die Hinreihen rechts nach links, und die Rückreihen links nach rechts. Hier lesen Sie mehr über Diagramme. Viel Spaß beim stricken!
23.04.2021 - 12:02
![]() Marie wrote:
Marie wrote:
Bonjour, pour le modèle 64-11,je ne comprends pas ce que vous voulez dire, à la page 1, dans "note :dans M1, les 6 mailles à droite doivent être déplacées d'abord quand les 6 mailles sont déplacées à gauche “ Pourriez-vous m'expliquer ce qu'il faut faire. Lesquelles 6 mailles ? Je suis novice pour les torsades. Merci d'avance et aussi pour tout ce que vous faites pour les tricoteuses et travailleuses de vos laines magnifiques.
31.07.2019 - 20:40DROPS Design answered:
Bonjour Marie, les 6 mailles au début des rangs 27, 28 et 29 de M.1 vont être supprimées du diagramme, ces 6 mailles sont les 6 mailles endroit de la fin de M.1 (= 4 m end + les 2 m end de la torsade). On va ainsi décaler le motif en tricotant ces 6 mailles endroit de la fin du motif précédent avec les 4 mailles endroit du début du diagramme suivant. Bon tricot!
07.08.2019 - 09:35
|
||||||||||||||||||||||||||||
Cable Magic#cablemagicsweater |
||||||||||||||||||||||||||||
 |
 |
|||||||||||||||||||||||||||
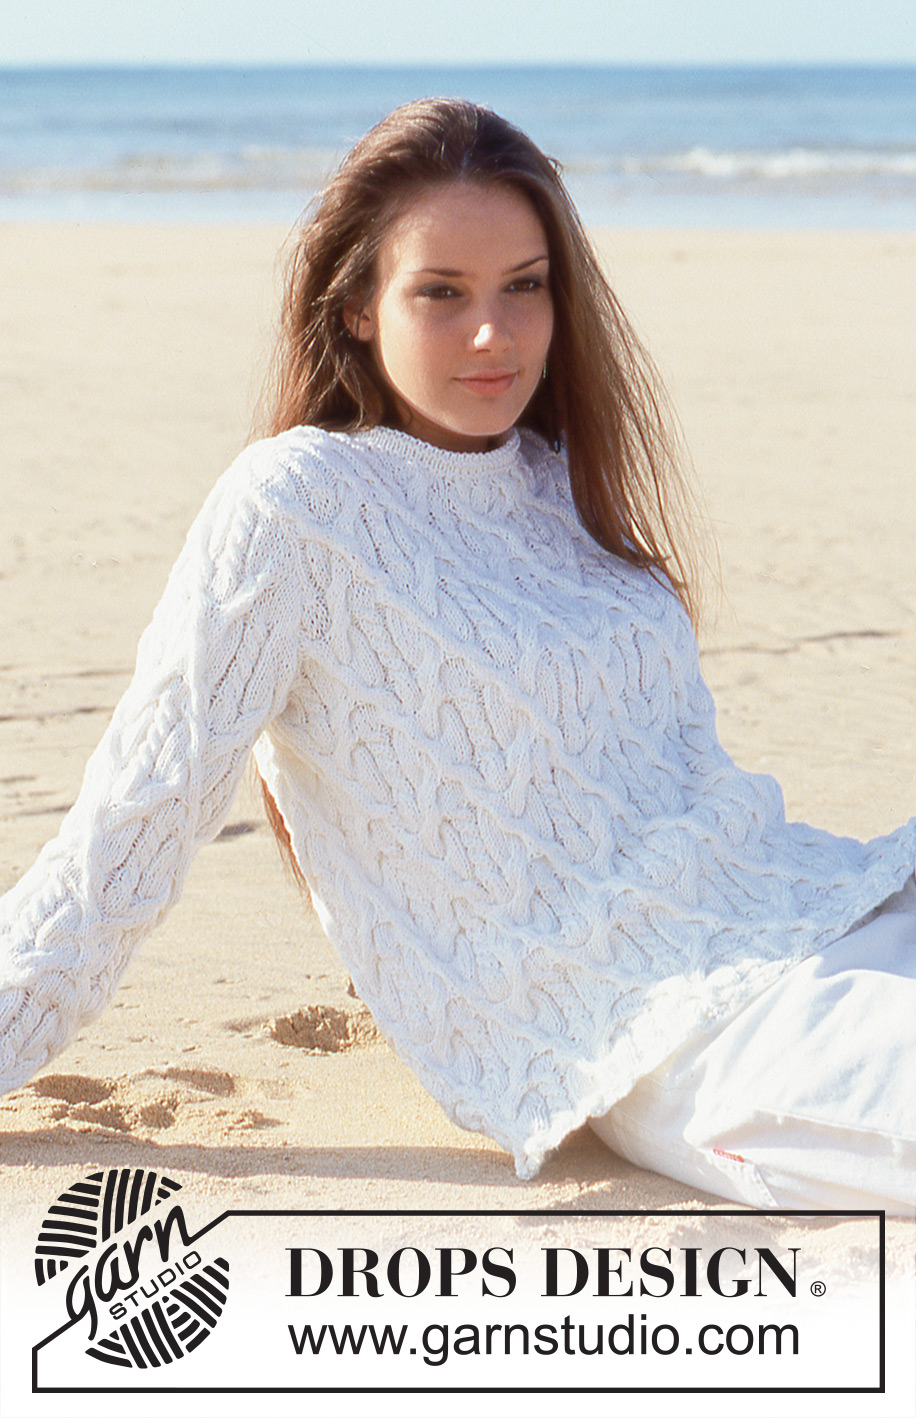
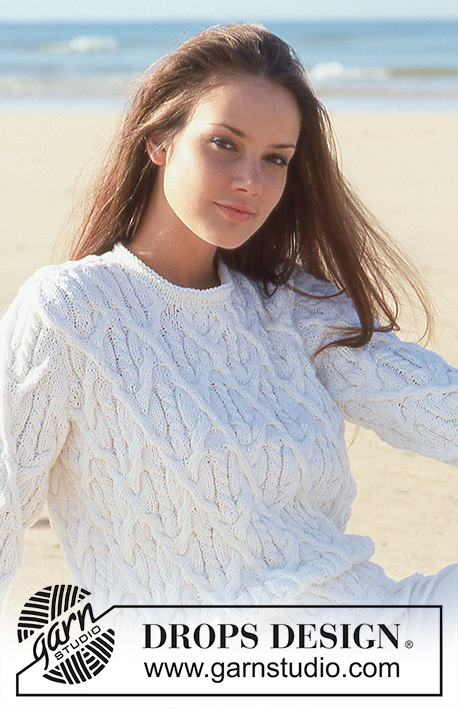
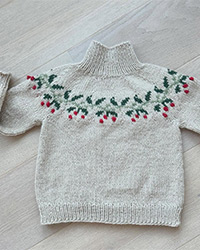
DROPS Cabled Sweater in Bomull-Lin
DROPS 64-11 |
||||||||||||||||||||||||||||
|
Gauge: 20 sts x 26 rows on larger needles in stockinette st = 10 x 10 cm. Pattern: See charts (1 chart = 1 repeat). The pattern is seen from the right side. An arrow indicates the center st («midt m») of the pattern. Note! In chart M.1 6 sts in right side should be displaced first when the 6 sts gets displaced in the left side. Body: Cast on 180-210-240 sts on smaller circular needles. Join and knit 2 rows garter st; increasing 108-126-144 sts evenly distributed on the last row as follows: * K 1, inc 1 st in the two following sts, K 1, inc 1 st in the next st *, repeat from * - * = 288-336-384 sts. Change to larger circular needles and knit Pattern 1 over all sts. Attach a marker at the center front and center back - see the arrow on the chart. When the work measures 39-41-44 cm, bind off 8 sts at each side (4 sts each side of side markers) for armholes. Front and back each = 136-160-184 sts. Knit the rest of the front and back separately. Front: = 136-160-184 sts. Bind off at each side for armholes every other row: 4 sts 0-1-1 time, 3 sts 0-2-4 times, 2 sts 1-2-4 times, 1 st 3-3-5 times = 126-126-126 sts. Keep 1 st at each side in garter st throughout and continue in pattern. When the work measures 50-53-56 cm, dec 16-16-16 sts evenly distributed over the center 38-38-38 sts. On the next row, bind off the 24-24-24 center sts for the neck. Bind off at each neck edge every other row: 2 sts 4 times, 1 st 3 times = 32-32-32 sts remain on each shoulder. When the work measures 58-61-64 cm, dec 10-10-10 sts evenly distributed on each shoulder = 22-22-22 sts. On the next row, bind off all sts. Back: = 136-160-184 sts. Bind off for armholes as on the front = 126-126-126 sts. Keep 1 st at each armhole edge in garter st throughout and continue in pattern until the work measures 56-59-62 cm. Dec 20-20-20 sts evenly distributed over the center 54-54-54 sts. On the next row, bind off the center 34-34-34 sts. Bind off 2 sts at each neck edge every other row 2 times = 32-32-32 sts remain on each shoulder. When the work measures 58-61-64 cm, dec 10-10-10 sts evenly distributed on each shoulder = 22-22-22 sts. On the next row, bind off all sts. Sleeve: Cast on 50-50-50 sts on smaller double pointed needles; join and place a marker at the join. Knit 2 rows garter st; increasing 30-30-30 sts evenly distributed on the last row = 80-80-80 sts. Change to larger double pointed needles and establish pattern as follows: Pattern 2 over 8 sts (4 sts each side of marker), and Pattern 1 over the remaining 72 sts. Continue in pattern as established. When the work measures 6 cm, inc 1 st at each side of Pattern 2, 12-12-12 times: Size XS: every 9 rows Sizes S/M and L: alternately every 8 and 9 rows = 104-104-104 sts. Knit the increased sts into Pattern 1 as you go along. When the work measures 49-46-45 cm, bind off 4 sts each side of marker (the 8 sts of Pattern 2). Bind off at each side for sleeve cap every other row: 4 sts 2-0-0 times, 3 sts 1-2-1 times, 2 sts 1-8-13 times, 3 sts 1-2-2 times, 4 sts 3-1-0 times. Dec 8 sts evenly distributed over the remaining sts. On the next row bind off all sts. Assembly: Sew shoulder seams. Pick up approx. 90 to 100 sts around the neck on smaller double pointed needles and join. Purl 1 row (right side row), knit 4 rows stockinette st, purl 1 row, and then knit 5 rows stockinette st for facing. Bind off loosely, fold the facing over double against the wrong side and sew. Sew in the sleeves using the edge sts on the body as a seam allowance. |
||||||||||||||||||||||||||||
Diagram explanations |
||||||||||||||||||||||||||||
|
||||||||||||||||||||||||||||
 |
||||||||||||||||||||||||||||
 |
||||||||||||||||||||||||||||
Have you finished this pattern?Tag your pictures with #dropspattern #cablemagicsweater or submit them to the #dropsfan gallery. Do you need help with this pattern?You'll find 20 tutorial videos, a Comments/Questions area and more by visiting the pattern on garnstudio.com. © 1982-2025 DROPS Design A/S. We reserve all rights. This document, including all its sub-sections, has copyrights. Read more about what you can do with our patterns at the bottom of each pattern on our site. |
||||||||||||||||||||||||||||


With over 40 years in knitting and crochet design, DROPS Design offers one of the most extensive collections of free patterns on the internet - translated to 17 languages. As of today we count 320 catalogues and 12089 patterns translated into English (UK/cm). 12089
We work hard to bring you the best knitting and crochet have to offer, inspiration and advice as well as great quality yarns at incredible prices! Would you like to use our patterns for other than personal use? You can read what you are allowed to do in the Copyright text at the bottom of all our patterns. Happy crafting!
Post a comment to pattern DROPS 64-11
We would love to hear what you have to say about this pattern!
If you want to leave a question, please make sure you select the correct category in the form below, to speed up the answering process. Required fields are marked *.