
Popular categories
Looking for a yarn?


Comments / Questions (29)
![]() Mion wrote:
Mion wrote:
Je déteste faire les coutures sur un tricot. Ce modèle peut-il être tricoté sur une aiguille circulaire devants et dos ensemble ?
11.10.2017 - 10:48DROPS Design answered:
Bonjour Mme Mion, cette veste se tricote de haut en bas, on tricote d'abord les 2 devants et le dos séparément en allers et retours sur aiguille circulaire, puis on reprend toutes les mailles du dos et des devants sur la même aiguille circulaire pour tricoter à partir des emmanchures jusqu'en bas. Bon tricot!
11.10.2017 - 13:43
![]() Camilla Stenersen wrote:
Camilla Stenersen wrote:
Er bolen på denne jakken identisk med vesten med samme design (179-13)? Jeg startet på vesten før jeg så at det fantes en jakke også, så jeg lurer på om jeg bare kan strikke ermene som hører til her, og bruke vesten som bol til en jakke.
04.10.2017 - 13:15DROPS Design answered:
Hej Camilla, Ja ermehullet er det samme, så du kan strikke ermer og sy i :)
05.10.2017 - 09:16
![]() Gabriele wrote:
Gabriele wrote:
Ich freue mich sehr,dass die Anleitung da ist!Leider muss ich mich noch etwas gedulden,denn ich werde sie in Nord stricken. Danke für das schöne Modell. Gabriele
09.08.2017 - 13:29
![]() Gabriele wrote:
Gabriele wrote:
Bitte schreibt mir doch wann man mit der Anleitung rechnen darf!Ich möchte endlich beginnen, Mit lieben Grüßen, Gabriele
08.08.2017 - 12:35Lorraine B wrote:
A really beautiful jacket. I hope this pattern comes out very soon, I would love to be able to wear it before summer comes. (I am in Australia.)
05.08.2017 - 06:34
![]() Karen wrote:
Karen wrote:
Can't wait till the pattern comes out! This is Classy!
04.08.2017 - 23:05
![]() Tabita wrote:
Tabita wrote:
Tolle Jacke! Ich habe schon von 2 Freundinnen den Auftrag sie zu stricken. Das Material ist auch schon da - jetzt warte ich fieberhaft auf die Anleitung :-)
26.07.2017 - 12:14
![]() Regina wrote:
Regina wrote:
Ein sehr schönes Modell. Figurbetont und trotzdem umspielend lang genug. Diese Jacke möchte ich gern nachstricken! Wann wird es die Anleitung geben?
16.07.2017 - 17:42
![]() Cornelia wrote:
Cornelia wrote:
Schönes, zartes Muster mit dünner Wolle, gefällt mir gut, allerdings würde ich die Ärmelenden anders gestalten.
20.06.2017 - 13:12
|
|||||||||||||||||||||||||||||||
Morgan's Daughter Jacket#morgansdaughterjacket |
|||||||||||||||||||||||||||||||
 |
 |
||||||||||||||||||||||||||||||
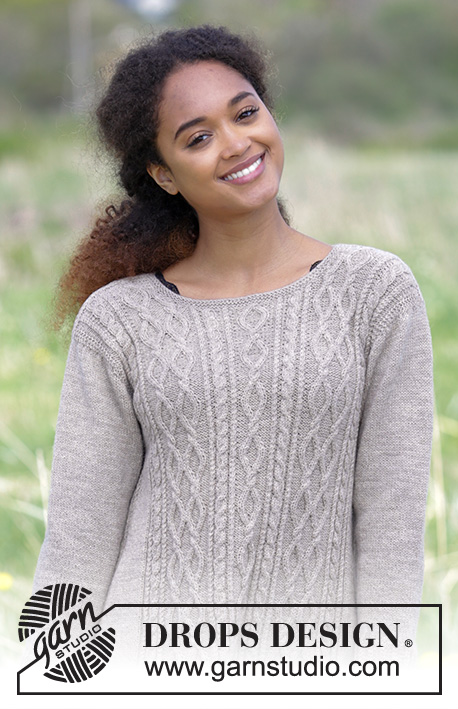
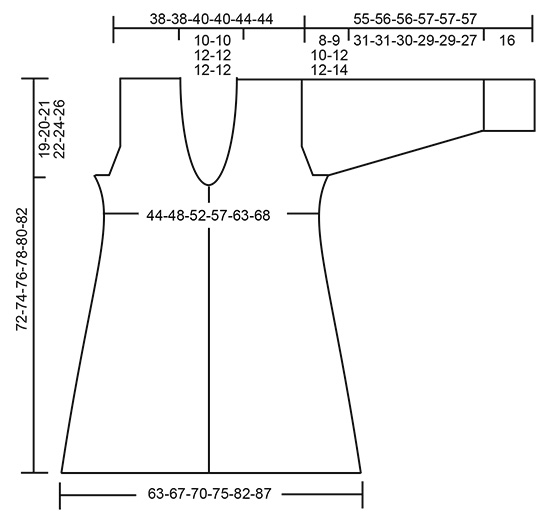
Jacket with shawl collar, cables and A-shape, knitted top down. Size: S - XXXL Piece is knitted in DROPS Flora.
DROPS 179-14 |
|||||||||||||||||||||||||||||||
|
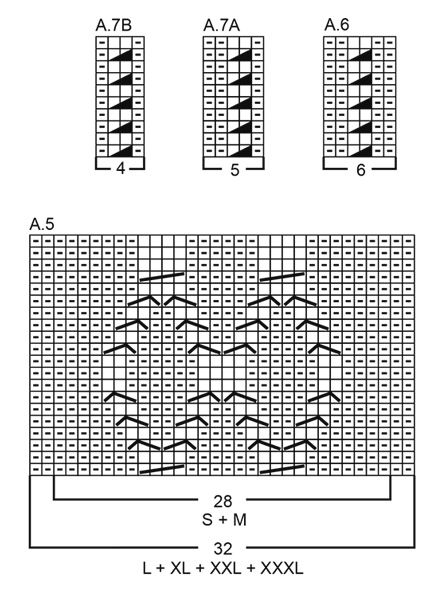
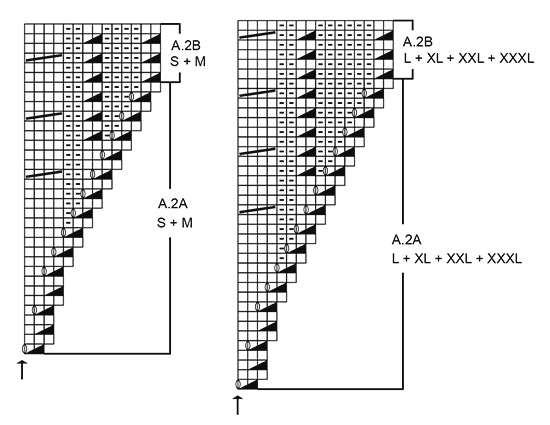
INFORMATION FOR PATTERN: GARTER STITCH (back and forth): 1 ridge = knit 2 rows. GARTER STITCH (worked in the round): 1 ridge = 2 rounds. Knit 1 round and purl 1 round. PATTERN: See diagrams A.1 to A.7. Choose diagram for your size. Diagrams show all rows in pattern seen from the right side. KNITTING TIP (applies to band): To avoid the band from contracting vertically work one extra ridge only over band stitches evenly (the other stitches are on the needle when working one ridge only over band). Repeat approx. every 5 cm until finished measurements. INCREASE TIP-1: To calculate how to decrease evenly, use the total number of stitches to be increased over (e.g. 34 stitches) and divide stitches by number of increases to be done (e.g. 13) = 2.6. In this example increase after alternately approx. every 2nd and 3rd stitch. Increase 1 stitch by making 1 yarn over, on next row work yarn over twisted to avoid holes. INCREASE TIP-2 (applies to armhole): All increases are done from the right side. Increase 1 stitch by making 1 yarn over, on next row (wrong side) purl yarn over twisted to avoid holes. INCREASE TIP-3 (applies to sides of body): All increases are done from the right side. Begin 4 stitches before marker, make 1 yarn over, work 1 stitch in stocking stitch, work A.6 (= 6 stitches, marker thread is in the middle of A.6), work 1 stitch in stocking stitch, make 1 yarn over (= 2 stitches increased). On next row (wrong side) purl yarn overs twisted to avoid holes. DECREASE TIP (applies to mid under sleeve): Begin 5 stitches before marker and knit 2 together, work A.6 (= 6 stitches, marker thread is in the middle of A.6), slip 1 stitch knitwise, knit 1, pass slipped stitch over stitch worked (= 2 stitches decreased). BUTTONHOLES: Decrease for buttonholes on right band (when garment is worn). I.e. work from right side until 4 stitches remain at the end of row, cast off 2 stitches and knit the last stitch. On next row cast on 2 new stitches over the cast off stitches from previous row (= hole). Cast off first buttonhole when piece measures 30-30-32-32-34-34 cm from shoulder (i.e. when decrease at the edge of shawl collar is finished). Then cast off the next 3-3-3-4-4-4 buttonholes approx. 8-8-8-7-7-7 cm apart. ---------------------------------------------------------- JACKET: Work front and back piece back and forth on circular needle separately and work top down. When increases for armholes are done, slip parts together and work body back and forth on circular needle from mid front until finished measurements. Work sleeves back and forth on circular needle, top down until sleeve cap is done, then work in the round on a short circular needle, switch to double pointed needles when needed. SHAWL COLLAR ON LEFT FRONT PIECE (when garment is worn): Cast on 26-26-28-28-30-30 stitches on circular needle size 3 mm with Flora. Work in GARTER STITCH - see explanation above, as follows: * 1 ridge back and forth over all stitches, 1 ridge back and forth over the first 20-20-22-22-24-24 stitches towards mid front *, repeat from *-* until shawl collar measures 7-7-8-8-8-8 cm along the shortest side. Knit 1 row from right side and cast on 34-34-34-34-38-38 stitches for shoulder at the end of this row (where shawl collar is shortest) = 60-60-62-62-68-68 stitches. NOW MEASURE PIECE FROM HERE! Knit 1 row from wrong side, knit 1 row from right side and knit 1 row from wrong side (over all stitches). Then work left front piece as explained below. LEFT FRONT PIECE WITH SHAWL COLLAR: = 60-60-62-62-68-68 stitches on row. Work first row as follows from right side: Work 26-26-28-28-30-30 stitches in garter stitch over shawl collar, knit over the remaining 34-34-34-34-38-38 stitches and increase at the same time 13 stitches in all sizes evenly over these stitches – read INCREASE TIP-1 = 73-73-75-75-81-81 stitches. Work back from wrong side with 3 edge stitches in garter stitch, purl 44-44-44-44-48-48 and knit 26-26-28-28-30-30. Then work as follows from right side: 26-26-28-28-30-30 stitches in garter stitch over shawl collar, work A.1 (= 44-44-44-44-48-48 stitches) and finish with 3 edge stitches in garter stitch. Insert 1 marker thread after the 2 first stitches in A.1 (seen from right side – i.e. directly after a small cable) – move the marker thread when working. Continue the pattern like this, decrease at the same time shawl collar into a band, increase armhole and increase neck line as explained below. REMEMBER THE KNITTING TENSION! BAND: When piece measures 11-11-12-12-11-11 cm from shoulder, decrease 1 stitch at the edge on shawl collar by knitting second and third stitch at beginning of row from right side, knit together. Decrease like this every 6th row 3-3-3-3-4-4 times in total, every 4th row 7-7-7-7-8-8 times in total and every other row 10-10-12-12-12-12 times in total. After last decrease for band there are 6 band stitches in garter stitch towards mid front and piece measures approx. 30-30-32-32-34-34 cm from shoulder and down. ARMHOLE: AT THE SAME TIME when piece measures 16-15-16-13-14-13 cm, increase 1 stitch for armhole before the 3 edge stitches in garter stitch at the end of row from right side – read INCREASE TIP-2 (i.e. work the increased stitches in stocking stitch). Increase like this every other row 4-8-8-14-16-20 times in total, then cast on 3-4-6-6-8-10 new stitches towards armhole at the end of next row from right side = 7-12-14-20-24-30 stitches increased for armhole. Piece measures now approx. 19-20-21-22-24-26 cm from shoulder and down. Work back from wrong side with knit 6-7-9-9-11-13, purl 4-8-8-14-16-20, A.1, A.2 as explained below NECK LINE and knit over shawl collar as before. Put piece aside and continue with SHAWL COLLAR ON RIGHT FRONT PIECE and RIGHT FRONT PIECE WITH SHAWL COLLAR but note that the increase for NECK LINE explained below begins at the same time or before putting piece aside. NECK LINE: AT THE SAME TIME when piece measures 19-19-20-20-22-22 cm from shoulder increase for neck line after marker thread as shown in A.2A, i.e. work next row as follows from right side: Work in garter stitch over shawl collar as before, work A.2A and increase as in diagram, continue A.1, continue increase for armhole as explained above and finish with 3 edge stitches in garter stitch. The first two stitches in A.1 are now A.2A. NOTE! Work the cable on the same row in A.2A as in A.1. After last increase for neck line, piece measures approx. 28-28-30-30-32-32 cm from shoulder and down and 12-12-14-14-14-14 stitches have been increased for neck line. Work next row as follows from right side: Work in garter stitch over shawl collar/band, continue A.2B over A.2A (= 14-14-16-16-16-16 stitches), continue A.1 (the first 2 stitches in A.1 are the same as the first 2 stitches in A.2 and have already been worked), work in stocking stitch over the increased stitches at the armhole and finish with 3 edge stitches in garter stitch. SHAWL COLLAR ON RIGHT FRONT PIECE (when garment is worn): Cast on 26-26-28-28-30-30 stitches on circular needle size 3 mm. Knit 1 row. Then work in garter stitch as follows: * Work 1 ridge back and forth over all stitches, 1 ridge back and forth over the first 20-20-22-22-24-24 stitches towards mid front *, repeat from *-* until shawl collar measures 7-7-8-8-8-8 cm along the shortest side. Knit 1 row from wrong side and cast on 34-34-34-34-38-38 stitches for shoulder at the end of this row (where shawl collar is shortest) = 60-60-62-62-68-68 stitches. NOW MEASURE PIECE FROM HERE! Knit 1 row from right side and knit 1 row from wrong side (over all stitches). Then work right front piece as explained below. RIGHT FRONT PIECE WITH SHAWL COLLAR: = 60-60-62-62-68-68 stitches on row. Work first row as follows from right side: Knit the first 34-34-34-34-38-38 stitches and increase at the same time 13 stitches in all sizes evenly over these stitches, work 26-26-28-28-30-30 stitches in garter stitch over shawl collar = 73-73-75-75-81-81 stitches. Work back from wrong side with knit 26-26-28-28-30-30, purl 44-44-44-44-48-48 and knit 3 edge stitches. Then work as follows from right side: 3 edge stitches in garter stitch, work A.3 (= 44-44-44-44-48-48 stitches) and finish with 26-26-28-28-30-30 stitches in garter stitch over shawl collar. Insert 1 marker thread before the 2 first stitches in A.3 (seen from right side – i.e. directly before a small cable) – move the marker thread when working. Continue the pattern like this, decrease at the same time shawl collar into a band, increase armhole and increase neck line as explained below. BAND: When piece measures 11-11-12-12-11-11 cm from shoulder, decrease 1 stitch at the edge on shawl collar by knitting second and third last stitch at the end of row from right side, knit together. Decrease like this every 6th row 3-3-3-3-4-4 times in total, every 4th row 7-7-7-7-8-8 times in total and every other row 10-10-12-12-12-12 times in total. After last decrease for band there are 6 band stitches in garter stitch towards mid front and piece measures approx. 30-30-32-32-34-34 cm from shoulder and down. ARMHOLE: AT THE SAME TIME when piece measures 16-15-16-13-14-13 cm, increase 1 stitch for armhole after the 3 edge stitches in garter stitch at the beginning of row from right side – read INCREASE TIP-2. Increase like this every other row 4-8-8-14-16-20 times in total, then cast on 3-4-6-6-8-10 new stitches towards armhole at the end of next row from wrong side = 7-12-14-20-24-30 stitches increased for armhole. Piece measures now approx. 19-20-21-22-24-26 cm from shoulder and down. Put piece aside and continue with RIGHT SHOULDER AT THE BACK but note that the increase for NECK LINE explained below begins at the same time or before putting piece aside. NECK LINE: AT THE SAME TIME when piece measures approx. 19-19-20-20-22-22 cm from shoulder, increase for neck line before marker thread as shown in A.4A, i.e. work next row as follows from right side: Work 3 edge stitches in garter stitch, continue increase for armhole as explained above, continue A.3 until marker thread, work A.4A and increase as shown in diagram and finish with garter stitch over shawl collar as before. The last two stitches in A.3 are now A.4A. NOTE! Work the cable on the same row in A.4A as in A.3. After last increase for neck line, piece measures approx. 28-28-30-30-32-32 cm from shoulder and down and 12-12-14-14-14-14 stitches have been increased for neck line. Work next row as follows from right side: 3 edge stitches in garter stitch, work in stocking stitch over the increased stitches for armhole, continue A.3 (the last 2 stitches in A.3 are the same as the last 2 stitches in A.4B and are worked when A.4B is worked), continue A.4B over A.4A (= 14-14-16-16-16-16 stitches) and finish with garter stitch over shawl collar/band. RIGHT SHOULDER BACK (when garment is worn): Cast on 34-34-34-34-38-38 stitches on circular needle size 3 mm. Knit 1 row from wrong side, knit 1 row from right side and knit 1 row from wrong side. Knit 1 row from right side while increasing 13 stitches evenly in all sizes = 47-47-47-47-51-51 stitches. Work back from wrong side with knit 3 edge stitches and purl 44-44-44-44-48-48 stitches. Work next row as follows from right side, work A.1 (= 44-44-44-44-48-48 stitches) and finish with 3 edge stitches in garter stitch. When 2 rows in A.1 have been worked, cast on 2 stitches at the end of last row for neck (purl the new stitches from right side and knit from wrong side). Work 2 rows more in A.1 and cast on 24-24-28-28-28-28 new stitches at the end this row for neck = 73-73-77-77-81-81 stitches on needle. Put piece aside and work left shoulder at the back as explained below. LEFT SHOULDER BACK (when garment is worn): Cast on 34-34-34-34-38-38 stitches on circular needle size 3 mm. Knit 1 row from wrong side, knit 1 row from right side and knit 1 row from wrong side. Knit 1 row from right side while increasing 13 stitches evenly in all sizes = 47-47-47-47-51-51 stitches. Work back from wrong side with purl 44-44-44-44-48-48 and knit 3 edge stitches. Work next row as follows from right side: Work 3 edge stitches in garter stitch, then work A.3 (= 44-44-44-44-48-48 stitches). When 3 rows in A.3 have been worked, cast on 2 stitches at the end of last row for neck = 49-49-49-49-53-53 stitches. Work back from wrong side with knit 2, A.3 and knit 3 edge stitches. Now slip left and right shoulder together for back piece as explained below. BACK PIECE: Slip stitches from the two shoulder on to same circular needle size 3 mm (the 24-24-28-28-28-28 stitches cast on for neck on right shoulder at the back = mid back of neck) = 122-122-126-126-134-134 stitches on needle. Work first row as follows from right side: 3 edge stitches in garter stitch, continue A.3 over the next 44-44-44-44-48-48 stitches, work A.5 over the next 28-28-32-32-32-32 stitches, continue A.1 over the next 44-44-44-44-48-48 stitches and finish with 3 edge stitches in garter stitch. Continue pattern like this, and increase for armhole as explained below. ARMHOLE: When piece measures 16-15-16-13-14-13 cm, increase 1 stitch in each side for armhole as on front pieces, i.e. increase from right side after 3 edge stitches in garter stitch at the beginning of row and before 3 edge stitches at the end of row. Increase like this every other row (i.e. on every row from right side) 4-8-8-14-16-20 times in total, then cast on 3-4-6-6-8-10 new stitches at the end of the next two rows = 136-146-154-166-182-194 stitches and piece measures approx. 19-20-21-22-24-26 cm from shoulder and down. Now put front pieces and back piece together as explained below. BODY: Slip stitches from left front piece (seen from right side) on needle without working stitches, insert 1 marker thread (= in the side), slip stitches from back piece on needle, insert 1 marker thread (= in the side) and slip stitches from right front piece on needle. Continue pattern as before, continue increase for neck line as before and continue decrease for band as before. I.e. work first row from right side as follows: Work in garter stitch over shawl collar/band with any decrease as before, continue A.2 and A.1, work 4-8-8-14-16-20 stitches in stocking stitch, 12-14-18-18-22-26 stitches in garter stitch (marker thread in the side is in the middle of these 12-14-18-18-22-26 stitches), work 4-8-8-14-16-20 stitches in stocking stitch, continue A.3, A.5 and A.1 over back piece, work 4-8-8-14-16-20 stitches in stocking stitch, 12-14-18-18-22-26 stitches in garter stitch (marker thread in the side is in the middle of these 12-14-18-18-22-26 stitches), work 4-8-8-14-16-20 stitches in stocking stitch, continue A.3 and A.4 as before and finish with garter stitch over shawl collar/band with any decrease as before. Continue pattern like this but when working 2 ridges over the middle 12-14-18-18-22-26 stitches in each side, work as follows from right side: Work in garter stitch over shawl collar/band with any decrease as before, continue A.2 and A.1 as before, work 7-12-14-20-24-30 stitches in stocking stitch, work A.6 (= 6 stitches, marker in the side is in the middle of A.6), work 7-12-14-20-24-30 stitches in stocking stitch, continue A.3, A.5 and A.1 as before, work 7-12-14-20-24-30 stitches in stocking stitch, work A.6 (marker thread in the side is in the middle of A.6), work 7-12-14-20-24-30 stitches in stocking stitch, continue A.3 and A.4 as before and finish with garter stitch over shawl collar/band with decreases if necessary as before. After all increases for neck line and decreases for bands are done, there are 280-300-316-340-372-396 stitches on needle. Read KNITTING TIP and continue until piece measures 30-32-34-36-38-40 cm from shoulder. Read BUTTONHOLES. On next row from right side increase 2 stitches in each side - read INCREASE TIP-3 (= 4 stitches increased). Increase like this every 6th row (approx. every 2 cm) until finished measurements (if the knitting tension is correct there are approx. 21 increases in each side). When piece measures 71-73-75-77-79-81 cm, there are approx. 364-384-400-424-456-480 stitches on needle. On next row from right side knit stitches in every cable (both cables with 4 stitches and cables with 2 stitches) together 2 by 2 (only applies to cables, not purl sections and stocking stitch sections) = approx. 312-332-348-372-404-428 stitches. Work 3 ridges back and forth over all stitches and loosely cast off by knitting from right side but to avoid a tight cast-off edge make 1 yarn over after every 8th stitch while casting off (cast off yarn overs as regular stitches). Entire jacket measures approx. 72-74-76-78-80-82 cm from shoulder and down. SLEEVE: Cast on 38-40-40-40-48-48 stitches on short circular needle size 3 mm. Work stocking stitch back and forth and cast on new stitches for sleeve cap at the end of every row in each side as follows: Cast on 3 stitches 1 time in all sizes, 2 stitches 2 times in all sizes, 1 stitch 7-8-11-14-14-17 times, 2 stitches 2-2-1-1-1-1 time and 3-4-6-6-8-10 stitches 1 time = 80-86-92-98-110-120 stitches and piece measures approx. 8-9-10-12-12-14 cm from cast-on edge and down. Insert 1 marker thread at beginning of row (= mid under sleeve). Then work in stocking stitch in the round but over the middle 6 stitches under sleeve work A.6. When piece measures 3-3-2-2-2-2 cm from marker thread, decrease 2 stitches mid under sleeve - read DECREASE TIP. Decrease like this every 2½-2-2-1½-1-1 cm 11-14-15-18-22-26 times in total = 58-58-62-62-66-68 stitches. When piece measures 31-31-30-29-29-27 cm from marker thread, knit 1 round while increasing 22-22-23-23-24-22 stitches evenly = 80-80-85-85-90-90 stitches. Switch to double pointed needles size 2.5 mm. Work next round as follows: Continue A.6 over the 6 stitches under sleeve, work A.7A until 4 stitches remain before A.6 (= 14-14-15-15-16-16 repetitions of 5 stitches) and finish with A.7B (= 4 stitches). Continue pattern like this. When cuff measures 12 cm, decrease 3 purl to 2 purl by purling 2 together in every purl section = 64-64-68-68-72-72 stitches. Work until cuff measures 15 cm (entire sleeve measures approx. 54-55-55-56-56-56 cm from cast-on edge). On next round knit stitches in each cable together 2 by 2 = 48-48-51-51-54-54 stitches. Work 2 ridges in GARTER STITCH in the round - see explanation above. Then cast off by knitting but to avoid a tight cast-off edge cast off on double pointed needles size 3 mm. Work the other sleeve the same way. ASSEMBLY: Sew shoulder seams inside cast-on edges. Sew shawl collar together mid back and make sure that seam is in towards wrong side when collar is folded down. Sew shawl collar to neck line in the back of neck. Sew in sleeves. Sew on buttons. |
|||||||||||||||||||||||||||||||
Diagram explanations |
|||||||||||||||||||||||||||||||
|
|||||||||||||||||||||||||||||||
|
|||||||||||||||||||||||||||||||

|
|||||||||||||||||||||||||||||||
|
|||||||||||||||||||||||||||||||

|
|||||||||||||||||||||||||||||||
|
|||||||||||||||||||||||||||||||
Have you finished this pattern?Tag your pictures with #dropspattern #morgansdaughterjacket or submit them to the #dropsfan gallery. Do you need help with this pattern?You'll find 29 tutorial videos, a Comments/Questions area and more by visiting the pattern on garnstudio.com. © 1982-2025 DROPS Design A/S. We reserve all rights. This document, including all its sub-sections, has copyrights. Read more about what you can do with our patterns at the bottom of each pattern on our site. |
|||||||||||||||||||||||||||||||


With over 40 years in knitting and crochet design, DROPS Design offers one of the most extensive collections of free patterns on the internet - translated to 17 languages. As of today we count 314 catalogues and 11820 patterns translated into English (UK/cm). 11820
We work hard to bring you the best knitting and crochet have to offer, inspiration and advice as well as great quality yarns at incredible prices! Would you like to use our patterns for other than personal use? You can read what you are allowed to do in the Copyright text at the bottom of all our patterns. Happy crafting!
Post a comment to pattern DROPS 179-14
We would love to hear what you have to say about this pattern!
If you want to leave a question, please make sure you select the correct category in the form below, to speed up the answering process. Required fields are marked *.