
Looking for a yarn?


Comments / Questions (47)
![]() Nicoletta wrote:
Nicoletta wrote:
Ho visto che nelle risposte è indicato di iniziare con i diagramma A1 (12 ferri) e continuare con A2 (16 ferri) Quindi non capisco se gli ultimi o i primi 4 ferri sono da considerare come le caselline vuote Grazie
13.07.2018 - 09:54DROPS Design answered:
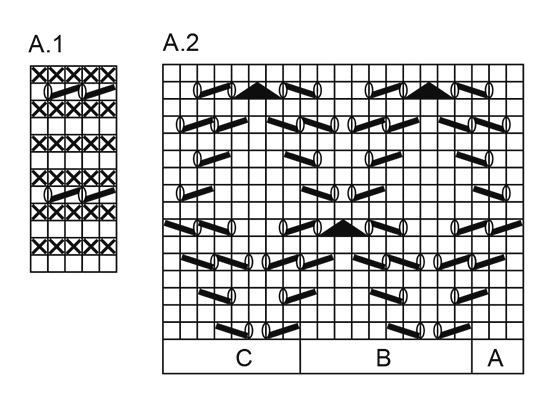
Buongiorno Nicoletta. I diagrammi A1 e A2 vanno lavorati insieme. A1 sulle prime e ultime 5 maglie; A2 sulle altre maglie. Al 13° ferro, lavora il primo ferro di A1 e il 13 ferro di A2 e così via. Il diagramma A1 è il bordo ai due lati del poncho. Buon lavoro!
13.07.2018 - 10:24
![]() Marina wrote:
Marina wrote:
Grazie, appena finiti i lavori che ho in cantiere inizierò questo, mi piace troppo!!!!
29.04.2018 - 21:56
![]() Marina wrote:
Marina wrote:
Buongiorno sono Marina, purtroppo io non so lavorare con i ferri circolari, è possibile lavorare il poncho con i ferri diritti o fare due rettangoli e poi cucirli, o viene n lavoro "brutto"? Grazie, buona giornata
29.04.2018 - 13:17DROPS Design answered:
Buonasera Marina, questo modello è lavorato in piano, non in tondo, per cui può seguire le istruzioni e cucirlo alla fine. Buon lavoro!
29.04.2018 - 18:51
![]() Chiara Cellamare wrote:
Chiara Cellamare wrote:
Grazie ancora Drops. Temo che ci sia un errore nelle istruzioni allora. Il disegno del diagramma A1 non inizia insieme al diagramma A2. Forse dovrebbe essere corretto. Grazie mille
13.04.2018 - 17:16
![]() Chiara Cellamare wrote:
Chiara Cellamare wrote:
Grazie ancora Drops. Temo che ci sia un errore nelle istruzioni allora. Il disegno del diagramma A1 non inizia insieme al diagramma A2. Forse dovrebbe essere corretto. Grazie mille
13.04.2018 - 17:16
![]() Chiara Cellamare wrote:
Chiara Cellamare wrote:
Grazie Drops per la risposta. Ma ho un problema con diagramma A1. Quando si inizia a lavorare? Dal disegno sembrerebbe più tardi rispetto al diagramma A2. Grazie mille Ciao
13.04.2018 - 08:29DROPS Design answered:
Buongiorno Chiara. Inizia a lavorare i diagrammi A1 e A2 sullo stesso ferro. Quindi dopo aver lavorato i 4 ferri a diritto, lavora le prime e le ultime 5 maglie seguendo il diagramma A1 e le altre maglie seguendo il diagramma A2. Buon lavoro!
13.04.2018 - 08:41
![]() CHIARA CELLAMARE wrote:
CHIARA CELLAMARE wrote:
Buongiorno, sto lavorando il poncho. Non ho capito però, se il diagrama A1 va lavorato subito o dal quarto ferro. Dal diagramma sembrerebbe che inizi dopo, dalle istruzioni si capisce che si inizia subito. Grazie mille! ciaooo
12.04.2018 - 18:29DROPS Design answered:
Buongiorno Chiara. Dopo aver avviato le maglie, lavora 4 ferri a diritto e poi inizia a lavorare il diagramma. Buon lavoro!
12.04.2018 - 19:06
![]() Elke wrote:
Elke wrote:
Ich verstehe nicht ganz, wo der Rapport anfängt und endet? A2B ist doch als Rapport gedacht... Greift aber laut Diagramm in A2A und A2C durch zusammen Stricken über?
13.03.2018 - 20:07DROPS Design answered:
Liebe Elke, die Reihe wird mit A.2A anfangen, dann A.2B wiederholen und mit A.2C schliessen = die letzte Masche in A.2 A/A.2B/A.2C wird manchmal mit der ersten Masche in A.2B/A.2C gestrickt. Beachten Sie nur, daß Sie immer die richtige Maschenanzahl in jedem Rapport haben (= 3 M für A.2A, 10 M für A.2B und 8 M für A.2C), Markierungen können damit helfen. Viel Spaß beim stricken!
14.03.2018 - 09:14
![]() Chatarina Malmberg wrote:
Chatarina Malmberg wrote:
TACK Ingrid för att du har klurat och fått rätt på mönstret. Jag höll på att bli tokig och kunde inte förstå vad jag gjorde för fel. Nu ska jag strax sätta mig och börja om med ett mönster som funkar. MVH Chatarina
20.02.2017 - 12:48
![]() Claudia wrote:
Claudia wrote:
Hallo, ich versuche diesen Poncho (176-25) zu stricken, habe aber leider ein Problem mit dem Muster. Dies bezieht sich auf die Reihen 7 und 15 im Muster. Da kann etwas nicht stimmen, da ich am Ende der Reihe zu viele Maschen habe. Gibt es eine überarbeitete Version des Musters ? Ich freue mich auf eine Antwort, da ich den Poncho gerne wieder stricken würde. Liebe Grüße Claudia
18.02.2017 - 20:42DROPS Design answered:
Liebe Claudia, Danke für den Hinweis, ein neues Diagram wird bald hochgeladen. Viel Spaß beim stricken!
20.02.2017 - 10:07
|
|||||||||||||||||||
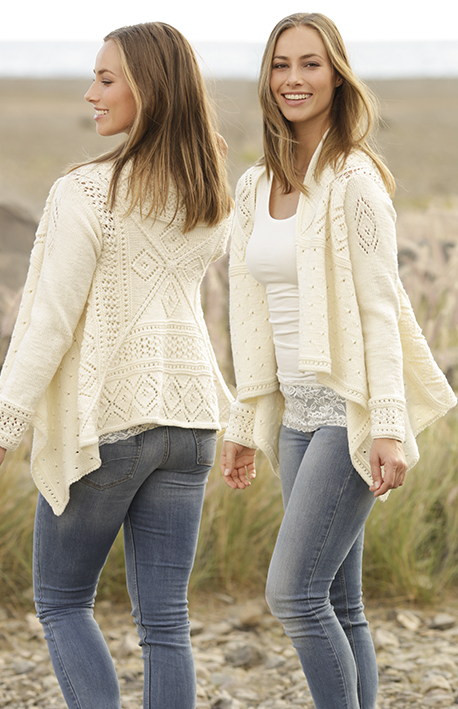
Inayah#inayahponcho |
|||||||||||||||||||
|
|
|||||||||||||||||||
Knitted poncho with lace pattern in DROPS Bomull-Lin. Sizes S - XXXL.
DROPS 176-25 |
|||||||||||||||||||
|
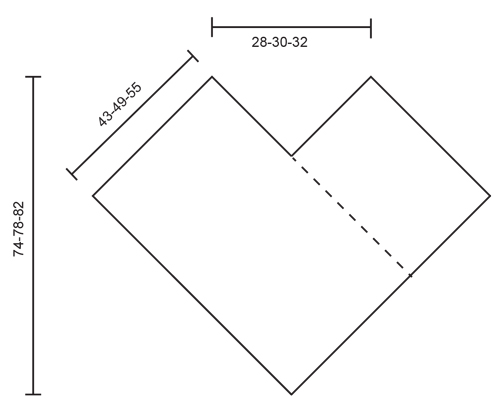
RIDGE/GARTER STITCH (worked back and forth): 1 ridge = Knit 2 rows. PATTERN: See diagrams A.1 and A.2. The diagrams show all rows in the pattern from the right side. ---------------------------------------------------------- PONCHO: The piece is worked back and forth like a scarf and is sewn into a poncho at the end. Cast on 71-81-91 stitches with circular needle size 5 mm and Bomull-Lin. Work 2 RIDGES – see description above, then work as follows – from the right side: A.1 (= 5 stitches), A.2 A (= 3 stitches), A.2 B across the next 50-60-70 stitches, A.2 C (= 8 stitches), finish with A.1. REMEMBER THE KNITTING TENSION! Repeat the pattern in height. Continue in this way until the piece measures 43-49-55 cm. Insert 1 marker in the side of the piece, the cast-off edge will be sewn from this marker later. Continue to work with the pattern as before until the piece measures 112-121-130 cm. Cast off. ASSEMBLY: Sew the short side (= cast-off edge) together with the long side, from the marker and down to the cast-on edge. Sew in the outermost loop of the outermost stitch. The opposite long side now makes a tip mid front. |
|||||||||||||||||||
Diagram explanations |
|||||||||||||||||||
|
|||||||||||||||||||
 |
|||||||||||||||||||
 |
|||||||||||||||||||
Have you finished this pattern?Tag your pictures with #dropspattern #inayahponcho or submit them to the #dropsfan gallery. Do you need help with this pattern?You'll find 18 tutorial videos, a Comments/Questions area and more by visiting the pattern on garnstudio.com. © 1982-2025 DROPS Design A/S. We reserve all rights. This document, including all its sub-sections, has copyrights. Read more about what you can do with our patterns at the bottom of each pattern on our site. |
|||||||||||||||||||


With over 40 years in knitting and crochet design, DROPS Design offers one of the most extensive collections of free patterns on the internet - translated to 17 languages. As of today we count 320 catalogues and 12091 patterns translated into English (UK/cm). 12091
We work hard to bring you the best knitting and crochet have to offer, inspiration and advice as well as great quality yarns at incredible prices! Would you like to use our patterns for other than personal use? You can read what you are allowed to do in the Copyright text at the bottom of all our patterns. Happy crafting!
Post a comment to pattern DROPS 176-25
We would love to hear what you have to say about this pattern!
If you want to leave a question, please make sure you select the correct category in the form below, to speed up the answering process. Required fields are marked *.