
Looking for a yarn?


Comments / Questions (50)
![]() Luison wrote:
Luison wrote:
Bonjour, j'aimerais réaliser ce model pour ma fille mais elle à déjà acheté de la laine qui se tricote avec des aiguilles n°3,5 . j'ai réalisé un échantillon: les 28 rgs en gersey donne ne hauteur de 9cm au lieu de 10cm et 10 cm en largeur que dois-je faire ?
31.01.2020 - 18:18DROPS Design answered:
Bonjour Luison, dans ce modèle, le nombre de rangs en hauteur est important pour coller aux explications - plus d'infos ici. Essayez de bloquer votre échantillon pour voir, ou sinon, il vous faudra fort probablement procéder à quelques ajustements. Bon tricot!
03.02.2020 - 09:07
![]() Mette Eriksen-Vik wrote:
Mette Eriksen-Vik wrote:
Hei! Jeg finner ikke A8, A9 og A10
18.12.2019 - 12:14DROPS Design answered:
Hej Mette, det ligger i nederste højre hjørne, lige over måleskitsen. God fornøjelse!
15.01.2020 - 11:46
![]() Birgit wrote:
Birgit wrote:
Hallo, gibt es eine Möglichkeit einen Verschluss (Bindeband?) an der Jacke zu befestigen?
09.06.2019 - 06:59DROPS Design answered:
Liebe Birgit, die Jacke können Sie am besten mit einer Nadel oder Brosche zusammenhalten. Viel spaß beim stricken!
11.06.2019 - 10:56
![]() Aurelie PRUDENT wrote:
Aurelie PRUDENT wrote:
Bonjour, Qu'est ce que des aiguilles doubles? Combien de pelotes pour la taille S/M svp? Merci pour votre retour et bonne journée !
09.04.2019 - 12:46DROPS Design answered:
Bonjour Mme Aurelie PRUDENT! Les aiguilles doubles pointes (5 aiguilles au total) sont les aiguilles pour tricoter en rond, mais surtout des petits ouvrages (ex. chausettes). Pour la taille S/M il vous faut 15 pelotes de DROPS MERINO EXTRA FINE. Bon tricot!
09.04.2019 - 13:22
![]() Elodie wrote:
Elodie wrote:
Bonjour, Faut-il bien tricoter 4 fois les diagrammes A2 à A4 (après A1), car cela n'est pas flagrant sur les photos du modèle. Merci!
22.03.2019 - 05:56DROPS Design answered:
Bonjour Elodie! Continuer ainsi: *A.2 (= 7 mailles), A.3 au-dessus des 48 mailles suivantes (= 8 fois en largeur), A.4 au-dessus des 4 mailles suivantes*, tricoter de *-* 4 fois au total > cela veut dire que vous tricotez les diagrammes A2 à A4 quatre fois en largueur (parce que vous travaillez le carre). Bon tricot!
22.03.2019 - 07:38
![]() Karin wrote:
Karin wrote:
Meiner Meinung nach ist das Diagramm A8, A9 und A10 für Stricken in Runden gezeichnet. Für Stricken in Hin und Rückreihen muss man die Rückreihe dementsprechend anders stricken. Laut Foto sehe ich es als glatt rechts gestrickt.
23.01.2019 - 19:26DROPS Design answered:
Liebe Karin, alle Diagramme zeigen alle Reihen (= Hin- sowie Rückreihen) in A.9 werden die leere Kästchen glatt rechts gestrickt. Die 2 ersten und 2 letzten Maschen sind kraus rechts gestrickt: rechts bei den HInreihen sowie bei den Rückreihen. Viel Spaß beim stricken!
24.01.2019 - 10:44
![]() Karin wrote:
Karin wrote:
Bei den Vorderteil Muster A8 A9 und A10 sind das Hin u. Rückreihen im Musterdiagramm? Laut Foto der Jacke sieht es aus wie nur Hinreihen. Kann mir da jemand was dazu sagen?
21.01.2019 - 17:52DROPS Design answered:
Liebe Karin, alle Reihen sind im Diagram gezeigt, dh die Hin sowie die Rückreihen. Diagramme lesen Sie von der unteren rechten Ecke rechts nach links bei den Hinreihen und links nach rechts bei den Rückreihen. Viel Spaß beim stricken!
22.01.2019 - 07:56
![]() Camilla Phersson wrote:
Camilla Phersson wrote:
Hej! när man stickar i large ska man sticka diagram 2,3och 4 4gånger. Det blir 16varv för mig Då stämmer inte Bilden man ser innan man avmaskar för ärmen. Det är inte hela diagrammet. Tänker jag fel?
17.07.2018 - 21:53DROPS Design answered:
Hei Camilla. Diagram A.2, A.3 og A.4 for størrelse L har 23 omganger. Det felles til ermer på den nest siste omgang (= omgang 22), og på den siste omgangen legges det opp nye masker over. Du skal sette ermet inn i dette hullet under montering. De maskene som legges opp på den siste omgangen av M.2, M.3 og M.4 havner derfor på framsiden av jakken i forhold til ermet. God fornøyelse
19.07.2018 - 15:17
![]() Annelies wrote:
Annelies wrote:
Bedankt voor het snelle antwoord, maar ik begrijp het niet zo goed. Dus ik moet geen teruggaande naald breien? Bij A.1 wilt dit dan zeggen dat ik na dat ik 1 rechts gebreidt heb naar de volgende rij op het telpatroon moet gaan? Dus 3 rechts ipv 6 recht (3x teruggaande naald)
13.04.2018 - 10:17DROPS Design answered:
Dag Annelies, Alle naalden die je breit staan in het telpatroon aangegeven, dus je slaat niks over. Nadat je naald 1 (= 3 steken) van telpatroon A.3 hebt gebreid, brei je naald 2 (=3 steken) en zo ga je verder in de hoogte met het telpatroon. Telpatroon A.1 brei je 4 keer in de rondte, dus je herhaalt het patroon in de breedte (3 steken x 4 = de 12 steken die je hebt opgezet) en omdat je in de rondte aan het breien bent, brei je steeds op de goede kant van het werk.
16.04.2018 - 10:08
![]() Annelies wrote:
Annelies wrote:
Hallo, ik ben begonnen met deze trui te breien en als beginster vraag ik me af hoe ik het telpatroon moet lezen. Bij a1 is dit dan 3 rijen rechts zoals het er staat? Of moet ik 6 rijen rechts breien omdat je nog eens terug moet? Mvg Annelies
11.04.2018 - 15:29DROPS Design answered:
Hallo Annelies, In de telpatronen zijn altijd alle naalden aangegeven, dus de zowel de heengaande als de teruggaande naald. (Bij rondbreien heb je geen teruggaande naald :) )
12.04.2018 - 07:11
|
||||||||||||||||||||||
Sunny Date#sunnydatecardigan |
||||||||||||||||||||||
 |
 |
|||||||||||||||||||||
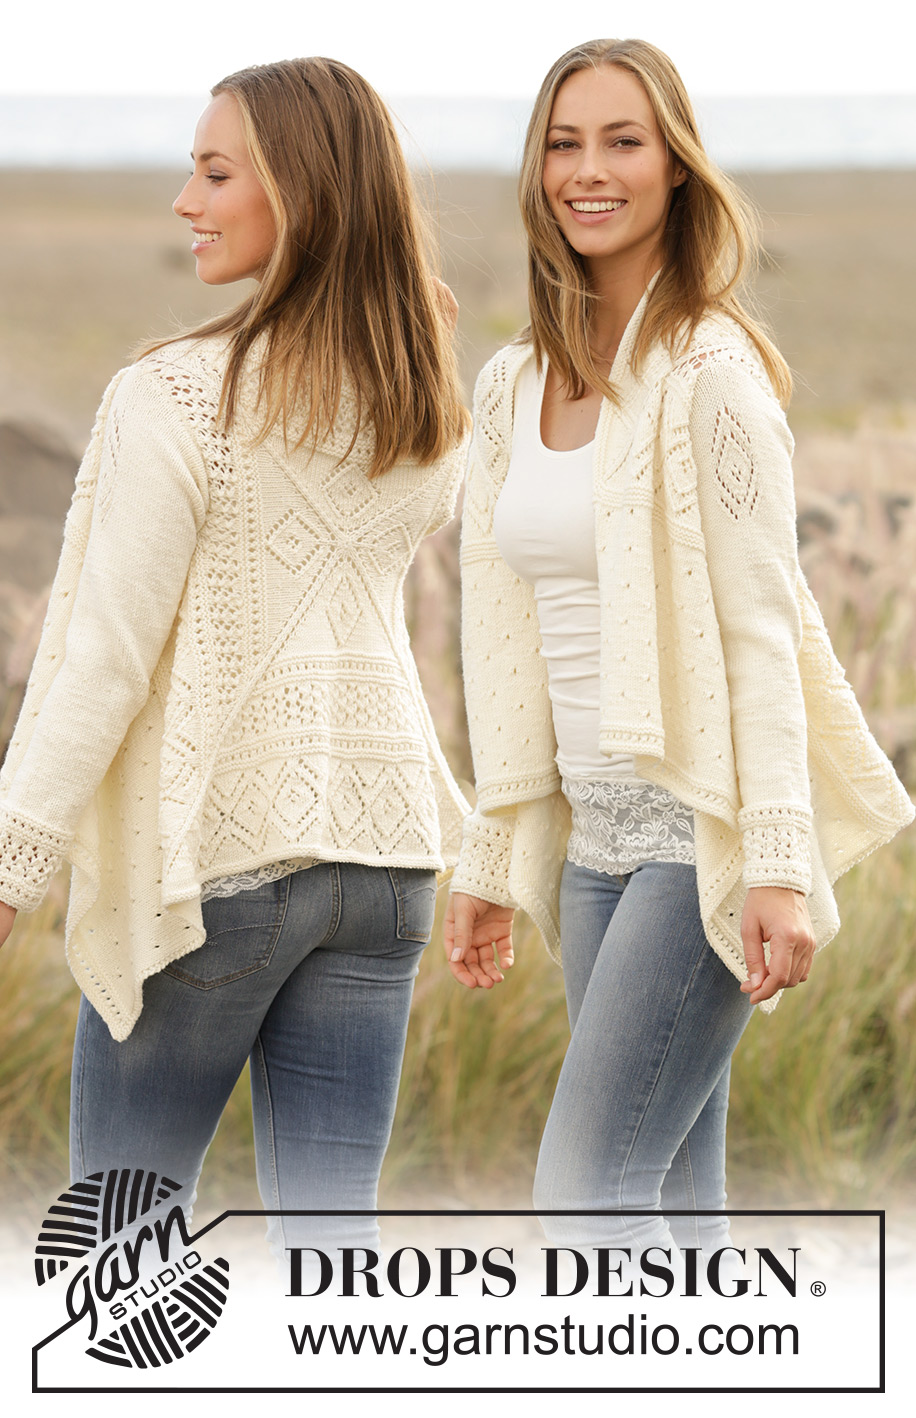
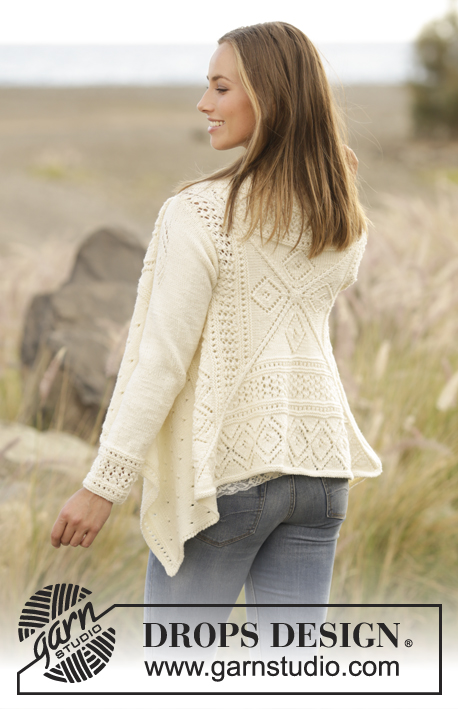
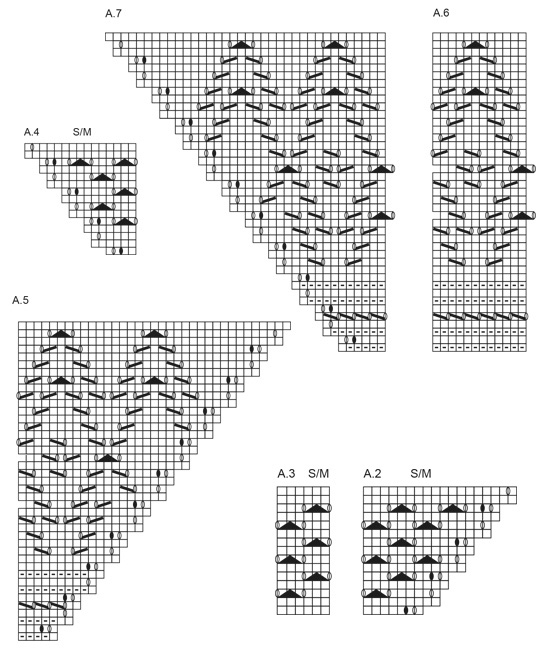
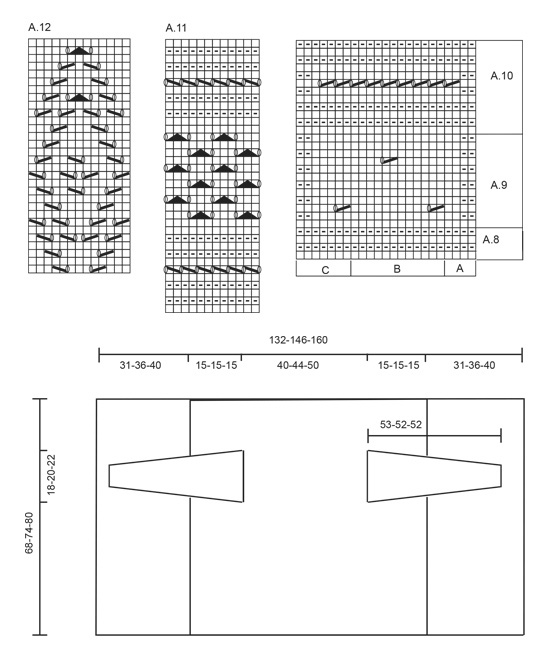
Knitted jacket with lace pattern, worked in square in DROPS Merino Extra Fine. Sizes S - XXXL.
DROPS 176-26 |
||||||||||||||||||||||
|
RIDGE/GARTER STITCH (worked in the round): 1 ridge = 2 rounds. Knit 1 round and purl 1 round. PATTERN: See diagrams A.1 to A.12. The diagrams show the pattern seen from the right side. Choose the diagram needed for the right size when you are working according to A.2, A.3 and A.4. INCREASE TIP (for the sleeves): Increase 1 stitch by making 1 yarn over, on the next round knit the yarn overs twisted to prevent holes. Start 1 stitch before the marker thread, make 1 yarn over, knit 3 (the stitch with the marker thread sits in the middle of these 3 stitches), make 1 yarn over. --------------------------------------------------------- JACKET: The piece is worked in square on double pointed needles/circular needle, from the middle of the back and outwards. Then work the front pieces back and forth in each side. BACK PIECE: Cast on 12 stitches in all sizes with double pointed needles size 4 mm and Merino Extra Fine. Work according to A.1 (= 4 repeats on the round) and switch to circular needle when there is increase enough stitches. When A.1 is finished 1 time in height there are 236 stitches on the round. Continue working as follows: * A.2 (= 7 stitches), A.3 over the next 48 stitches (= 8 repeats in width), A.4 over the next 4 stitches *, work from *-* in total 4 times. NOTE! Choose the diagram for the right size. On the next to last round in A.2, A.3 and A.4 (there are now 324-372-420 stitches on the round) work as follows: Work the first 83-95-107 stitches, cast off the next 38-42-46 stitches (= armhole), work the next 163-191-219 stitches, cast off the next 38-42-46 stitches (= armhole) and work the last 2 stitches. On the next round (= the last round in A.2, A.3 and A.4) cast on 38-42-46 new stitches over the cast-off stitches = 332-380-428 stitches. Continue to work as follows: * A.5 (= 5 stitches), A.6 over the next 72-84-96 stitches (= 6-7-8 repeats in width), A.7 (= 6 stitches) *, work from *-* in total 4 times. Continue with A.5, A.6 and A.7 until the diagrams are worked 1 time in height = 572-620-668 stitches on the round. Work 2 RIDGES – see description above, over all the stitches (without increases), then cast off the first 143-155-167 stitches, place the next 143-155-167 stitches on a thread (knit them first), cast off the next 143-155-167 stitches, keep the last 143-155-167 stitches on the needle and continue working back and forth over these stitches (= right front piece). RIGHT FRONT PIECE: The piece is worked back and forth without increases in the side. Work as follows, from the right side: A.8 A (= 4 stitches), A.8 B over the next 132-144-156 stitches (= 11-12-13 repeats in width), A.8 C (= 7 stitches). Work A.8 1 time in height, then work A.9 A-C over A.8 A-C. When A.9 has been worked 6-7-8 times in height, work A.10 A-C over A.9 A-C. Cast off with knit. LEFT FRONT PIECE: Place the stitches from the thread in the other side back on the needle. Work in the same way as the right front piece, but the first row in A.8 has already been worked, start from the wrong side on the 2nd row in the diagram. SLEEVE: The sleeve is worked in the round with double pointed needles. Cast on 48-48-54 stitches with double pointed needles size 4 mm and Merino Extra Fine. Work A.11 over all stitches. When A.11 has been worked 1 time in height continue working stocking stitch, on the first round adjust the number of stitches to 45-49-55 stitches. Insert 1 marker thread in the first stitch on the round = mid under the sleeve. When the piece measures 10 cm increase 1 stitch on each side of the marker thread – READ INCREASE TIP. Increase every 2½-2-2cm in total 16-18-19 times = 77-85-93 stitches. AT THE SAME TIME when the piece measures 41-40-40 cm work A.12 over the middle 13 stitches on the round (= mid on top of the sleeve). Cast off when the sleeve measures 53-52-52 cm. Work 1 more sleeve. ASSEMBLY: Sew in the sleeves. Use a needle to sew and close up the hole mid back (= cast-on edge). |
||||||||||||||||||||||
Diagram explanations |
||||||||||||||||||||||
|
||||||||||||||||||||||
 |
||||||||||||||||||||||
 |
||||||||||||||||||||||
 |
||||||||||||||||||||||
 |
||||||||||||||||||||||
Have you finished this pattern?Tag your pictures with #dropspattern #sunnydatecardigan or submit them to the #dropsfan gallery. Do you need help with this pattern?You'll find 27 tutorial videos, a Comments/Questions area and more by visiting the pattern on garnstudio.com. © 1982-2025 DROPS Design A/S. We reserve all rights. This document, including all its sub-sections, has copyrights. Read more about what you can do with our patterns at the bottom of each pattern on our site. |
||||||||||||||||||||||


With over 40 years in knitting and crochet design, DROPS Design offers one of the most extensive collections of free patterns on the internet - translated to 17 languages. As of today we count 320 catalogues and 12091 patterns translated into English (UK/cm). 12091
We work hard to bring you the best knitting and crochet have to offer, inspiration and advice as well as great quality yarns at incredible prices! Would you like to use our patterns for other than personal use? You can read what you are allowed to do in the Copyright text at the bottom of all our patterns. Happy crafting!
Post a comment to pattern DROPS 176-26
We would love to hear what you have to say about this pattern!
If you want to leave a question, please make sure you select the correct category in the form below, to speed up the answering process. Required fields are marked *.