
Popular categories
Looking for a yarn?


Comments / Questions (240)
![]() Kit Laursen wrote:
Kit Laursen wrote:
Hej. Jeg er nået til udtagningerne i sjalskraven/forkanten og vil høre om jeg fortsat skal strikke de forkortede pinde på hver 10. pind? Hilsen Kit
22.09.2023 - 09:09DROPS Design answered:
Hej Kit, ja dem fortsætter du med :)
26.09.2023 - 15:31
![]() Anne Rosvall wrote:
Anne Rosvall wrote:
Continue to cast off 2 sts in each side of piece until… (sleeve). So cast off once or more times?
05.09.2023 - 19:31DROPS Design answered:
Dear Mrs Rowall, depending on your tension in height, you have to cast off 2 stitches on each side until you reach the required length. Make just sure that you cast off the same number of times these 2 stitches on each side so that the sleeve cap will be symmetrical. Happy knitting!
06.09.2023 - 09:06
![]() Dupont wrote:
Dupont wrote:
Bonjour, Pour les manches, pourquoi utiliser des aiguilles doubles pointes (5 ?) plutôt qu’une aiguille circulaire ? Bonne réception
24.07.2023 - 16:12DROPS Design answered:
Bonjour Mme Dupont, si vous aimez la technique magic loop, vous pouvez utiliser une aiguille circulaire pour les manches. Bon tricot!
24.07.2023 - 16:19
![]() Brandi Agnew wrote:
Brandi Agnew wrote:
Hello I am working the left side and am at the point of working the neckline + shawl collar. In the decrease tip, am I to complete all of those steps or am I to choose one?
22.06.2023 - 22:13DROPS Design answered:
Hi Brandi, On the front pieces, work only one of the decreases (either before or after the band depending on whether the band is at the beginning or end of the row). Hope this helps and happy knitting!
23.06.2023 - 06:42
![]() Leonie O’Garro-Hovens wrote:
Leonie O’Garro-Hovens wrote:
Fout in de omschrijving, ik brei dit vest, heb 355 steken opgezet, na de boord in totaal 44 steken geminderd (3+19+19+3) geeft een totaal van 311 steken en niet zoals in patroon staat van 309. Zou fijn zijn als dit gecorrigeerd kan worden voor toekomstige breiers,
09.04.2023 - 15:19
![]() Isabelle wrote:
Isabelle wrote:
Bonjour. Je suis rendue aux augmentations et diminutions du col châle devant gauche. Ma question est la suivante: j’ai besoin de précisions en ce qui concerne les explications de cette partie. VOIR DIMINUTIONS 12 fois au total tous les 2 rangs et 4 fois dans toutes les tailles à tous les 4 rangs. Je ne comprends pas comment faire ces diminutions en même temps. Aussi aux 4 rangs est-ce bien des diminutions? Merci pour vos précisions.
18.02.2023 - 14:14DROPS Design answered:
Bonjour Isabelle, vous diminuez pour l'encolure après (devant droit) / avant (devant gauche) toutes les mailles du col autrement dit les 10 mailles de la bordure devant + celles que vous avez augmentées en plus (et que vous allez continuer à augmenter). Diminuez 12 x tous les 2 rangs + 4 x tous les 4 rangs, mais, en même temps, continuez à augmenter pour le col comme avant. Bon tricot!
20.02.2023 - 09:34
![]() Pia Spånghagen wrote:
Pia Spånghagen wrote:
Jag stickar L - Large Hälsning Pia
30.01.2023 - 10:19DROPS Design answered:
Hei Pia. Jo, det blir riktig. For å få det likt midt bak strikkes det slik det er forklart i oppskriften. Midt bak ryggen vil da bli siste masken av siste rapport av A.3A . Altså du har strikket 10 stolpemasker + 25 masker (A.4) + 96 (A.3A) = 131 maske og da er maske nr 131 midtmasken på ryggen. Så strikker du 5 masker (A.3B) + 90 (A.3C) + 25 (A.5) + 10 stolpemasker = 130 masker. mvh DROPS Design
30.01.2023 - 13:21
![]() Pia Spånghagenb wrote:
Pia Spånghagenb wrote:
Hej Jag stickar hela kroppen. Jag förstår inte varför det ska vara 96 rapporter på ena sidan och 90 rapporter på andra sidan när jag har bytt till stickor stl 4? då blir ju ryggmaskorna inte mitt bak. Mönstret på A3A-A3B-A3C fungerar ju inte då heller. Hjälp mig. Tack Pia
25.01.2023 - 09:06DROPS Design answered:
Hei Pia. Vi skal hjelpe deg så godt vi kan, men fint om du kan opplyse hvilken str. du strikker. mvh DROPS Design
30.01.2023 - 10:15
![]() Ayesha Naeem wrote:
Ayesha Naeem wrote:
I am doing Jackson jacket pattern please tell me after how many rows should I turn cable and in diagram A.3A ,the diagram is showing RS only or showing both sides RS and WSthanks
08.01.2023 - 16:27DROPS Design answered:
Dear Mrs Naem, there is no cables to work in diagrams A.3 - in A.4 and A.5 work the first cable on the 3rd row (= 2nd row from RS) and repeat the cable on every 10th row. Diagrams show all rows, = the rows from RS as well as the rows from WS - read more about diagrams here. Happy knitting!
09.01.2023 - 10:22
![]() Polixas Christins wrote:
Polixas Christins wrote:
Eine Frage zum Schallkragen:wird nur einmal 1 Krausrippe nur über die ersten 10 Maschen gestrickt,oder 18mal vor jeder Zunahme?
24.10.2022 - 17:40DROPS Design answered:
Liebe Frau Polixas, diese verkürzten Reihen werden nur einmal gestrickt, ie 2 Reihen nach dem letzten Knopfloch. Viel Spaß beim stricken!
25.10.2022 - 08:58
|
|||||||||||||||||||
Jackson#jacksoncardigan |
|||||||||||||||||||
 |
 |
||||||||||||||||||
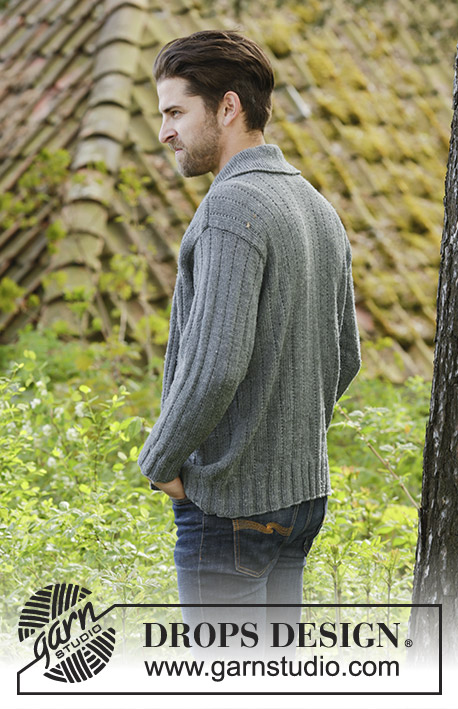
Knitted DROPS men’s jacket with simple cable, textured pattern and shawl collar in Karisma. Size: XS - XXXL.
DROPS 174-1 |
|||||||||||||||||||
|
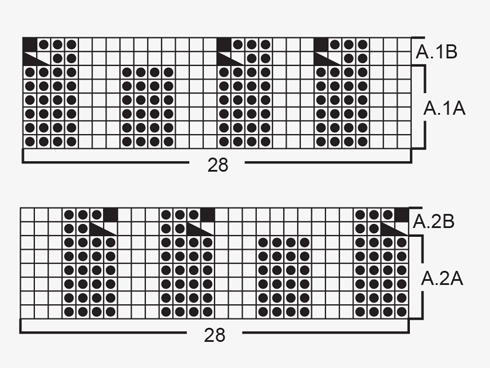
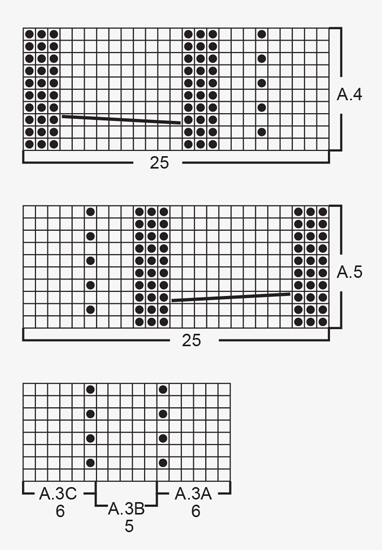
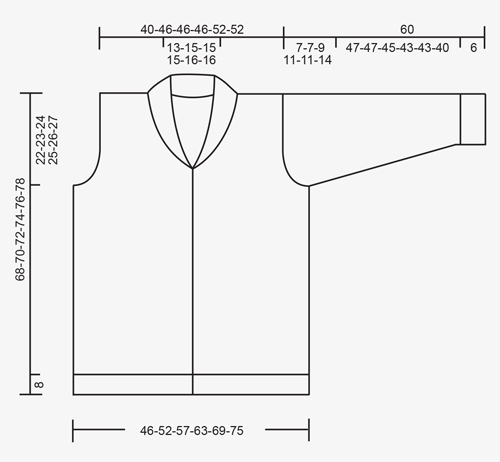
GARTER ST (back and forth): K all rows. 1 ridge = 2 rows K. PATTERN: See diagrams A.1 to A.5. The diagrams show all rows in pattern seen from RS. KNITTING TIP (applies to bands): To keep the bands from contracting vertically work short rows over bands as follows: * Beg mid front and K the outermost 10 sts (= band), turn piece, slip 1st st as if to K, tighten yarn and K the rest of row *, repeat from *-* after approx. every 10 rows in piece. INCREASE TIP-1 (applies to shawl collar): Inc 1 st in next to last st towards mid front by K in front and back loop of same st. INCREASE TIP-2 (applies to mid under sleeve): Inc 1 st on each side of st with marker mid under sleeve. Inc 1 st by making 1 YO, on next round work YO twisted to avoid holes. Work the inc sts in the pattern A.3. DECREASE TIP (applies to neckline): Dec inside 10 band sts in garter st + inc sts for shawl collar. All dec are done from RS! Dec as follows before band + collar: K 2 tog. Dec as follows after collar + band: Slip 1 st as if to K, K 1, psso. BUTTONHOLES: Dec for buttonholes from RS on left band (when garment is worn). 1 buttonhole = work 6 band sts as before, slip next to last st on right needle over outermost st on right needle, K 1, slip next to last st on right needle over outermost st on right needle (2 sts cast off), K the last 3 sts. On next row cast on 2 new sts over the cast off sts. Dec for buttonholes when piece measures: SIZE XS/S: 2, 12, 21, 31, 40 and 50 cm. SIZE M: 2, 12, 21, 31, 41 and 51 cm. Size L: 2, 12, 22, 32, 42 and 52 cm. SIZE XL: 3, 13, 23, 33, 43 and 53 cm. Size XXL: 3, 13, 23, 33, 43 and 54 cm. SIZE XXXL: 3, 13, 24, 34, 45 and 55 cm. ---------------------------------------------------------- JACKET: Worked back and forth on circular needle from mid front. BODY: Cast on 243-271-299-327-355-383 sts (incl 10 band sts in each side towards mid front) on circular needle size 3 mm with Karisma. P 1 row from WS. Work next row as follows from RS: 10 band sts in GARTER ST – see explanation above, A.1A (= 28 sts), * K 3, P 4 *, repeat from *-* 11-13-15-17-19-21 times in total, K 3, P 7 (= mid back), * K 3, P 4 *, repeat from *-* 11-13-15-17-19-21 times in total, K 3, A.2A (= 28 sts) and 10 band sts in garter st. Work back from WS with garter st over garter st, P over P, K over K. Continue rib until piece measures 8 cm, remember BUTTONHOLES on left band – see explanation above and KNITTING TIP. Work next row as follows from RS: 10 band sts as before, A.1B (= 28 sts dec to 25 sts), * K 3, P 2, P 2 tog *, repeat from *-* 11-13-15-17-19-21 times in total, K 3, P 2 tog, P 3, P 2 tog, * K 3, P 2, P 2 tog *, repeat from *-* 11-13-15-17-19-21 times in total, K 3, A.2B (= 28 sts dec to 25 sts) and 10 band sts as before = 213-237-261-285-309-333 sts. Work back from WS with garter st over garter st, P over P, K over K, (work A.1B and A.2B as shown in diagram). Switch to circular needle size 4 mm and work next row from RS as follows: 10 band sts as before, A.4 (= 25 sts), work A.3A over the next 72-84-96-108-120-132 sts (= 12-14-16-18-20-22 repetitions of 6 sts), work A.3B (= 5 sts), work A.3C over the next 66-78-90-102-114-126 sts (= 11-13-15-17-19-21 repetitions of 6 sts), work A.5 (= 25 sts) and finish with 10 band sts as before. Insert 1 marker in the 59th-65th-71st-77th-83rd-89th st in from each side (markers are in a st in garter st in the sides on body). Continue the pattern like this and move the markers upwards when working. REMEMBER THE KNITTING TENSION When piece measures 46-47-48-49-50-51 cm, cast off 7 sts in each side for armholes (i.e. cast off st with marker + 3 sts on each side of this). Then finish front and back piece separately. BACK PIECE: = 89-101-113-125-137-149 sts. Continue A.3 on back piece as before and cast off for armholes at beg of every row in each side as follows: Cast off 2 sts 0-0-2-5-5-7 times and 1 st 2-2-4-4-4-6 times = 85-97-97-97-109-109 sts. Continue to work until piece measures 66-68-70-72-74-76 cm. Now cast off the middle 23-27-27-27-29-29 sts for neck and finish each shoulder separately. Cast off 2 st on next row from neck = 29-33-33-33-38-38 sts remain on the shoulder. Continue to work until piece measures 68-70-72-74-76-78 cm and loosely cast off. Repeat on the other shoulder. LEFT FRONT PIECE: = 55-61-67-73-79-85 sts. Continue the pattern as before and cast off for armhole at beg of every row from the side as on back piece. AT THE SAME TIME when 2 rows have been worked after last buttonhole on band work 1 ridge (i.e. 2 rows K) over only the outermost 10 band sts towards mid front (do not work the other sts on row). Then work over all sts on row as before. AT THE SAME TIME inc 1 st for shawl collar towards mid front – READ INCREASE TIP-1. Inc like this every other row 18-18-18-20-20-20 times in total. AT THE SAME TIME when piece measures 52-53-54-55-56-57 cm (2 cm should now be worked after last buttonhole), dec 1 st for neckline towards mid front - READ DECREASE TIP. Dec like this every other row (i.e. every row from RS) a total of 10-12-12-12-13-13 times and then every 4th row (i.e. every other row from RS) 4 times in total in all sizes. After all inc and dec, there are 57-61-61-63-68-68 sts on needle. When piece measures 68-70-72-74-76-78 cm, cast off the outermost 29-33-33-33-38-38 sts on shoulder = 28-28-28-30-30-30 sts remain for collar. Continue back and forth in garter st over these sts as follows: * 1 ridge over all sts, 1 ridge over only the outermost 18-18-18-20-20-20 sts *, repeat from *-* until collar measures approx. 9-9-9-10-10-10 cm inside on the most narrow (collar measures approx. 18-18-18-20-20-20 cm at the edge on the widest). Cast off. RIGHT FRONT PIECE: Work as left but reversed. NOTE: Do not dec for buttonholes on right band. When working 1 ridge over only the outermost 10 sts towards mid front, adjust according to left front piece. SLEEVE: Cast on 56-56-63-63-63-70 sts on double pointed needles size 3 mm with Karisma. K 1 round. Work next round as follows: * K 3, P 4 *, repeat from *-* the entire round. When piece measures 6 cm, work next round as follows: * K 3, P 2, P 2 tog *, repeat from *-* the entire round = 48-48-54-54-54-60 sts. Switch to double pointed needles size 4 mm and work pattern in the round according to diagram A.3A. Insert 1 marker in last st on round (i.e. in st in garter st = mid under sleeve) and move the marker upwards. When piece measures 8 cm, inc 2 sts mid under sleeve - READ INCREASE TIP-2. Inc a total of 18-20-20-22-25-25 times in Size S: On every 7th round, in size M + L: On every 6th round, in size XL: On every 5th round, in size XXL: Alternately on every 4th and 5th round and size XXXL: On every 4th round = 84-88-94-98-104-110 sts. When piece measures 53-53-51-49-49-46 cm (NOTE: Shorter measurements in the larger sizes because of longer sleeve cap and wider shoulders) cast off the middle 7 sts under sleeve (cast off st with marker + 3 sts on each side of this). Now work sleeve cap back and forth on circular needle. Continue with the pattern while AT THE SAME TIME casting off at beg of every row in each side as follows: Cast off 3 sts 1 time, 2 sts 1-1-2-3-3-4 time and 1 st 2-2-3-3-3-6 times. Continue to cast off 2 sts in each side of piece until piece measures 59 cm in all sizes, cast off 3 sts 1 time in each side and cast off the remaining sts. Sleeve measures approx. 60 cm in all sizes. Knit another sleeve the same way. ASSEMBLY: Sew the shoulder seams. Sew collar tog mid back (make sure that seam is not visible when collar is folded down). Sew collar to neckline in the back of neck. Sew in sleeves. Sew the buttons on to the right band. |
|||||||||||||||||||
Diagram explanations |
|||||||||||||||||||
|
|||||||||||||||||||
 |
|||||||||||||||||||
 |
|||||||||||||||||||
 |
|||||||||||||||||||
Have you finished this pattern?Tag your pictures with #dropspattern #jacksoncardigan or submit them to the #dropsfan gallery. Do you need help with this pattern?You'll find 26 tutorial videos, a Comments/Questions area and more by visiting the pattern on garnstudio.com. © 1982-2026 DROPS Design A/S. We reserve all rights. This document, including all its sub-sections, has copyrights. Read more about what you can do with our patterns at the bottom of each pattern on our site. |
|||||||||||||||||||


With over 40 years in knitting and crochet design, DROPS Design offers one of the most extensive collections of free patterns on the internet - translated to 17 languages. As of today we count 324 catalogues and 12285 patterns translated into English (UK/cm). 12285
We work hard to bring you the best knitting and crochet have to offer, inspiration and advice as well as great quality yarns at incredible prices! Would you like to use our patterns for other than personal use? You can read what you are allowed to do in the Copyright text at the bottom of all our patterns. Happy crafting!
Post a comment to pattern DROPS 174-1
We would love to hear what you have to say about this pattern!
If you want to leave a question, please make sure you select the correct category in the form below, to speed up the answering process. Required fields are marked *.