
Popular categories
Looking for a yarn?


Comments / Questions (240)
![]() Yu Ting, Huang wrote:
Yu Ting, Huang wrote:
This comment is not related to knitting, but I still want suggest. My country is Taiwan. Taiwan is not a province of China. Please correct. Thank you.
29.01.2020 - 12:26
![]() Yu Ting wrote:
Yu Ting wrote:
How to do the binding off for armholes at beg of every row in each side? Thanks
29.01.2020 - 08:51DROPS Design answered:
Dear Mrs Ting, you cast off for armhole at the beginning of each row in each side, ie both at the beg of a right side row and at the beginning of the next wrong side row. Happy knitting!
29.01.2020 - 08:55
![]() Marie-Josee Picotte wrote:
Marie-Josee Picotte wrote:
Je suis embêtée sur les bordures de devants. Il y en a deux de chaque coté et dans l'astuce tricot les explications sont pour un au début du tricot sur l'endroit. Donc, je comprend que je tricote les dix premières mailles de bordure de devant en point mousse, je tourne, je glisse la première maille que j'ai tricoté, je serre le fil, et tricote les restantes. Ensuite je tourne mon travail et je tricote jusqu'à l'autre bordure de devants mais comment se tricote l'autre
29.01.2020 - 05:15DROPS Design answered:
Bonjour Mme Picotte, l'autre va se tricoter de la même façon: vous tricotez les 10 premières maille, vous tournez, glissez la 1ère m, tricotez les mailles restantes, tournez et tricotez le rang retour sur toutes les mailles. Vous avez ainsi tricoté 2 rangs sur les 10 premières mailles du devant droit (en commençant sur l'endroit) et 2 rangs sur les 10 premières mailles du devant gauche (en commençant sur l'envers) et 2 rangs sur toutes les mailles (= 1 aller-retour), soit 4 rangs sur les 10 premières m de chaque côté. Bon tricot!
29.01.2020 - 08:51
![]() Hanan Salah wrote:
Hanan Salah wrote:
Bonsoir Madame ,le 1er rang de A.1A, j'ai sur l'endroit: 3 m end (case blanche), 4 m env (point noir), 3 m end, 4 m env, 3 m end, 4 m env, 3 m end, 4 m env. Sur l'envers, le 2ème rang : 4 m end (point noir), 3 m env (case blanche), 4 m end, 3 m env, 4 m end, 3 m env, 4 m end, 3 m env , j'ai travaillé comme ça jusqu'a 8 cm , donc pour faire A.1B et A.2B j'ai les points noirs à l'endroit sur l'envers et les cases blanches j'ai endroit sur l'endroit c'est juste ?
26.01.2020 - 18:56DROPS Design answered:
Bonjour Mme Salah, ça a l'air juste. Le 1er rang de A.1B/A.2B va se tricoter sur l'endroit, les points noirs = à l'env sur l'endroit et les cases blanches = à l'endroit sur l'endroit. Bon tricot!
27.01.2020 - 09:46
![]() Marie-Josee Picotte wrote:
Marie-Josee Picotte wrote:
Bonjour, suite a votre réponse concernant les diagrammes je viens de me rendre compte que j'ai inversé les diagrammes du début( j ai commencer a gauche sur lendroi et vice versa). je suis encore rendu a la partie de l'ouvrage A.1A et A.2A ,pas encore A.1B ET A.2B mais je suis trop loin pour recommencer. Alors je me demande si je vais avoir le même résultats ou si je suis dans le pétrin et que dois je faire. (Surtout pour les torsades). Merci
22.01.2020 - 23:08DROPS Design answered:
Bonjour Mme Picotte, montrez votre ouvrage à votre magasin - même par mail - il pourra probablement vous trouver une solution plus facilement qu'ici. Sinon, la meilleure alternative est de recommencer, mais cette fois sur de meilleures bases. Relisez bien la page des diagrammes pour bien comprendre comment ils se lisent. Bon tricot!
23.01.2020 - 10:03
![]() Hanan Salah wrote:
Hanan Salah wrote:
BONJOUR MADAME ,dans A.1B et A.2B j'ai les points noirs à l'endroit sur l'envers et les cases blanches j'ai endroit sur l'endroit est ce que c'est juste ? Merci bcp
22.01.2020 - 06:46DROPS Design answered:
Bonjour Mme Salah, prenons le 1er rang de A.1A, vous allez le tricoter ainsi sur l'endroit: 3 m end (case blanche), 4 m env (point noir), 3 m end, 4 m env, 3 m end, 4 m env, 3 m end, 4 m env. Sur l'envers, vous allez tricoter le 2ème rang ainsi: 4 m end (point noir), 3 m env (case blanche), 4 m end, 3 m env, 4 m end, 3 m env, 4 m end, 3 m env. 1 case blanche = jersey endroit, 1 point noir = jersey envers. La 6ème maille de A.4 par ex va elle se tricoter au point mousse = à l'endroit sur l'endroit et à l'endroit sur l'envers. Bon tricot!
22.01.2020 - 09:56
![]() Hanan Salah wrote:
Hanan Salah wrote:
Bonsoir madame, je suis vraiment perdue, Au rang retour sur l'envers, tricoter au point mousse au-dessus du point mousse, les m env à l'env et les m end à l'end, (tricoter A.1B et A.2B ) où sont les points mousses sur ce rang puisque j'ai toujours 3 mailles envers et 3 mailles endroit à part AB1 et AB2 ? 2- Pour commencer A1B et A2B il faut faire envers sur l'endroit et endroit sur l'envers ( les points noirs) excusez moi car je suis débutante et merci beaucoup
20.01.2020 - 22:28DROPS Design answered:
Bonjour Mme Salah, tricotez simplement les diagrammes comme ils sont expliqués dans la légende: dans A.1B et A.2B vous tricotez les points noirs à l'endroit sur l'envers et les cases blanches à l'envers sur l'envers. Les seules mailles point mousse des diagrammes seront dans A.4, A.5 et A.3 (1 case blanche sur l'endroit et 1 point noir sur l'envers), cf également les réponses précédentes. Bon tricot!
21.01.2020 - 10:01
![]() Hanan Salah wrote:
Hanan Salah wrote:
C'est moi encore , je crois que mon erreur est sur ce rang , (Au rang retour sur l'envers, tricoter au point mousse au-dessus du point mousse, les m env à l'env et les m end à l'end) quels sont les points mousses sur ce rang ? ils sont ceux de du bord seulement ?
20.01.2020 - 12:49DROPS Design answered:
Bonjour Mme Salah, les mailles point mousse sont celles de A.3, de A. 4 et de A.5 qui se tricotent à l'endroit sur l'endroit (case blanche) et à l'endroit sur l'envers (point noir sur les rangs envers). Bon tricot!
20.01.2020 - 13:13
![]() Hanan Salah wrote:
Hanan Salah wrote:
Bonjour Madame , en rang envers , faut il faire A.3C sur les 66-78-90-102-114-126 m suivantes (= 11-13-15-17-19-21 motifs de 6 m) et A.3A sur les 72-84-96-108-120-132 m suivantes ? ou comme elles sont présentes dans le diagramme sur les 17 mailles ?
20.01.2020 - 12:40DROPS Design answered:
Bonjour Mme Salah, sur l'envers vous tricotez en lisant les diagrammes de gauche à droite: 10 m de bordure, A.5, A.3C sur les 66-126 m suivantes, A.3B (on lit toujours de gauche à droite), A.4A sur les 72-132 m, A.4 et 10 m de bordure comme avant. Vous tricotez les mailles comme elles sont indiquées dans le diagramme: 1 case blanche se tricote à l'envers sur l'envers et 1 point noir se tricote à l'endroit sur l'envers. Bon tricot!
20.01.2020 - 13:08
![]() Hanan Salah wrote:
Hanan Salah wrote:
Bonjour Madame, est ce qu'il faut faire chaque rang envers A5, A3C,A3B, A3A,A4 , après avoir fait le A5, faut il faire toutes les mailles comme elles se présentent ? car au 2ème rang A3b il faut faire le point noir endroit sur l'envers et envers sur l'endroit , ça me donne pas le même résulat que le dessin du modèle , où est l'erreur ? merci beaucoup
19.01.2020 - 13:49DROPS Design answered:
Bonjour Mme Salah, sur l'envers, vous tricotez les diagrammes en sens inverse et en les lisant de gauche à droite, soit ainsi: A.3C: 5 m env, 1 m end (le point noir). A.3B = 5 m envers, A.3A (= 1 m end (le point noir), 5 m env. Le point noir va créer une maille point mousse entre les 5 m jersey. Bon tricot!
20.01.2020 - 09:40
|
|||||||||||||||||||
Jackson#jacksoncardigan |
|||||||||||||||||||
 |
 |
||||||||||||||||||
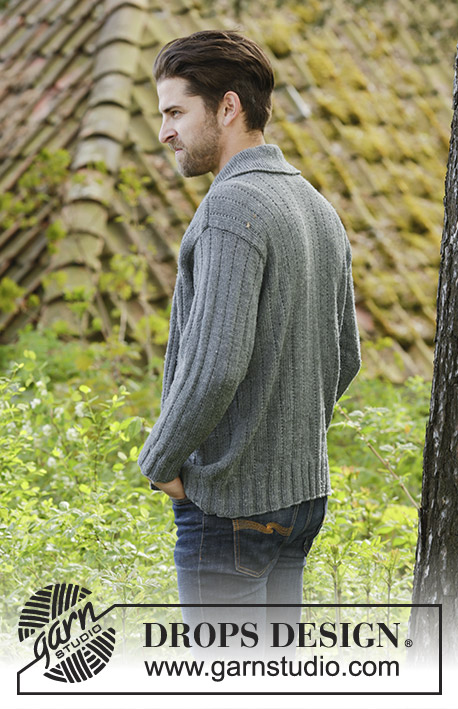
Knitted DROPS men’s jacket with simple cable, textured pattern and shawl collar in Karisma. Size: XS - XXXL.
DROPS 174-1 |
|||||||||||||||||||
|
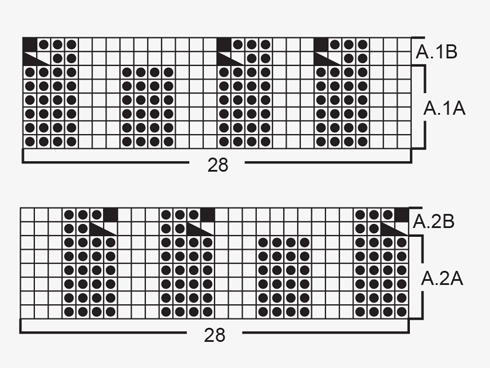
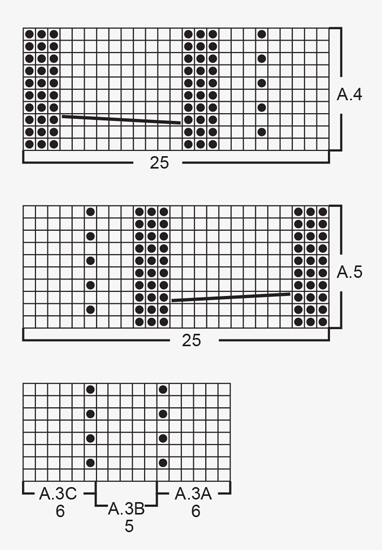
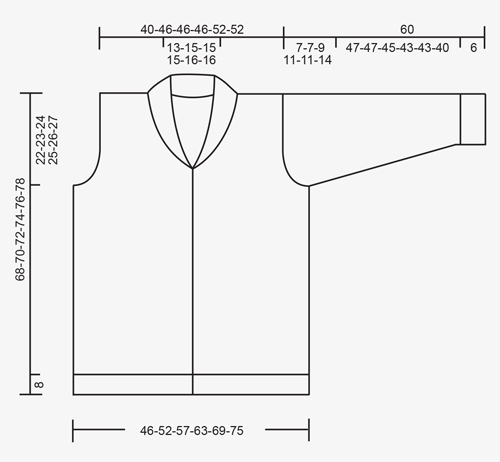
GARTER ST (back and forth): K all rows. 1 ridge = 2 rows K. PATTERN: See diagrams A.1 to A.5. The diagrams show all rows in pattern seen from RS. KNITTING TIP (applies to bands): To keep the bands from contracting vertically work short rows over bands as follows: * Beg mid front and K the outermost 10 sts (= band), turn piece, slip 1st st as if to K, tighten yarn and K the rest of row *, repeat from *-* after approx. every 10 rows in piece. INCREASE TIP-1 (applies to shawl collar): Inc 1 st in next to last st towards mid front by K in front and back loop of same st. INCREASE TIP-2 (applies to mid under sleeve): Inc 1 st on each side of st with marker mid under sleeve. Inc 1 st by making 1 YO, on next round work YO twisted to avoid holes. Work the inc sts in the pattern A.3. DECREASE TIP (applies to neckline): Dec inside 10 band sts in garter st + inc sts for shawl collar. All dec are done from RS! Dec as follows before band + collar: K 2 tog. Dec as follows after collar + band: Slip 1 st as if to K, K 1, psso. BUTTONHOLES: Dec for buttonholes from RS on left band (when garment is worn). 1 buttonhole = work 6 band sts as before, slip next to last st on right needle over outermost st on right needle, K 1, slip next to last st on right needle over outermost st on right needle (2 sts cast off), K the last 3 sts. On next row cast on 2 new sts over the cast off sts. Dec for buttonholes when piece measures: SIZE XS/S: 2, 12, 21, 31, 40 and 50 cm. SIZE M: 2, 12, 21, 31, 41 and 51 cm. Size L: 2, 12, 22, 32, 42 and 52 cm. SIZE XL: 3, 13, 23, 33, 43 and 53 cm. Size XXL: 3, 13, 23, 33, 43 and 54 cm. SIZE XXXL: 3, 13, 24, 34, 45 and 55 cm. ---------------------------------------------------------- JACKET: Worked back and forth on circular needle from mid front. BODY: Cast on 243-271-299-327-355-383 sts (incl 10 band sts in each side towards mid front) on circular needle size 3 mm with Karisma. P 1 row from WS. Work next row as follows from RS: 10 band sts in GARTER ST – see explanation above, A.1A (= 28 sts), * K 3, P 4 *, repeat from *-* 11-13-15-17-19-21 times in total, K 3, P 7 (= mid back), * K 3, P 4 *, repeat from *-* 11-13-15-17-19-21 times in total, K 3, A.2A (= 28 sts) and 10 band sts in garter st. Work back from WS with garter st over garter st, P over P, K over K. Continue rib until piece measures 8 cm, remember BUTTONHOLES on left band – see explanation above and KNITTING TIP. Work next row as follows from RS: 10 band sts as before, A.1B (= 28 sts dec to 25 sts), * K 3, P 2, P 2 tog *, repeat from *-* 11-13-15-17-19-21 times in total, K 3, P 2 tog, P 3, P 2 tog, * K 3, P 2, P 2 tog *, repeat from *-* 11-13-15-17-19-21 times in total, K 3, A.2B (= 28 sts dec to 25 sts) and 10 band sts as before = 213-237-261-285-309-333 sts. Work back from WS with garter st over garter st, P over P, K over K, (work A.1B and A.2B as shown in diagram). Switch to circular needle size 4 mm and work next row from RS as follows: 10 band sts as before, A.4 (= 25 sts), work A.3A over the next 72-84-96-108-120-132 sts (= 12-14-16-18-20-22 repetitions of 6 sts), work A.3B (= 5 sts), work A.3C over the next 66-78-90-102-114-126 sts (= 11-13-15-17-19-21 repetitions of 6 sts), work A.5 (= 25 sts) and finish with 10 band sts as before. Insert 1 marker in the 59th-65th-71st-77th-83rd-89th st in from each side (markers are in a st in garter st in the sides on body). Continue the pattern like this and move the markers upwards when working. REMEMBER THE KNITTING TENSION When piece measures 46-47-48-49-50-51 cm, cast off 7 sts in each side for armholes (i.e. cast off st with marker + 3 sts on each side of this). Then finish front and back piece separately. BACK PIECE: = 89-101-113-125-137-149 sts. Continue A.3 on back piece as before and cast off for armholes at beg of every row in each side as follows: Cast off 2 sts 0-0-2-5-5-7 times and 1 st 2-2-4-4-4-6 times = 85-97-97-97-109-109 sts. Continue to work until piece measures 66-68-70-72-74-76 cm. Now cast off the middle 23-27-27-27-29-29 sts for neck and finish each shoulder separately. Cast off 2 st on next row from neck = 29-33-33-33-38-38 sts remain on the shoulder. Continue to work until piece measures 68-70-72-74-76-78 cm and loosely cast off. Repeat on the other shoulder. LEFT FRONT PIECE: = 55-61-67-73-79-85 sts. Continue the pattern as before and cast off for armhole at beg of every row from the side as on back piece. AT THE SAME TIME when 2 rows have been worked after last buttonhole on band work 1 ridge (i.e. 2 rows K) over only the outermost 10 band sts towards mid front (do not work the other sts on row). Then work over all sts on row as before. AT THE SAME TIME inc 1 st for shawl collar towards mid front – READ INCREASE TIP-1. Inc like this every other row 18-18-18-20-20-20 times in total. AT THE SAME TIME when piece measures 52-53-54-55-56-57 cm (2 cm should now be worked after last buttonhole), dec 1 st for neckline towards mid front - READ DECREASE TIP. Dec like this every other row (i.e. every row from RS) a total of 10-12-12-12-13-13 times and then every 4th row (i.e. every other row from RS) 4 times in total in all sizes. After all inc and dec, there are 57-61-61-63-68-68 sts on needle. When piece measures 68-70-72-74-76-78 cm, cast off the outermost 29-33-33-33-38-38 sts on shoulder = 28-28-28-30-30-30 sts remain for collar. Continue back and forth in garter st over these sts as follows: * 1 ridge over all sts, 1 ridge over only the outermost 18-18-18-20-20-20 sts *, repeat from *-* until collar measures approx. 9-9-9-10-10-10 cm inside on the most narrow (collar measures approx. 18-18-18-20-20-20 cm at the edge on the widest). Cast off. RIGHT FRONT PIECE: Work as left but reversed. NOTE: Do not dec for buttonholes on right band. When working 1 ridge over only the outermost 10 sts towards mid front, adjust according to left front piece. SLEEVE: Cast on 56-56-63-63-63-70 sts on double pointed needles size 3 mm with Karisma. K 1 round. Work next round as follows: * K 3, P 4 *, repeat from *-* the entire round. When piece measures 6 cm, work next round as follows: * K 3, P 2, P 2 tog *, repeat from *-* the entire round = 48-48-54-54-54-60 sts. Switch to double pointed needles size 4 mm and work pattern in the round according to diagram A.3A. Insert 1 marker in last st on round (i.e. in st in garter st = mid under sleeve) and move the marker upwards. When piece measures 8 cm, inc 2 sts mid under sleeve - READ INCREASE TIP-2. Inc a total of 18-20-20-22-25-25 times in Size S: On every 7th round, in size M + L: On every 6th round, in size XL: On every 5th round, in size XXL: Alternately on every 4th and 5th round and size XXXL: On every 4th round = 84-88-94-98-104-110 sts. When piece measures 53-53-51-49-49-46 cm (NOTE: Shorter measurements in the larger sizes because of longer sleeve cap and wider shoulders) cast off the middle 7 sts under sleeve (cast off st with marker + 3 sts on each side of this). Now work sleeve cap back and forth on circular needle. Continue with the pattern while AT THE SAME TIME casting off at beg of every row in each side as follows: Cast off 3 sts 1 time, 2 sts 1-1-2-3-3-4 time and 1 st 2-2-3-3-3-6 times. Continue to cast off 2 sts in each side of piece until piece measures 59 cm in all sizes, cast off 3 sts 1 time in each side and cast off the remaining sts. Sleeve measures approx. 60 cm in all sizes. Knit another sleeve the same way. ASSEMBLY: Sew the shoulder seams. Sew collar tog mid back (make sure that seam is not visible when collar is folded down). Sew collar to neckline in the back of neck. Sew in sleeves. Sew the buttons on to the right band. |
|||||||||||||||||||
Diagram explanations |
|||||||||||||||||||
|
|||||||||||||||||||
 |
|||||||||||||||||||
 |
|||||||||||||||||||
 |
|||||||||||||||||||
Have you finished this pattern?Tag your pictures with #dropspattern #jacksoncardigan or submit them to the #dropsfan gallery. Do you need help with this pattern?You'll find 26 tutorial videos, a Comments/Questions area and more by visiting the pattern on garnstudio.com. © 1982-2026 DROPS Design A/S. We reserve all rights. This document, including all its sub-sections, has copyrights. Read more about what you can do with our patterns at the bottom of each pattern on our site. |
|||||||||||||||||||


With over 40 years in knitting and crochet design, DROPS Design offers one of the most extensive collections of free patterns on the internet - translated to 17 languages. As of today we count 324 catalogues and 12285 patterns translated into English (UK/cm). 12285
We work hard to bring you the best knitting and crochet have to offer, inspiration and advice as well as great quality yarns at incredible prices! Would you like to use our patterns for other than personal use? You can read what you are allowed to do in the Copyright text at the bottom of all our patterns. Happy crafting!
Post a comment to pattern DROPS 174-1
We would love to hear what you have to say about this pattern!
If you want to leave a question, please make sure you select the correct category in the form below, to speed up the answering process. Required fields are marked *.