
Looking for a yarn?


Comments / Questions (18)
![]() Loredana Brusamolino wrote:
Loredana Brusamolino wrote:
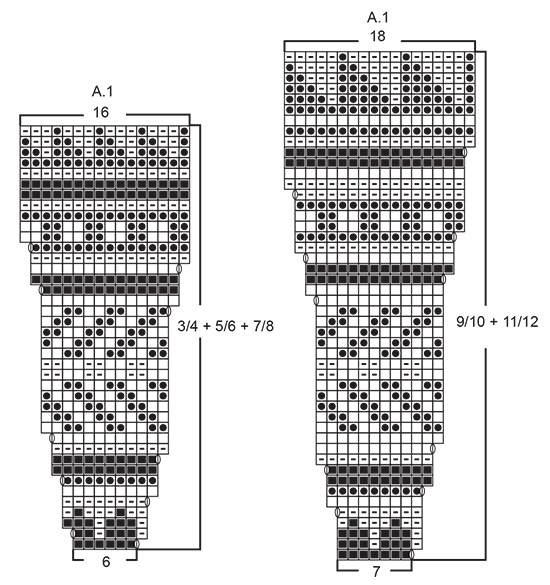
Sto eseguendo il modello nella taglia 3/4 anni e ho difficoltà ad eseguire il motivo jacard. Quando è scritto "eseguire la 1' maglia in A1 ......" si deve iniziare dalla 1' maglia sul ferro o dalla prima dopo le 4 del bordo? Grazie
24.01.2019 - 18:41DROPS Design answered:
Buonasera Loredana. Lavora il motivo jacquard in questo modo: 4 m a legaccio, ripete A1 (leggendo il diagramma dal basso verso l’alto e da destra verso sinistra) finché non rimangono 5 m, la maglia successiva la lavora come indicato per la prima maglia di A1 e finisce con 4 m a legaccio. Buon lavoro!
24.01.2019 - 20:25
![]() Angelika Hanisch wrote:
Angelika Hanisch wrote:
Hallo, Leider verstehe ich die Zunahme beim Diagramm A1 nicht. Ich sehe nur 10 Umschläge. Wie kommt ihr auf 217 Maschen am Ende des Diagramms bei Größe 3/4? Danke schon mal im Voraus
19.10.2018 - 10:52DROPS Design answered:
Liebe Frau Hanisch, bei der 1. Größe haben Sie 87 M, die stricken wie so: 4 M kraus re, 13 x A.1 (= 6 M in der 1. Reihe), die erste M in A.1 und 4 M kraus re. In jedem A.1 werden Sie je 10 M zunehmen, nach der letzten Zunahmen haben Sie: 4 M kraus re, 13 x A.1 (= 16 M), die erste M A.1, 4 M kraus re = 4 + 13x16 + 1 + 4 = 217 M. Viel Spaß beim stricken!
19.10.2018 - 11:01
![]() Dani wrote:
Dani wrote:
Guten Tag Sind die beidseitigen je 4 Blendenmaschen in der Zahl die angegeben wird enthalten? Und gilt das dann immer inklusive oder exklusive…z.B wenn man nach der Passe den Rumpfteil strickt…
08.10.2018 - 12:26DROPS Design answered:
Liebe Dani, die Blendemaschen sind in den gesamten angegebenen Maschenanzahl inbegriffen, dh wenn Sie 94-98-102-110-118 Maschen anschlagen, sind die beidseitigen 4 Blendemaschen inbegriffen, die sollen Sie nicht extra anschlagen. Viel Spaß beim stricken!
08.10.2018 - 14:18
![]() Myriam LEPAGE wrote:
Myriam LEPAGE wrote:
Bonjour, j ai réalisé ce modèle avec plaisir, mais lorsque je l ai lavé je suis passée d\\\'une taille 5 ans à une taille d \\\'environ 8/10 ans pourtant j ai respecté les consignes de lavage en faisant une lessive à 20° , pas de soupline et séchage à plat, peut on revenir à la taille initiale et si oui comment?
02.10.2018 - 14:20DROPS Design answered:
Bonjour Mme Lepage, DROPS Merino Extra Fine est traitée Superwash et passe ainsi en machine sur programme délicat, à 40°C - cf nuancier et étiquette. Vous trouverez ici des informations complémentaires sur l'entretien, n'hésitez pas à contacter votre magasin DROPS, il saura vous conseiller.
02.10.2018 - 16:03
![]() Susan Haugaard wrote:
Susan Haugaard wrote:
Hej, Jeg forstår ikke helt teksten ved bærestykket : Når der skal tages ud, er det så hver gang efter 7 masker? For jeg kan ikke få det til at passe med maskeantallet. Vil ende med kun at have 234 masker (str 9/10) i stedet for 261. Anden gang der skal tages ud, strikker jeg 8 masker, derefter udtagning, og så fremdeles, er det ikke korrekt?
13.07.2018 - 23:36DROPS Design answered:
Hei Susan. Du skal øke som angitt i diagram A.1, så hvilken omgang du er på avgjør hvor mange masker det er mellom økingene. På 1 omgang økes det på starten av hver rapport, altså med 7 maskers mellomrom. Neste øking er 5 omgang, og da økes det på slutten av hver rapport, altså med 8 maskers mellomrom. Som du kan se på diagrammet er det 18 masker i hver rapport når A.1 er strikket ferdig i høyden. Siden man starter med 7 masker i hver rapport har man økt totalt 11 masker i hver A.1. Det er 14 rapporter av A.1 på omgangen: 14 x 11 = 154 masker økt. Om man legger de til de originale 107 maskene får man 261 masker. God fornøyelse.
18.07.2018 - 09:20
![]() Schatt K. wrote:
Schatt K. wrote:
Guten Tag, Ich habe eine Frage zum Muster A1. Gilt das Muster nur für die Hin R und auf der Rück R wird glatt rechts gestrickt? Das Muster A1 ist von unten links her zu starten, oder? Freundliche Grüße K.S.
10.11.2017 - 06:59DROPS Design answered:
Liebe Frau Schatt, Diagram wird bei den Hinreihen von unten rechts nach links und bei den Rückreihen von links nach rechts gelesen. 1 Kästchen = 1 M x 1 Reihe, dh die Rückreihen sind im Diagram eingeschlossen. Viel Spaß beim stricken!
10.11.2017 - 08:06
![]() Monica Lippstreu wrote:
Monica Lippstreu wrote:
Ich stricke mit Begeisterung nach Ihrer Anleitung! Habe aber gestutzt, als ich den Gesamtteil in grau, die Ärmel aber in hellblau weiterstricken sollte: Passe: Die Arb nun glatt re mit hellgrau weiterstr, dabei zuerst 1 Hin-R re str Ärmel: DIE ARB WIRD NUN AB HIER GEMESSEN! Glatt re mit hellblau in Rd str. Danke für die Bereitstellung der Strickmuster! Mit herzlichen Grüßen aus München! Monica Lippstreu
12.07.2017 - 07:35
![]() Anke Crielaard wrote:
Anke Crielaard wrote:
In de 3e naald van het telpatroon begin je met een afwijkende kleur (lichtgrijs). Er staat dat je de voorbies in de kleur van het patroon moet breien. Het advies is om van kleur te wisselen ná de voorbies, maar hoe kan ik de voorbies dan in kleur breien?
15.12.2016 - 20:03DROPS Design answered:
Hoi Anke. Je breit ook de voorbies in de patroonkleur - zie foto :)
16.12.2016 - 14:25
|
|||||||||||||||||||
Little Adventure Jacket#littleadventurejacket |
|||||||||||||||||||
 |
 |
||||||||||||||||||
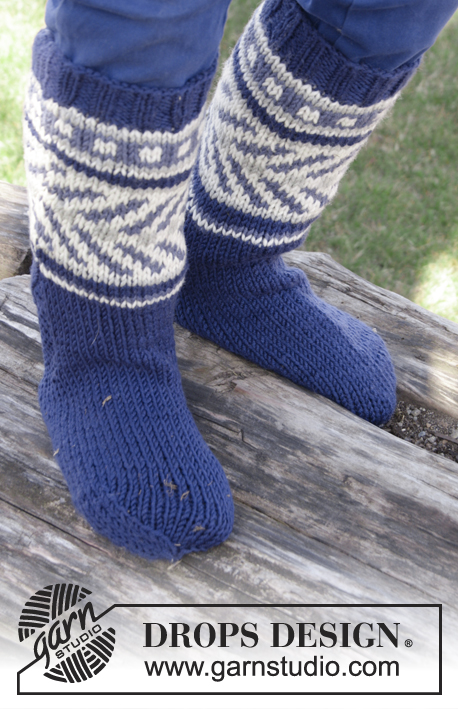
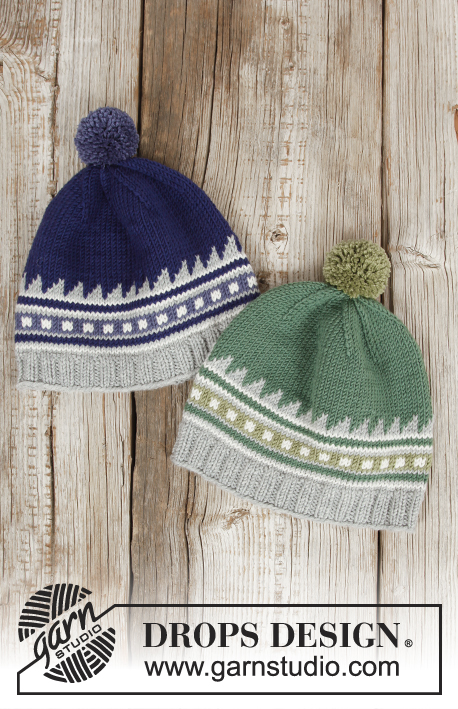
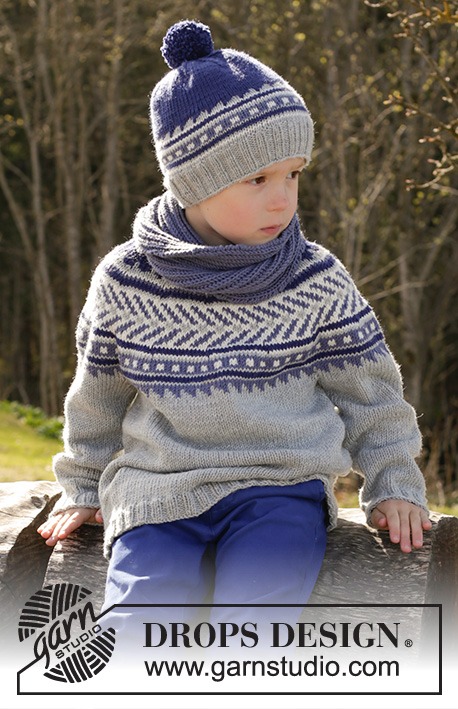
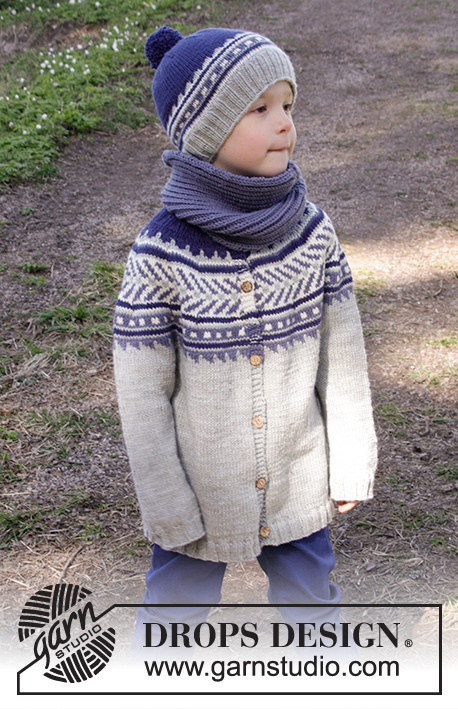
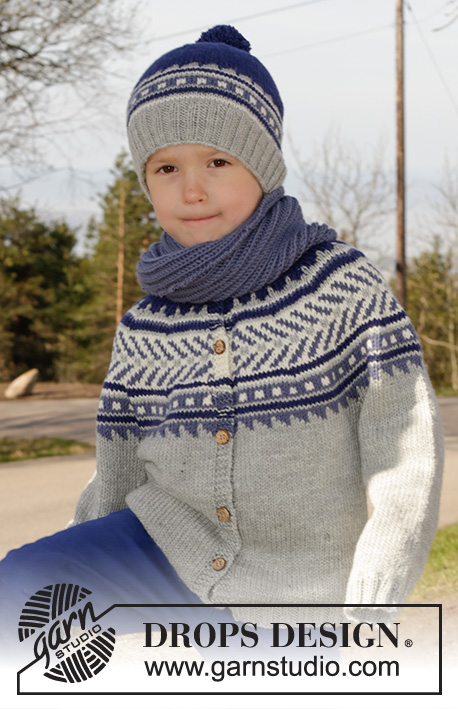
Knitted jacket worked top down with round yoke and multi-coloured pattern in DROPS Merino Extra Fine. Size children 3 - 12 years
DROPS Children 27-31 |
|||||||||||||||||||
|
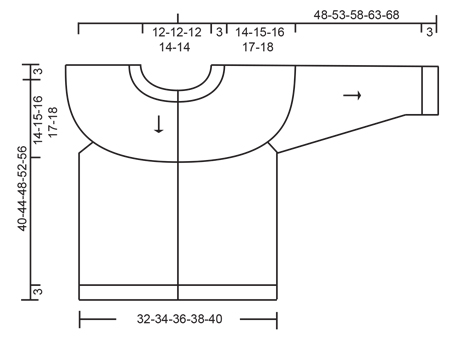
GARTER ST (back and forth): K all rows. 1 ridge = 2 rows K. PATTERN: See diagram A.1 - NOTE: Choose diagram for correct size. Work entire pattern in stocking st. KNITTING TIP (applies to bands): On the rows where there are either stripes or pattern border work the colour in the stripes or the base colour of pattern border also over the 4 band sts in each side but do yarn change between band and body (to avoid fastening the yarn on band). INCREASE TIP: Inc 1 st with a YO, on next row work YO twisted to avoid holes. DECREASE TIP (applies to mid under sleeve): Dec 1 st on each side of marker as follows: Beg 3 sts before marker and K 2 tog, K 2 (marker is between these 2 sts), slip 1 st as if to K, K 1, psso (= 2 sts dec). BUTTONHOLES: Dec for buttonholes on right band (when garment is worn). 1 button hole = beg from WS and K tog second and third st from edge and make 1 YO. On next round K the YO to make a hole. Dec for buttonholes when piece measures: SIZE 3/4 YEARS: 2, 9, 16, 23, 30 and 37 cm. SIZE 5/6 YEARS: 2, 10, 18, 26, 34 and 42 cm. SIZE 7/8 YEARS: 2, 9, 17, 24, 32, 39 and 46 cm SIZE 9/10 YEARS: 2, 10, 18, 26, 34, 42 and 50 cm SIZE 11/12 YEARS: 2, 11, 19, 28, 36, 45 and 53 cm ---------------------------------------------------------- JACKET: Work back and forth on circular needle from mid front, work top down. YOKE: Cast on 94-98-102-110-118 sts (incl 4 band sts in each side towards mid front) on a circular needle size 3 mm with dark blue. P 1 row from WS. Work next row as follows from RS: 4 band sts in GARTER ST - see explanation above - * K 2, P 2 *, repeat from *-* until 6 sts remain on needle, finish with K 2 and 4 bands sts in garter st. Continue rib like this for 3 cm – remember BUTTONHOLES on right band – see explanation above and finish after 1 row from RS (= neck edge). Switch to circular needle size 4 mm. P 1 row from WS while dec 7-5-3-3-4 sts evenly (do not dec over bands) = 87-93-99-107-114 sts. Then work an elevation at the back in stocking st as follows: K until 8-10-10-12-12 sts remain on row, turn, tighten yarn and P until 8-10-10-12-12 sts in the other side, turn, tighten yarn and K until 16-18-18-20-20 sts, turn, tighten yarn and P until 16-18-18-20-20 sts in the other side. Continue to working 8 sts less on every turn 2 more times in each side, turn, tighten yarn and K the rest of row, then P 1 row from WS (work bands in garter st). Work next row as follows from RS: 4 band sts in garter st, work pattern according to diagram A.1 until 5 sts remain on row - NOTE: Choose diagram for correct size (= 13-14-15-14-15 repetitions of 6-6-6-7-7 sts), work first st in A.1 (so that pattern beg and ends the same way inside band in each) and finish with 4 band sts in garter st. Continue pattern like this and inc as shown in diagram (do not inc the extra st at the end of row before band) – READ KNITTING TIP, REMEMBER KNITTING TENSION. When A.1 has been worked, there are 217-233-249-261-279 sts on needle. Work 0-1-2-0-1 cm with light grey. Piece now measures approx. 14-15-16-17-18 cm mid front (measured without rib in the neck). Finish piece in stocking st with light grey. First K 1 row from RS while inc 4-4-4-12-10 sts evenly - READ INCREASE TIP (do not inc over bands) = 221-237-253-273-289 sts. Work next row as follows from WS: Work 35-37-39-41-43 sts as before, slip the next 44-48-52-58-62 sts on 1 stitch holder for sleeve (without working them first), cast on 6 new sts on row, work 63-67-71-75-79 sts (= back piece), slip the next 44-48-52-58-62 sts on 1 stitch holder for sleeve (without working them first), cast on 6 new sts on row and work 35-37-39-41-43 sts as before. BODY: = 145-153-161-169-177 sts. NOW MEASURE PIECE FROM HERE! Continue back and forth in stocking st with 4 band sts in garter st in each side for 23-26-29-32-35 cm. Switch to circular needle size 3 mm. P 1 row from WS while inc 13-13-13-17-17 sts evenly (continue bands in garter st and do not inc over bands) = 158-166-174-186-194 sts. Work next row as follows from RS: 4 band sts in garter st, * K 2, P 2 *, repeat from *-* until 6 sts remain on needle, finish with K 2 and 4 bands sts in garter st. Continue rib like this for 3 cm, then LOOSELY cast off with garter st over garter st, K over K and P over P. Entire jacket now measures approx. 40-44-48-52-56 cm mid front (measured without rib in the neck). SLEEVE: Slip sts from one stitch holder on double pointed needles size 4 mm, pick in addition up 1 st in each of the 6 sts cast on in the side of body (insert 1 marker in the middle of these new sts = mid under sleeve) = 50-54-58-64-68 sts on row. NOW MEASURE PIECE FROM HERE! Work in stocking st in the round with light grey. When sleeve measures 2 cm, dec 2 sts mid under sleeve - READ DECREASE TIP. Dec like this every 3-2½-3-2½-2½ cm a total of 7-9-10-13-14 times = 36-36-38-38-40 sts. When sleeve measures 22-26-30-33-37 cm, inc 4-4-6-6-8 sts evenly = 40-40-44-44-48 sts. Switch to double pointed needle size 3 mm and work rib in the round = K 2/P 2 for 3 cm, then LOOSELY cast off with K over K and P over P. Work the other sleeve the same way. ASSEMBLY: Sew the buttons on to the left band. |
|||||||||||||||||||
Diagram explanations |
|||||||||||||||||||
|
|||||||||||||||||||
 |
|||||||||||||||||||
 |
|||||||||||||||||||
Have you finished this pattern?Tag your pictures with #dropspattern #littleadventurejacket or submit them to the #dropsfan gallery. Do you need help with this pattern?You'll find 30 tutorial videos, a Comments/Questions area and more by visiting the pattern on garnstudio.com. © 1982-2025 DROPS Design A/S. We reserve all rights. This document, including all its sub-sections, has copyrights. Read more about what you can do with our patterns at the bottom of each pattern on our site. |
|||||||||||||||||||


With over 40 years in knitting and crochet design, DROPS Design offers one of the most extensive collections of free patterns on the internet - translated to 17 languages. As of today we count 320 catalogues and 12092 patterns translated into English (UK/cm). 12092
We work hard to bring you the best knitting and crochet have to offer, inspiration and advice as well as great quality yarns at incredible prices! Would you like to use our patterns for other than personal use? You can read what you are allowed to do in the Copyright text at the bottom of all our patterns. Happy crafting!
Post a comment to pattern DROPS Children 27-31
We would love to hear what you have to say about this pattern!
If you want to leave a question, please make sure you select the correct category in the form below, to speed up the answering process. Required fields are marked *.