
Looking for a yarn?


Comments / Questions (29)
![]() Christine Isnard wrote:
Christine Isnard wrote:
Pour le tour de cou, Combien de fois faut il tricoter A.3A et A.3B en hauteur? Ou bien à combien de cm faut il commencer les côtes? J' ai visionné la vidéo et relu plusieurs fois les explications mais cela n'est mentionné nulle part... Merci pour votre réponse.
23.12.2016 - 10:05DROPS Design answered:
Bonjour Mme Isnard, on répète A.3a et A.4b jusqu'à ce que toutes les augmentations soient faites (ou, en fonction de la longueur souhaitée, il doit rester 5 cm avant la hauteur totale). Bon tricot!
29.12.2016 - 13:19
![]() Emelie wrote:
Emelie wrote:
Det är vanten jag tänker på. /Emelie
05.12.2016 - 19:51DROPS Design answered:
Hej Emelie, jo förskjutningen av mönstret börjar först efter 2 varv av mönstret och då hinner du med alla 12 tills du är klar med mönstret. Lycka till!
16.03.2017 - 11:23
![]() Emelie wrote:
Emelie wrote:
Jag undrar om det verkligen är 12 förskjutningar? Jag tycker att det borde vara 14. Första maskan av de 7 borde bli den maskan som minskas först då arbetet börjar minskas. Annars blir minskningen "mitt i flätan". Har jag rätt eller ska det verkligen vara 12 förskjutningar? Mvh, Emelie
04.12.2016 - 19:29DROPS Design answered:
Hej Emelie. Er det huen, vanterne eller halsen du mener? Tak!
05.12.2016 - 14:32
![]() Anne wrote:
Anne wrote:
Er staat, zoals eerder al aangegeven, een fout in het patroon bij de uitleg van de rechterwant: "als het patroon wordt verschoven, meerder dan voor de eerste markeerder en na de 2e markeerder". Bij de rechterwant moet er geminderd worden voor de eerste markeerder en gemeerderd na de tweede markeerder om het patroon te laten kloppen. Jammer dat ik dat na een foutieve aanwijzing van jullie kant zelf heb moeten uitvinden.
17.11.2016 - 10:38DROPS Design answered:
Hoi Anne. Ik zal een notitie maken en laten nakijken of het fout is. Ja, dat kan gebeuren, we zijn maar mensen en ook niet altijd "foutvrij" ;) Fijne dag verder!
17.11.2016 - 13:58
![]() Anne wrote:
Anne wrote:
Ik ben bezig met het breien van de wanten. De linkerwant is volledig af, en nu ben ik net begonnen met de rechterwant. Nu staat er in de beschrijving het volgende: "Als het patroon wordt verschoven, meerder dan voor de eerste markeerder en na de 2e markeerder". Het lijkt me niet de bedoeling dat er twee keer gemeerderd wordt, en nu vraag ik me af waar er nou precies gemeerderd en geminderd moet worden bij de rechterwant. Alvast bedankt.
12.11.2016 - 21:20DROPS Design answered:
Hoi Anne. Je hebt nu het patroon aan het einde van de nld en je meerdert voor de eerste markeerder en je mindert na de laatste markeerder. Het is maar een uitleg over hoe je meerdert bij de rechterwant - het is niet dubbel.
14.11.2016 - 14:57
![]() Cobi wrote:
Cobi wrote:
Hartelijk dank voor het snelle antwoord. Ik las het telpatroon verkeerd.
18.08.2016 - 13:57
![]() Cobi Walter wrote:
Cobi Walter wrote:
Bij de halswarmer: na de boordsteek ga verder " 3 steken in gerstekorrel ...... t/m .....einde regel, Houd ik steken over want: 8 steken A3A of A3B zijn maar 6 steken van de brienaald. Graag uitleg !
17.08.2016 - 09:27DROPS Design answered:
A.3A en A.3B zijn 8 steken op de breinaald, niet zes. De eerste nld van A.3A breit u bijvoorbeeld als volgt: 1 omslag, 2 av, 1 r, 1 omslag, 1 r, 2 av, 1 omslag, 1 r afh, 1 r, afgeh st overh. Dus u breit over 8 steken, maakt er 3 st bij (omslagen) en mindert 1 st (aan het eind), zodat u na deze nld 10 st hebt.
17.08.2016 - 10:20
![]() Corbel Jocelyne wrote:
Corbel Jocelyne wrote:
Superbe modele
19.06.2016 - 19:59
![]() Paninnguaq Ane Jørgensen Davidsen wrote:
Paninnguaq Ane Jørgensen Davidsen wrote:
Fantastisk sæt
11.06.2016 - 21:55
|
|||||||||||||||||||||||||||||||
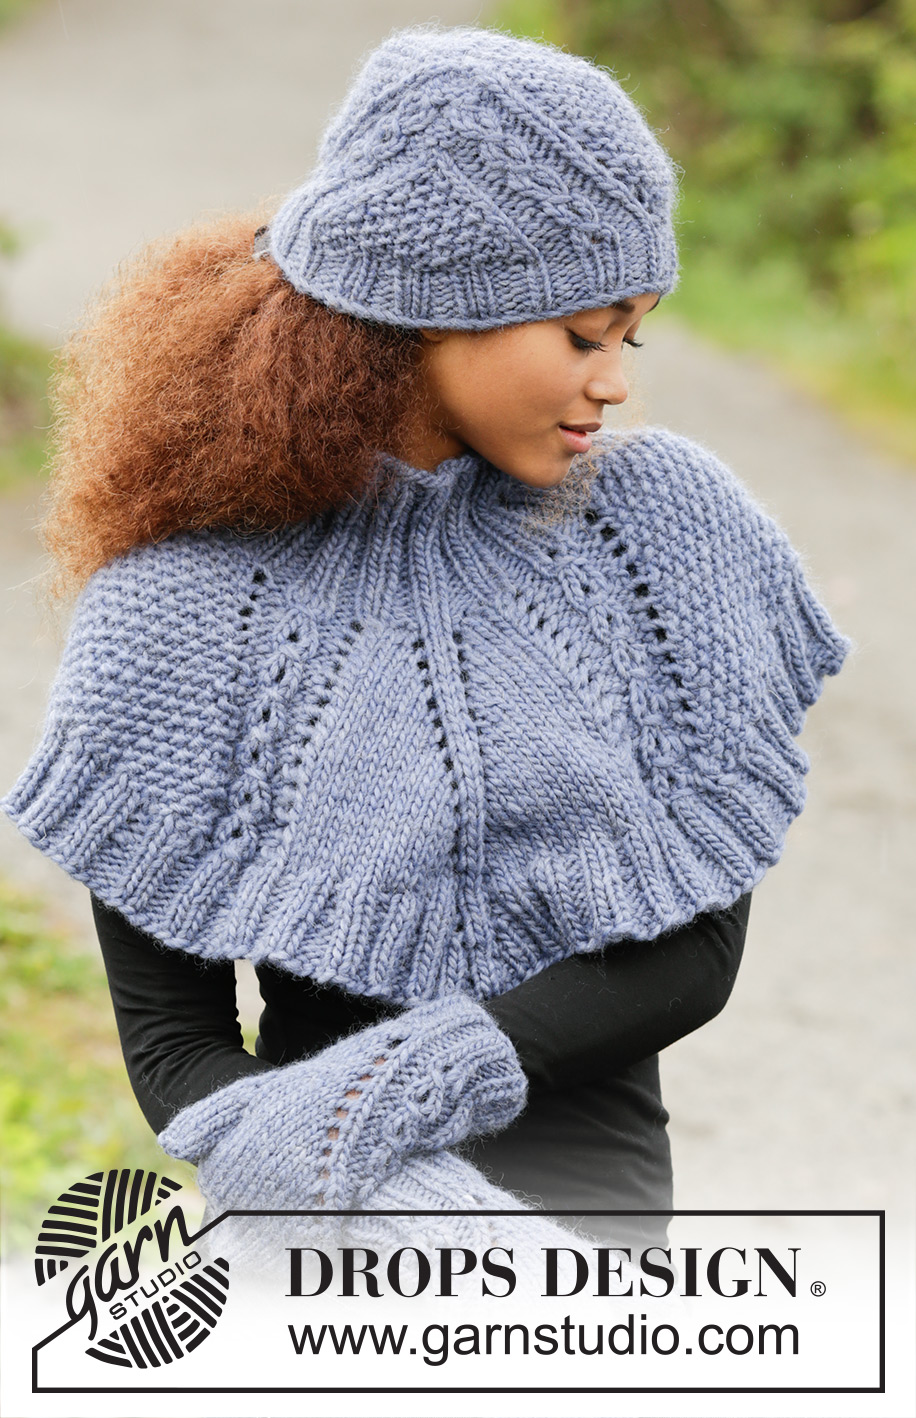
A Royal Embrace#aroyalembraceset |
|||||||||||||||||||||||||||||||
 |
 |
||||||||||||||||||||||||||||||
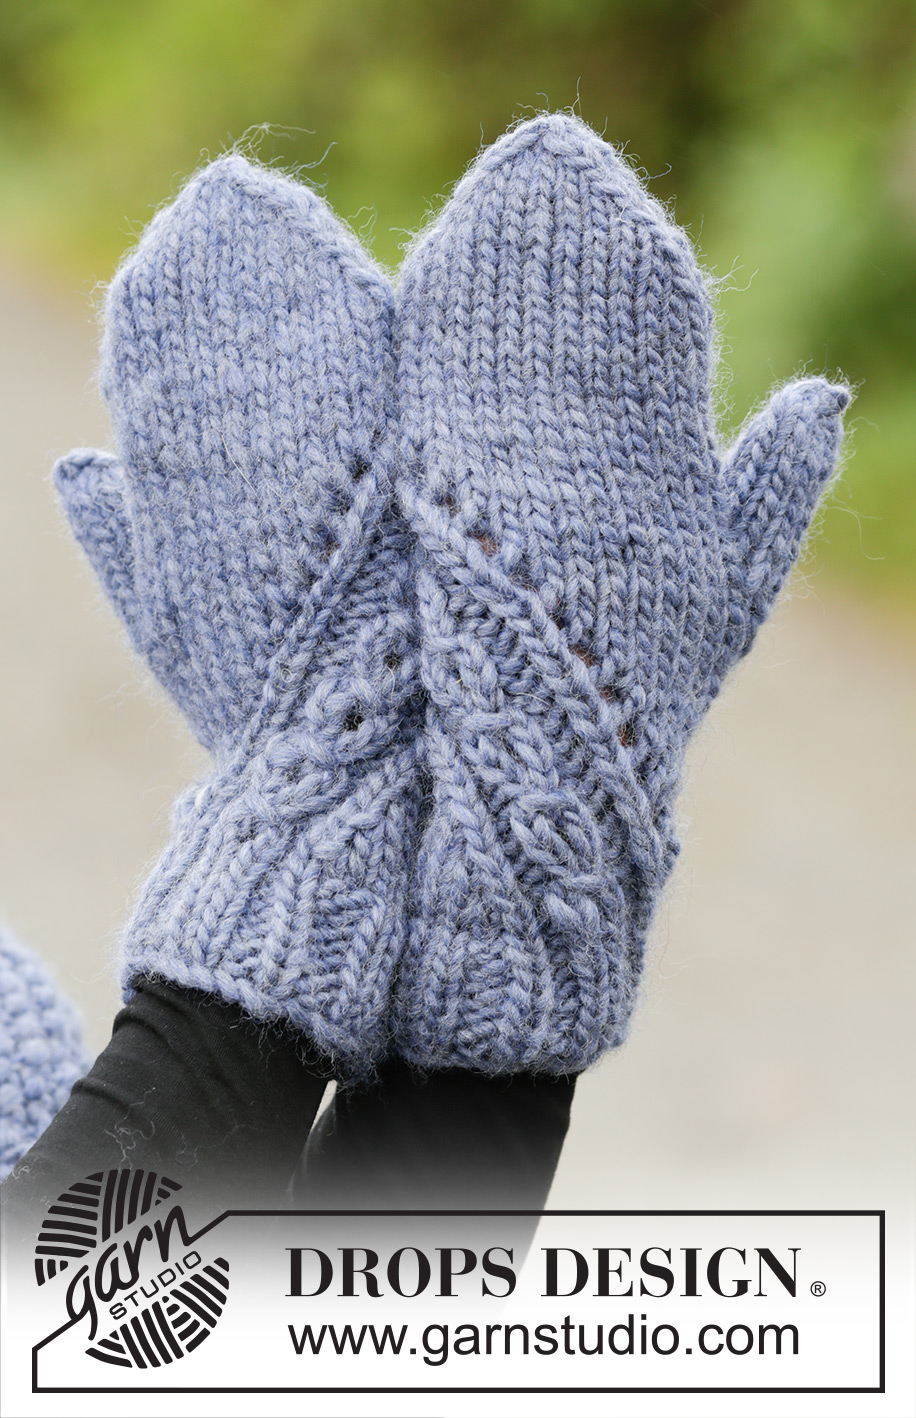
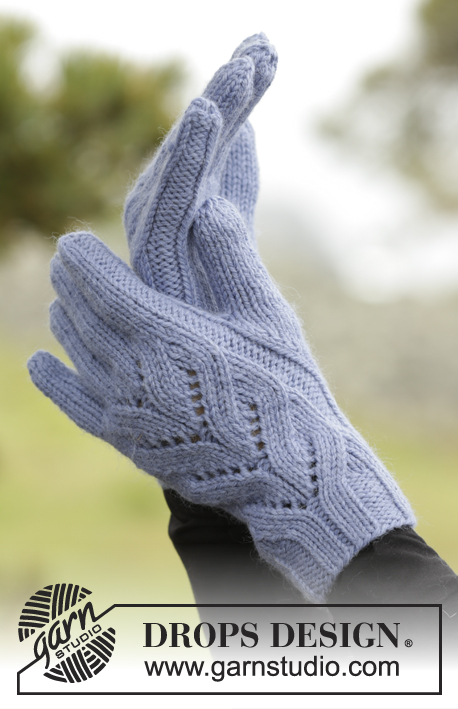
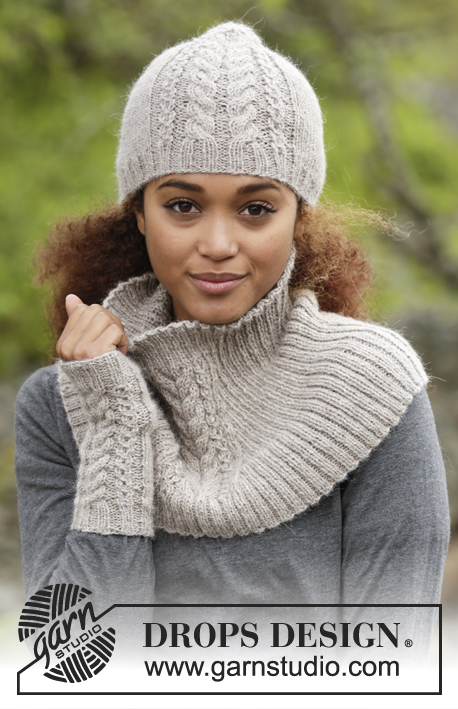
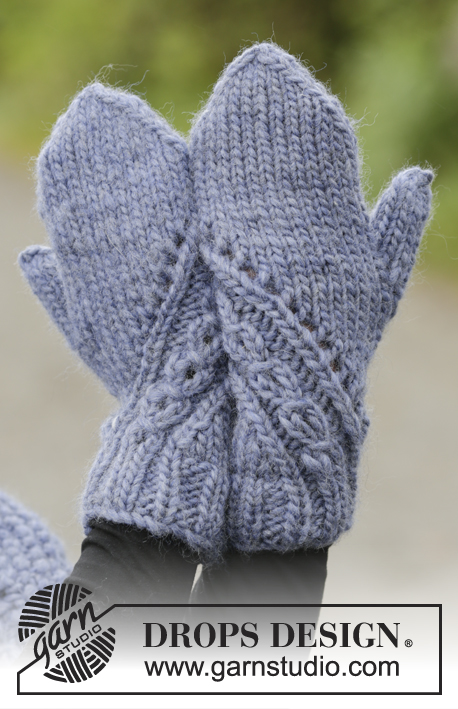
Set consists of: Knitted DROPS hat, neck warmer and mittens with textured pattern in “Snow”.
DROPS 171-18 |
|||||||||||||||||||||||||||||||
|
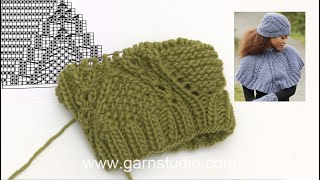
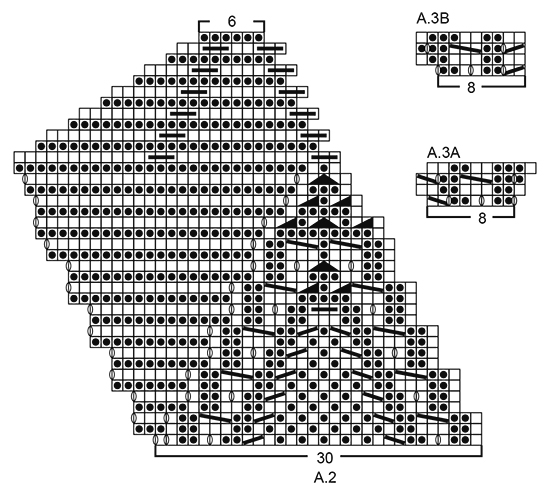
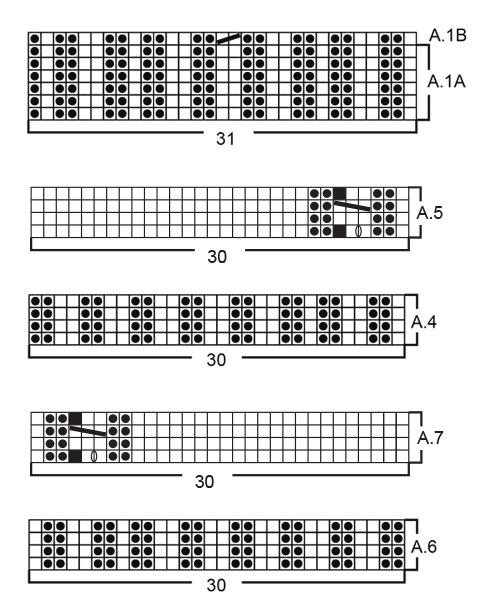
HAT: PATTERN: See diagrams A.1 and A.2. ---------------------------------------------------------- HAT: Worked in the round on circular needle, switch to double pointed needles when needed. Cast on 62 sts on circular needle size 6 mm with Snow. K 1 round. Then work rib according to diagram A.1A (= 2 repetitions of 31 sts). When rib measures 4 cm, work next round as shown in diagram A.1B = 60 sts on needle. Switch to circular needle size 7 mm and work pattern in the round according to diagram A.2 (= 2 repetitions of 30 sts). REMEMBER THE KNITTING TENSION When diagram A.2 has been worked, 12 sts remain on needle. K 1 round while K all sts tog 2 by 2 = 6 sts remain on needle. Cut the yarn and pull it through the remaining sts, tighten tog and fasten. Hat measures approx. 24 cm from top and down. ---------------------------------------------------------- NECK WARMER: MOSS ST: ROUND 1: * K 1, P 1 *, repeat from *-*. ROUND 2: P over K and K over P. Repeat 2nd round. PATTERN: See diagram A.3. INCREASE MID FRONT/MID BACK: Inc 1 st on each side of the middle 2 sts front and back. Inc 1 st by making 1 YO, on next round K YO to make holes. ---------------------------------------------------------- NECK WARMER: Worked in the round on circular needle, top down. Cast on 56 sts on a short circular needle size 7 mm with Snow. K 1 round. Work next round as follows: P 1, * K 2, P 2 *, repeat from *-* until 3 sts remain on round, finish with K 2 and P 1. Continue rib like this until piece measures approx. 12 cm or desired length. Switch to circular needle size 8 mm and work next round as follows (beg of round = in the side): 3 sts MOSS ST – see explanation above (= over shoulder), A.3A (= 8 sts), 6 sts in stocking st (= front), A.3B (= 8 sts), 6 sts in moss st (= over shoulder), A.3A (= 8 sts), 6 sts in stocking st (= back), A.3B (= 8 sts) and 3 sts in moss st (= over shoulder). Insert 1 marker on each side of all A.3A/A.3B (markers are only used to indicate where A.3 beg and end – move markers upwards when working). Continue pattern like this and inc and dec as shown in A.3A/A.3B (work sts inc in moss st = 4 sts per inc round). AT THE SAME TIME on first round beg INC MID FRONT/MID BACK – see explanation above (= 4 sts inc per inc round – work inc sts in stocking st). Inc like this every other round 14 times in total (or desired length – approx. 5 cm remain until finished measurements). After all inc, 168 sts on needle. RIB: Switch to circular needle size 7 mm and work next round as follows (continue inc on each side of the middle 2 sts front and back on every other round until finished measurements): * K the first/next 17 sts and inc 4 sts over these sts (= 21 sts), P 2, K 2, P 2 over A.3, K the next 18 sts and inc 2 sts over these sts (= 20 sts), K 2 (= mid front), K over the next 18 sts and inc 2 sts over these sts (= 20 sts), P 2, K 2, P 2 over A.3 and K the next 17 sts and inc 4 sts over these sts (= 21 sts) *, repeat from *-* one more time = 192 sts on needle. Work next round as follows: K 1, * P 2, K 2 *, repeat from *-* until 3 sts remain on round and finish with P 2 and K 1 (rib will continue neatly over A.3 in the diagonal lines and over the 2 mid sts front and back – work sts inc mid front and mid back in rib). When rib measures 2 cm, inc every other P 2 to P 3 = approx. 216 sts (inc 1 st by making 1 YO in transition between K and P, on next round P YO twisted to avoid holes). When rib measures approx. 5 cm (adjust to that 4 sts have been inc on each side of mid st front and back) cast off with K over K and P over P. Neck warmer measures approx. 36 cm from top and down on the shortest. ---------------------------------------------------------- MITTENS: PATTERN: See diagrams A.4 to A.7. INCREASE TIP (applies to displacement of pattern): Inc 1 st before or after marker by making 1 YO. On next round K the YO to make hole. DECREASE TIP: Dec as follows after marker: Slip 1 st as if to K, K 1, psso. Dec as follows before marker: Beg 2 sts before marker, K 2 tog. ---------------------------------------------------------- LEFT MITTEN: Work size S in the round on double pointed needles size 6 and 7 mm. Work size M/L in the round on double pointed needles size 7 and 8 mm. Cast on 30 sts on double pointed needles size 6-7 mm with Snow. K 1 round. Then work rib according to diagram A.4 (= 1 repetition of 30 sts). When piece measures 4 cm, switch to double pointed needles size 7-8 mm. Insert 1 marker at beg of round and 1 marker after the first 7 sts on round - move the markers upwards when working. Then work pattern according to diagram A.5 (= 1 repetition of 30 sts). After 2 round beg displacement of pattern. Inc before first marker – READ INCREASE TIP and dec after 2nd marker – READ DECREASE TIP. Continue pattern AT THE SAME TIME inc and dec like this every other round 12 times in total (when displacement is done, remove markers and continue pattern without inc/dec). REMEMBER THE KNITTING TENSION AT THE SAME TIME when piece measures 13-14 cm, inc 1 st on each side of next to last st on round for thumb gusset (inc 1 st by making 1 YO, on next round K YO twisted to avoid holes). Work 1 round without inc for thumb gusset. On next round inc for thumb gusset on each side of 3 sts in thumb gusset = 5 sts in thumb gusset. Work 1-2 rounds without inc. Then slip the 5 thumb sts on 1 stitch holder. On next round cast on 1 new st behind sts on stitch holder = 30 sts. When piece measures 23-24 cm, insert 1 marker in each side (= 15 sts between markers). Work in stocking st over all sts while AT THE SAME TIME dec on each side of both markers - READ DECREASE TIP (= 4 sts dec). Repeat dec every round a total of 6 times = 6 sts remain on needle. Cut the yarn and pull it through the remaining sts, tighten tog and fasten. The entire mitten measures approx. 27-28 cm. THUMB: Slip the 5 thumb sts back on double pointed needles size 7-8 mm. Pick up 5 sts behind the thumb = 10 sts. Work stocking st in the round until thumb measures 5-6 cm. On next round K tog all sts 2 by 2 = 5 sts. Repeat on next round = 3 sts remain. Cut the yarn and pull it through the remaining sts, tighten tog and fasten. RIGHT MITTEN: Cast on and work as left mitten but reversed - i.e. work rib according to diagram A.6 and pattern according to diagram A.7. Then insert 1 marker after the first 23 sts and 1 marker at the end of round. When pattern is displaced, dec before first marker and inc after 2nd marker. Inc thumb gusset on each side of 2nd st on round. |
|||||||||||||||||||||||||||||||
Diagram explanations |
|||||||||||||||||||||||||||||||
|
|||||||||||||||||||||||||||||||
 |
|||||||||||||||||||||||||||||||
 |
|||||||||||||||||||||||||||||||
Have you finished this pattern?Tag your pictures with #dropspattern #aroyalembraceset or submit them to the #dropsfan gallery. Do you need help with this pattern?You'll find 29 tutorial videos, a Comments/Questions area and more by visiting the pattern on garnstudio.com. © 1982-2025 DROPS Design A/S. We reserve all rights. This document, including all its sub-sections, has copyrights. Read more about what you can do with our patterns at the bottom of each pattern on our site. |
|||||||||||||||||||||||||||||||


With over 40 years in knitting and crochet design, DROPS Design offers one of the most extensive collections of free patterns on the internet - translated to 17 languages. As of today we count 320 catalogues and 12094 patterns translated into English (UK/cm). 12094
We work hard to bring you the best knitting and crochet have to offer, inspiration and advice as well as great quality yarns at incredible prices! Would you like to use our patterns for other than personal use? You can read what you are allowed to do in the Copyright text at the bottom of all our patterns. Happy crafting!
Post a comment to pattern DROPS 171-18
We would love to hear what you have to say about this pattern!
If you want to leave a question, please make sure you select the correct category in the form below, to speed up the answering process. Required fields are marked *.