
Looking for a yarn?


Comments / Questions (19)
![]() Sophie Nieuwenhuizen wrote:
Sophie Nieuwenhuizen wrote:
Ik kan het patroon vanaf blad 4 niet meer printen. Alles is dan blanco. Ik wil dit patroon graag breien.
07.08.2016 - 20:22DROPS Design answered:
Deze vraag is al beantwoord, zie onder.
08.08.2016 - 07:53
![]() Sophie Nieuwenhuizen wrote:
Sophie Nieuwenhuizen wrote:
Ik kan het patroon vanaf blad 4 niet meer printen. Alles is dan blanco. Ik wil dit patroon graag breien.
07.08.2016 - 09:02DROPS Design answered:
Ik heb hier getest en kan alle blandzijden printen. Het ligt dus niet aan de website. Wellicht licht het aan de instellingen van uw printer, wij raden u aan daar naar te kijken. Het kan ook zijn dat u niet de laatste versie van uw browser hebt geïnstalleerd. U kunt het ook met een andere browser proberen.
07.08.2016 - 14:12Lorraine wrote:
Love the lace pattern and also the collar on the garment. Hope it is available in English soon. It is winter here in Australia so would like to make it now!
26.06.2016 - 06:21
![]() Nadine wrote:
Nadine wrote:
Superbe, et magnifique en jaune !
14.06.2016 - 22:57
![]() Gemma Gola wrote:
Gemma Gola wrote:
Abbastanza elegante ma il colore non invita molto
13.06.2016 - 16:40Rene wrote:
Love it, so stylish!
12.06.2016 - 09:17
![]() Ellis wrote:
Ellis wrote:
Mmmmmm, nice. Like setin sleeves because they are elegant (I understand that dropped shoulders are easy to knit for beginners) and also the colour, mustard/ ochre / yellow.
08.06.2016 - 21:54
![]() ELIE wrote:
ELIE wrote:
Lumineux!
05.06.2016 - 17:01
![]() Franca wrote:
Franca wrote:
Molto elegante!
03.06.2016 - 16:06
|
||||||||||||||||
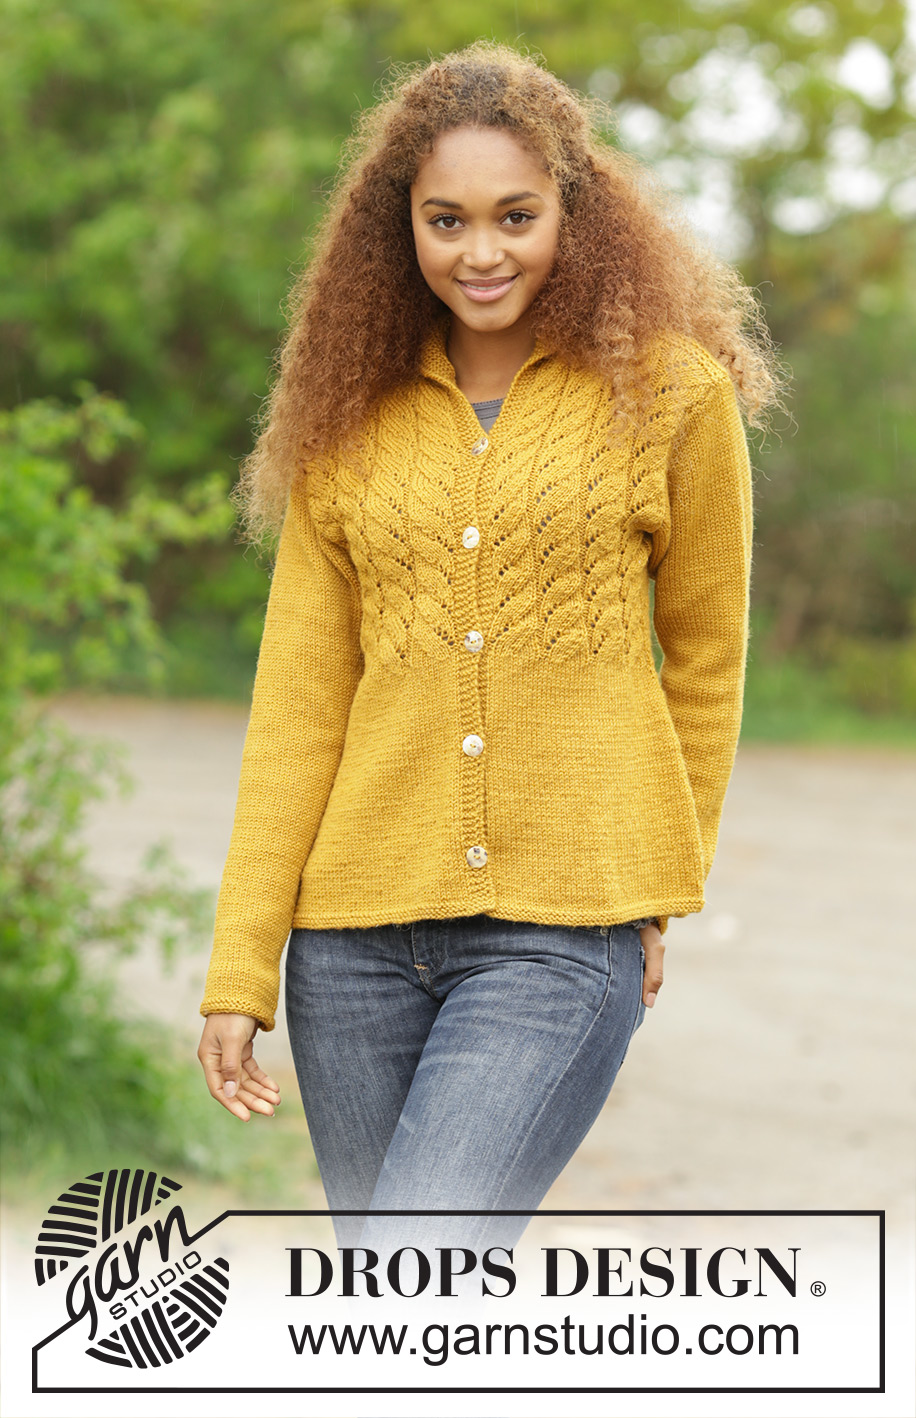
Cornfield#cornfieldcardigan |
||||||||||||||||
|
|
||||||||||||||||
Knitted DROPS jacket with lace pattern and shawl collar in ”Karisma”. Size: S - XXXL.
DROPS 173-13 |
||||||||||||||||
|
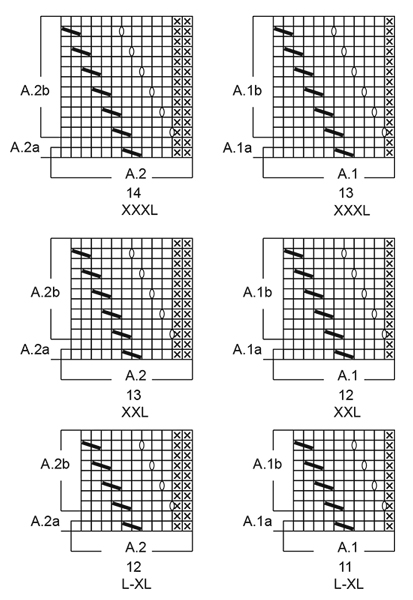
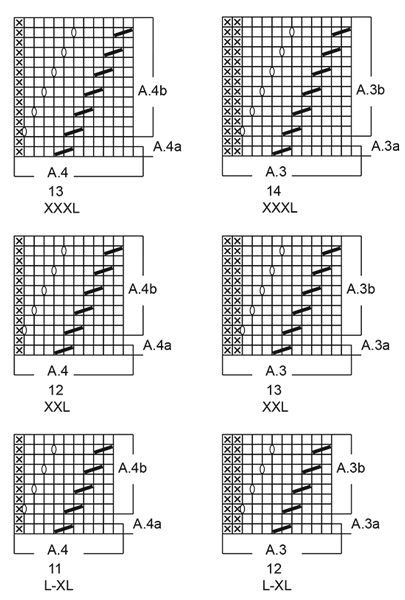
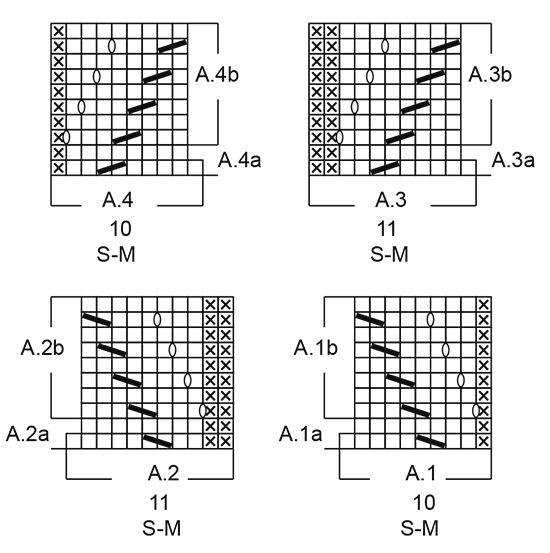
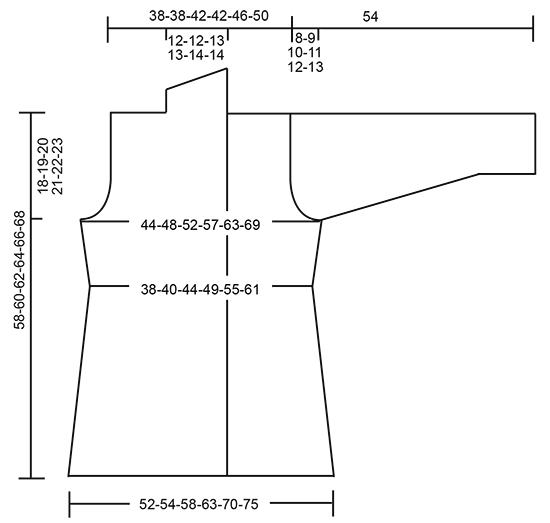
GARTER ST (worked in the round): 1 ridge = 2 rounds. * K 1 round and P 1 round *, repeat from *-*. GARTER ST (back and forth): K all rows. 1 ridge = 2 rows K. PATTERN: See diagrams A.1 to A.4. The diagrams show all rows in pattern seen from RS. See diagram for correct size. DECREASE TIP: All dec are done from RS! Work until 3 sts remain before marker, K 2 tog (= 1 st dec), K 2 (marker is in the middle of these 2 sts), slip 1 st as if to K, K 1, psso (= 1 st dec). INCREASE TIP: Work until 1 sts remain before marker in the side, 1 YO, work 2 sts in stocking st (marker is in the middle of these sts), 1 YO (= 2 sts inc). Work YO twisted on next row to avoid holes. BUTTONHOLES: Dec for buttonholes on right band. 1 buttonhole = K tog second and third st from edge and make 1 YO. Dec for buttonholes when piece measures: SIZE S: 6, 15, 24, 33 and 42 cm SIZE M: 7, 16, 25, 34 and 43 cm SIZE L: 6, 14, 22, 30, 38 and 46 cm. SIZE XL: 7, 15, 23, 31, 39 and 47 cm. SIZE XXL: 6, 15, 24, 33, 41 and 49 cm. SIZE XXXL: 8, 17, 26, 34, 42 and 50 cm. ---------------------------------------------------------- JACKET: Worked back and forth on needle. BODY: Cast on 230-238-254-274-302-326 sts (incl 5 band sts in each side of piece) on circular needle size 3.5 mm with Karisma. Work 2 ridges in GARTER ST - see explanation above. Switch to circular needle size 4 mm. On next row insert 2 markers in the piece as follows: Work 5 band sts in garter st, 55-57-61-66-73-79 sts in stocking st, insert 1 marker (= right front piece), 110-114-122-132-146-158 sts in stocking st (= back piece), insert 1 marker, 55-57-61-66-73-79 sts in stocking st, finish with 5 band sts in garter st (= left front piece). REMEMBER THE KNITTING TENSION Work band sts in garter st until finished measurements. Remember BUTTONHOLES - see explanation above. When piece measures 7 cm, dec 1 st on each side of each markers (= 4 sts dec) - READ DECREASE TIP! Dec like this every 1½ cm 11 times in total = 186-194-210-230-258-282 sts. When piece measures 25 cm, work next row from RS as follows: Work 5 band sts in garter st, * A.1a (= 10-10-11-11-12-13 sts), repeat A.2a (= 11-11-12-12-13-14 sts) 3 times in total in width (= 33-33-36-36-39-42 sts), P 1, 0-4-4-14-20-24 sts in stocking st (marker is in the middle of these sts), P 1, repeat A.3 (= 11-11-12-12-13-14 sts) 3 times in total in width (= 33-33-36-36-39-42 sts), A.4 (= 10-10-11-11-12-13 sts) *, repeat from *-* 2 times in total, finish with 5 band sts in garter st. When A.1a to A.4a have been worked 1 time vertically, there are 170-178-194-214-242-266 sts. Then work A.1b to A.4b over A.1a to A.4a vertically. When piece measures 27 cm, inc 1 st on each side of each marker (= 4 sts inc) - READ INCREASE TIP! Inc like this every 2-1½-1½-1½-2-2 cm 6-8-9-9-8-8 times in total = 194-210-230-250-274-298 sts. P YOs twisted on next row, they should not make holes. Then work these sts in stocking st. When piece measures 40-41-42-43-44-45 cm, cast off for armholes on next row from RS as follows: Work 48-52-57-61-67-73 sts (incl band sts = right front piece), cast off the next 6-6-6-8-8-8 sts (= 3-3-3-4-4-4 sts on each side of marker), work 86-94-104-112-124-136 sts (= back piece), cast off the next 6-6-6-8-8-8 sts (= 3-3-3-4-4-4 sts on each side of marker), work the remaining 48-52-57-61-67-73 sts (incl band sts = left front piece) = 48-52-57-61-67-73 sts on each front piece and 86-94-104-112-124-136 sts on back piece. LEFT FRONT PIECE: = 48-52-57-61-67-73 sts. Continue working pattern as before and cast off for armhole at beg of every row from RS as follows: Cast off 3 sts 0-0-0-0-1-1 time in total, 2 sts 0-2-2-4-4-4 times in total, and then 1 st 2-2-3-3-2-4 times in total = 46-46-50-50-54-58 sts. Work next row as follows from RS: K 1, P 1, A.3 a total of 3 times in width as before, A.4 over the next 9-9-10-10-11-12 sts as before and finish with 5 band sts in garter st. Continue pattern like this. When piece measures 57-59-61-63-65-67 cm (adjust so that next row is from RS), switch to circular needle size 3.5 mm and work 1 ridge over all sts. On next row from RS cast off the first 28-29-31-31-34-38 sts for shoulder = 18-17-19-19-20-20 sts remain for shawl collar. Work short rows over the remaining sts (= for shawl collar), beg mid front (1st row = WS) as follows: * Work 2 rows back and forth over the first 11-10-12-12-13-13 sts, work 2 rows back and forth over all sts *, repeat from *-* until shawl collar measures 8-8-9-9-10-10 cm at the shortest. Cast off. RIGHT FRONT PIECE: Work and cast off as left front piece but reversed. I.e. cast off for armhole at beg of row from WS. Work pattern A.1 instead of A.4 and A.2 instead of A.3. Shawl collar beg from RS. BACK PIECE: = 86-94-104-112-124-136 sts. Continue working pattern as before and cast off for armhole at beg of every row in each side of piece as follows: Cast off 3 sts 0-0-0-0-1-1 time in total, 2 sts 0-2-2-4-4-4 times in total, and then 1 st 2-2-3-3-2-4 times in total = 82-82-90-90-98-106 sts. Work next row as follows from RS: Work 1 st in stocking st, P 1, repeat A.3 a total of 3 times in width as before, A.4 over the next 9-9-10-10-11-12 sts as before, A.1 over the next 9-9-10-10-11-12 sts as before, repeat A.2 a total of 3 times in width as before, finish with P 1 and 1 st in stocking st. When piece measures 56-58-60-62-64-66 cm, cast off the middle 24-24-26-26-28-28 sts = 29-29-32-32-35-39 sts on each shoulder. Now finish each shoulder separately. On next row from the neck, cast off 1 st = 28-29-31-31-34-38 sts remain on shoulder. Continue to work P over P and pattern, work the repetitions that do not fit pattern in stocking st. When piece measures 57-59-61-63-65-67 cm, switch to circular needle size 3.5 mm. Work 1 ridge in garter st over all sts. Cast off. Work the other shoulder the same way. Piece measures 58-60-62-64-66-68 cm in total. SLEEVE: Worked in the round on double pointed needles. Cast on 42-44-46-48-50-52 sts on double pointed needles size 3.5 mm with Karisma. Work 2 ridges in GARTER ST - see explanation above. Switch to double pointed needles size 4 mm. Work in stocking st. Insert 1 marker at the beg of the round. When piece measures 10-8-6-10-10-7 cm, inc 1 st on each side of marker (= 2 sts inc). Inc like this every 2-2-2-1½-1½-1½ cm 17-18-19-20-21-22 times in total = 76-80-84-88-92-96 sts. When piece measures 46-45-44-43-42-41 cm (shorter measurements in the larger sizes because of longer sleeve cap and wider shoulders), cast off for sleeve cap at beg of every row in each side as follows: Cast off 3-3-3-4-4-4 sts 1 time, 2 sts 3 times and 1 st 6 times, then cast off 2 sts in each side until piece measures 53 cm, then cast off 3 sts 1 time in each side. Cast off the remaining sts, the piece measures 54 cm. Knit another sleeve. ASSEMBLY: Sew the shoulder seams. Sew the collar tog mid back and sew it to the neckline. Sew in sleeves. Sew the buttons on to the left band. |
||||||||||||||||
Diagram explanations |
||||||||||||||||
|
||||||||||||||||
 |
||||||||||||||||
 |
||||||||||||||||
 |
||||||||||||||||
 |
||||||||||||||||
Have you finished this pattern?Tag your pictures with #dropspattern #cornfieldcardigan or submit them to the #dropsfan gallery. Do you need help with this pattern?You'll find 24 tutorial videos, a Comments/Questions area and more by visiting the pattern on garnstudio.com. © 1982-2025 DROPS Design A/S. We reserve all rights. This document, including all its sub-sections, has copyrights. Read more about what you can do with our patterns at the bottom of each pattern on our site. |
||||||||||||||||


With over 40 years in knitting and crochet design, DROPS Design offers one of the most extensive collections of free patterns on the internet - translated to 17 languages. As of today we count 320 catalogues and 12094 patterns translated into English (UK/cm). 12094
We work hard to bring you the best knitting and crochet have to offer, inspiration and advice as well as great quality yarns at incredible prices! Would you like to use our patterns for other than personal use? You can read what you are allowed to do in the Copyright text at the bottom of all our patterns. Happy crafting!
Post a comment to pattern DROPS 173-13
We would love to hear what you have to say about this pattern!
If you want to leave a question, please make sure you select the correct category in the form below, to speed up the answering process. Required fields are marked *.