
Looking for a yarn?


Comments / Questions (134)
![]() Nancy wrote:
Nancy wrote:
In the last row of the yoke, A.1 and A.2 alternate in the same row: "A.2 over the first 4 tr, ... A.1 over the next 12 tr ... A.2 over the next 4 tr, ... work A.1 over the next ... A.2 over the next 4" etc. Do I follow the same pattern of alternating A.1 and A.2 in the next row?
15.01.2019 - 13:43DROPS Design answered:
Dear Nancy, you are working all diagrams at the same time, on a same row from beg, on row 1 in diagram on yoke work row 1 in A.2 over the first 4 sts, insert a marker, work row 1 in A.1 over the next 12 sts, insert a marker, work row 1 in A.2 over the next 4 sts and so on. On next row, work row 2 all diagrams, then row 3 etc.. Depending on the size you may have to increase evenly in A.1, the inc in A.2 are included in the diagram. Happy crocheting!
16.01.2019 - 08:02
![]() Nancy wrote:
Nancy wrote:
I am finding this pattern very confusing. For example, the rows on the chart are not numbered, and they don't seem to correspond to the written pattern. I think that row 1 on the chart corresponds to the last 7 lines of the written YOKE instruction, where I need to insert the 8 markers. There is no written instruction for rows 2, 3, 4, and 5. Do I just follow the chart, carrying up the markers on each row? How do I know whether to do A.1 or A.2 for these rows? Do I alternate them?
14.01.2019 - 23:43DROPS Design answered:
Dear Nancy, start reading diagrams from the bottom corner on the right side towards the left on every round (the row with a star has already been worked, it's the row you just worked before next diagram, it shows how to crochet the sts on first row). When you have to crochet several diagrams on a same row, work row 1 on all diagrams, then work row 2 on all diagrams and so on. Each symbol represents one stitch/group of stitch, see diagram key. Happy crocheting!
15.01.2019 - 09:30
![]() Chris Bassett wrote:
Chris Bassett wrote:
What makes it even more confusing for me is that it says to work a2 over 4 stitches then change to a1, how can that work when there are more than 4 stitches to the graph. Yip I'm finding it really hard too
30.08.2018 - 23:49DROPS Design answered:
Dear Mrs Basset, you will work each row each diagram in the given order, ie: work first row 1 A.2 andn A.1 as explained, then work row 2 in each diagrams and so on. Happy crocheting!
06.09.2018 - 09:53
![]() Chris Wood wrote:
Chris Wood wrote:
This is the most beautiful sweater but I am so confused on the pattern... even after reading the questions and answers... I am now more confused. Is there another pattern similar that is easier to read?
16.08.2018 - 20:38DROPS Design answered:
Dear Chirs, it can always help if you read the pattern more than once, and make notes. See the diagram, and the explanation for each symbol can also help. There are videos to help you, and do not forget you can always ask for help in person in the store you bought your DROPS yran from. Happy Crefting!
16.08.2018 - 23:25
![]() Vicen wrote:
Vicen wrote:
Hola.He intentado hacer este patrón pero sinceramente no me aclaro. Si se teje en círculo, no se supone que deberían ser series exactas que cuadraran de principio a fin? . En la talla S, con 108 cadenetas de base, la primera fila son 3 pa, espacio,6 puntos altos, espacio...hasta el final, entonces no entiendo, son todo series de pa más espacio y que pasa con los 3 puntos altos del principio? O son 4 pa al principio? De todos modos no me cuadran con las cadenetas de base.
15.08.2018 - 19:32DROPS Design answered:
Hola Vicen, el patrón está correcto, no es simétrico. Con los saltos se van disminuyendo los puntos para que se ajuste a la forma que va a tener posteriormente. Siempre se montan puntos de más ya que el borde de montaje no debe quedar tenso.
20.08.2018 - 21:19
![]() Pam Chapman wrote:
Pam Chapman wrote:
Trouble understanding row 6 for small size. I believe there are 0 increases for this size? So when I look at A2 do I ignore the increases and work next row of V stitches skipping 1 stitch then 2 stitches across? Also do you know of a good book that teaches how to follow multiple diagrams in English?
14.08.2018 - 01:46DROPS Design answered:
Dear Mrs Chapman, work row 6 as before in A.1 as before without increasing any sts in size S, at the same time work row 6 in A.1 as shown in diagram, ie you will increase in A.2 only in size S and not in A.1 (= not between markers). Happy crocheting!
14.08.2018 - 07:56Bronwen wrote:
Hi. I have never worked with a pattern such as this when the diagrams are broken into pieces. Do you perhaps have an image of how the A1, A2 and A3 diagrams slot together? I can see they overlap, but with each section having a different number of rows, I am struggling to see how they fit together. I am particularly confused with whether after R6 of A1 where I increase, is the row that I do the repeats of A1 going back to the first row of A1 (the row with the block) or do I go into A1a? Thank you
04.08.2018 - 15:39DROPS Design answered:
Dear Mrs Bronwen, you will work each row of each diagram at the same time, ie row 1 in A.1, A.2 then row 2 in A.1, A.2 etc. On row 6 work row 6 in A.1 as before (=row with only tr (UK)/dc(US)) increasing between markers as explained, and work row 6 in A.2 as shown in diagram. Happy crocheting!
06.08.2018 - 08:59
![]() Freya wrote:
Freya wrote:
Jeg er i gang med bærestykket, der hvor man skal tage ud første gang. Men jeg får alt for mange masker når jeg tæller dem bagefter. Jeg hækler str. S
16.06.2018 - 19:54DROPS Design answered:
Hej Freya, du har 94 st, tager 18 st m ud jævnt fordelt, og nu har du 112 st. God fornøjelse!
18.06.2018 - 10:52
![]() Tsui-Dan Durant-Chao wrote:
Tsui-Dan Durant-Chao wrote:
Hallo. Ik begrijp even niet of ik het armsgat de 10 stokjes (xxl) moet blijven haken( dan wordt het patroon dus onderbroken met de 2 "banen" van stokjes) of dat ik a1a rondom moet gaan haken incl de armsgaten... Bedankt voor de reaktie.
11.06.2018 - 17:11DROPS Design answered:
Dag Tsui San, Bij het maken van de armsgaten staat per maat aangegeven met een pijl waar het patroon A.1a begint. Zie ook de paragraaf 'ALLE MATEN' hierover wat je precies moet doen, zodat het patroon mooi doorloopt.
12.06.2018 - 10:15Hila wrote:
Hello I am trying to do this pattern size M.. I am having problems with the row numbers- on the A1 diagrams there are no row numbers- is this diagram starting from row #3 or #1? I need to increase on row #5- and cant understand which row is it thank you
06.05.2018 - 06:26DROPS Design answered:
Dear Hila, the first row in A.1 and A.2 (= the one with a star) has already been worked = 1st row after the fundation chain. Start reading diagram on next row (with a black square in both diagrams), reading from the right towards the left on every row. The 5th row will be then the one with dc (US)/tr (UK). Happy crocheting!
07.05.2018 - 09:07
|
||||||||||||||||||||||||||||
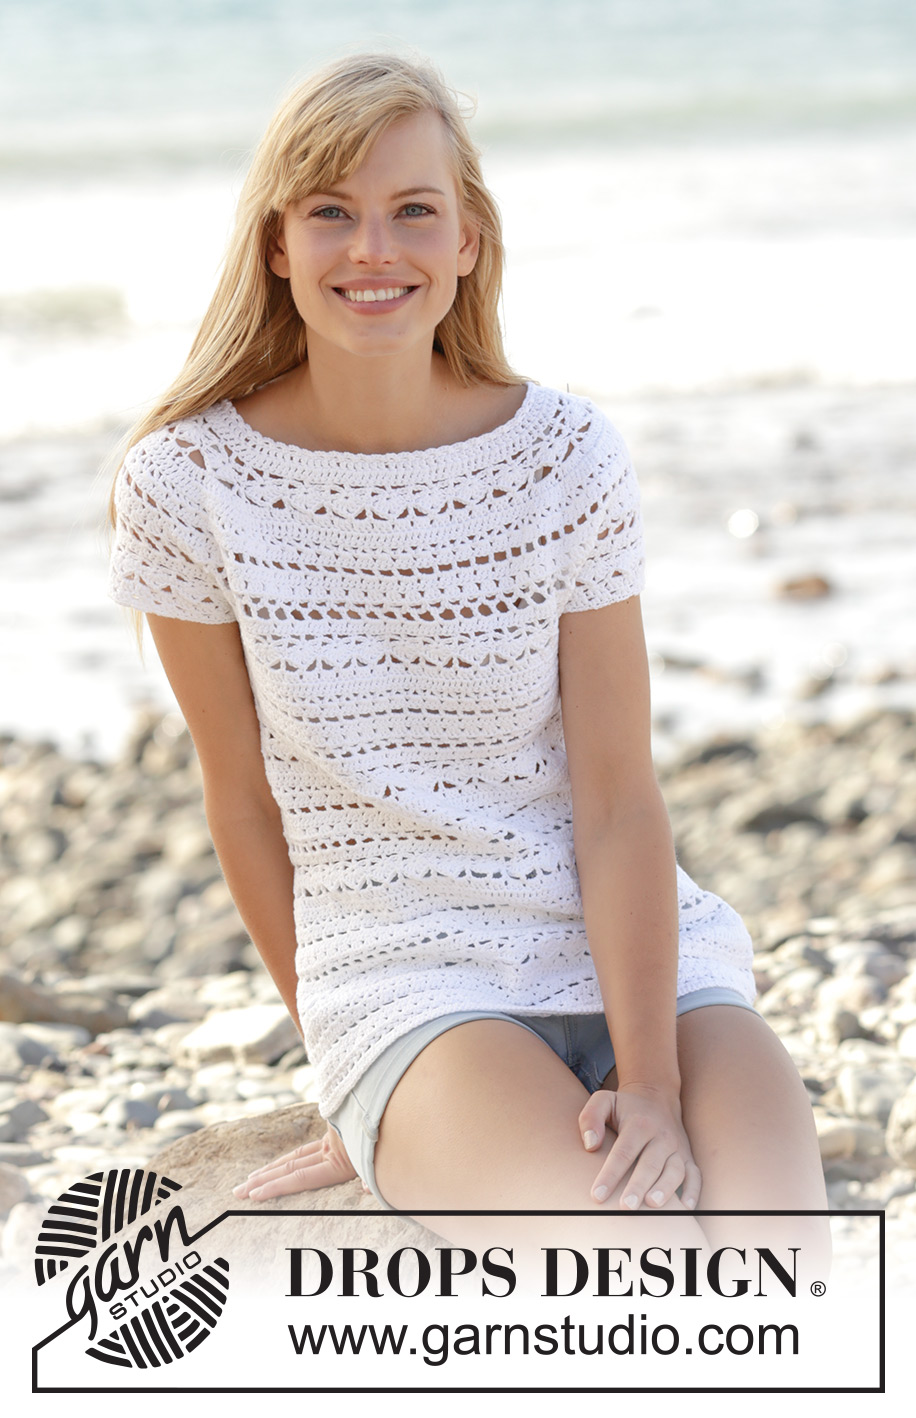
Seashore Bliss Top#seashoreblisstop |
||||||||||||||||||||||||||||
|
|
||||||||||||||||||||||||||||
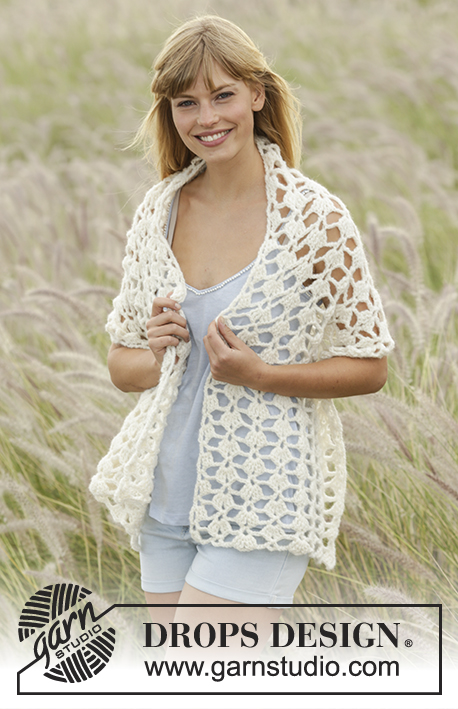
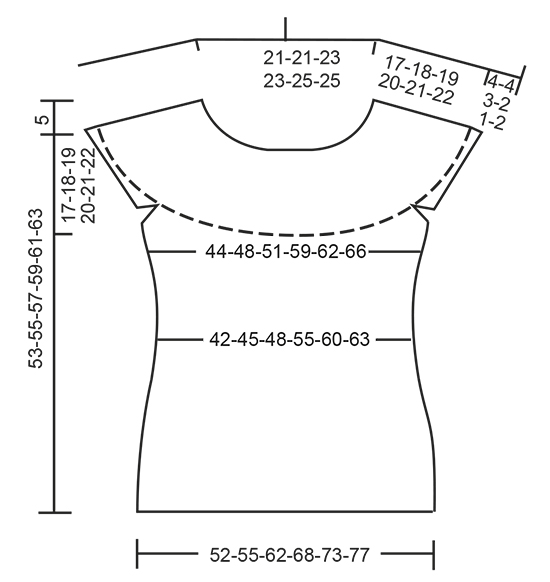
Crochet DROPS top with lace pattern and round yoke in ”Muskat”. The piece is worked top down. Size: S - XXXL.
DROPS 169-26 |
||||||||||||||||||||||||||||
|
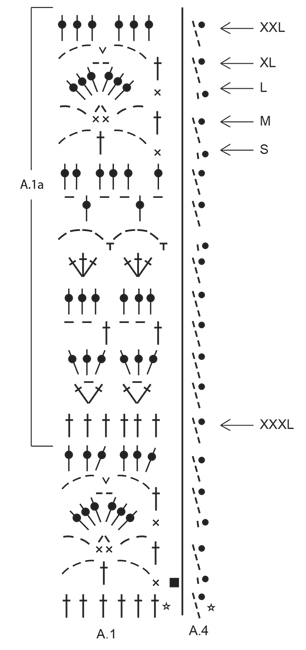
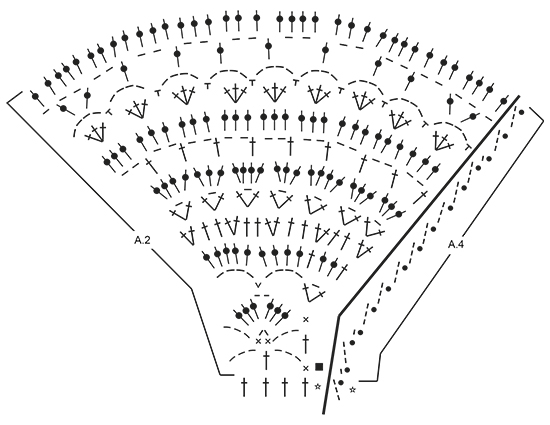
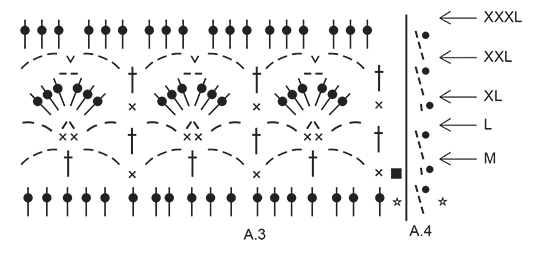
PATTERN: See diagrams A.1 to A.4. Diagram A.4 shows how round beg and ends. CROCHET INFO: Replace first tr at beg of every tr round with 3 ch. Finish round with 1 sl st in 3rd ch at beg of round. Replace first dc at beg of every dc round with 1 ch. Finish every round with 1 sl st in ch from beg of round. INCREASE TIP: Inc 1 tr by working 2 tr in same tr. DECREASE TIP: Dec 1 tr by working 2 tr tog as follows: Work 1 tr but wait with last pull through (= 2 sts on hook), then work next tr but on last pull through, pull yarn through all 3 sts on hook. TIP ARMHOLE: Size S, M and XL: In the last repeat of A.1 before marker 1 and marker 3 (= beginning of armhole), replace the last chain stitch with a treble crochet in the last stitch of the same repeat on previous row. ---------------------------------------------------------- TOP: The piece is worked top down. NOTE: It is important to keep the crochet tension vertically so that the measurements on yoke will be correct. YOKE: Work 108-108-117-117-124-124 ch on hook size 4 mm with Muskat and form 1 ring with 1 sl st in first ch. Work first round as follows: Work 3 ch (= 1 tr) - READ CROCHET INFO, 1 tr in each of the next 3-3-5-5-5-5 ch, * skip 1 ch, 1 tr in each of the next 6 ch *, repeat from *-* the entire row = 94-94-102-102-108-108 tr. Work 1 round with 1 tr in every tr and inc 18-18-22-22-28-40 tr evenly - READ INCREASE TIP = 112-112-124-124-136-148 tr. Work next round and insert 8 markers in the piece as follows: A.4 shows how round beg and ends. Insert 1st marker at beg of round, work A.2 over the first 4 tr, insert 2nd marker, A.1 over the next 12 tr (= 2 times in width), insert 3rd marker, A.2 over the next 4 tr, insert 4th marker, work A.1 over the next 36-36-42-42-48-54 tr (= 6-6-7-7-8-9 times in width), insert 5th marker, A.2 over the next 4 tr, insert 6th marker, A.1 over the next 12 tr (= 2 times in width), insert 7th marker, A.2 over the next 4 tr, insert 8th marker, A.1 over the last 36-36-42-42-48-54 tr (= 6-6-7-7-8-9 times in width). REMEMBER THE CROCHET TENSION! SIZE XXL-XXXL: On 5th round (round with tr) in A.1 inc evenly as follows: Between 2nd and 3rd marker and 6th and 7th marker: Inc 6-6 tr. 12-12 tr have been inc in total on round (= 18-18 tr between 2nd and 3rd marker and 6th and 7th marker). Repeat A.1 3-3 times between 2nd and 3rd marker and between 6th and 7th marker: ALL SIZES: On 6th round (round with tr) in A.1 inc evenly as follows: Between 2nd and 3rd marker and 6th and 7th marker: Inc 0-0-6-6-6-6 tr (= 12-12-18-18-24-24 tr between these markers). Between 4th and 5th marker and 8th and 1st marker: Inc 0-6-6-6-6-6 tr (= 36-42-48-48-54-60 tr between each of these markers). Then repeat diagram A.1 2-2-3-3-4-4 times between 2nd and 3rd marker, 6-7-8-8-9-10 times between 4th and 5th marker, 2-2-3-3-4-4 times between 6th and 7th marker and 6-7-8-8-9-10 times between 8th and 1st marker. Work A.2 as before. SIZE XL-XXL-XXXL: On 8th round (round with tr) in A.1 inc evenly as follows: Between 4th and 5th marker and 8th and 1st marker: Inc 6-6-6 tr (= 54-60-66 tr between each of these markers). 12-12-12 tr have been inc in total on round. Repeat A.1 9-10-11 times between 4th and 5th marker and between 8th and 1st marker. Repeat inc on 10th round in A.1 (= 60-66-72 tr between each of these markers). Repeat diagram A.1 10-11-12 times between 4th and 5th marker and between 8th and 1st marker. ALL SIZES: On last round in A.2 insert 1 new marker in the middle of each A.2 (i.e. 18 tr on each side of marker in A.2 = 4 markers). Remove the old markers (= 4 markers remain in piece). Sts between markers are for sleeves (= 48-48-54-54-60-60 tr on each sleeve). When A.2 has been worked 1 time vertically, there are 240-252-276-300-324-336 tr on round. Yoke is now done in size S. SIZE M-L-XL-XXL-XXXL: Continue with pattern A.1 as before but over tr in A.2 (= 36 tr) work A.3 2 times in total in width (marker is in the middle of these repetitions). Work 1-2-3-4-5 rounds of A.3 (see arrow in diagram for correct size). Piece now measures 17-18-19-20-21-22 cm vertically. ALL SIZES: Work A.1a (see arrow on where pattern beg in the different sizes) 3 times in total in width until first marker – SEE ARMHOLE TIP, work 8-8-8-10-10-10 ch, skip sts between the 2 markers (= sleeve), work A.1a 12-13-14-16-17-18 times in total in width until next marker (= front piece), work 8-8-8-10-10-10 ch, skip sts between the 2 markers (= sleeve), work A.1a 9-10-11-13-14-15 times in total in width (= 160-172-184-212-224-236 sts). Fasten off. BODY: Beg round mid under sleeve as follows: Size S-L: Work 1 sl st in 5th ch, 1 ch, work 1 dc in each of the next 3-3 ch, work A.1a as before until ch under 2nd sleeve, 1 dc in each of the 8-8 ch under sleeve, work A.1a as before the rest of round. Work the 8-8 sts under each sleeve as 1st st in A.1a. SIZE M-XL-XXL-XXXL: Work 1 sl st in 5th ch, 3 ch, work 1 tr in each of the next 3-5-5-5 ch, work A.1a as before until ch under 2nd sleeve, 1 tr in each of the 8-10-10-10 ch under sleeve, work A.1a as before the rest of round. Work the 8-10-10-10 sts under each sleeve as 1st st in A.1a. ALL SIZES: Insert 1 marker in piece, NOW MEASURE PIECE FROM HERE. On first round with tr dec 4-4-4-2-2-2 tr evenly - READ DECREASE TIP = 156-168-180-210-222-234 tr. Then repeat A.1a 26-28-30-35-37-39 times in width. Repeat A.1a vertically. When piece measures 12 cm, adjust so that next round is with tr, dec 6 tr evenly = 150-162-174-204-216-228 tr. Now repeat A.1a 25-27-29-34-36-38 times in width. SIZE XL: Repeat dec when piece measures 16 cm from marker = 198 tr. Now repeat A.1a 33 times in width. ALL SIZES: When piece measures 20-21-22-23-24-25 cm from marker – adjust so that next round is with tr, inc 6 tr evenly. Repeat inc every 2-2-1½-1½-1½-1½ cm 5-5-7-7-7-7 more times = 186-198-222-246-264-276 tr. Repeat A.1a 1 more in width on every inc. When all inc are done, repeat A.1a 31-33-37-41-44-46 times in width. Work until piece measures 36-37-38-39-40-41 cm from marker, adjust to finish nicely according to pattern. Fasten off. SLEEVE EDGE: SIZE S: Beg by working mid under sleeve as follows: Work 1 sl st in 4th ch of the 8 ch worked in armhole on body. Work 1 ch (= 1 dc). Then work with 1 dc in each of the next 4 ch, work A.3 over the next 18 tr, work A.1 (adjust pattern according to A.3) 2 times in total in width as before, work A.3 over the next 18 tr, finish with 1 dc in each of the last 3 ch. Work as 1st st in A.3 in the 8 sts under sleeve. On last round in A.3 dec 10 tr evenly = 46 tr. SIZE M-XL-XXL: Beg by working mid under sleeve as follows: Work 1 sl st in 4th ch of the 8-10-10 ch worked in armhole on body. Work 3 ch (= 1 tr). Then work with 1 tr in each of the next 4-6-6 ch, work A.3 as before, work A.1 (adjust pattern according to A.3) 2-3-4 times in total in width as before, work A.3, finish with 1 tr in each of the last 3 ch. Work as 1st st in A.3 in the 8-10-10 sts under sleeve. On last round in A.3 dec 10 tr evenly = 46-54-60 tr. SIZE L: Beg by working mid under sleeve as follows: Work 1 sl st in 4th ch of the 8 ch worked in armhole on body. Work 1 ch (= 1 dc). Then work 1 dc in each of the next 4 ch, work A.3 as before, work A.1 (adjust pattern according to A.3) 3 times in total in width as before, work A.3, finish with 1 dc in each of the last 3 ch. Work as 1st st in A.3 in the 8 sts under sleeve. On last round in A.3 dec 10 tr evenly = 52 tr. SIZE XXXL: Beg by working mid under sleeve as follows: Work 1 sl st in 4th ch of the 10 ch worked in armhole on body. Work 3 ch (= 1 tr). Then work 1 tr in each of the next 6 ch, work 1 tr in each of the 60 tr, finish with 1 tr in each of the last 3 ch. Work 1 tr in every tr and dec 10 tr evenly = 60 tr. ALL SIZES: Work * 1 dc in first/next tr, 1 ch, skip approx. 1 cm *, repeat from *-* around the entire sleeve. Fasten off. Work the other sleeve the same way. NECK EDGE: Crochet an edge around the neck. Beg mid back. Work * 1 dc in first/next tr, 3 ch, skip approx. 1 cm *, repeat from *-* around the entire neck. Make sure to avoid a tight neck edge, adjust to finish with 1 sl st in first ch. Fasten off. |
||||||||||||||||||||||||||||
Diagram explanations |
||||||||||||||||||||||||||||
|
||||||||||||||||||||||||||||
 |
||||||||||||||||||||||||||||
 |
||||||||||||||||||||||||||||
 |
||||||||||||||||||||||||||||
 |
||||||||||||||||||||||||||||
Have you finished this pattern?Tag your pictures with #dropspattern #seashoreblisstop or submit them to the #dropsfan gallery. Do you need help with this pattern?You'll find 10 tutorial videos, a Comments/Questions area and more by visiting the pattern on garnstudio.com. © 1982-2025 DROPS Design A/S. We reserve all rights. This document, including all its sub-sections, has copyrights. Read more about what you can do with our patterns at the bottom of each pattern on our site. |
||||||||||||||||||||||||||||


With over 40 years in knitting and crochet design, DROPS Design offers one of the most extensive collections of free patterns on the internet - translated to 17 languages. As of today we count 320 catalogues and 12093 patterns translated into English (UK/cm). 12093
We work hard to bring you the best knitting and crochet have to offer, inspiration and advice as well as great quality yarns at incredible prices! Would you like to use our patterns for other than personal use? You can read what you are allowed to do in the Copyright text at the bottom of all our patterns. Happy crafting!
Post a comment to pattern DROPS 169-26
We would love to hear what you have to say about this pattern!
If you want to leave a question, please make sure you select the correct category in the form below, to speed up the answering process. Required fields are marked *.