
Looking for a yarn?


Comments / Questions (134)
![]() Alda wrote:
Alda wrote:
Buongiorno, ho ancora bisogno di aiuto per il modello in oggetto. Sono all'inizio del corpo (taglia M) Ho eseguito il giro 11° della figura A.1a. Nel giro successivo dopo aver lavorato le 5 m.a. sulle 8 cat. del sottomanica non capisco come procedere. Proseguo come da schema cioè con i gruppi di 3 m.a. separati da 2 cat.(12° giro di A.1a) ? Grazie per la disponibilità
18.05.2017 - 09:27DROPS Design answered:
Buongiorno Alda. Procede lavorando il 12° giro di A.1a. Lavora le maglie del sottomanica come indicato per la prima maglia di A.1a, quindi a seconda del giro, sono maglie basse oppure maglie alte. Buon lavoro!
18.05.2017 - 11:10
![]() Alda wrote:
Alda wrote:
Buongiorno sto eseguendo il modello in oggetto e sono in difficoltà con la comprensione del 4 giro del diagramma A2. Vorrei sapere se le due maglie alte iniziali, nello stesso punto e divise da una catenella, vanno ripetute anche alla fine di A2; inoltre e' corretto il 5° giro dove leggo: 1 m.a., 2 m.a, 1 m.a., 4 m.a., 5 m.a. ? Al 6° giro (in m. alta) tra il 4° e 5° segnapunti e tra il 6° e 7° segnapunti non riesco ad avere 42 m. come detto per la taglia M. Grazie
11.05.2017 - 12:09DROPS Design answered:
Buongiorno Alda. Al 4° giro di A.2, le due maglie alte divise da una catenella si lavorano solo all'inizio. Il giro 5 è corretto come ha scritto. Al 6° giro deve aumentare 6 maglie (1 maglia in ogni ripetizione di A1) per avere 42 m tra il 4° e il 5° segnapunti e tra l'8° ed il 1° segnapunti. Buon lavoro!
11.05.2017 - 14:24
![]() Melanie Schmidt wrote:
Melanie Schmidt wrote:
Irgend etwas stimmt in der kompletten Anleitung nicht. Wenn Ich alle zu und abnahmen zusammen rechne komme ich in der letzten Runde von A2 in der die Markierung für die Ärmel gesetzt werden auf 196 stb soll aber auf 324 Stb kommen. Rechne oder denke ich falsch. Selbst wenn Ich A2 nach der häkelschrift arbeite komme ich nur auf 252 Stb. Wo fehlen die knapp 100 Maschen?
24.04.2017 - 21:16DROPS Design answered:
Liebe Frau Schmidt, die Zunahmen in A.1 bitte nicht vergessen, dh in A.1 sollen Sie auch zwischen Markierer 2-3 + 6-7 und dann zwischen Markierer 4-5+8-1. Am Ende sollen Sie 324 Stb haben. Viel Spaß beim häkeln!
25.04.2017 - 08:56
![]() Melanie Schmidt wrote:
Melanie Schmidt wrote:
Ich arbeite nach Größe XXL
24.04.2017 - 17:25
![]() Melanie Schmidt wrote:
Melanie Schmidt wrote:
Hallo, Bei dem Teil Alle Gr in der letzten Runde von A2 4 markierer einsetzen. Dort soll links und rechts jedes markierers 18 Stb sein sind zusammen 36 stb laut Anleitung sollen aber zwischen Markierung 1 und 2 54 stb für die Ärmel sein. Ich verstehe nicht wie ich auf diese Zahl kommen soll wenn ich doch in die Mitte jedes A2 eine Markierung setzten soll. Ich bitte um schnelle Hilfe. Vielen dank im vorraus
24.04.2017 - 11:04DROPS Design answered:
Liebe Frau Schmidt, können Sie bitte Ihre Größe erklären? Danke im voraus!
24.04.2017 - 14:29
![]() Tina wrote:
Tina wrote:
Wie werden die M unter den Ärmeln gehäkelt? Lt Anleitung so, wie die erste M der Reihe. In der zweiten Abnahmereihe (6 M abnehmen, Größe. S) stimmt dann aber das Muster nicht mehr. Außerdem habe ich von Beginn an insgesamt weniger Mustersätze, als in der Anleitung stehen, obwohl die Anzahl der M stimmt. In einer der englischen Antworten stand auch, man solle das Muster nach der ersten Reihe auch unter den Ärmeln häkeln. Aber das passt vom Mustersatz auch nicht. Wie wird hier gehäkelt? Danke!
22.04.2017 - 21:32DROPS Design answered:
Liebe Tina, Beim Rumpfteil werden 4 Stb in der Größe S gleichmäßig verteilt abgenommen = 156 Stb dann wird A.1a 26 x in der Breite gearbeitet (26 x 6 M = 156 M). Viel Spaß beim häkeln!
30.05.2017 - 13:27
![]() Krisztina Pethő wrote:
Krisztina Pethő wrote:
A 6. sornál tartok. Értem ,hogy az A1est a jelzett markerek közt szaporítani kell, köztük pedig az A2vel az ábra szerint dolgozom, szaporítás nélkül. Onnantól nem értem, hogy "Ezután ismételjem az A1es diagramot 3 és 8 alkalommal. (L méret)" Hol? A következő sorban? Ismételjem meg ugyanezt a sort/mintát? Vagy folytassam a következő sorral a minta szerint? Nagyon örülnék, ha kapnék rá választ! Köszönöm!
12.03.2017 - 20:59DROPS Design answered:
Kedves Krisztina! Köszönjük a kérdését! A 6. sorban / körben a megadott számok szerint szaporítani kell, a következő sorban az adott helyeken a megadott számú alkalommal kell ismételni a mintákat egymás mellett a jelölők között.
28.03.2017 - 00:46
![]() Mariangeles wrote:
Mariangeles wrote:
En el remate final de la manga faltan los tres puntos de cadeneta
08.03.2017 - 21:05
![]() Julie wrote:
Julie wrote:
Je suis rendu à la sixième tour de a1. Il faut augmenter dans la dans le 2eme et le 3eme marqueur et le 6eme et le 7eme. Pour les autres marqueur, est ce que je dois faire dans la sixième tour ou je dois faire sur un autre tour. Ensuite, il faut répéter a1. Faut il recommencer depuis le début.
11.01.2017 - 06:18DROPS Design answered:
Bonjour Julie, augmentez entre les marqueurs comme indiqué soit entre le 2ème et le 3ème + entre le 6ème et le 7ème + entre le 4ème et le 5ème + entre le 8ème et le 1er marqueur - crochetez les autres diagrammes comme avant. Comme on augmente un nombre multiple du motif, on pourra crocheter 1 motif en plus entre les marqueurs comme indiqué. Bon crochet!
11.01.2017 - 09:33
![]() Iris wrote:
Iris wrote:
Hallo, ik had nog een over dit patroon. Er staat twee keer genoemd dat ik in het lijf een markeerder moet plaatsen om de lengte te kunnen meten. Welke is de juiste? Bij het begin van het lijf of na de eerste keer A1a?
01.01.2017 - 16:13DROPS Design answered:
Hoi Iris. Je hebt gelijk. Dit is een klein foutje in de vertaling. Je moet alleen de eerste markeerder plaatsen. Het patroon is aangepast. Bedankt.
12.01.2017 - 15:08
|
||||||||||||||||||||||||||||
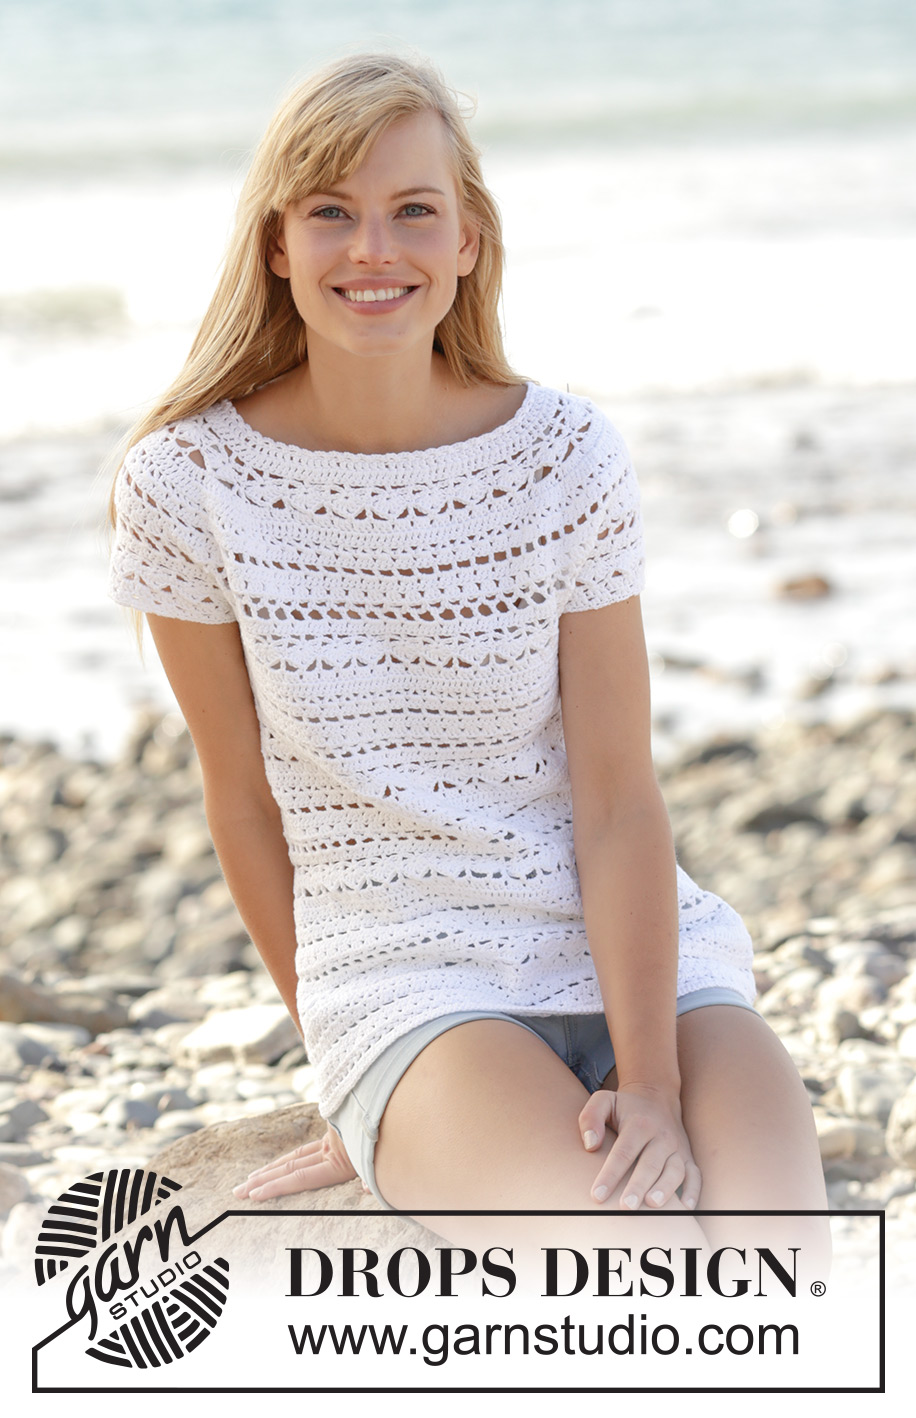
Seashore Bliss Top#seashoreblisstop |
||||||||||||||||||||||||||||
|
|
||||||||||||||||||||||||||||
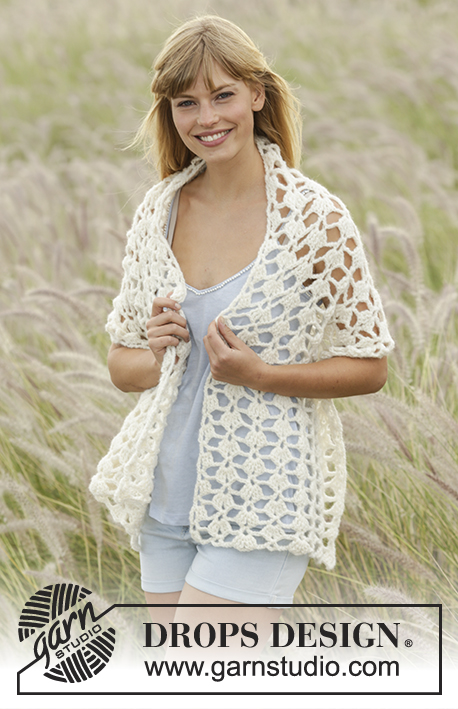
Crochet DROPS top with lace pattern and round yoke in ”Muskat”. The piece is worked top down. Size: S - XXXL.
DROPS 169-26 |
||||||||||||||||||||||||||||
|
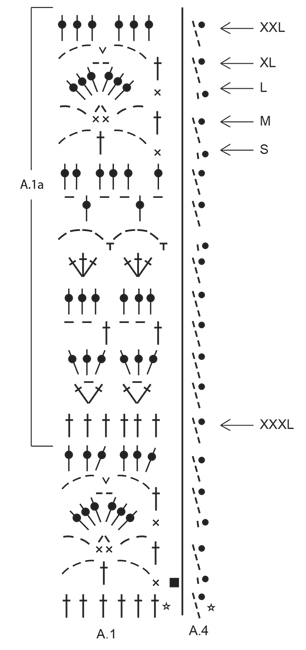
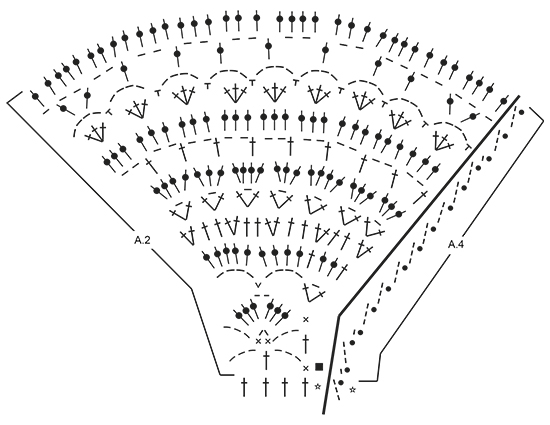
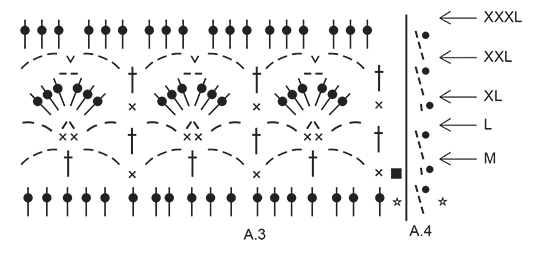
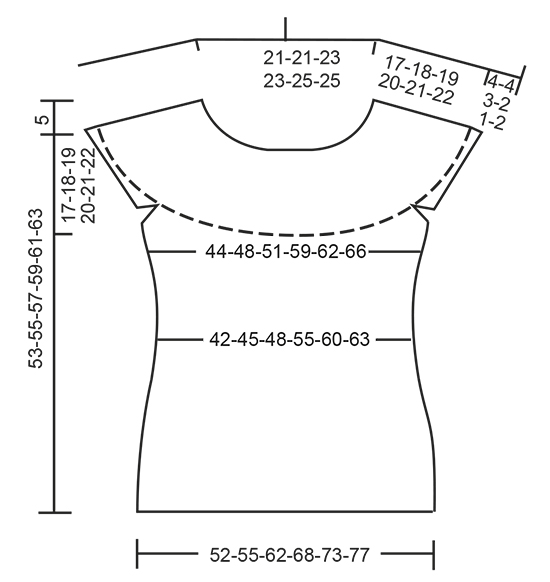
PATTERN: See diagrams A.1 to A.4. Diagram A.4 shows how round beg and ends. CROCHET INFO: Replace first tr at beg of every tr round with 3 ch. Finish round with 1 sl st in 3rd ch at beg of round. Replace first dc at beg of every dc round with 1 ch. Finish every round with 1 sl st in ch from beg of round. INCREASE TIP: Inc 1 tr by working 2 tr in same tr. DECREASE TIP: Dec 1 tr by working 2 tr tog as follows: Work 1 tr but wait with last pull through (= 2 sts on hook), then work next tr but on last pull through, pull yarn through all 3 sts on hook. TIP ARMHOLE: Size S, M and XL: In the last repeat of A.1 before marker 1 and marker 3 (= beginning of armhole), replace the last chain stitch with a treble crochet in the last stitch of the same repeat on previous row. ---------------------------------------------------------- TOP: The piece is worked top down. NOTE: It is important to keep the crochet tension vertically so that the measurements on yoke will be correct. YOKE: Work 108-108-117-117-124-124 ch on hook size 4 mm with Muskat and form 1 ring with 1 sl st in first ch. Work first round as follows: Work 3 ch (= 1 tr) - READ CROCHET INFO, 1 tr in each of the next 3-3-5-5-5-5 ch, * skip 1 ch, 1 tr in each of the next 6 ch *, repeat from *-* the entire row = 94-94-102-102-108-108 tr. Work 1 round with 1 tr in every tr and inc 18-18-22-22-28-40 tr evenly - READ INCREASE TIP = 112-112-124-124-136-148 tr. Work next round and insert 8 markers in the piece as follows: A.4 shows how round beg and ends. Insert 1st marker at beg of round, work A.2 over the first 4 tr, insert 2nd marker, A.1 over the next 12 tr (= 2 times in width), insert 3rd marker, A.2 over the next 4 tr, insert 4th marker, work A.1 over the next 36-36-42-42-48-54 tr (= 6-6-7-7-8-9 times in width), insert 5th marker, A.2 over the next 4 tr, insert 6th marker, A.1 over the next 12 tr (= 2 times in width), insert 7th marker, A.2 over the next 4 tr, insert 8th marker, A.1 over the last 36-36-42-42-48-54 tr (= 6-6-7-7-8-9 times in width). REMEMBER THE CROCHET TENSION! SIZE XXL-XXXL: On 5th round (round with tr) in A.1 inc evenly as follows: Between 2nd and 3rd marker and 6th and 7th marker: Inc 6-6 tr. 12-12 tr have been inc in total on round (= 18-18 tr between 2nd and 3rd marker and 6th and 7th marker). Repeat A.1 3-3 times between 2nd and 3rd marker and between 6th and 7th marker: ALL SIZES: On 6th round (round with tr) in A.1 inc evenly as follows: Between 2nd and 3rd marker and 6th and 7th marker: Inc 0-0-6-6-6-6 tr (= 12-12-18-18-24-24 tr between these markers). Between 4th and 5th marker and 8th and 1st marker: Inc 0-6-6-6-6-6 tr (= 36-42-48-48-54-60 tr between each of these markers). Then repeat diagram A.1 2-2-3-3-4-4 times between 2nd and 3rd marker, 6-7-8-8-9-10 times between 4th and 5th marker, 2-2-3-3-4-4 times between 6th and 7th marker and 6-7-8-8-9-10 times between 8th and 1st marker. Work A.2 as before. SIZE XL-XXL-XXXL: On 8th round (round with tr) in A.1 inc evenly as follows: Between 4th and 5th marker and 8th and 1st marker: Inc 6-6-6 tr (= 54-60-66 tr between each of these markers). 12-12-12 tr have been inc in total on round. Repeat A.1 9-10-11 times between 4th and 5th marker and between 8th and 1st marker. Repeat inc on 10th round in A.1 (= 60-66-72 tr between each of these markers). Repeat diagram A.1 10-11-12 times between 4th and 5th marker and between 8th and 1st marker. ALL SIZES: On last round in A.2 insert 1 new marker in the middle of each A.2 (i.e. 18 tr on each side of marker in A.2 = 4 markers). Remove the old markers (= 4 markers remain in piece). Sts between markers are for sleeves (= 48-48-54-54-60-60 tr on each sleeve). When A.2 has been worked 1 time vertically, there are 240-252-276-300-324-336 tr on round. Yoke is now done in size S. SIZE M-L-XL-XXL-XXXL: Continue with pattern A.1 as before but over tr in A.2 (= 36 tr) work A.3 2 times in total in width (marker is in the middle of these repetitions). Work 1-2-3-4-5 rounds of A.3 (see arrow in diagram for correct size). Piece now measures 17-18-19-20-21-22 cm vertically. ALL SIZES: Work A.1a (see arrow on where pattern beg in the different sizes) 3 times in total in width until first marker – SEE ARMHOLE TIP, work 8-8-8-10-10-10 ch, skip sts between the 2 markers (= sleeve), work A.1a 12-13-14-16-17-18 times in total in width until next marker (= front piece), work 8-8-8-10-10-10 ch, skip sts between the 2 markers (= sleeve), work A.1a 9-10-11-13-14-15 times in total in width (= 160-172-184-212-224-236 sts). Fasten off. BODY: Beg round mid under sleeve as follows: Size S-L: Work 1 sl st in 5th ch, 1 ch, work 1 dc in each of the next 3-3 ch, work A.1a as before until ch under 2nd sleeve, 1 dc in each of the 8-8 ch under sleeve, work A.1a as before the rest of round. Work the 8-8 sts under each sleeve as 1st st in A.1a. SIZE M-XL-XXL-XXXL: Work 1 sl st in 5th ch, 3 ch, work 1 tr in each of the next 3-5-5-5 ch, work A.1a as before until ch under 2nd sleeve, 1 tr in each of the 8-10-10-10 ch under sleeve, work A.1a as before the rest of round. Work the 8-10-10-10 sts under each sleeve as 1st st in A.1a. ALL SIZES: Insert 1 marker in piece, NOW MEASURE PIECE FROM HERE. On first round with tr dec 4-4-4-2-2-2 tr evenly - READ DECREASE TIP = 156-168-180-210-222-234 tr. Then repeat A.1a 26-28-30-35-37-39 times in width. Repeat A.1a vertically. When piece measures 12 cm, adjust so that next round is with tr, dec 6 tr evenly = 150-162-174-204-216-228 tr. Now repeat A.1a 25-27-29-34-36-38 times in width. SIZE XL: Repeat dec when piece measures 16 cm from marker = 198 tr. Now repeat A.1a 33 times in width. ALL SIZES: When piece measures 20-21-22-23-24-25 cm from marker – adjust so that next round is with tr, inc 6 tr evenly. Repeat inc every 2-2-1½-1½-1½-1½ cm 5-5-7-7-7-7 more times = 186-198-222-246-264-276 tr. Repeat A.1a 1 more in width on every inc. When all inc are done, repeat A.1a 31-33-37-41-44-46 times in width. Work until piece measures 36-37-38-39-40-41 cm from marker, adjust to finish nicely according to pattern. Fasten off. SLEEVE EDGE: SIZE S: Beg by working mid under sleeve as follows: Work 1 sl st in 4th ch of the 8 ch worked in armhole on body. Work 1 ch (= 1 dc). Then work with 1 dc in each of the next 4 ch, work A.3 over the next 18 tr, work A.1 (adjust pattern according to A.3) 2 times in total in width as before, work A.3 over the next 18 tr, finish with 1 dc in each of the last 3 ch. Work as 1st st in A.3 in the 8 sts under sleeve. On last round in A.3 dec 10 tr evenly = 46 tr. SIZE M-XL-XXL: Beg by working mid under sleeve as follows: Work 1 sl st in 4th ch of the 8-10-10 ch worked in armhole on body. Work 3 ch (= 1 tr). Then work with 1 tr in each of the next 4-6-6 ch, work A.3 as before, work A.1 (adjust pattern according to A.3) 2-3-4 times in total in width as before, work A.3, finish with 1 tr in each of the last 3 ch. Work as 1st st in A.3 in the 8-10-10 sts under sleeve. On last round in A.3 dec 10 tr evenly = 46-54-60 tr. SIZE L: Beg by working mid under sleeve as follows: Work 1 sl st in 4th ch of the 8 ch worked in armhole on body. Work 1 ch (= 1 dc). Then work 1 dc in each of the next 4 ch, work A.3 as before, work A.1 (adjust pattern according to A.3) 3 times in total in width as before, work A.3, finish with 1 dc in each of the last 3 ch. Work as 1st st in A.3 in the 8 sts under sleeve. On last round in A.3 dec 10 tr evenly = 52 tr. SIZE XXXL: Beg by working mid under sleeve as follows: Work 1 sl st in 4th ch of the 10 ch worked in armhole on body. Work 3 ch (= 1 tr). Then work 1 tr in each of the next 6 ch, work 1 tr in each of the 60 tr, finish with 1 tr in each of the last 3 ch. Work 1 tr in every tr and dec 10 tr evenly = 60 tr. ALL SIZES: Work * 1 dc in first/next tr, 1 ch, skip approx. 1 cm *, repeat from *-* around the entire sleeve. Fasten off. Work the other sleeve the same way. NECK EDGE: Crochet an edge around the neck. Beg mid back. Work * 1 dc in first/next tr, 3 ch, skip approx. 1 cm *, repeat from *-* around the entire neck. Make sure to avoid a tight neck edge, adjust to finish with 1 sl st in first ch. Fasten off. |
||||||||||||||||||||||||||||
Diagram explanations |
||||||||||||||||||||||||||||
|
||||||||||||||||||||||||||||
 |
||||||||||||||||||||||||||||
 |
||||||||||||||||||||||||||||
 |
||||||||||||||||||||||||||||
 |
||||||||||||||||||||||||||||
Have you finished this pattern?Tag your pictures with #dropspattern #seashoreblisstop or submit them to the #dropsfan gallery. Do you need help with this pattern?You'll find 10 tutorial videos, a Comments/Questions area and more by visiting the pattern on garnstudio.com. © 1982-2025 DROPS Design A/S. We reserve all rights. This document, including all its sub-sections, has copyrights. Read more about what you can do with our patterns at the bottom of each pattern on our site. |
||||||||||||||||||||||||||||


With over 40 years in knitting and crochet design, DROPS Design offers one of the most extensive collections of free patterns on the internet - translated to 17 languages. As of today we count 320 catalogues and 12093 patterns translated into English (UK/cm). 12093
We work hard to bring you the best knitting and crochet have to offer, inspiration and advice as well as great quality yarns at incredible prices! Would you like to use our patterns for other than personal use? You can read what you are allowed to do in the Copyright text at the bottom of all our patterns. Happy crafting!
Post a comment to pattern DROPS 169-26
We would love to hear what you have to say about this pattern!
If you want to leave a question, please make sure you select the correct category in the form below, to speed up the answering process. Required fields are marked *.