
Popular categories
Looking for a yarn?


Comments / Questions (94)
![]() Liesbeth Van Besouw wrote:
Liesbeth Van Besouw wrote:
Bij telpatroon Drops Children 26-3 gebroken lijn links=lange kant: zet 1 st op een kabelnld en houd deze achter het werk, 3 r, 1 r van de kabelnld gebroken lijn rechts=lange kant: zet 3 st op een kabelnld en houd deze voor het werk, 3 r, 1 r van de kabelnld. Klopt dat wel? Of moet de laatste zijn: 3 st op kabelnld, dan 1r, 3r van de kabelnld
04.11.2022 - 12:04DROPS Design answered:
Dag Liesbeth,
Er stond inderdaad een foutje in de beschrijving bij het laatste symbool. Het is nu aangepast, hoor!
05.11.2022 - 14:13
![]() Andi wrote:
Andi wrote:
I am almost finished! Great pattern! I have just slipped the middle 26 stitches to my stitch holder for the yoke. And now I am ready to start the back and forth rows. I am confused because my left needle is on the left of the slipped stitches and my right needle is to the right of the slipped stitches. Is that incorrect? When I start knitting won’t I bind together the left and right sides of the neck? Sorry I am kind of stuck here! Thank you!
23.10.2022 - 23:00DROPS Design answered:
Dear Andi, before slipping the stitches to the auxiliary needle, you should have worked the stitches, so as to avoid cutting the thread and starting with a new one. Therefore, you should have slipped the worked stitches from the right needle to the auxiliary needle and you can continue until the other side of the neck in the same row; then turn back and start the decreases for the neck. Happy knitting!
23.10.2022 - 23:21
![]() Andi wrote:
Andi wrote:
I am at the first instructions to bind off for the neck edge, mid front. I am concussed because the photo on this pattern does not look like the instructions and am wondering if you have a photo of the sweater with the neck as described in the pattern steps?
16.10.2022 - 21:22DROPS Design answered:
Dear Andi, could you indicate specifically which part of the bind-off for the neck edge is different from the neck in the photo? Both should match since this is the final product of the pattern instructions. Happy knitting!
17.10.2022 - 00:24
![]() Lorella wrote:
Lorella wrote:
Salve !Vorrei lavorare questo modello ma ho un dubbio con quante maglie iniziare il lavoro per il bordo a coste .Dato che la circonferenza del corpo per una taglia 2 anni è di 60 cm. ed il campione è di 21 m. in 10 cm . ,non sono tante 184 m. da mettere sul ferro ?\r\nGrazie.
06.10.2022 - 19:47DROPS Design answered:
Buonasera Lorella, il bordo a coste tende a stringere il lavoro, per cui si montano più maglie che poi verranno diminuite alla fine del bordo. Buon lavoro!
07.10.2022 - 20:58
![]() Lendvay-Barabási Andrea wrote:
Lendvay-Barabási Andrea wrote:
A3 minta felett a diagramm alsó sorában 3 szemet teszünk segédtűre nem az 1 szemet. A 9-10 éves résznél a 70 szemből ha leláncolunk 6-t akkor 64 marad a 66 helyett. Üdvözlettel, Andrea
26.11.2021 - 20:08
![]() Lendvay-Barabási Andrea wrote:
Lendvay-Barabási Andrea wrote:
Kedves Hölgyem, A kérdésem az lenne hogy amikor elértem a 46 cm-t (9-10 évesre kötöm) akkor csak az elején kell a 20 szemet a tűtartóra csúsztatnom v a hátulján is? Nem láncolom le őket csak külön tűtartora teszem? Vagy a hátulján egy kisebb nyak vonalat hagyjak ki?
26.11.2021 - 20:03
![]() Shelley wrote:
Shelley wrote:
Thank you for your answer. Unfortunately there are no instructions to place a marker. Here are the instructions. " Switch to double pointed needles size 4 mm and work in stocking st. When piece measures 6-8-8-8-7 cm, inc 2 sts mid under sleeve. Repeat inc every 2-2-2½-2½-2½ cm a total of 10-10-10-11-13 times = 52-56-60-66-70 sts. When piece measures 26-29-32-36-39 cm, cast off the middle 6 sts mid under sleeve = 4
14.11.2021 - 00:39DROPS Design answered:
Dear Shelley, it will make your work easier t put a marker to where you start the round, and make that the middle line at the underside of the sleeve. Happy Stitching!
14.11.2021 - 09:54
![]() Shelley wrote:
Shelley wrote:
I am stumped. II am about to start the sleeves in Lucky Jack. What does "inc 2 sts mid under sleeve" mean?
13.11.2021 - 16:26DROPS Design answered:
Dear Shelley, it means that under the sleeve, where you have put the marker, you should increase 1 stitch befor and after the marker. Happy stitching!
14.11.2021 - 00:21
![]() Pamela Aguirre wrote:
Pamela Aguirre wrote:
Hola Se puede tejer con agujas lisas y no circulares? como tengo que dividir el tejido? gracias
18.10.2021 - 22:06DROPS Design answered:
Hola Pamela. Para tejer con agujas lisas, puedes trabajar la espalda y el delantero por separado. Para eso tienes que dividir el número total de puntos entre 2 y añadir los puntos orillo a cada lado de cada parte. Pero la parte de canesú la tienes que trabajar en redondo con una aguja circular o agujas de doble punta (como las de calcetines).
18.10.2021 - 22:19
![]() Yvonne Wilhelm wrote:
Yvonne Wilhelm wrote:
Wenn ich die Ärmel an das Rumpfteil ansetze, ist dann mein Rundenbeginn oben in der Mitte des linken Ärmels, oder kann ich diesen beliebig hinter den linken Ärmel bei dem glatt rechts gestrickten Teil ansetzen? Danke und LG Vonny
18.01.2021 - 20:24DROPS Design answered:
Liebe Frau Wilhelm, Rundenbeginn soll zwischen Rückenteil und Ärmel sein (entweder vor dem Rückenteil oder nach Rückenteil), seien Sie nur sicher, daß Sie mit 1 Masche rechts beginnen (zwischen den 2 Raglanmaschen). Viel Spaß beim stricken!
19.01.2021 - 07:13
|
|||||||||||||||||||||||||||||||
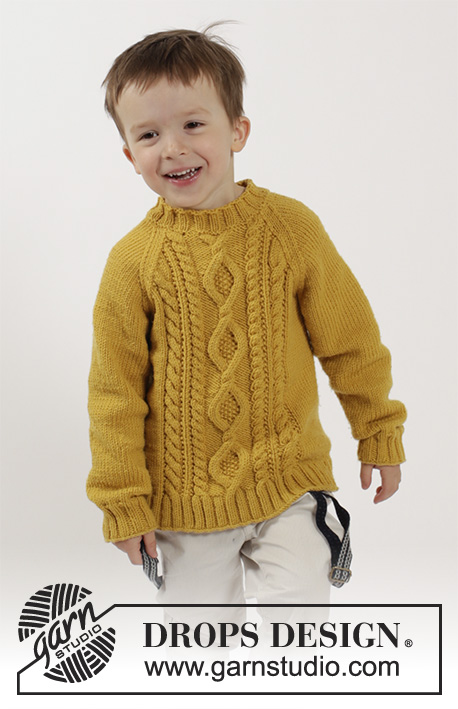
Lucky Jack#luckyjacksweater |
|||||||||||||||||||||||||||||||
 |
 |
||||||||||||||||||||||||||||||
Knitted jumper with raglan and cables in DROPS Merino Extra Fine. Size children 2 - 10 years
DROPS Children 26-3 |
|||||||||||||||||||||||||||||||
|
PATTERN: See diagrams A.1 to A.3. The diagrams show all rows in pattern seen from RS. RAGLAN: Dec for raglan on each side of marker in every transition between sleeves and body. DEC AS FOLLOWS FROM RS: Beg 3 sts before marker and K 2 tog, K 2 (marker is between these 2 sts), slip 1 st as if to K, K 1, psso (= 2 sts dec). DEC AS FOLLOWS FROM WS: Beg 3 sts before marker and P 2 twisted tog, P 2 (marker is between these 2 sts) and P 2 tog (= 2 sts dec). ---------------------------------------------------------- BODY: Worked in the round on circular needle. Cast on 184-200-208-216-224 sts on circular needle size 3.5 mm with Merino Extra Fine. K 1 round. Work next round as follows: SIZE 2 + 3/4 + 7/8 YEARS: K 1, * P 2, K 2 *, repeat from *-* 4-5-6 times in total, work rib according to diagram A.1 over the next 58 sts (= mid front), * K 2, P 2 *, repeat from *-* 8-10-12 times in total, K 2, work rib according to diagram A.1 over the next 58 sts (= mid back), * K 2, P 2 *, repeat from *-* 4-5-6 times in total and finish with K 1. SIZE 5/6 + 9/10 YEARS: P 1, * K 2, P 2 *, repeat from *-* 5-6 times in total, K 2, work rib according to diagram A.1 over the next 58 sts (= mid front), * K 2, P 2 *, repeat from *-* 11-13 times in total, K 2, work rib according to diagram A.1 over the next 58 sts (= mid back), * K 2, P 2 *, repeat from *-* 5-6 times in total and finish with K 2 and P 1. Continue rib like this until piece measures 5 cm. Switch to circular needle size 4.0 mm and work next round as follows FOR ALL SIZES: K the first 17-21-23-25-27 sts and dec at the same time 3-5-5-5-5 sts evenly over these sts, work and dec according to A.2 over the next 58 sts, K over the next 34-42-46-50-54 sts and dec at the same time 6-10-10-10-10 sts evenly over these sts, work and dec according to A.2 over the next 58 sts, K the last 17-21-23-25-27 sts and dec at the same time 3-5-5-5-5 sts evenly over these sts. After A.2, there are 160-168-176-184-192 sts on needle. Work next round as follows: 14-16-18-20-22 sts in stocking st, work pattern according to diagram A.3 (= 52 sts), 28-32-36-40-44 sts in stocking st, work pattern according to diagram A.3 (= 52 sts) and finish with 14-16-18-20-22 sts in stocking st. Continue pattern like this. REMEMBER THE KNITTING TENSION When piece measures 22-25-28-31-34 cm, work next round as follows: Cast off 3 sts for armhole, work the next 74-78-82-86-90 sts as before (= front piece), cast off 6 sts for armhole, work the next 74-78-82-86-90 sts as before (= back piece) and cast off the last 3 sts for armhole. Put piece aside and knit the sleeves. SLEEVE: Worked in the round on double pointed needles. Cast on 32-36-40-44-44 sts on double pointed needles size 3.5 mm with Merino Extra Fine. K 1 round. Then work rib = K 2/P 2 until piece measures 5 cm. Switch to double pointed needles size 4 mm and work in stocking st. When piece measures 6-8-8-8-7 cm, inc 2 sts mid under sleeve. Repeat inc every 2-2-2½-2½-2½ cm a total of 10-10-10-11-13 times = 52-56-60-66-70 sts. When piece measures 26-29-32-36-39 cm, cast off the middle 6 sts mid under sleeve = 46-50-54-60-64 sts remain on needle. Put piece aside and knit another sleeve. YOKE: Slip sleeves on to same circular needle as body where armholes were cast off (without working them first) = 240-256-272-292-308 sts on needle. Insert 1 marker in all transitions between sleeves and body piece = 4 markers. Continue in the round with stocking st and pattern as before. AT THE SAME TIME on first round dec for RAGLAN in every transition between body and sleeves – see explanation above (= 8 sts dec). Repeat dec for raglan every other round a total of 14-16-16-17-17 times and then every round a total of 3-3-5-7-9 times. AT THE SAME TIME when piece measures 32-35-39-42-46 cm, slip the middle 28-26-26-20-20 sts mid front on 1 stitch holder for neck (work sts before slipping them on the stitch holder). Then finish piece back and forth on circular needle from mid front and cast off for neck at beg of every row in each side as follows: Cast off 2 sts 1-1-1-2-2 times and 1 st 1-2-2-2-2 times. After all dec for raglan and cast offs for neck, 70-70-70-68-68 sts remain on needle. NECK EDGE: Pick up from RS on circular needle size 3.5 mm approx. 104-104-104-100-100 sts around the neck (incl sts on stitch holder at the front). P 1 round. Then K 1 round while dec evenly to 60-68-76-80-88 sts. Then work rib = K 2/P 2 for 3 cm, then cast off with K over K and P over P. ASSEMBLY: Sew the openings under the sleeves. |
|||||||||||||||||||||||||||||||
Diagram explanations |
|||||||||||||||||||||||||||||||
|
|||||||||||||||||||||||||||||||

|
|||||||||||||||||||||||||||||||

|
|||||||||||||||||||||||||||||||

|
|||||||||||||||||||||||||||||||
Have you finished this pattern?Tag your pictures with #dropspattern #luckyjacksweater or submit them to the #dropsfan gallery. Do you need help with this pattern?You'll find 27 tutorial videos, a Comments/Questions area and more by visiting the pattern on garnstudio.com. © 1982-2025 DROPS Design A/S. We reserve all rights. This document, including all its sub-sections, has copyrights. Read more about what you can do with our patterns at the bottom of each pattern on our site. |
|||||||||||||||||||||||||||||||


With over 40 years in knitting and crochet design, DROPS Design offers one of the most extensive collections of free patterns on the internet - translated to 17 languages. As of today we count 314 catalogues and 11820 patterns translated into English (UK/cm). 11820
We work hard to bring you the best knitting and crochet have to offer, inspiration and advice as well as great quality yarns at incredible prices! Would you like to use our patterns for other than personal use? You can read what you are allowed to do in the Copyright text at the bottom of all our patterns. Happy crafting!
Post a comment to pattern DROPS Children 26-3
We would love to hear what you have to say about this pattern!
If you want to leave a question, please make sure you select the correct category in the form below, to speed up the answering process. Required fields are marked *.