
Looking for a yarn?


Comments / Questions (91)
![]() Laura wrote:
Laura wrote:
Scusate non mi sono spiegata, quando devo fare la calatura per la scollatura a V, che dite di calare le maglie prima o dopo del bordo a seconda se sia la.parte dx o sx, dite di mantenere il motivo ma se diminuisco 1 maglia prima del bordo le devo prendere dal motivo (3 dritti poi accavallata doppia, 3 rov) e quindi per il motivo mi trovo 1maglia in meno se le calo sulle 8 del bordo legaccio poi ne ho 7
20.06.2023 - 19:30
![]() Laura wrote:
Laura wrote:
Salve,sono arrivata allo scollo del davanti sx, sto lavorando con i ferri doppi, non capisco come diminuire le.maglie sul bordo legaccio e mantenere il motivo visto che calando una maglia devo comunque avere sempre lo stesso numero di maglie per il bordo (sto lavorando con il 3.5 quindk ho messo 11 maglie).grazie
19.06.2023 - 21:24DROPS Design answered:
Buonasera Laura, se abbiamo capito bene il suo dubbio, le maglie del bordo non diminuiscono, si lavora a ferri accorciati nell'ultima parte della lavorazione. Buon lavoro!
20.06.2023 - 17:03
![]() Jana wrote:
Jana wrote:
Je možné aktualizovat návod v češtině tak, aby odpovídal i jiným jazykovým mutacím ( němčině, angličtině)? Jedná se o přední díly, které se do počtu ok a ujímání musí plést jinak. Já už jsem si část, která nekoresponduje, musela vypárat . Bohužel. Až na tuto výtku si velmi cením Vašich návodů.
24.10.2022 - 12:19
![]() Sylvie wrote:
Sylvie wrote:
Bonjour. Vous dites qu'après A1 il fait faire A2 et après faire 2 cotes mousse et en même temps au 1er rg augmenter 2 m. Faut il les augmenter au début du shema A2 ou au 1er rg des côtes mousse. Merci pour votre réponse
25.07.2022 - 20:13DROPS Design answered:
Bonjour Sylvie, vous augmentez ces 2 mailles au 1er rang des côtes mousse. Bon tricot!
25.07.2022 - 20:30
![]() Valérie wrote:
Valérie wrote:
Bonjour, J ai l impression que le col en rang raccourci est inversé car le côté arrondi et donc le plus long est celui qui doit s emboîter et être cousu. Merci pour votre retour Cordialement Valérie
20.03.2022 - 19:39DROPS Design answered:
Bonjour Valérie, en commençant les rangs raccourcis sur l'endroit pour le devant droit (sur l'envers pour le devant gauche), vous commencez par les mailles de l'extérieur, autrement dit, le côté le plus court sera celui côté épaule/ qui sera assemblé le long de l'encolure dos. Bon tricot!
21.03.2022 - 08:48
![]() Daniela wrote:
Daniela wrote:
Buongiorno. Non riesco a capire come lavorare i ferri accorciato sui davanti.
25.11.2021 - 09:08DROPS Design answered:
Buonasera Daniela, i ferri accorciati sono ferri lavorati solo su una parte delle maglie sul ferro: ci può spiegare quale passaggio non le è chiaro? Buon lavoro!
26.11.2021 - 00:25
![]() Lysiane wrote:
Lysiane wrote:
Bonjour Je me demandais s'il n'y avait pas une inversion dans la légende concernant les 2 mailles ensemble et le surjet. Car les dessins représentés sont l'inverse de ce que cela donne. Merci d'avance pour votre réponse.
27.10.2021 - 17:16DROPS Design answered:
Bonjour Lysiane, vous avez raison. Les symbols 1. 2 mailles ensemble a l'endroit et 2. glisser 1 m à l'end, 1 m end, passer la m glissée par-dessus la m tricotée sont inverses. Merci de l'avoir notifie. Bon tricot!
27.10.2021 - 18:27
![]() Dubuisson wrote:
Dubuisson wrote:
Bonjour, Tout d abord un grand merci pour ce magnifique modèle. J ai un soucis au niveau des diminutions devant droit,j ai 46 mailles pour le modèle xxl, si je rabat comme pour le dos soit 12 mailles+3mailles+1m+4 fois au total(1 maille? Non précisé), j obtiens 26 mailles au lieu de 19 mailles au final. Merci pour votre aide Cordialement Valérie
29.09.2021 - 19:55DROPS Design answered:
Bonjour Mme Dubuisson, vous devez avoir 27 m au total en XXL, avant de rabattre les mailles de l'épaule, autrement dit: 46 m - 3 m - 4 m (encolure) - 12 (emmanchure) = 27 m, vous rabattez ensuite les 19 m de l'épaule, il reste 8 m pour le col. Est-ce que cela peut vous aider? Bon tricot!
30.09.2021 - 09:51
![]() Elke Neurohr wrote:
Elke Neurohr wrote:
Hallo, würde gerne wissen ob der Rand mit Randmaschen gestrickt wird? Konnte in der Anleitung keinen Hinweis dazu finden. Vielen Dank. MfG Elke Neurohr
24.05.2021 - 15:05DROPS Design answered:
Liebe Frau Neurohr, es sind keine zusätzliche Maschen anzuschlagen, nur die 177 bis 277 M (siehe Größe) und dann stricken Sie 8 BlendeMaschen krausrechts beidseitig und die mittleren Maschen im Muster. Viel Spaß beim stricken!
25.05.2021 - 08:32
![]() Dozol Dominique wrote:
Dozol Dominique wrote:
Bonjour serai t il possible de tricoter ce modèle sans aiguille circulaire mais avec des aiguilles normales donc le dos et les 2 devants séparés si oui merci de me expliquer comment compter mes mailles merci
19.09.2020 - 18:52DROPS Design answered:
Bonjour Mme Dozol, cette leçon explique comment adapter un modèle sur aiguilles droites et vous expliquera ainsi comment procéder. Bon tricot!
21.09.2020 - 09:05
|
|||||||||||||||||||
Maja#majacardigan |
|||||||||||||||||||
 |
 |
||||||||||||||||||
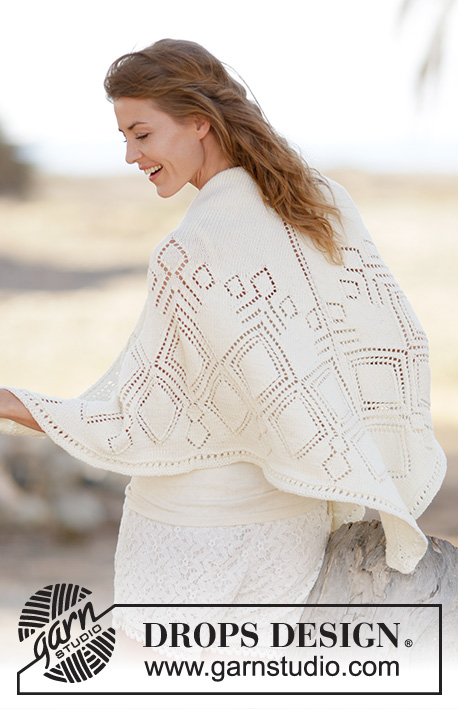
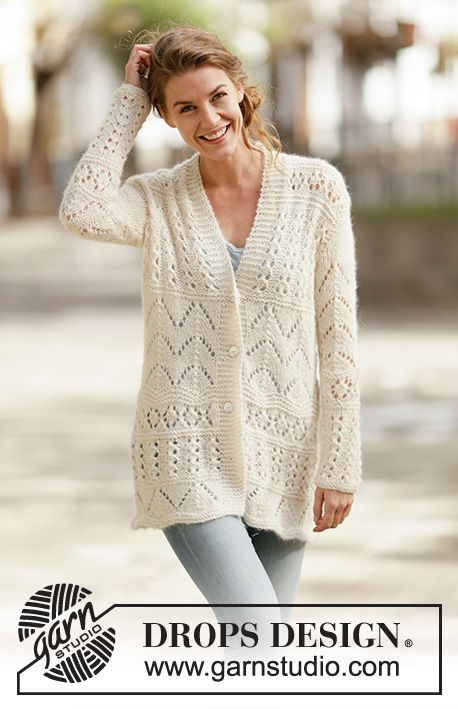
Knitted DROPS jacket with lace pattern in ”Air”. Size: S - XXXL.
DROPS 160-3 |
|||||||||||||||||||
|
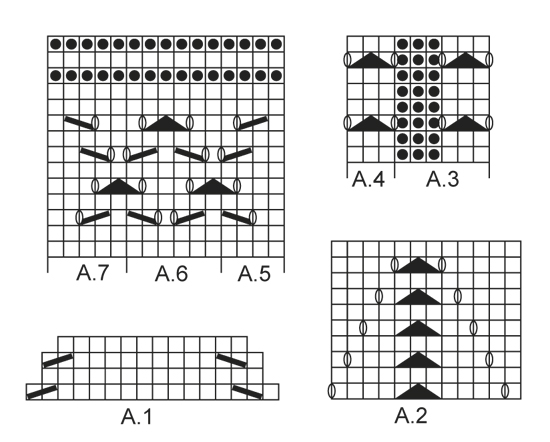
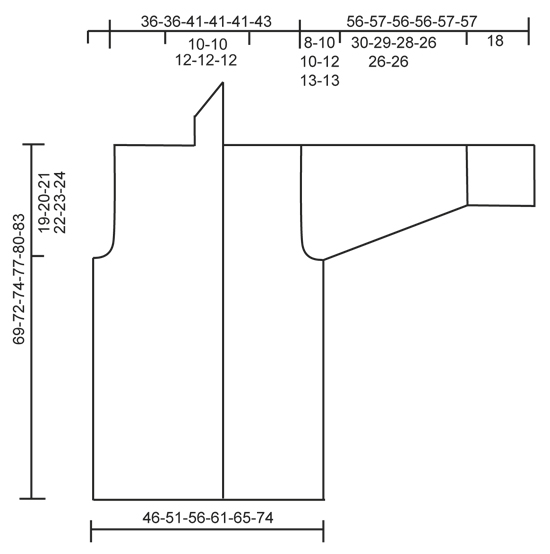
GARTER ST (back and forth on needle): K all rows. 1 ridge = 2 rows K. PATTERN: See diagrams A.1 to A.7. The diagrams show all rows in pattern seen from RS. BUTTONHOLES: Dec for buttonholes when piece measures approx: 22,32 and 42 cm for all sizes. Make the buttonholes by K tog 4th and 5th st from RS and make a YO, K YO on next row. ---------------------------------------------------------- JACKET: Worked back and forth on circular needle. Loosely cast on 177-193-209-225-241-257 sts (incl 8 band sts in each side) on circular needle size 7 mm with Air. Work 2 ridges in GARTER ST - see explanation above (1st row = RS). Then work according to diagram A.1 as follows: 8 band sts in GARTER ST - see explanation above, repeat A.1 until 9 sts remain, work 1 st in stocking st and 8 band sts in garter st. REMEMBER THE KNITTING TENSION When diagram A.1 has been worked 1 time vertically = 137-149-161-173-185-197 sts. Now work according to diagram A.2 over A.1. When diagram has been worked 1 time in total vertically, work 2 ridges AT THE SAME TIME on first row inc 2 sts evenly on row = 139-151-163-175-187-199 sts. Now work according to diagram A.3 and A.4 as follows: 8 band sts in garter st, repeat A.3 until 11 sts remain, work A.4 and 8 band sts in garter st. Work diagram A.3 and A.4 2 times in total vertically. Work 2 ridges. Work according to diagram A.5-A.7 as follows: 8 band sts in garter st, A.5 over 4 sts, repeat A.6 until 13 sts remain, A.7 over 5 sts and 8 band sts in garter st. NOTE: Dec for BUTTONHOLES - see explanation above - on right band. Work diagram 1 time vertically. Work 2 ridges - AT THE SAME TIME on first row dec 2 sts evenly on row = 137-149-161-173-185-197 sts. Then work according to diagram A.2 as follows: 8 band sts in garter st, repeat A.2 until 9 sts remain, 1 st in stocking st and 8 band sts in garter st. Work diagram 3 times in total vertically. Work 2 ridges AT THE SAME TIME on first row dec 4-10-4-10-4-10 sts evenly on row = 133-139-157-163-181-187 sts. Work according to A.3-A.4 as before- AT THE SAME TIME when piece measures 50-52-53-55-57-60 cm, divide the piece as follows: 8 band sts in garter st, work according to diagram over 26-28-32-34-38-40 sts, cast off the next 6 sts, work according to diagram over 53-55-65-67-77-79 sts, cast off 6 sts and work according to diagram over 26-28-32-34-38-40 sts and 8 band sts in garter st. Then finish each part separately. BACK PIECE: = 53-55-65-67-77-79 sts. Continue with pattern as before and cast off for armholes in each side on every other row: 2 sts 0-1-1-2-4-4 times and 1 st 3-2-4-3-4-4 times = 47-47-53-53-53-55 sts – NOTE: Work sts that do not fit pattern when casting off in stocking st. When piece measures approx. 58-60-62-62-66-68 cm (adjust after 1 whole repetition vertically), K 4 rows. Then work A.5-A.7 1 time vertically. After A.5-A,7 work in stocking st until finished measurements. When piece measures 68-70-72-75-78-81 cm, cast off the middle 11-11-13-13-13-13 sts for neck. Then cast off 1 st on next row towards the neck = 17-17-19-19-19-20 sts remain on each shoulder. When piece measures 69-71-73-76-79-82 cm, work 1 ridge before casting off. Piece measures 70-72-74-77-80-83 cm. RIGHT FRONT PIECE: = 34-36-40-42-46-48 sts. Work and cast off for armhole as on back piece. Work as back piece until piece measures appr 58-60-62-62-66-68 cm - adapt after a whole rep of diagram A.3-A.4 in hight. Knit 4 rows and AT THE SAME TIME dec 3 st evenly on first row. Knit diagram A.5-A.7 and AT THE SAME TIME dec 1 st for neck inside 8 band st, dec on every 4th row a total of 3-4-4-5-4-5 times - adapt pattern as you go. When A.5-A.7 is worked 1 time in hight knit in stock st until finished measurements. Make sure to work the same no of rows as on back piece = 25-25-27-27-27-28 st. When piece measures 69-71-73-76-79-82 cm, work 1 ridge over all sts. On next row from WS cast off the first 17-17-19-19-19-20 sts towards the shoulder and work the rest of row. Then work in garter st over the 8 band sts with short rows, beg from RS as follows: * K 4 sts, turn piece and K back. K all sts, turn piece and K back. * Repeat from *-* until collar measures 6-6-6-7-7-7 cm from shoulder (measured on the short side of band) and loosely cast off. LEFT FRONT PIECE: = 34-36-40-42-46-50 sts. Work as right front piece but reversed - NOTE: Make sure that the pattern is the same on each side of mid front. When piece measures 69-71-73-76-79-82 cm, work 1 ridge over all sts. On next row from RS cast off the first 17-17-19-19-19-20 sts, work the rest of row and work short rows as follows, beg from WS: * K 4 sts, turn and work back, K all sts, turn and work back. * Repeat from *-* until collar measures 6-6-6-7-7-7 cm from shoulder (measured on the short side of band) and loosely cast off. SLEEVE: Loosely cast on 26-26-29-29-32-32 sts (incl 1 edge st in each side) on circular needle size 7 mm with Air. Work 2 ridges (1st row = RS). Then work A.3 as follows: 1 edge st, A.3 over 24-24-27-27-30-30 sts and 1 edge st. Continue pattern like this until piece measures approx. 17 cm, adjust after 1 whole repetition vertically. Work 2 ridges (1st row = RS). Then work A.5-A.7 as follows: 1 edge st, 2-2-0-0-2-2 sts in stocking st, A.5 over 4 sts, repeat A.6 2-2-3-3-3-3 times, A.7 over 5 sts, 1-1-0-0-1-1 st in stocking st and 1 edge st AT THE SAME TIME when piece measures 18 cm, inc 1 st inside 1 edge st in each side every 3-2½-2½-2-2-1½ cm 10-11-11-13-13-14 times in total = 46-48-51-55-58-60 sts (work the inc sts in stocking st until they fit the pattern). When A.5-A.7 has been worked 1 time vertically, work according to diagram A.2 4 times in total vertically. Then continue in stocking st until finished measurements. When piece measures 49-47-47-45-44-43 cm (shorter measurements in the larger sizes because of longer sleeve cap and wider shoulders) cast off for sleeve cap in each side every other row: 3 sts 1 time, 2 sts 2-1-1-1-1 time and 1 st 2-6-5-6-7-8 times. Then cast off 2 sts in each side until piece measures 56 cm, then cast off 3 sts 1 time in each side. Cast off the remaining sts, piece measures approx. 56-57-56-56-57-57 cm. Knit another sleeve the same way. ASSEMBLY: Sew the shoulder seams. Sew in sleeves and sew sleeve seams. Sew on buttons. Sew band tog mid back and fasten the side of band to neck edge at the back. |
|||||||||||||||||||
Diagram explanations |
|||||||||||||||||||
|
|||||||||||||||||||
 |
|||||||||||||||||||
 |
|||||||||||||||||||
Have you finished this pattern?Tag your pictures with #dropspattern #majacardigan or submit them to the #dropsfan gallery. Do you need help with this pattern?You'll find 21 tutorial videos, a Comments/Questions area and more by visiting the pattern on garnstudio.com. © 1982-2025 DROPS Design A/S. We reserve all rights. This document, including all its sub-sections, has copyrights. Read more about what you can do with our patterns at the bottom of each pattern on our site. |
|||||||||||||||||||


With over 40 years in knitting and crochet design, DROPS Design offers one of the most extensive collections of free patterns on the internet - translated to 17 languages. As of today we count 320 catalogues and 12092 patterns translated into English (UK/cm). 12092
We work hard to bring you the best knitting and crochet have to offer, inspiration and advice as well as great quality yarns at incredible prices! Would you like to use our patterns for other than personal use? You can read what you are allowed to do in the Copyright text at the bottom of all our patterns. Happy crafting!
Post a comment to pattern DROPS 160-3
We would love to hear what you have to say about this pattern!
If you want to leave a question, please make sure you select the correct category in the form below, to speed up the answering process. Required fields are marked *.