
Looking for a yarn?


Comments / Questions (47)
![]() Marion wrote:
Marion wrote:
Bei der Anleitung heißt es beim Rückenteil der Jacke, nach 6, 5 cm die Armmaschen abnehmen... Der Ärmel der Vorderseite misst allerdings bei mir nur 5, 5 cm obwohl ich alle Maßangaben für das Vorderteil korrekt eingehalten habe. Ist es korrekt, dass der hintere Ärmel breiter gestrickt wird, als der vordere? Auf der Zeichnung ist dies nicht erkennbar.
03.09.2017 - 17:29DROPS Design answered:
Liebe Marion, nach 6.5 cm ketten Sie die ersten Maschen der Ärmel ab, alle Maschen für beiden Ärmel werden nach 9 cm abgekettet, so sind beide Ärmel gleich. Viel Spaß beim stricken!
04.09.2017 - 10:52
![]() Christiane wrote:
Christiane wrote:
Ich möchte gerne die Jacke stricken und stolpere leider schon über den Anfang. Ich habe die Maschen angeschlagen und weiß nun nicht genau wo ich zunehmen soll. gegen die Mitte steht da. Ist das dann in der Mitte vom Strickmuster? Allerdings ist am Amfang beim Tipp zum Aufnehmen erklärt, dass man aufnimmt indem man 2M. in die äußerste Masche strickt. Danke für die Hilfe Christiane
17.07.2017 - 16:13DROPS Design answered:
Liebe Christiane, die Zunahmen sollen gegen die Mitte sein, dh beim rechten Vorderteil am Anfang der Hinreihen und am Ende der Rückreihen. Die Zunahmen abwechslungsweise in jeder 2. und 3. R. wiederholen (= am Anfang einer Hinreihe bzw Ende einer Rückreihe). Viel Spaß beim stricken!
18.07.2017 - 08:26
![]() Hayley wrote:
Hayley wrote:
Hi, I've just come across your wonderful website. My question is after a brief look at baby patterns, they seem to be knitted on circular needles. As an underarm knitter, try as I might I can't use circular ones. Can I use straight needles or will it affect pattern/ tension or such? Thank you so much your site is beautifully wonderful and so generous with all the free patterns!
28.01.2017 - 13:12DROPS Design answered:
Dear Hayley, please find here all relevant informations about adapting a pattern into straight needles. Happy knitting!
30.01.2017 - 10:54Jórunn Sörensen wrote:
Er det ikke en fejl at man skal i störrelse 6-9 mdr slutte med at tage ud 18 m på 1 gang? Det passer i hvert fald ikke med det antal masker man skal slutte med - altså 58 efter alle udtagninger og afslutninger? Venlig hilsen og tak for de mange dejlige opskrifter. Den her skal til mit nyfödte oldebar. Jorunn
17.03.2016 - 00:38DROPS Design answered:
Hej Jorunn, Jo det stemmer, du skal slå 18 nye m op sidst på pinden til ærme og da stemmer antal masker med alle indtagninger mod midt foran og nye masker til ærmet. God fornøjelse!
30.03.2016 - 14:41
![]() Susanne Knudsen wrote:
Susanne Knudsen wrote:
Jeg har nu strikket en del i Merino big og Ekstra fine og Baby Merino Og først nu begynder jeg at vaske Og det vokser , og det er mest i længden Jeg overholder fuldstændig vaskeanvisning Først troede jeg jo jeg var god, når jeg vaskede i hånden Nu er jeg meget i tvivl, om jeg orker at strikke mere med Merino HJÆLP ER der nogen der har oplevet det samme, for det er ubrugeligt efter vask. Jeg har lavet små strikkeprøver og vasket , og de både mister lidt glans
11.03.2016 - 11:40DROPS Design answered:
Hej Susanne. Merino garn er så blødt og dejligt og der er absolut ikke nogle problemer med at vaske det - MEN det er utroligt vigtigt at man vasker det korrekt - Se information på hvert farvekort. Vask i vaskemaskine på 40 grader (gerne på uldprogram), altid separat med lidt uldvaskemiddel. Brug aldrig skyllemiddel (skyllemiddel gør fibrene endnu blødere så de glider fra hinanden). Lad tøjet ligge til tørre efter centrifugering (hvis det hænger vil fibrene glide fra hinanden og tøjet vil vokse). Overhold altid strikkefastheden, strik hellere for fast end for løst! Held og lykke med vasken fremover!
11.03.2016 - 12:03
![]() Britt-Inger Köhn wrote:
Britt-Inger Köhn wrote:
I mönstret står det att masktätheten ska vara 21 m/42v. Det måste vara fel. På garnet står det 21m/28 v
26.09.2015 - 09:54DROPS Design answered:
Hej Masktätheten som uppges på garnet är i slätstickning. Du får fler varv med rätstickning som det ska vara i detta mönster så därför är det olika antal v. Lycka till!
30.09.2015 - 11:20
![]() Ann Boqvist wrote:
Ann Boqvist wrote:
Jag får inte antalet maskor att stämma på koftan. Efter att ha 24 maskor och gjort ökning med 3x3 maskor 2x5 maskor och 16 maskor så får jag det till 59 maskor och inte 53 som det står i mönstret på den minsta storleken....har jag fattat fel nånstans eller är det fel i mönstret?
31.08.2015 - 23:34DROPS Design answered:
Hej Vilken storlek stickar du, jag hittar inte när du skall ha 24 m som du skriver här?
03.09.2015 - 19:58
![]() Matis wrote:
Matis wrote:
Ich habe eine Frage zu den Aufnahmen: Vorderteil- 2 Maschen gegen den Hals aufnehmen. Wo genau ist das denn? Am Anfang der Reihe oder nach dem Markierungsfaden an der Schulter ( nach 18 Maschen)?
03.12.2013 - 22:48DROPS Design answered:
Liebe Frau Matis, das ist am Halsausschnitt. Dort wird 2 x 1 M aufgenommen - meinten Sie diese Stelle?
04.12.2013 - 08:34
![]() Annika wrote:
Annika wrote:
Jacke ist fertig, toll! Bezgl Hose: nach dem Bündchen soll man wiederholt Maschen aufnehmen. Heißt das, Zunahmen indem ich 2M aus einer stricke ? Viele grüsse
02.10.2013 - 21:41DROPS Design answered:
Liebe Annika, Sie können an dieser Stelle entweder 2 M in 1 M stricken oder die Maschen aus dem Zwischenfaden aufnehmen.
04.10.2013 - 07:19
![]() Petra wrote:
Petra wrote:
Jacke: Was bedeuten denn die Formulierungen "gegen die Mitte", "gegen die vordere Mitte" und "gegen die Seite", "gegen den Hals"? Das verwirrt mich, wo soll ich zu- bzw. abnehmen? Viele Grüße Petra
24.09.2013 - 19:25DROPS Design answered:
Liebe Petra, die Zu- bzw. Abnahmen werden an diesen Stellen durchgeführt: an der vorderen Mitte, an den Seiten oder am Halsausschnitt.
25.09.2013 - 07:12
|
|
Boo Blue#boobluejacket |
|
 |
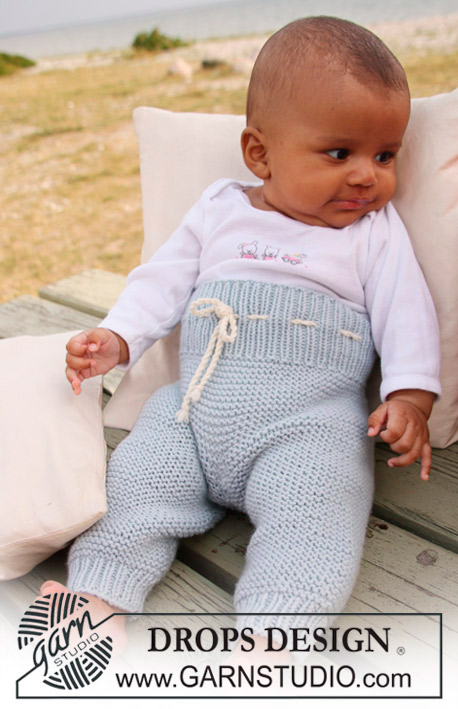 |
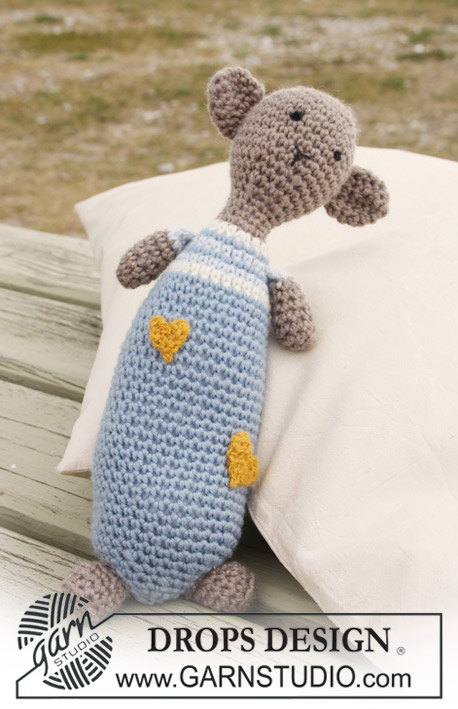
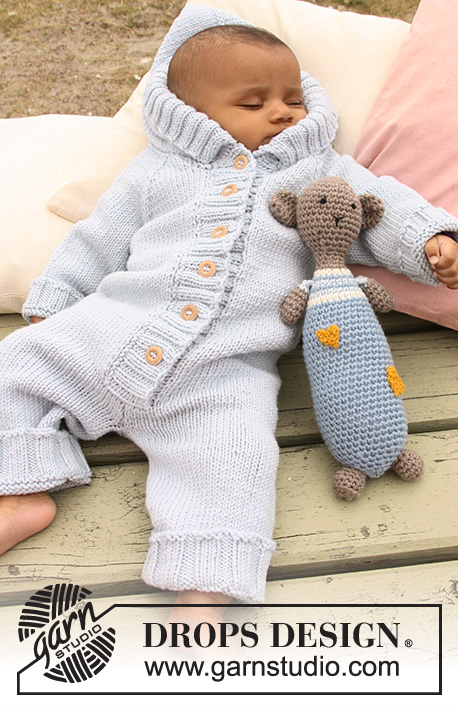
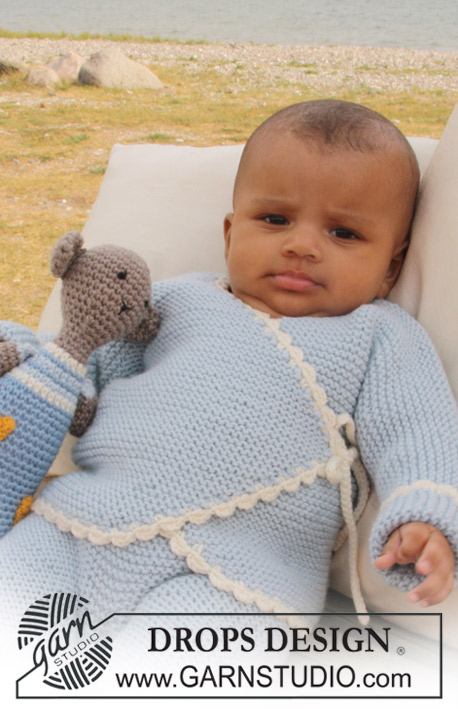
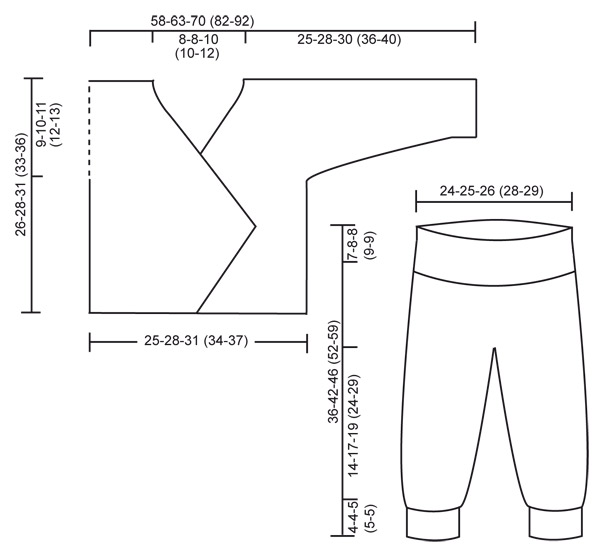
Set of knitted wrap-round jacket and pants in garter st with crochet borders and crochet teddy bear for baby and children in DROPS Merino Extra Fine
DROPS Baby 20-24 |
|
|
JACKET: GARTER ST (back and forth on needle): K all rows. INCREASING TIP (applies to front piece): Inc on every other and 3rd row as follows: work * 1 row without inc, 1 row with inc towards mid front, 2 rows without inc, 1 row with inc towards mid front *, repeat from *-*. Inc 1 st by working 2 sts in the outermost st towards mid front. --------------------------------------------------------- --------------------------------------------------------- JACKET: Worked back and forth on circular needle. Beg with one front piece, cast on sts for sleeve and work piece up to shoulder. Work the other front piece and slip the 2 front pieces tog to work the back piece from neck down. RIGHT FRONT PIECE: Cast on 26-29-33 (36-39) sts on circular needle size 4 mm with light grey/green. Work GARTER ST – see above! AT THE SAME TIME on row 2 inc 1 new st towards mid front. Repeat the inc towards mid front on every other and every 3rd row alternately - SEE INCREASING TIP - a total of 16-18-22 (24-26) times = 42-47-55 (60-65) sts. After the last inc work 8 rows garter st. Piece now measures approx 11-13-15 (16-17) cm. READ ALL OF THE FOLLOWING SECTION BEFORE CONTINUING! On next row dec 1 st towards mid front by K2 tog. Repeat the dec on every row (i.e. from RS as well as WS) a total of 0-2-8 (10-10) times and then on every other row a total of 24-24-24 (24-29) times (= 24-26-32 (34-39) dec sts). AT THE SAME TIME when piece measures 17-18-20 (21-23) cm cast on new sts at the end of every row towards the side for sleeve as follows: 3 sts 3-3-4 (4-4) times, 5 sts 2 times, 7 sts 0-0-0 (1-2) times and 16-18-19 (21-22) sts 1 time. When all inc and dec are complete there are 53-58-64 (76-84) sts on needle for shoulder/sleeve. Continue in garter st. When piece measures 26-28-31 (33-36) cm insert a marker = mid shoulder. Continue, AT THE SAME TIME cast on 1 new st at the end of row towards the neck 2 times = 55-60-66 (78-86) sts. Slip all sts on a stitch holder. LEFT FRONT PIECE: Cast on and work like right front piece but mirrored – NOTE. Make sure to finish from the same side as right front piece (either RS or WS) in order to work pieces from the same side when continuing for back piece. BACK PIECE: Work 1 front piece onto circular needle (work from sleeve edge towards neck), cast on 12-12-16 (16-22) new sts (= neck on back piece) and work the other front piece onto needle (work from neck towards sleeve edge) = 122-132-148 (172-194) sts. NOW MEASURE PIECE FROM MARKERS ON SHOULDER! Continue in garter st back and forth on needle. When piece measures 6.5-7.5-8 (8.5-9) cm cast off all sleeve sts. Cast off at the beg of every row from each side as follows: 16-18-19 (21-22) sts 1 time, 7 sts 0-0-0 (1-2) times, 5 sts 2 times and 3 sts 3-3-4 (4-4) times = 52-58-66 (72-78) sts on needle. Continue until piece measures approx 26-28-31 (33-36) cm – fold piece double by shoulder and measure back piece to front pieces – and cast off. ASSEMBLY: Sew side- and sleeve seams in outer loops of sts. CROCHET BORDER: Crochet with off-white on crochet hook size 4 mm round the opening of jacket as follows: 1 dc in first st, * 3 ch, 1 tr in first ch, skip 3 sts / 6 rows, 1 dc in next st *, repeat from *-*. At the 2 points on front pieces, crochet tie ribbons as follows: 1 dc in point, then crochet a string of ch measuring approx 25 cm, turn and work 1 sl st in each ch on return row, work 1 dc in point again and continue the border round jacket opening. Crochet a similar border (without tie ribbons) round sleeve edges. Now crochet 2 tie ribbons as described for jacket opening on the inside of side seam on the right side of piece and on the outside of side seam on the left side of piece – make sure to place the ribbons to fit ribbons in points on front pieces. -------------------------------------------------------- PANTS: GARTER ST (in the round): K 1 round, P 1 round. DECREASING TIP: Dec as follows 3 sts before marker: slip 1 st as if to K, K1, psso, K1. Dec as follows after marker: K1, K2 tog. --------------------------------------------------------- --------------------------------------------------------- LEG: Worked in the round on double pointed needles from bottom of leg towards the waist. LOOSELY cast on 38-42-44 (48-50) sts on double pointed needles size 3.5 mm with light grey/green. Insert a marker at beg of round = inside of leg. Work rib, K1/P1, in the round for 4-4-5 (5-5) cm. Change to double pointed needles size 4 mm and continue in garter st – SEE ABOVE – AT THE SAME TIME on first round inc 6-6-6 (5-5) sts evenly = 44-48-50 (53-55) sts. REMEMBER THE KNITTING TENSION! When piece measures 6-6-6 (7-7) cm inc 1 st on each side of marker. Repeat the inc on every 1.5-2-2.5 (3-4) cm a total of 7 times = 58-62-64 (67-69) sts. When piece measures 16-19-22 (27-32) cm divide piece on the inside of leg and complete piece back and forth on needle (to make it easier to slip legs on the same circular needle afterwards). Cast on 1 new st each side for seam = 60-64-66 (69-71) sts. When piece measures 18-21-24 (29-34) cm cast off 3 sts at the beg of the next 2 rows (beg from RS) = 54-58-60 (63-65) sts. Put piece aside and knit the other leg in the same way. PANTS: Slip both legs on the same circular needle size 4 mm = 108-116-120 (126-130) sts. Insert a marker mid front. Continue in garter st in the round on circular needle, AT THE SAME TIME dec 1 st each side of marker mid front – SEE DECREASING TIP! Repeat the dec on every other round a total of 4-5-5 (4-4) times = 100-106-110 (118-122) sts. When piece measures 29-34-38 (43-50) cm change to circular needle size 3.5 mm and continue in rib, K1/P1. Cast off LOOSELY with K over K and P over P when pants measures 36-42-46 (52-59) cm. ASSEMBLY: Sew tog split on the inside of each leg inside 1 edge st, and sew opening between legs. TIE RIBBON: Cut 2 threads off-white measuring approx 300 cm each. Twist the threads hard, fold them double and let them twist again. Tie a knot each end. Thread the ribbon through rib at waist with approx 4-5 sts between, beg and end mid front. -------------------------------------------------------- TEDDY: CROCHET INFO: Replace first dc on round with 1 ch and finish each round with 1 sl st in first dc from beg of round. CROCHET DC TOG: Crochet 2 dc tog to 1 dc as follows: Insert hook in first st, pick up thread, insert hook in next st, pick up thread, make 1 YO and pull thread through all 3 sts on hook. --------------------------------------------------------- --------------------------------------------------------- HEAD AND BODY: Beg at the top of head and after the head crochet the body. Then crochet ears, arms, and the hearts, which are sewn on afterwards. HEAD: SEE CROCHET INFO! Crochet 4 ch with crochet hook size 4 mm with light brown mix and form a ring with 1 sl st in first ch. ROUND 1: Crochet 6 dc in ring. ROUND 2: 2 dc in each dc = 12 dc. ROUND 3: * 1 dc in first dc, 2 dc in next dc *, repeat from *-* = 18 dc. ROUND 4: * 1 dc in each of the first 2 dc, 2 dc in next dc *, repeat from *-* = 24 dc. ROUND 5: * 1 dc in each of the first 3 dc, 2 dc in next dc *, repeat from *-* = 30 dc. ROUND 6-11: Crochet 1 dc in each dc = 30 dc. ROUND 12: * 1 dc in each of the first 3 dc, then crochet the next 2 dc tog (see above) *, repeat from *-* = 24 dc. ROUND 13: Crochet 1 dc in each dc = 24 dc. ROUND 14: * 1 dc in each of the first 2 dc, then crochet the next 2 dc tog *, repeat from *-* = 18 dc. ROUND 15: * 1 dc in first dc, then crochet the next 2 dc tog *, repeat from *-* = 12 dc. Now fill the head with cotton wool and continue in the round for body without cutting the thread. ROUND 16-18: Crochet 1 dc in each dc = 12 dc. ROUND 19: * 1 dc in each of the first 2 dc, 2 dc in next dc *, repeat from *-* = 16 dc. Change to off-white. ROUND 20: * 1 dc in each of the first 3 dc, 2 dc in next dc *, repeat from *-* = 20 dc. Change to light grey/blue. ROUND 21: Crochet 1 dc in each dc = 20 dc. Change to light grey/green. ROUND 22: * 1 dc in each of the first 4 dc, 2 dc in next dc *, repeat from *-* = 24 dc. Change to light grey/blue. ROUND 23: Crochet 1 dc in each dc = 24 dc. Change to light grey/green. ROUND 24: * 1 dc in each of the first 3 dc, 2 dc in next dc *, repeat from *-* = 30 dc. Change to off-white. ROUND 25: Crochet 1 dc in each dc = 30 dc. Change to light grey blue and crochet the rest of the body as follows: ROUND 26-29: Crochet 1 dc in each dc = 30 dc. ROUND 30: * 1 dc in each of the first 9 dc, 2 dc in next dc *, repeat from *-* = 33 dc. ROUND 31-39: Crochet 1 dc in each dc = 33 dc. ROUND 40: * 1 dc in each of the first 10 dc, 2 dc in next dc *, repeat from *-* = 36 dc. ROUND 41-46: Crochet 1 dc in each dc = 36 dc. ROUND 47: * 1 dc in each of the first 10 dc, then crochet the next 2 dc tog *, repeat from *-* = 33 dc. ROUND 48: Crochet 1 dc in each dc = 33 dc. ROUND 49: * 1 dc in each of the first 9 dc, then crochet the next 2 dc tog *, repeat from *-* = 30 dc. ROUND 50: * 1 dc in each of the first 3 dc, then crochet the next 2 dc tog *, repeat from *-* = 24 dc. ROUND 51: Crochet 1 dc in each dc = 24 dc. ROUND 52: * 1 dc in each of the first 2 dc, then crochet the next 2 dc tog *, repeat from *-* = 18 dc. ROUND 53: Crochet 1 dc in each dc = 18 dc. ROUND 54: * 1 dc in first dc, then crochet the next 2 dc tog *, repeat from *-* = 12 dc. ROUND 55: Crochet 2 dc tog all the way round = 6 dc. Fill the body with cotton wool, cut the thread, pull thread through remaining sts, tighten and fasten. LEGS: Crochet 4 ch with crochet hook size 4 mm with light brown mix and form a ring with 1 sl st in first ch. ROUND 1: Crochet 8 dc in ring. ROUND 2: * 1 dc in first dc, 2 dc in next dc *, repeat from *-*= 12 dc. ROUND 3: Crochet 1 dc in each dc = 12 dc – NOTE: Crochet in back loop of st. ROUND 4: Crochet 1 dc in each dc = 12 dc – NOTE: Crochet through both loops again. ROUND 5: Crochet 1 dc in each dc, at the same time crochet 2 dc tog at the beg and at the end of round = 10 dc. ROUND 6: Crochet 1 dc in each dc, at the same time crochet tog 5th and 6th dc and crochet tog 7th and 8th dc on round = 8 dc. Cut the thread. Crochet 1 more leg in the same way. Fill the legs with cotton wool and sew the legs to bottom of body. ARMS: Crochet 4 ch with crochet hook size 4 mm with light brown mix and form a ring with 1 sl st in first ch. ROUND 1: Crochet 4 dc in ring. ROUND 2: Crochet 2 dc in each dc = 8 dc. ROUND 3-6: Crochet 1 dc in each dc = 8 dc. Change to light grey/green. ROUND 7: Crochet 1 dc in each dc = 8 dc Fill the arm with cotton wool, place piece flat and crochet 1 dc in each dc through both layers = 4 dc. Cut the thread. Crochet 1 more arm in the same way and sew arms to the side of body at the top. EARS: Crochet 4 ch with crochet hook size 4 mm with light brown mix and form a ring with 1 sl st in first ch. ROUND 1: Crochet 6 dc in ring. ROUND 2: * 1 dc in first dc, 2 dc in next dc *, repeat from *-* = 9 dc. ROUND 3: * 1 dc in each of the first 2 dc, 2 dc in next dc *, repeat from *-* = 12 dc. ROUND 4-6: Crochet 1 dc in each dc = 12 dc. Place piece flat and crochet 1 dc in each dc through both layers = 6 dc, turn piece and crochet 2 dc tog across the row = 3 dc. Cut the thread and sew ear to the top of head to the side. Crochet 1 more ear and attach to the opposite side of head. SMALL HEART: Crochet 2 ch with crochet hook size 3 mm with guacamole (try to find a yellow section of the yarn) and crochet 3 dc in first ch, turn piece. Crochet 1 ch, then 1 dc in each st = 5 dc (includes ch at beg and end of row), turn piece. Crochet 3 ch, 1 tr in first ch, 1 dc in middle of heart, 3 ch, 1 tr in first ch, 1 sl st in ch from beg of previous row. Cut the thread and sew the heart to the front of teddy. LARGE HEART: Crochet 2 ch with crochet hook size 3 mm with guacamole (try to find a yellow section of the yarn) and crochet 3 dc in first ch, turn piece. Crochet 1 ch, then 1 dc in each st = 5 dc (includes ch at beg and end of row), turn piece. Crochet 1 ch, then 1 dc in each st = 6 dc (includes ch at beg of row), turn piece. Crochet 4 ch, 1 tr in first ch, 1 dc in the middle of heart, 4 ch,1 tr in first ch, 1 sl st in ch from beg of previous row. Cut the thread and sew the heart to the front of teddy. Crochet 1 more heart and sew to the back of teddy. Embroider eyes and mouth at the front of teddy with black. |
|
 |
|
Have you finished this pattern?Tag your pictures with #dropspattern #boobluejacket or submit them to the #dropsfan gallery. Do you need help with this pattern?You'll find 19 tutorial videos, a Comments/Questions area and more by visiting the pattern on garnstudio.com. © 1982-2025 DROPS Design A/S. We reserve all rights. This document, including all its sub-sections, has copyrights. Read more about what you can do with our patterns at the bottom of each pattern on our site. |
|


With over 40 years in knitting and crochet design, DROPS Design offers one of the most extensive collections of free patterns on the internet - translated to 17 languages. As of today we count 320 catalogues and 12091 patterns translated into English (UK/cm). 12091
We work hard to bring you the best knitting and crochet have to offer, inspiration and advice as well as great quality yarns at incredible prices! Would you like to use our patterns for other than personal use? You can read what you are allowed to do in the Copyright text at the bottom of all our patterns. Happy crafting!
Post a comment to pattern DROPS Baby 20-24
We would love to hear what you have to say about this pattern!
If you want to leave a question, please make sure you select the correct category in the form below, to speed up the answering process. Required fields are marked *.