
Looking for a yarn?


Comments / Questions (47)
![]() Sif Klein wrote:
Sif Klein wrote:
Hvordan strikker man de 2 forstykker sammen til rygstykket? Jeg forstår at tage ind og ud men jeg forstår ikke hvordan de skal strikkes sammen.
24.10.2023 - 14:43DROPS Design answered:
Hej, jo du strikker en pind over det ene forstykke (fra skulderen og ind mod halsen), slår det antal masker op som modsvarer din størrelse (12 i den mindste størrelse) og fortsætter med at strikke over det andet forstykke (fra halsen og ud mod skulderen). Nu har du samlet arbejdet og kan strikke rygstykket fra skulderen og ned (du måler nu fra mærket du satte tidligere) :)
24.10.2023 - 15:33
![]() Sif Klein wrote:
Sif Klein wrote:
Hej Hvordan strikker man forstykkerne samme? Ved tråden samme side, betyder det begge til højre eller begge ind mod halsen? Mvh Sif
23.10.2023 - 09:26DROPS Design answered:
Hej Sif, du følger samme opskrift, men når du tager ud gør du det i den anden side, og altså mod midt foran på det andet forstykke :)
24.10.2023 - 09:20
![]() Irmgard Nüßlein wrote:
Irmgard Nüßlein wrote:
Wie stricke ich kraus rechts auf Nadelspiel?
03.08.2023 - 18:28DROPS Design answered:
Liebe Frau Nüsslein, für 1 Krausrippe wird man abwechslungsweise 1 Runde rechts und 1 Runde links stricken - siehe dieses Video. Viel Spaß beim stricken!
04.08.2023 - 08:02
![]() Wendy Timana Robles wrote:
Wendy Timana Robles wrote:
Hola, quisiera saber por dónde estoy empezando a tejer la chaqueta? Por abajo o arriba del delantero? Y cuando dice disminución 0 en talla pequeña quiere decir tejer sólo la misma cantidad de puntos en la vuelta?
03.03.2023 - 15:25
![]() Sophia wrote:
Sophia wrote:
Hallo, ich habe eine Frage zur Hose: Nachdem beide Beine gestrickt sind und sie auf einer Rundstrichnadel sind, wo findet die Abnahme statt? Vorne im Schritt? Die Krausrippen werden hin- und zurück gestrickt. Heißt das, dass hinten am Po die Arbeit offen bleibt und am Ende zusammengenäht wird? Danke für die Hilfe.
13.02.2023 - 11:45DROPS Design answered:
Liebe Sophia, die Hose wird jetzt in Runden gestrickt und die Runden werden hinten (am Po) beginnen, so sollen Sie eine Markierung für die Mitte vorne einsetzen - und beidseitig von dieser Markierung abnehmen. Viel Spaß beim stricken!
13.02.2023 - 15:45
![]() Sue wrote:
Sue wrote:
Love this pattern
06.01.2023 - 17:19
![]() Lea Feigel wrote:
Lea Feigel wrote:
Hallo ich verstehe nicht ganz wie man das rückenteil bei der Jacke strickt.ich habe beide Vorderseiten die soll ich auf eine rundnadel aufnehmen und dann?
14.06.2022 - 09:19DROPS Design answered:
Liebe Frau Feigel, Rückenteil stricken Sie jetzt von oben nach unten von den beiden Vorderteilen: stricken Sie die Maschen von den einen Vorderteil, dann schlagen Sie die neuen Maschen an (= 12-12-16 (16-22) M für den Halskant/Rückenteil), und stricken Sie die Maschen von den 2. Rückenteil; dann stricken Sie kraus rechts, und später ketten Sie die Maschen von den Ärmeln ab. Viel Spaß beim stricken!
14.06.2022 - 17:15
![]() Marga wrote:
Marga wrote:
Hola.Me puedes decir la diferencia entre hilera,fila y vuelta? Gracias
11.10.2021 - 01:41DROPS Design answered:
Hola Marga, hilera y fila es lo mismo, se usa al trabajar de ida y vuelta (cuando se gira al final de cada fila). Mientras que vuelta se usa al trabajar en redondo (sin girar).
17.10.2021 - 19:37
![]() Margs wrote:
Margs wrote:
Hola me puedes indicar que quiere decir aumentar un punto hacia el centro del delantero?Gracias
11.10.2021 - 01:15DROPS Design answered:
Hola Marga, aumentar un punto hacia el centro del delantero significa aumentar antes o después del punto orillo según hacia donde quede el centro del delantero con respecto al punto orillo del centro.
17.10.2021 - 19:44
![]() Maria wrote:
Maria wrote:
Missä vaiheessa jakkuun tehdään hihat ja missä on hihojen ohje?
05.10.2021 - 09:40DROPS Design answered:
Hihojen silmukat luodaan etukappaleisiin, ja ensimmäset silmukat luodaan, kun hihan pituus on 17-18-20 (21-23) cm.
05.10.2021 - 16:49
|
|
Boo Blue#boobluejacket |
|
 |
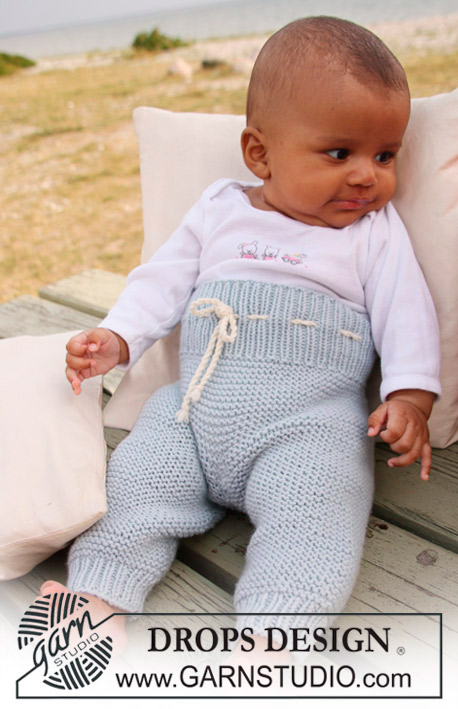 |
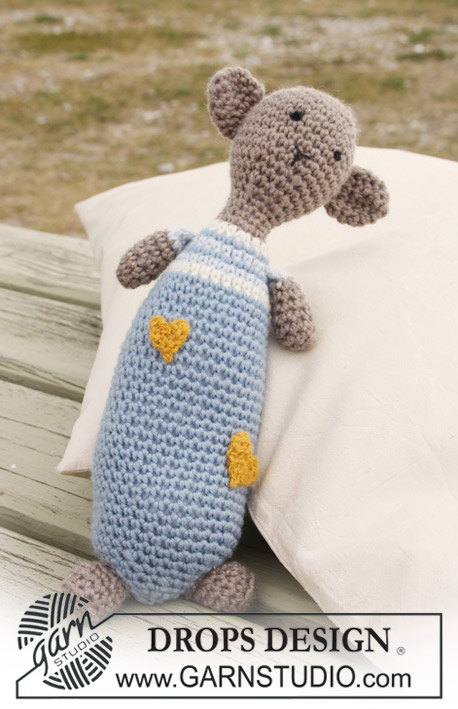
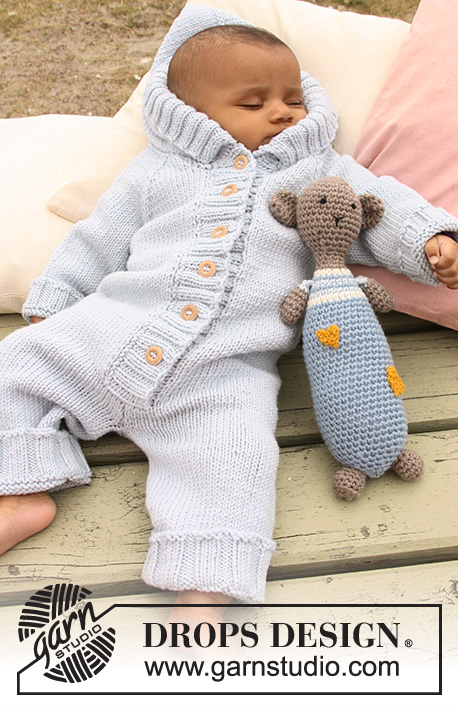
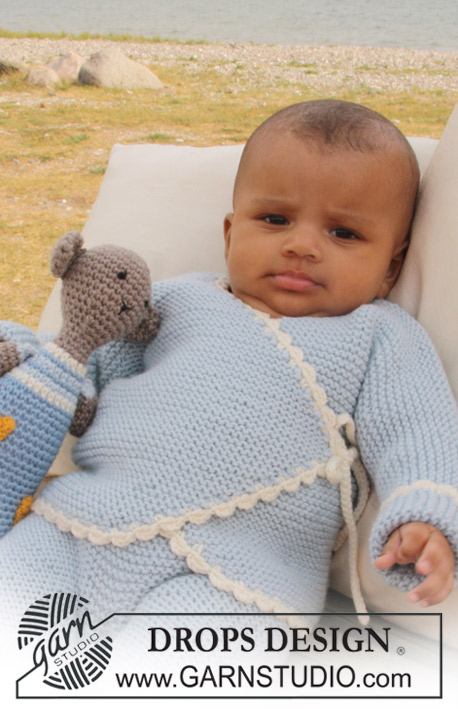
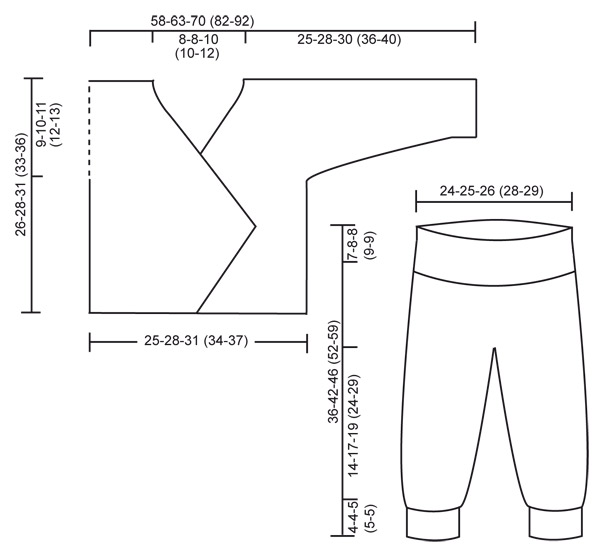
Set of knitted wrap-round jacket and pants in garter st with crochet borders and crochet teddy bear for baby and children in DROPS Merino Extra Fine
DROPS Baby 20-24 |
|
|
JACKET: GARTER ST (back and forth on needle): K all rows. INCREASING TIP (applies to front piece): Inc on every other and 3rd row as follows: work * 1 row without inc, 1 row with inc towards mid front, 2 rows without inc, 1 row with inc towards mid front *, repeat from *-*. Inc 1 st by working 2 sts in the outermost st towards mid front. --------------------------------------------------------- --------------------------------------------------------- JACKET: Worked back and forth on circular needle. Beg with one front piece, cast on sts for sleeve and work piece up to shoulder. Work the other front piece and slip the 2 front pieces tog to work the back piece from neck down. RIGHT FRONT PIECE: Cast on 26-29-33 (36-39) sts on circular needle size 4 mm with light grey/green. Work GARTER ST – see above! AT THE SAME TIME on row 2 inc 1 new st towards mid front. Repeat the inc towards mid front on every other and every 3rd row alternately - SEE INCREASING TIP - a total of 16-18-22 (24-26) times = 42-47-55 (60-65) sts. After the last inc work 8 rows garter st. Piece now measures approx 11-13-15 (16-17) cm. READ ALL OF THE FOLLOWING SECTION BEFORE CONTINUING! On next row dec 1 st towards mid front by K2 tog. Repeat the dec on every row (i.e. from RS as well as WS) a total of 0-2-8 (10-10) times and then on every other row a total of 24-24-24 (24-29) times (= 24-26-32 (34-39) dec sts). AT THE SAME TIME when piece measures 17-18-20 (21-23) cm cast on new sts at the end of every row towards the side for sleeve as follows: 3 sts 3-3-4 (4-4) times, 5 sts 2 times, 7 sts 0-0-0 (1-2) times and 16-18-19 (21-22) sts 1 time. When all inc and dec are complete there are 53-58-64 (76-84) sts on needle for shoulder/sleeve. Continue in garter st. When piece measures 26-28-31 (33-36) cm insert a marker = mid shoulder. Continue, AT THE SAME TIME cast on 1 new st at the end of row towards the neck 2 times = 55-60-66 (78-86) sts. Slip all sts on a stitch holder. LEFT FRONT PIECE: Cast on and work like right front piece but mirrored – NOTE. Make sure to finish from the same side as right front piece (either RS or WS) in order to work pieces from the same side when continuing for back piece. BACK PIECE: Work 1 front piece onto circular needle (work from sleeve edge towards neck), cast on 12-12-16 (16-22) new sts (= neck on back piece) and work the other front piece onto needle (work from neck towards sleeve edge) = 122-132-148 (172-194) sts. NOW MEASURE PIECE FROM MARKERS ON SHOULDER! Continue in garter st back and forth on needle. When piece measures 6.5-7.5-8 (8.5-9) cm cast off all sleeve sts. Cast off at the beg of every row from each side as follows: 16-18-19 (21-22) sts 1 time, 7 sts 0-0-0 (1-2) times, 5 sts 2 times and 3 sts 3-3-4 (4-4) times = 52-58-66 (72-78) sts on needle. Continue until piece measures approx 26-28-31 (33-36) cm – fold piece double by shoulder and measure back piece to front pieces – and cast off. ASSEMBLY: Sew side- and sleeve seams in outer loops of sts. CROCHET BORDER: Crochet with off-white on crochet hook size 4 mm round the opening of jacket as follows: 1 dc in first st, * 3 ch, 1 tr in first ch, skip 3 sts / 6 rows, 1 dc in next st *, repeat from *-*. At the 2 points on front pieces, crochet tie ribbons as follows: 1 dc in point, then crochet a string of ch measuring approx 25 cm, turn and work 1 sl st in each ch on return row, work 1 dc in point again and continue the border round jacket opening. Crochet a similar border (without tie ribbons) round sleeve edges. Now crochet 2 tie ribbons as described for jacket opening on the inside of side seam on the right side of piece and on the outside of side seam on the left side of piece – make sure to place the ribbons to fit ribbons in points on front pieces. -------------------------------------------------------- PANTS: GARTER ST (in the round): K 1 round, P 1 round. DECREASING TIP: Dec as follows 3 sts before marker: slip 1 st as if to K, K1, psso, K1. Dec as follows after marker: K1, K2 tog. --------------------------------------------------------- --------------------------------------------------------- LEG: Worked in the round on double pointed needles from bottom of leg towards the waist. LOOSELY cast on 38-42-44 (48-50) sts on double pointed needles size 3.5 mm with light grey/green. Insert a marker at beg of round = inside of leg. Work rib, K1/P1, in the round for 4-4-5 (5-5) cm. Change to double pointed needles size 4 mm and continue in garter st – SEE ABOVE – AT THE SAME TIME on first round inc 6-6-6 (5-5) sts evenly = 44-48-50 (53-55) sts. REMEMBER THE KNITTING TENSION! When piece measures 6-6-6 (7-7) cm inc 1 st on each side of marker. Repeat the inc on every 1.5-2-2.5 (3-4) cm a total of 7 times = 58-62-64 (67-69) sts. When piece measures 16-19-22 (27-32) cm divide piece on the inside of leg and complete piece back and forth on needle (to make it easier to slip legs on the same circular needle afterwards). Cast on 1 new st each side for seam = 60-64-66 (69-71) sts. When piece measures 18-21-24 (29-34) cm cast off 3 sts at the beg of the next 2 rows (beg from RS) = 54-58-60 (63-65) sts. Put piece aside and knit the other leg in the same way. PANTS: Slip both legs on the same circular needle size 4 mm = 108-116-120 (126-130) sts. Insert a marker mid front. Continue in garter st in the round on circular needle, AT THE SAME TIME dec 1 st each side of marker mid front – SEE DECREASING TIP! Repeat the dec on every other round a total of 4-5-5 (4-4) times = 100-106-110 (118-122) sts. When piece measures 29-34-38 (43-50) cm change to circular needle size 3.5 mm and continue in rib, K1/P1. Cast off LOOSELY with K over K and P over P when pants measures 36-42-46 (52-59) cm. ASSEMBLY: Sew tog split on the inside of each leg inside 1 edge st, and sew opening between legs. TIE RIBBON: Cut 2 threads off-white measuring approx 300 cm each. Twist the threads hard, fold them double and let them twist again. Tie a knot each end. Thread the ribbon through rib at waist with approx 4-5 sts between, beg and end mid front. -------------------------------------------------------- TEDDY: CROCHET INFO: Replace first dc on round with 1 ch and finish each round with 1 sl st in first dc from beg of round. CROCHET DC TOG: Crochet 2 dc tog to 1 dc as follows: Insert hook in first st, pick up thread, insert hook in next st, pick up thread, make 1 YO and pull thread through all 3 sts on hook. --------------------------------------------------------- --------------------------------------------------------- HEAD AND BODY: Beg at the top of head and after the head crochet the body. Then crochet ears, arms, and the hearts, which are sewn on afterwards. HEAD: SEE CROCHET INFO! Crochet 4 ch with crochet hook size 4 mm with light brown mix and form a ring with 1 sl st in first ch. ROUND 1: Crochet 6 dc in ring. ROUND 2: 2 dc in each dc = 12 dc. ROUND 3: * 1 dc in first dc, 2 dc in next dc *, repeat from *-* = 18 dc. ROUND 4: * 1 dc in each of the first 2 dc, 2 dc in next dc *, repeat from *-* = 24 dc. ROUND 5: * 1 dc in each of the first 3 dc, 2 dc in next dc *, repeat from *-* = 30 dc. ROUND 6-11: Crochet 1 dc in each dc = 30 dc. ROUND 12: * 1 dc in each of the first 3 dc, then crochet the next 2 dc tog (see above) *, repeat from *-* = 24 dc. ROUND 13: Crochet 1 dc in each dc = 24 dc. ROUND 14: * 1 dc in each of the first 2 dc, then crochet the next 2 dc tog *, repeat from *-* = 18 dc. ROUND 15: * 1 dc in first dc, then crochet the next 2 dc tog *, repeat from *-* = 12 dc. Now fill the head with cotton wool and continue in the round for body without cutting the thread. ROUND 16-18: Crochet 1 dc in each dc = 12 dc. ROUND 19: * 1 dc in each of the first 2 dc, 2 dc in next dc *, repeat from *-* = 16 dc. Change to off-white. ROUND 20: * 1 dc in each of the first 3 dc, 2 dc in next dc *, repeat from *-* = 20 dc. Change to light grey/blue. ROUND 21: Crochet 1 dc in each dc = 20 dc. Change to light grey/green. ROUND 22: * 1 dc in each of the first 4 dc, 2 dc in next dc *, repeat from *-* = 24 dc. Change to light grey/blue. ROUND 23: Crochet 1 dc in each dc = 24 dc. Change to light grey/green. ROUND 24: * 1 dc in each of the first 3 dc, 2 dc in next dc *, repeat from *-* = 30 dc. Change to off-white. ROUND 25: Crochet 1 dc in each dc = 30 dc. Change to light grey blue and crochet the rest of the body as follows: ROUND 26-29: Crochet 1 dc in each dc = 30 dc. ROUND 30: * 1 dc in each of the first 9 dc, 2 dc in next dc *, repeat from *-* = 33 dc. ROUND 31-39: Crochet 1 dc in each dc = 33 dc. ROUND 40: * 1 dc in each of the first 10 dc, 2 dc in next dc *, repeat from *-* = 36 dc. ROUND 41-46: Crochet 1 dc in each dc = 36 dc. ROUND 47: * 1 dc in each of the first 10 dc, then crochet the next 2 dc tog *, repeat from *-* = 33 dc. ROUND 48: Crochet 1 dc in each dc = 33 dc. ROUND 49: * 1 dc in each of the first 9 dc, then crochet the next 2 dc tog *, repeat from *-* = 30 dc. ROUND 50: * 1 dc in each of the first 3 dc, then crochet the next 2 dc tog *, repeat from *-* = 24 dc. ROUND 51: Crochet 1 dc in each dc = 24 dc. ROUND 52: * 1 dc in each of the first 2 dc, then crochet the next 2 dc tog *, repeat from *-* = 18 dc. ROUND 53: Crochet 1 dc in each dc = 18 dc. ROUND 54: * 1 dc in first dc, then crochet the next 2 dc tog *, repeat from *-* = 12 dc. ROUND 55: Crochet 2 dc tog all the way round = 6 dc. Fill the body with cotton wool, cut the thread, pull thread through remaining sts, tighten and fasten. LEGS: Crochet 4 ch with crochet hook size 4 mm with light brown mix and form a ring with 1 sl st in first ch. ROUND 1: Crochet 8 dc in ring. ROUND 2: * 1 dc in first dc, 2 dc in next dc *, repeat from *-*= 12 dc. ROUND 3: Crochet 1 dc in each dc = 12 dc – NOTE: Crochet in back loop of st. ROUND 4: Crochet 1 dc in each dc = 12 dc – NOTE: Crochet through both loops again. ROUND 5: Crochet 1 dc in each dc, at the same time crochet 2 dc tog at the beg and at the end of round = 10 dc. ROUND 6: Crochet 1 dc in each dc, at the same time crochet tog 5th and 6th dc and crochet tog 7th and 8th dc on round = 8 dc. Cut the thread. Crochet 1 more leg in the same way. Fill the legs with cotton wool and sew the legs to bottom of body. ARMS: Crochet 4 ch with crochet hook size 4 mm with light brown mix and form a ring with 1 sl st in first ch. ROUND 1: Crochet 4 dc in ring. ROUND 2: Crochet 2 dc in each dc = 8 dc. ROUND 3-6: Crochet 1 dc in each dc = 8 dc. Change to light grey/green. ROUND 7: Crochet 1 dc in each dc = 8 dc Fill the arm with cotton wool, place piece flat and crochet 1 dc in each dc through both layers = 4 dc. Cut the thread. Crochet 1 more arm in the same way and sew arms to the side of body at the top. EARS: Crochet 4 ch with crochet hook size 4 mm with light brown mix and form a ring with 1 sl st in first ch. ROUND 1: Crochet 6 dc in ring. ROUND 2: * 1 dc in first dc, 2 dc in next dc *, repeat from *-* = 9 dc. ROUND 3: * 1 dc in each of the first 2 dc, 2 dc in next dc *, repeat from *-* = 12 dc. ROUND 4-6: Crochet 1 dc in each dc = 12 dc. Place piece flat and crochet 1 dc in each dc through both layers = 6 dc, turn piece and crochet 2 dc tog across the row = 3 dc. Cut the thread and sew ear to the top of head to the side. Crochet 1 more ear and attach to the opposite side of head. SMALL HEART: Crochet 2 ch with crochet hook size 3 mm with guacamole (try to find a yellow section of the yarn) and crochet 3 dc in first ch, turn piece. Crochet 1 ch, then 1 dc in each st = 5 dc (includes ch at beg and end of row), turn piece. Crochet 3 ch, 1 tr in first ch, 1 dc in middle of heart, 3 ch, 1 tr in first ch, 1 sl st in ch from beg of previous row. Cut the thread and sew the heart to the front of teddy. LARGE HEART: Crochet 2 ch with crochet hook size 3 mm with guacamole (try to find a yellow section of the yarn) and crochet 3 dc in first ch, turn piece. Crochet 1 ch, then 1 dc in each st = 5 dc (includes ch at beg and end of row), turn piece. Crochet 1 ch, then 1 dc in each st = 6 dc (includes ch at beg of row), turn piece. Crochet 4 ch, 1 tr in first ch, 1 dc in the middle of heart, 4 ch,1 tr in first ch, 1 sl st in ch from beg of previous row. Cut the thread and sew the heart to the front of teddy. Crochet 1 more heart and sew to the back of teddy. Embroider eyes and mouth at the front of teddy with black. |
|
 |
|
Have you finished this pattern?Tag your pictures with #dropspattern #boobluejacket or submit them to the #dropsfan gallery. Do you need help with this pattern?You'll find 19 tutorial videos, a Comments/Questions area and more by visiting the pattern on garnstudio.com. © 1982-2025 DROPS Design A/S. We reserve all rights. This document, including all its sub-sections, has copyrights. Read more about what you can do with our patterns at the bottom of each pattern on our site. |
|


With over 40 years in knitting and crochet design, DROPS Design offers one of the most extensive collections of free patterns on the internet - translated to 17 languages. As of today we count 320 catalogues and 12091 patterns translated into English (UK/cm). 12091
We work hard to bring you the best knitting and crochet have to offer, inspiration and advice as well as great quality yarns at incredible prices! Would you like to use our patterns for other than personal use? You can read what you are allowed to do in the Copyright text at the bottom of all our patterns. Happy crafting!
Post a comment to pattern DROPS Baby 20-24
We would love to hear what you have to say about this pattern!
If you want to leave a question, please make sure you select the correct category in the form below, to speed up the answering process. Required fields are marked *.