
Looking for a yarn?


Comments / Questions (106)
![]() Drops Design France wrote:
Drops Design France wrote:
Bonjour Julie, Pour le béret, après le rang 16, on fait 3 tour de diminutions puis on termine par 7 rangs de ms. Bon crochet !
28.11.2011 - 08:57
![]() Julie wrote:
Julie wrote:
Bonjour, j'aimerais savoir combien de rang faire à partir de 16 et comment introduire le deuxième fil ensuite. Enfin comment fait-on pour arrêter tous les fils Merci
26.11.2011 - 19:53
![]() Julie wrote:
Julie wrote:
Bonjour, j'aimerais savoir combien de rang faire à partir de 16 et comment introduire le deuxième fil ensuite. Enfin comment fait-on pour arrêter tous les fils Merci
26.11.2011 - 19:53
![]() Angie wrote:
Angie wrote:
I am trying to check my gauge, but it says 14 dc X 8 rounds..the 8 rounds, do you mean rows, or am i suppose to make this in a circle or a ring like the beginning of this pattern?
17.11.2011 - 05:11
![]() Michele wrote:
Michele wrote:
How I wish I could read all these other languages! So curious to know what is being said.
03.09.2011 - 06:34
![]() DROPS Design NL wrote:
DROPS Design NL wrote:
Hoi Christel. Ik zal het even doorgeven aan ons Design afdeling. Bedankt voor de opmerking. Gr. Tine
03.03.2011 - 12:07
![]() Christel wrote:
Christel wrote:
I made this beret and it came out really nice. I thought the description of rows 10-16 was not ery clear, but with the extra information given here I managed. However, I needed slightly less than three skeins (description says four skeins are required; the size of my crocheting was in accordance with the 14 trx8rounds = 10x10 cm).
03.03.2011 - 10:46
![]() Selma wrote:
Selma wrote:
Jeg er ikke sikker på jeg forstår omg 10-16 rigtigt. Skal man først hækle 6 omg uden indtagninger og så derefter 3 omg med? Eller skal man hækle 3 omg uden indtagninger og så 3 omg med indtagninger?
07.12.2010 - 11:00
![]() Anne wrote:
Anne wrote:
I completed the beret but it looked wavy and more like a chef's hat. It does not sit flat like the one shown in the picture. Please let me know if this is know the hat is supposed to be. Tks
02.11.2010 - 21:56DROPS Design answered:
Hi Anne, did you use the same yarn as in the pattern, and did you get exact gauge? Different yarn can give a different look and shape.
02.11.2010 - 22:03Monique wrote:
Thank you very much! I did it right! YAY! No unravelling for me!! Thank you for replying so quickly. Much appreciated.
30.01.2010 - 02:36
|
|
DROPS 103-24 |
|
|
|
|
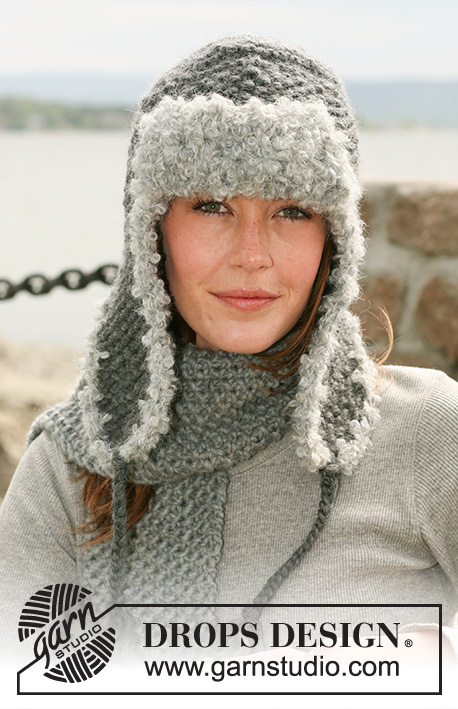
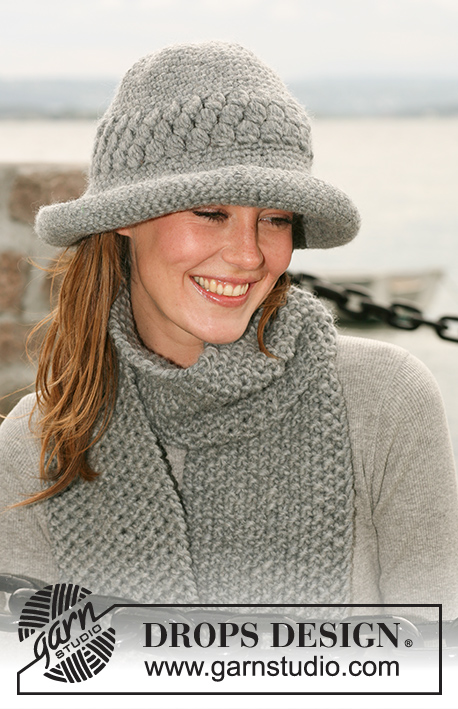
A set of: Crocheted DROPS beret in ”Alaska” and knitted scarf in ”Puddel”.
DROPS 103-24 |
|
|
Chrochet tension: 14 tr x 8 rounds = 10 x 10 cm Crochet info: Substitute first tr on round with 3 ch. Rounds ends with 1 sl st in 3rd ch in the beg of row. Substitute first dc on round with 1 ch. Round ends with 1 sl st in 1st ch in the beg of row. Decrease tip: Dec 1 tr like this: Crochet 1 tr, but wait with last “pull through” (= 2 loops on hook), crochet another tr but on the last pull through pull the yarn through all loops on hook. Beret: Check your crochet tension! The beret is crocheted from top and down. Crochet 10 ch with hook size 5 mm and Alaska and form a ring with 1 sl st in first ch. 1st round: Read Crochet info! Crochet 20 tr on ring. 2nd round: * 1 tr in first tr, 2 tr in next tr *, repeat *-* = 30 tr. 3rd round: * 1 tr in first 2 tr, 2 tr in next tr *, repeat *-* = 40 tr. 4th round: * 1 tr in first 3 tr, 2 tr in next tr *, repeat *-* = 50 tr. 5th -9th round: Continue the same way but with 1 more tr between every inc (i.e. inc 10 tr per round) = 100 tr. 10th-16th round: Crochet 1 tr in every tr without inc. Then put 10 marking threads in piece with 10 tr in between. Continue to crochet in the round with tr, at the same time dec 1 tr on left side of every marking thread on every round – read Dec. tip! Crochet a total of 3 rounds with dec = 70 tr. Continue crocheting the beret to finished measurement with double thread. Crochet 1 round with 1 dc in every tr, then crochet 7 rounds with 1 dc in every dc. Cut and fasten the thread. Pompon: Make a pompon with a diameter of approx 5 cm. Attach the pompon on top of the beret. SCARF Measurement: approx 15 x 80 cm + crocheted edge Materials: DROPS Puddel from Garnstudio 100 g colour no. 8, dark grey DROPS needle size 7 mm - or size needed to make 10 sts x 14 rows in stocking stitch on 10 x 10 cm DROPS Crochet hook size 7 mm – for crocheted edge. Knitting tension: 10 sts x 14 rows in stocking stitch = 10 x 10 cm. Scarf: Cast on 15 sts on 2 needles size 7 mm with Puddel (this will make the casting on edge elastic). Pull out one needle and K1 row from WS. Continue in stocking stitch until piece measures approx 79 cm. K1 row from WS. Cast off loosely. Crocheted edge: Crochet 1 round around the scarf with hook size 7 mm like this: 1 dc, * 4 ch, skip approx 2 cm and crochet 1 dc in following st *, repeat *-*. |
|
Have you finished this pattern?Tag your pictures with #dropspattern or submit them to the #dropsfan gallery. Do you need help with this pattern?You'll find 21 tutorial videos, a Comments/Questions area and more by visiting the pattern on garnstudio.com. © 1982-2025 DROPS Design A/S. We reserve all rights. This document, including all its sub-sections, has copyrights. Read more about what you can do with our patterns at the bottom of each pattern on our site. |


With over 40 years in knitting and crochet design, DROPS Design offers one of the most extensive collections of free patterns on the internet - translated to 17 languages. As of today we count 320 catalogues and 12094 patterns translated into English (UK/cm). 12094
We work hard to bring you the best knitting and crochet have to offer, inspiration and advice as well as great quality yarns at incredible prices! Would you like to use our patterns for other than personal use? You can read what you are allowed to do in the Copyright text at the bottom of all our patterns. Happy crafting!
Post a comment to pattern DROPS 103-24
We would love to hear what you have to say about this pattern!
If you want to leave a question, please make sure you select the correct category in the form below, to speed up the answering process. Required fields are marked *.