
Popular categories
Looking for a yarn?







































Comments / Questions (3)
 Leo wrote:
Wenn man beim Rückenteil Reihe 1 bis 4 immer wiederholt würde man ja in Reihe 1 und 2 Muster A.4 und A.5 auslassen. Wiederholt man also nir Reihe 3 und 4 immer wieder?
02.11.2026 - 21:21DROPS Design answered:
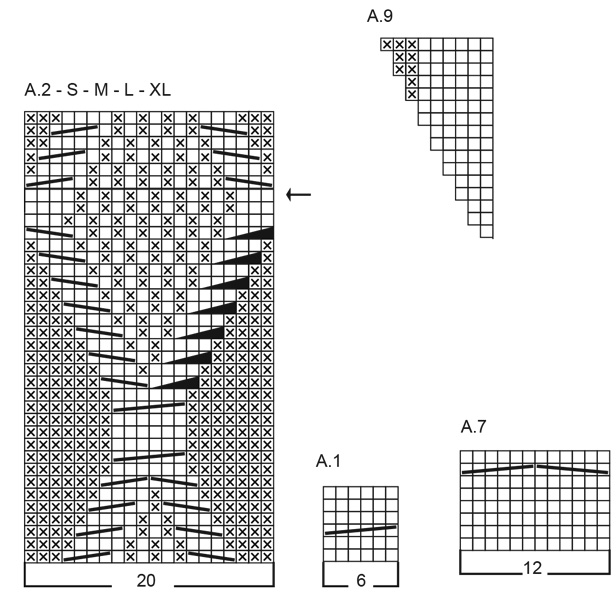
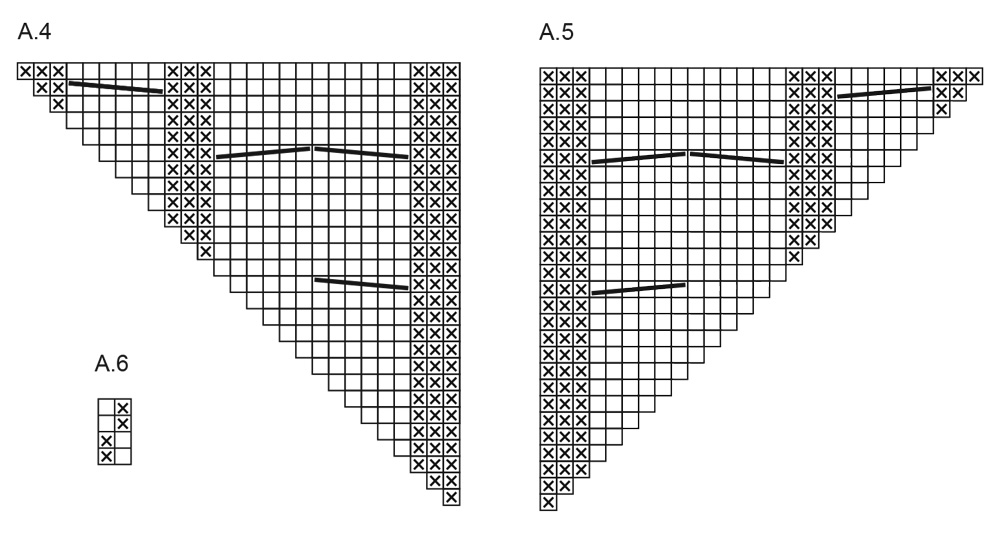
Lieber Leo, beim Rückenteil soll man die Diagramme wie zuvor/beschrieben stricken und gleichzeitig innerhalb 3 glattrechts Maschen in jeder Reihe zunehmen, bis alle Zunahmen gestrickt sind. Die Zunahmen sind im Diagram A.4 und A.5 gezeichnet, die letzten Zunahmen werden im Perlmuster (A.6) gestrickt wenn die Diagramme fertig sind. Viel Spaß beim Stricken!
03.11.2026 - 10:24
 Andreas wrote:
I bagstykket: Når man strikker pind 2 for anden gang, passer det ikke med maskerne, da pind 2 jo ikke har alle mønstrene med. Er det rigtigt at man skal gentage alle pindene eller er det kun pind 3 og 4 som skal gentages?
02.11.2026 - 21:13
Andreas wrote:
I bagstykket efter man strikket Pind 1-4, så skal disse gentages således at efter man har strikket pind 4, så kommer pind 1 igen, er dette rigtigt forstået?
30.10.2026 - 21:42DROPS Design answered:
Hei Andreas. Ja, det er riktig :) mvh DROPS Design
02.11.2026 - 10:23
|
||||||||||||||||||||||
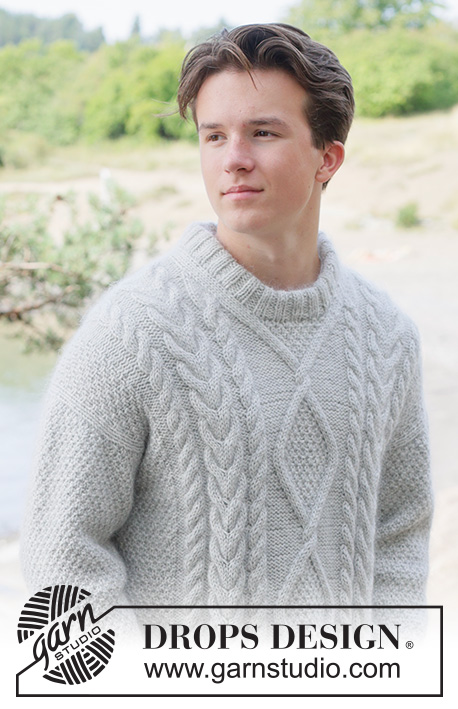
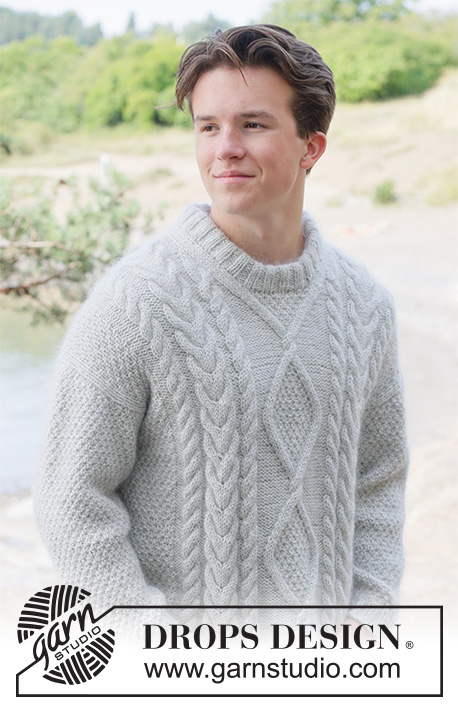
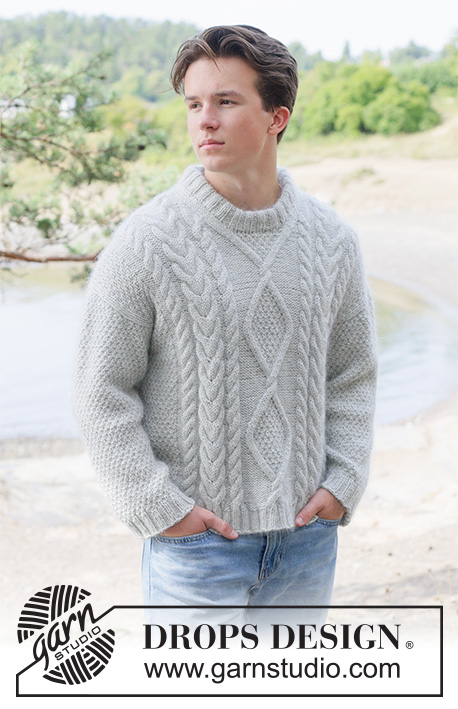
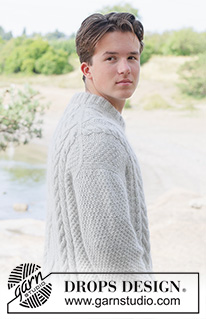
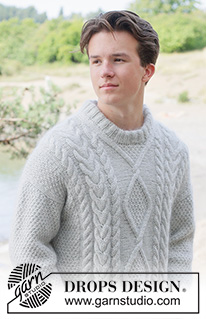
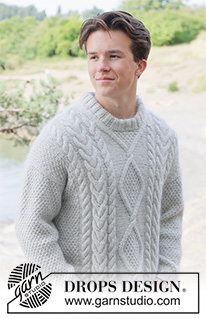
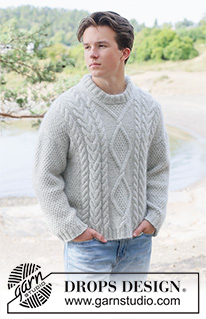
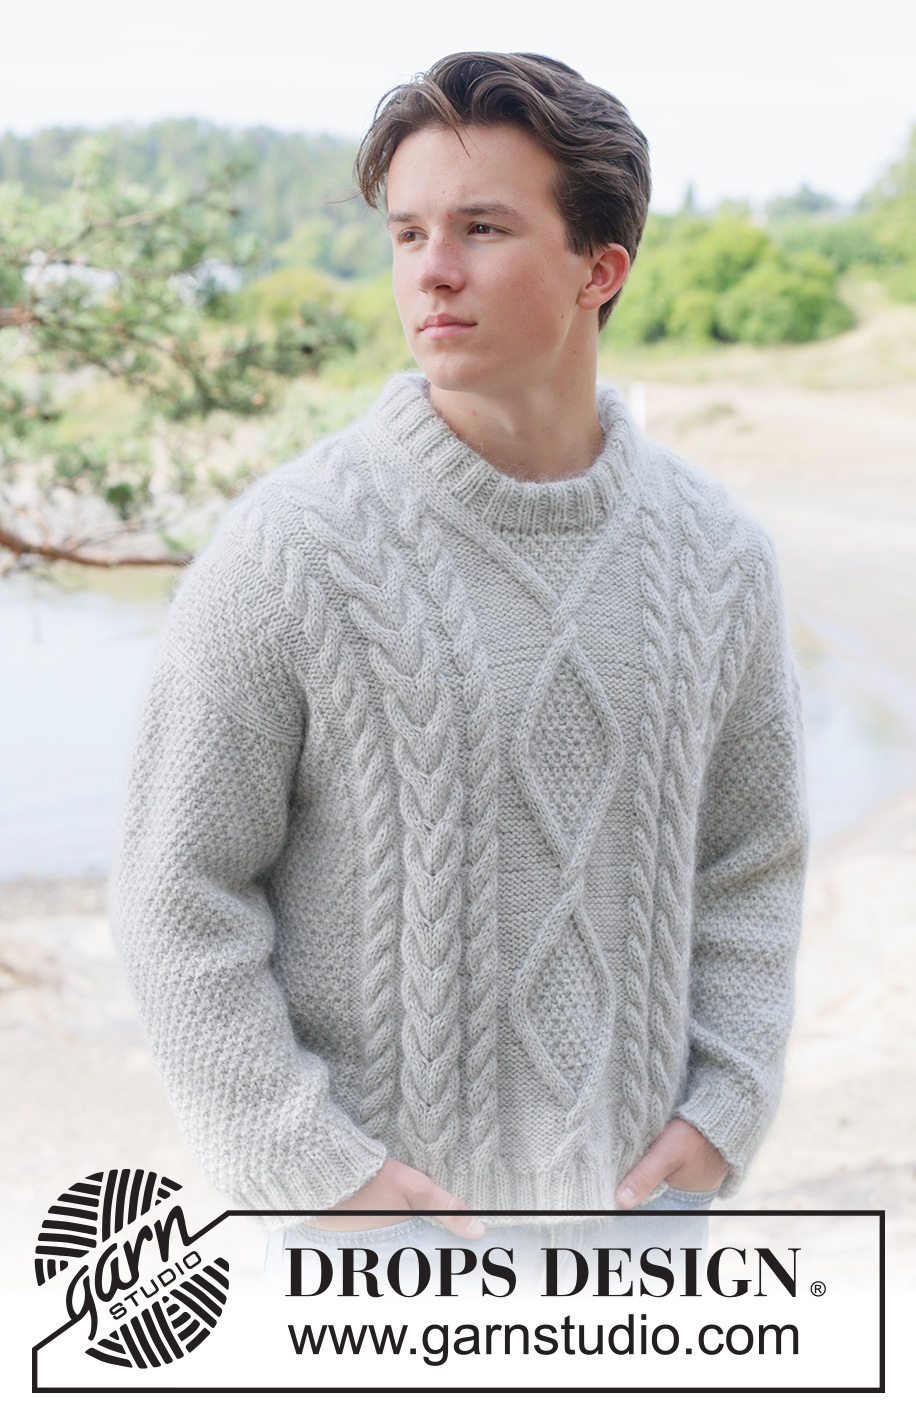
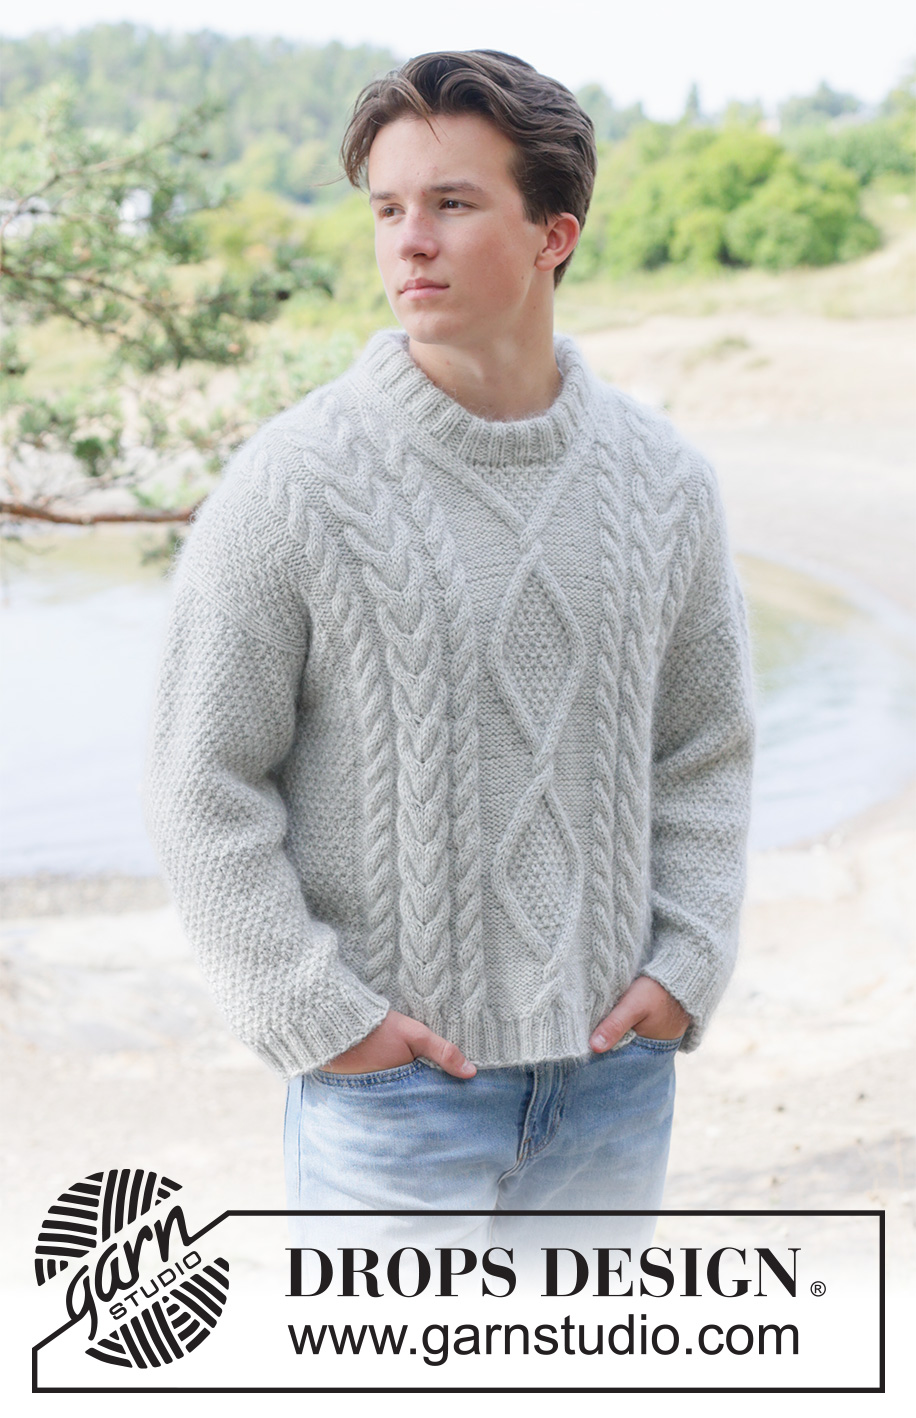
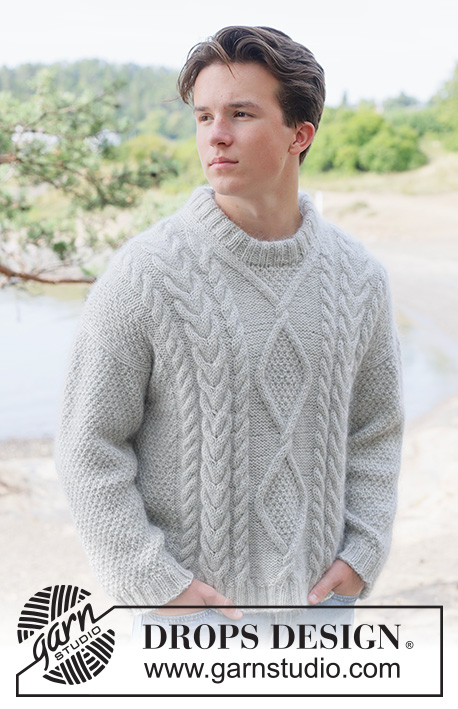
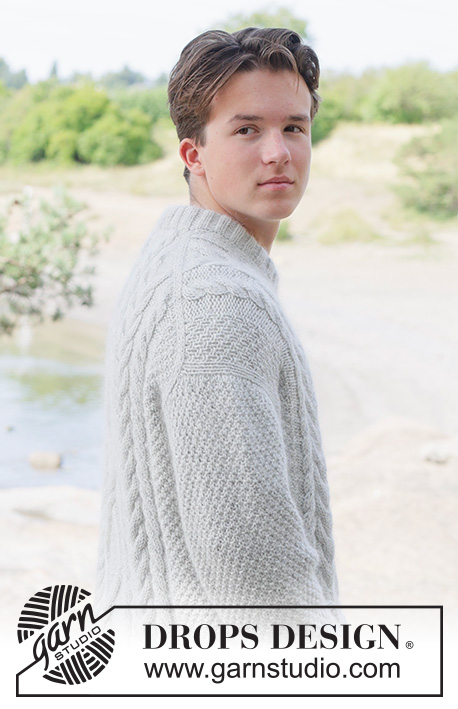
Moon Diamond Sweater#moondiamondsweater |
||||||||||||||||||||||
 |
 |
|||||||||||||||||||||
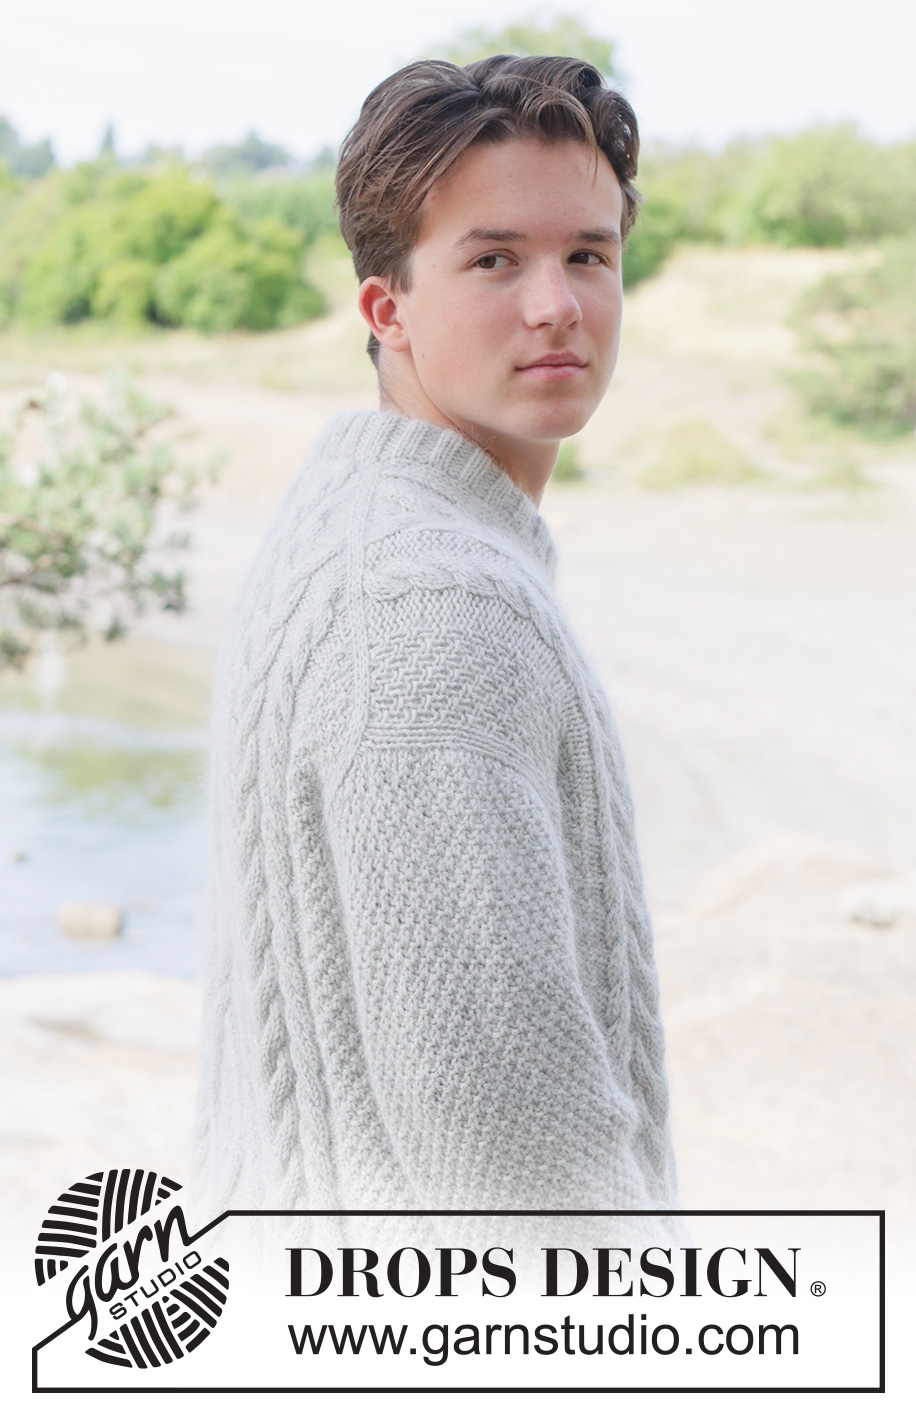
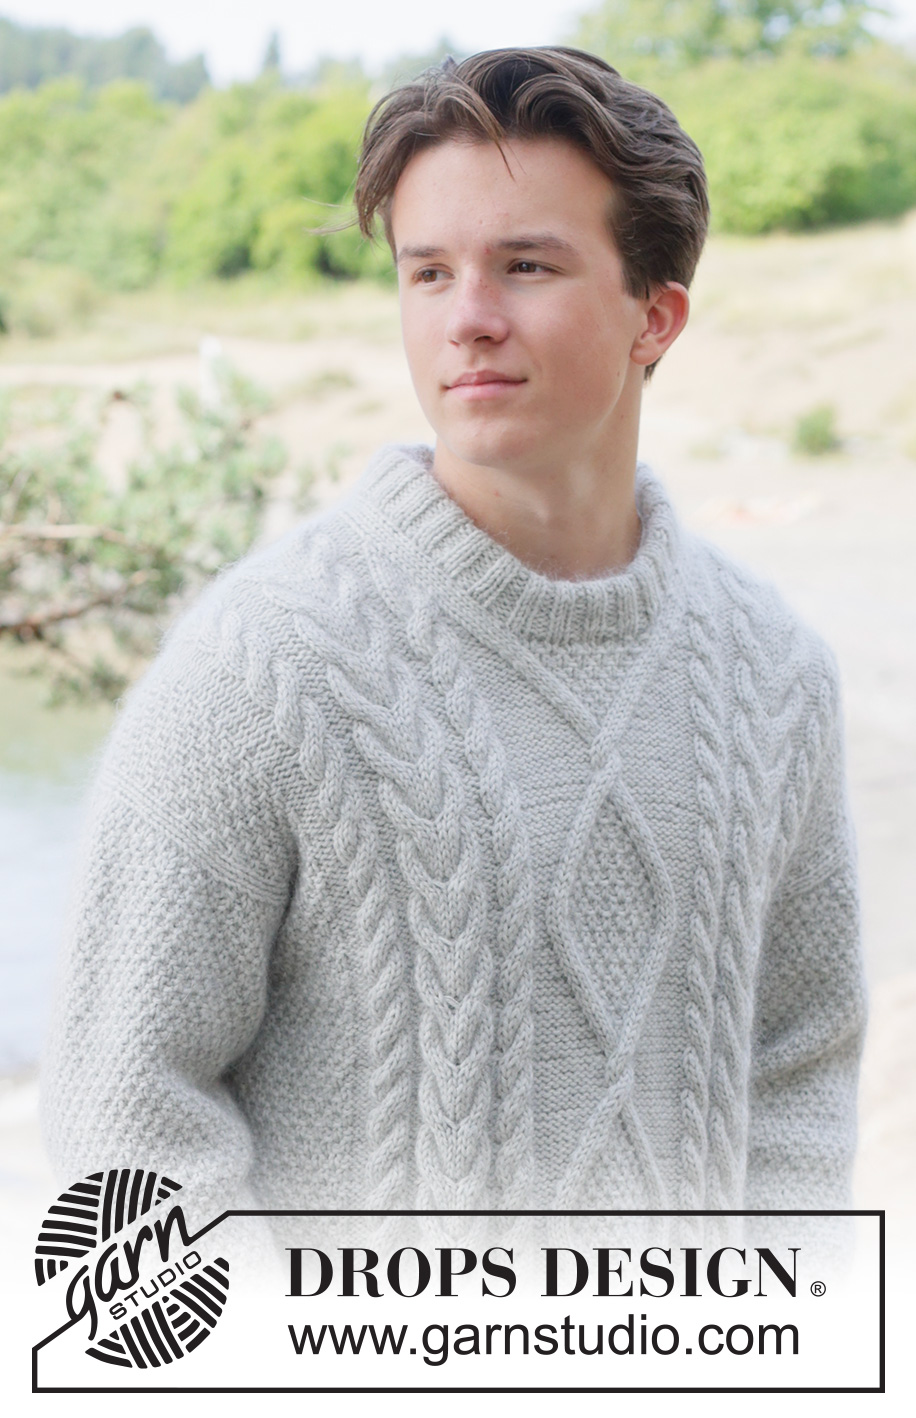
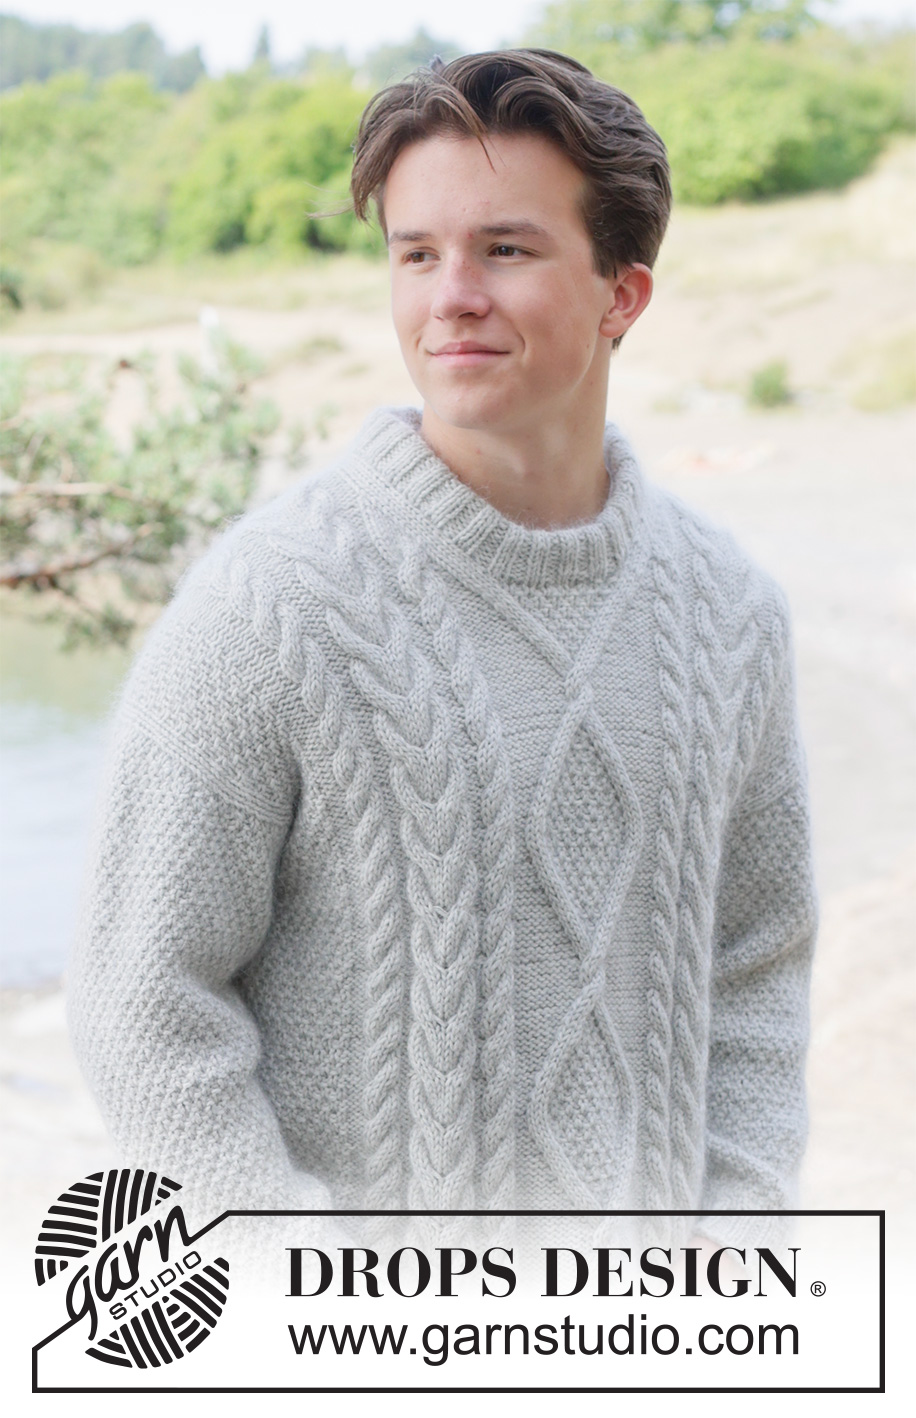
Knitted jumper for men in DROPS Lima and DROPS Kid-Silk or DROPS Saga and DROPS Kid-Silk. The piece is worked top down with European/diagonal shoulders, cables and double moss stitch. Sizes S – XXXXL.
DROPS 269-1 |
||||||||||||||||||||||
|
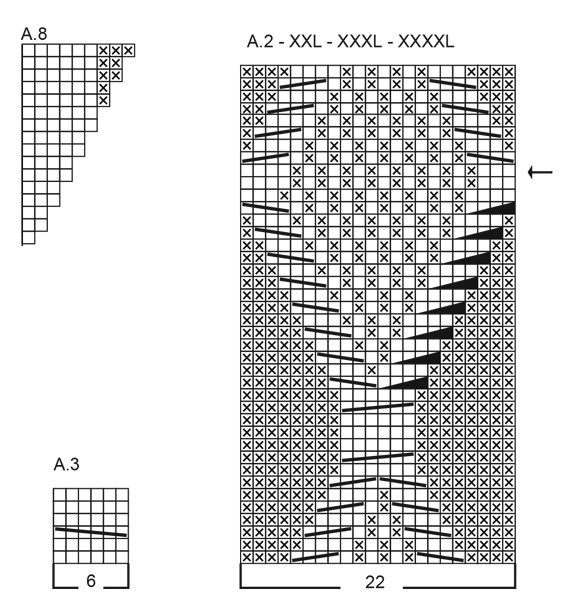
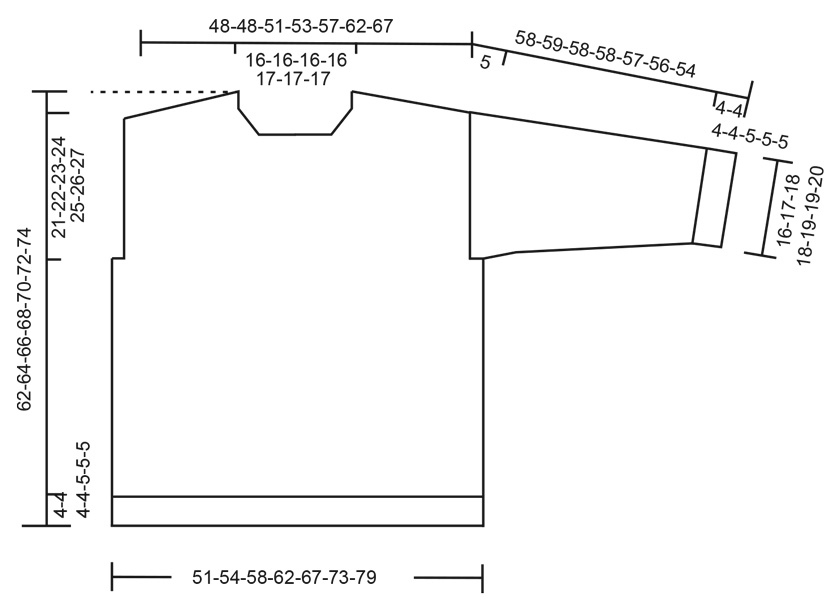
------------------------------------------------------- EXPLANATIONS FOR THE PATTERN: ------------------------------------------------------- PATTERN: See diagrams A.1 to A.9. Choose diagram for your size in A.2. The first row in A.4/A.5 is worked from the wrong side. The diagrams are worked from right to left when working from the right side and left to right when working from the wrong side. INCREASE 1 STITCH TOWARDS LEFT – from RIGHT SIDE: Use the left needle to pick up the strand between 2 stitches from the row below, pick up the strand from the front and knit/purl through the stitch-loop that lies on the back of the needle. INCREASE 1 STITCH TOWARDS THE RIGHT- from RIGHT SIDE: Use the left needle to pick up the strand between 2 stitches from the row below, pick up the strand from the back and knit/purl through the stitch-loop that lies on the front of the needle. INCREASE TIP-2: INCREASE 1 STITCH TOWARDS THE RIGHT- from WRONG SIDE: Use the left needle to pick up the strand between 2 stitches from the row below, pick up the strand from the back and knit/purl through the stitch-loop that lies on the front of the needle. INCREASE 1 STITCH TOWARDS LEFT – from WRONG SIDE: Use the left needle to pick up the strand between 2 stitches from the row below, pick up the strand from the front and knit/purl through the stitch-loop that lies on the back of the needle. DECREASE TIP (for sleeves): Decrease 1 stitch on each side of the marker under the sleeve: Work 2 stitches together before and after the marker, purling or knitting together depending on which fits best into the moss stitch. ------------------------------------------------------- START THE PIECE HERE: ------------------------------------------------------- JUMPER – SHORT OVERVIEW OF THE PIECE: The pattern uses both long and short needles; start with the length which fits the number of stitches and change when necessary. The piece is started back and forth, casting on stitches at the back of the neck and working the back piece top down, while increasing stitches on each side for the shoulders until the correct stitch count is achieved. The shoulders are slightly diagonal. The front piece is then worked in 2 sections, knitting up stitches along 1 back shoulder, working pattern and increasing for the neckline. This is repeated on the other shoulder. The 2 front shoulders are joined when the neckline-increases are finished and the front piece is worked as far as the armholes. The front and back pieces are joined on the same circular needle and the body finished in the round. Stitches are knitted up around the armholes for the sleeves, which are started back and forth for the sleeve cap, then finished in the round. Stitches are knitted up around the neckline and the neck is worked in the round. The neck is folded double to the inside and sewn down. BACK PIECE: The piece is worked back and forth. Cast on 44-44-44-44-46-46-46 stitches with circular needle size 5.5 mm, DROPS Lima and DROPS Kid-Silk (2 strands) or DROPS Saga and DROPS Kid-Silk (2 strands). ROW 1 (wrong side): Purl. ROW 2 (right side): Read INCREASE TIP-1. Knit 3, increase 1 stitch towards the left, work A.1, purl 3, A.2, purl 3, A.3, increase 1 stitch towards the right, knit 3. ROW 3 (wrong side): Read INCREASE TIP-2. Purl 3, increase 1 stitch towards the right, work A,4, A.3, knit 3, A.2, knit 3, A.1, A.5, increase 1 stitch towards the left, purl 3. ROW 4 (right side): Knit 3, increase 1 stitch towards the left, work A.5, A.1, purl 3, A.2, purl 3, A.3, A.4, increase 1 stitch towards the right, knit 3. Continue this pattern, increasing 1 stitch on each side of each row. When A.4/A.5 are finished worked the new stitches into pattern A.6 (into the double moss stitch). The cables in A.4 and A.5 continue as shown in A.1/A.3 and A.7 and the 3 purled stitches are continued. Increase a total of 30-30-32-34-36-40-44 times in each side (= 30-30-32-34-36-40-44 rows worked) = 104-104-108-112-118-126-134 stitches. Insert 1 marker outermost on one side. The piece is now measured from here! Continue the pattern, starting from the right side as follows: Knit 3, work A.6 across 3-3-5-7-9-13-17 stitches, purl 3, A.1, purl 3, A.7, purl 3, A.1, purl 3, A.2, purl 3, A.3, purl 3, A.7, purl 3, A.3, purl 3, work A.6 across 3-3-5-7-9-13-17 stitches, knit 3. Remember to maintain the knitting tension. Continue this pattern until the piece measures 11-11-10-10-10-10-9 cm from the marker on the armhole. Now increase for the armholes. INCREASE FOR ARMHOLES: ROW 1 (right side): Remember INCREASE TIP-1. Knit 3, increase 1 stitch towards the left, work pattern until there are 3 stitches left, increase 1 stitch towards the right, knit 3. The increased stitches are worked into the double moss stitch. ROW 2 (wrong side): Continue the pattern with purl-3 on each side. Work ROWS 1 and 2 a total of 1-2-3-4-4-4-5 times = 106-108-114-120-126-134-144 stitches. Continue working until the piece measures 12-13-13-14-14-14-14 cm, from the marker on the armhole, finishing after a row from the wrong side. Cut the strand and place the stitches on a stitch holder. Work the left front piece along the left back shoulder as follows. LEFT SHOULDER: Find the left back shoulder as follows: Lay the back piece flat, right side up, with the stitch holder/thread towards you; left side of piece = left shoulder. On the left back shoulder, start 4 stitches in on the neckline (3 knitted stitches + the first stitch in A.5), knit up 1 stitch in each of these stitches, then 1 stitch in each row worked inside the outermost stitch as far as the armhole (30-30-32-34-36-40-44 stitches), knit up 3 stitches down the side of the back piece = 37-37-39-41-43-47-51 stitches. All measurements on the front piece are taken from this knitted-up row. Purl 1 row from the wrong side. From the right side: Knit 4, purl 3, work A.7, purl 3, A.3, purl 3, A.6 across 3-3-5-7-9-13-17 stitches, knit 3. When the piece measures 4-4-4-4-5-5-5 cm, begin increasing after the first 4 stitches at the beginning of each row from the right side as follows: ROW 1 (right side): Remember INCREASE TIP-1. Knit 4, increase 1 stitch towards the left, continue the pattern to end of row. ROW 2 (wrong side): Continue the pattern; the increased stitches are worked into A.8. When there are 6 increased knitted stitches, work A.3 across these 6 stitches, making sure to cable on the same row as in the other A.3. Work ROWS 1 and 2 a total of 9 times (18 rows worked) = 46-46-48-50-52-56-60 stitches, with the last row from the wrong side. Cut the strand and place the stitches on a stitch holder. Work the right shoulder along the right back shoulder as follows. RIGHT SHOULDER: From the right side, start 3 stitches down on the right-hand side of the back piece and knit up 1 stitch in each row, then knit up 1 stitch in each row worked along the right back shoulder, inside the outermost stitch as far as the neck (30-30-32-34-36-40-44 stitches), finally knit up 4 stitches along the neckline (i.e., across 3 knitted stitches and the first stitch in A.4) = 37-37-39-41-43-47-51 stitches. All measurements on the front piece are taken from this knitted-up row. Purl 1 row from the wrong side. From the right side: Knit 3, work A.6 across 3-3-5-7-9-13-17 stitches, purl 3, A.1, purl 3, A.7, purl 3, knit 4. When the piece measures 4-4-4-4-5-5-5 cm, begin increasing before the last 4 stitches at the end of each row from the right side as follows: ROW 1 (right side): Work until there are 4 stitches left, increase 1 stitch towards the right, knit 4 - remember INCREASE TIP-1. ROW 2 (wrong side): Continue the pattern, the increased stitches are worked into pattern A.9. When you have 6 knitted stitches, work A.1 across these stitches, making sure to cable on the same row as in the other repeats of A.1. Work ROWS 1 and 2 a total of 9 times (18 rows worked) = 46-46-48-50-52-56-60 stitches, with the last row from the wrong side. Now join the 2 shoulders for the front piece as follows. FRONT PIECE (right and left shoulder joined): From the right side: Continue the pattern across the 46-46-48-50-52-56-60 stitches on the right shoulder, cast on 12-12-12-12-14-14-14 stitches, continue the pattern across the 46-46-48-50-52-56-60 stitches on the left front shoulder = 104-104-108-112-118-126-134 stitches. Continue pattern, with the first row from the wrong side as follows: Purl 3, work A.6 across 3-3-5-7-9-13-17 stitches, knit 3, A.3, knit 3, A.7, knit 3, A.3, knit 3, A.2 (start on the row with an arrow in A.2), knit 3, A.1, knit 3, A.7, knit 3, A.1, knit 3, work A.6 across 3-3-5-7-9-13-17 stitches, purl 3. Continue this pattern onwards. When the piece measures 29-29-30-30-32-34-35 cm, increase for the armholes. INCREASE FOR ARMHOLES: ROW 1 (right side): Knit 3, increase 1 stitch towards the left, work pattern until there are 3 stitches left, increase 1 stitch towards the right, knit 3. The increased stitches are worked into the double moss stitch. ROW 2 (wrong side): Continue the pattern with purl-3 on each side. Work ROWS 1 and 2 a total of 1-2-3-4-4-4-5 times = 106-108-114-120-126-134-144 stitches. Continue working until the piece measures 30-31-33-34-36-38-40 cm, finishing after a row from the wrong side. Now join the front and back pieces for the body. The front piece is longer than the back piece; approx. 2 cm of the neckline-depth will lie on the back piece. BODY: Work the 106-108-114-120-126-134-144 stitches on the front piece, cast on 2-6-6-6-8-10-10 stitches (mid-under the sleeve), work the 106-108-114-120-126-134-144 stitches on the back piece, cast on 2-6-6-6-8-10-10 stitches (mid-under the sleeve) = 216-228-240-252-268-288-308 stitches. NOTE! The cast-on stitches under each sleeve are worked into A.6; if the pattern does not match the stitches on the front and back pieces, adjust by decreasing 1 stitch on the first round so the pattern is correct. The round begins in the middle of the cast-on stitches under one sleeve. The 3 stocking stitches on each side are also worked in double moss stitch. Continue the pattern in the round until the piece measures 56-58-60-62-63-65-67 from the cast-on edge mid-back. Change to circular needle size 4 mm. Work rib (knit 2 and purl 2) for 4-4-4-4-5-5-5 cm. Cast off with rib. The jumper measures approx. 60-62-64-66-68-70-72 cm from mid-back and 62-64-66-68-70-72-74 cm from top of shoulder. SLEEVES: The sleeves are worked top down. Lay the piece flat and insert 1 marker at the top of the armhole. NOTE: This is not the same as the knitted-up row on the front piece but a few cms down the front piece. Use circular needle size 5.5 mm. Start in the middle of the cast-on stitches under the sleeve and knit up 64-66-68-76-78-84-88 stitches around the armhole, with equal numbers of stitches on both sides of the marker. Work A.6 back and forth with short rows for the sleeve cap (to give the sleeve a better fit), starting from mid-under the sleeve as follows: ROW 1 (right side): Knit to 8-8-10-10-10-12-12 stitches before the marker on top of the sleeve, work A.6 across the next 16-16-20-20-20-24-24 stitches, turn – read KNITTING TIP. ROW 2 (wrong side): Work A.6 across the first 20-20-24-24-24-28-28 stitches, turn. ROW 3 (right side): Work A.6 to 2 stitches past the previous turn, turn. ROW 4 (wrong side): Work A.6 to 2 stitches past the previous turn, turn. ROW 5 (right side): Work A.6 to 2 stitches past the previous turn, turn. ROW 6 (wrong side): Work A.6 to 2 stitches past the previous turn, turn. Repeat ROWS 5 and 6 until you have turned a total of 10 times (5 times each side, with the last row from the wrong side). AFTER THE LAST TURN: After the last row 6, turn and work A.6 from the right side across all stitches to the beginning of the round (mid-under the sleeve). Insert 1 marker-thread in the middle stitch under the sleeve; this is used when decreasing under the sleeve. Allow it to follow your work onwards. Work A.6 in the round. AT THE SAME TIME decrease stitches mid-under the sleeve - read DECREASE TIP as follows: When the sleeve measures 1 cm measured under the sleeve, decrease 2 stitches every 3½-3½-3-3-3-3-3 cm, 9-10-10-14-14-17-18 times = 46-46-48-48-50-50-52 stitches. Continue working until the sleeve measures 54-55-54-54-52-51-49 cm from mid-top of shoulder. Change to double pointed needles size 4 mm. Work rib (knit 2 and purl 2), AT THE SAME TIME increase 2-2-0-0-2-2-0 stitches evenly on the first round = 48-48-48-48-52-52-52 stitches. When the rib measures 4-4-4-4-5-5-5 cm, cast off. The sleeve measures approx. 58-59-58-58-57-56-54 cm from mid-top of shoulder. NECK: Use circular needle size 4 mm. Start from the right side on one shoulder-line and knit up 92 to 100 stitches inside 1 stitch around the neckline; the stitch count should be divisible by 4. Work rib in the round (knit 2 and purl 2) for 8-9 cm. Fold the neck double to the inside and sew down. To avoid the neck being tight and rolling outwards, it is important that the seam is elastic. |
||||||||||||||||||||||
Diagram explanations |
||||||||||||||||||||||
|
||||||||||||||||||||||
 |
||||||||||||||||||||||
 |
||||||||||||||||||||||
 |
||||||||||||||||||||||
 |
||||||||||||||||||||||
Have you finished this pattern?Tag your pictures with #dropspattern #moondiamondsweater or submit them to the #dropsfan gallery. Do you need help with this pattern?You'll find 33 tutorial videos, a Comments/Questions area and more by visiting the pattern on garnstudio.com. © 1982-2026 DROPS Design A/S. We reserve all rights. This document, including all its sub-sections, has copyrights. Read more about what you can do with our patterns at the bottom of each pattern on our site. |
||||||||||||||||||||||






With over 40 years in knitting and crochet design, DROPS Design offers one of the most extensive collections of free patterns on the internet - translated to 17 languages. As of today we count 333 catalogues and 12532 patterns translated into English (UK/cm). 12532
We work hard to bring you the best knitting and crochet have to offer, inspiration and advice as well as great quality yarns at incredible prices! Would you like to use our patterns for other than personal use? You can read what you are allowed to do in the Copyright text at the bottom of all our patterns. Happy crafting!
Post a comment to pattern DROPS 269-1
We would love to hear what you have to say about this pattern!
If you want to leave a question, please make sure you select the correct category in the form below, to speed up the answering process. Required fields are marked *.