
Popular categories
Looking for a yarn?


Comments / Questions (56)
![]() Rean wrote:
Rean wrote:
Welke kleuren zijn er gebuikt?\r\nNr 08 is zwart \r\nOp de foto lijkt het beige \r\nNr 10 is inderdaad mosgroen\r\nGraag hoor ik welke beige/witte kleur er is gebruikt
02.03.2025 - 13:22
![]() Maike wrote:
Maike wrote:
Hallo, ich verstehe den Anleitungsschritt ab dem stilllegen der 18 Maschen (ich stricke Größe S) für den Halsausschnitt nicht. Was bedeutet es, 3 Maschen 1 x, dann 2 Maschen 2 x. Dann 1 Masche 4 abzunehmen? Ich habe die Maschen doch eben auf einem Faden stillgelegt? Und wie soll ich dann gleichzeitig die Schulterschrägung stricken?
25.02.2025 - 11:40DROPS Design answered:
Liebe Maike, für den Halsausschnitt werden die mittleren 18 Maschen stillgelegt, dann wird jede Schulter separat gestrickt. Man wird die Maschen am Anfang jeder Reihe vom Halsausschnitt abketten und gleichzeitig, Maschen am Anfang vom Armausschnitt stilllegen. So Halsausschnitt ist am Anfang einer HinReihe beim linken Vorderteil/Rückreihe beim rechten Vorderteil und Schulter wird man am Anfang einer Rückreihe beim rechten Vorderteil/Hinreihe beim linken Vorderteil. Viel Spaß beim Stricken!
25.02.2025 - 16:33
![]() Michela wrote:
Michela wrote:
The diagonal shoulder part when it says to "place the stitches by the armhole on a thread" does that mean pick up stitches along the side of the pannel? how do you place 6 stitches 4 times? where the stitches are coming from (i'm making a small) the neck had a cast off/ decrease of 11 stitches leaving 30 stitches (plus 1 edge) for each shoulder are these 30 stitches the stitches being places on the thread place 6, knit& purl row, place another 6 etc?
29.01.2025 - 01:30DROPS Design answered:
Hi Michela, Yes, it is the shoulder stitches which are being placed on the stitch holder, 6 at a time while the others are worked, giving you the slightly diagonal shoulders. Start with the 6 stitches by the armhole and work them, then place them on the holder, work to end of row by neck then back again to the stitch holder. Turn, work the next 6 stitches, then place them on the holder etc.. All stitches should at the end either have been decreased or are on the holder. Hope this helps and happy knitting!
29.01.2025 - 07:00
![]() Dais wrote:
Dais wrote:
Hey i couldn’t figure out how i supposed to pick up stitches for diagonal shoulder. Place 6-7-8-9-10-11 stitches 4 times, then place the last 7-6-6-6-8-8 stitches on the thread. All stitches are now bind off or on the thread. should start from armhole? and should i pick up 6 stitches 4 times on different rows?
28.09.2024 - 01:10DROPS Design answered:
Dear Dais, yes, you start on the side where the armhole/side is (opposite to the neck) and pick up 6 stitches on 4 separate rows that start from the armhole/side. On the 5th row from the armhole you place the last remaining 7 stitches on the thread. Happy knitting!
29.09.2024 - 20:30
![]() Sofía wrote:
Sofía wrote:
Estoy tejiendo el talle L. No me queda claro cómo seguir el escote. Tengo que poner los 18 puntos del medio aparte y trabajar cada hombro por separado, pero no comprendo el resto. Cada hombro tendría 50 puntos de los cuales hay que hacerles disminuciones. Esa sería la parte de \"Cast off for the neck 3 stitches 1 time, 2 stitches 2 times, then decrease 1 stitch 5 times\" del lado de adentro de ambos hombros? Tampoco entiendo la parte de los hombros diagonales
20.09.2024 - 03:20
![]() Sofía wrote:
Sofía wrote:
I am having problems with decreasing when switching to the 4.5 mm circular needle. I am knitting size L so I have 144 stitches (142 not counting the edge stitches) and I need to decrease 38 stitches on the next row on the right side. As much as I read the article you have to help me to decrease stitches I am not able to do it. Could you give me a step by step or some more help to be able to advance? Thank you very much.
17.09.2024 - 04:52DROPS Design answered:
Hi Sofia, You decrease 38 stitches across 142 stitches on the row (the edge stitches are kept as they are). 142/ 38 = 3.7. This means you decrease by working together 2 stitches after alternately stitches 3 and 4 (approx.). Keep a tab on how many stitches you have decreased towards the end of the row and adjust accordingly. Hope this helps and happy knitting!
17.09.2024 - 07:00
![]() Emma wrote:
Emma wrote:
Hej jag behöver förtydligande vid framstycket. Det står såhär: "När arbetet mäter 12 cm från uppläggningskanten, ökas det 1 maska i varje sida - läs ÖKNINGSTIPS-1. Upprepa ökningen med 2 cm mellanrum tills det har ökats totalt 5 gånger i varje sida = 100maskor. När arbetet mäter 14 cm från uppläggningskanten stickas det vidare i A.1.\" Ska jag alltså bara ha två ökningar per rad eller ska det vara 10 ökningar på samma rad med 2cm mellanrum?
11.09.2024 - 23:38
![]() Laura D wrote:
Laura D wrote:
Attention, pour le modèle en taille M 1 seule pelote verte suffit largement. A l'inverse, il m'a manqué une pelote couleur naturel pour finir le pull....
26.04.2024 - 16:48
![]() Annet Van Loon wrote:
Annet Van Loon wrote:
Helemaal enthousiast over het patroon van de damestrui. Promise of Spring met breigaren Drops Belle Helaas kan ik niet met een rondbreinld breien. Is het mogelijk dat ik dit patroon met twee nld kan breien en zo ja waar moet ik op letten en waar moet het aangepast worden. Graag hoor ik van u. Met vriendelijke groet Annet van Loon
09.04.2024 - 19:12DROPS Design answered:
Dag Annet,
Om een patroon aan te passen om op rechte naalden te breien hebben we een instructie gemaakt. Deze vind je hier.
10.04.2024 - 08:39
![]() Maja wrote:
Maja wrote:
Der er en lille fejl i opskriften: Merino Extra Fine farve nr 08 er ikke Lys Beige, men Gråbeige. Lys beige er nr 50 :)
05.11.2023 - 18:47
|
|||||||||||||
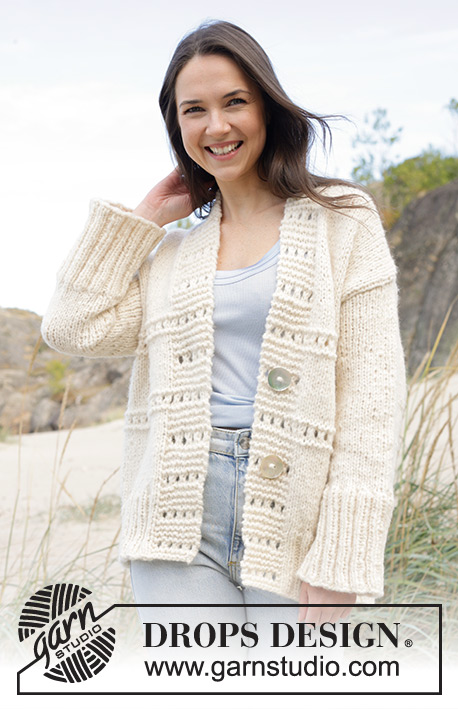
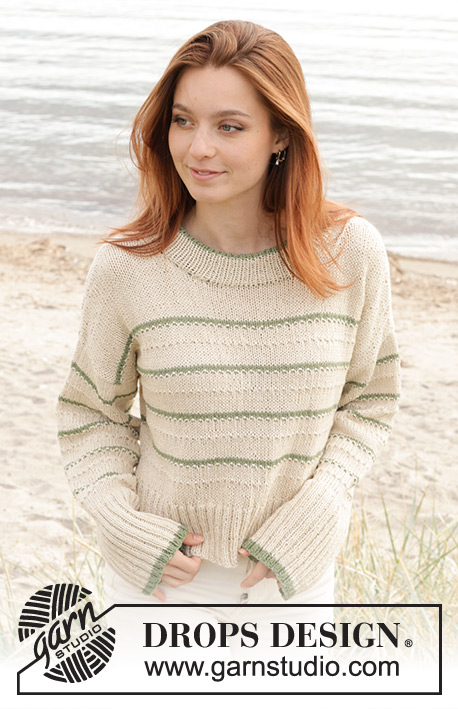
Promise of Spring#promiseofspringsweater |
|||||||||||||
 |
 |
||||||||||||
Knitted jumper in DROPS Belle or DROPS Merino Extra Fine. The piece is worked bottom up with stocking stitch, textured pattern, stripes and double neck. Sizes S - XXXL.
DROPS 241-7 |
|||||||||||||
|
------------------------------------------------------- EXPLANATIONS FOR THE PATTERN: ------------------------------------------------------- RIDGE/GARTER STITCH (worked back and forth): Knit all rows. 1 ridge = knit 2 rows. PATTERN: See diagram A.1. Choose diagram for your size. The diagram shows all rows in the pattern from the right side. INCREASE TIP-1 (sides of body): Make 1 yarn over inside the outermost 2 stitches on each side; the yarn overs are purled twisted on the next row to avoid holes. DECREASE TIP (for neck and when decreasing 1 stitch at a time): Decrease for the neck inside 3 stocking stitches. All decreases are worked from the right side! AFTER 3 STOCKING STITCHES: Slip 1 stitch as if to knit, knit 1 and pass the slipped stitch over the knitted stitch (1 stitch decreased). BEFORE 3 STOCKING STITCHES: Work until there are 5 stitches left mid-front, knit 2 together, work the last 3 stitches in stocking stitch (1 stitch decreased). INCREASE TIP-2 (sleeves): Increase 1 stitch on each side of the marker-stitch as follows: Work to the marker-stitch, make 1 yarn over, work the marker-stitch, 1 yarn over (= 2 stitches increased). On the next round work the yarn overs twisted to avoid holes. Then work the new stitches into A.1. ------------------------------------------------------- START THE PIECE HERE: ------------------------------------------------------- JUMPER – SHORT OVERVIEW OF THE PIECE: The front and back pieces are worked separately, back and forth and bottom up. The sleeves are worked in the round with double pointed needles/short circular needle, bottom up. The piece is sewn together, then the neck is worked in the round. FRONT PIECE: Cast on 120-132-144-156-172-188 stitches with circular needle size 3 mm and colour light beige DROPS Belle. Purl 1 row from the wrong side. Then work rib from the right side as follows: 1 edge stitch in GARTER STITCH – read description above, * knit 2, purl 2 *, work from *-* until there are 3 stitches left, knit 2 and 1 edge stitch in garter stitch. Continue this rib for 10 cm. Change to circular needle size 4.5 mm and work as follows from the right side: 1 edge stitch in garter stitch, work stocking stitch and decrease 30-34-38-40-44-50 stitches evenly spaced, 1 edge stitch in garter stitch = 90-98-106-116-128-138 stitches. Continue in stocking stitch with 1 edge stitch in garter stitch on each side. REMEMBER THE KNITTING TENSION! When the piece measures 12 cm from the cast-on edge, increase 1 stitch on each side - read INCREASE TIP-1. Repeat this increase every 2 cm a total of 5 times on each side = 100-108-116-126-138-148 stitches. When piece measures 14-14-15-15-15-16 cm from cast-on edge, work A.1. Continue working until the piece measures 31-32-33-34-35-36 cm. At the end of the next 2 rows cast on 1 stitch, which is used when sewing in the sleeves = 102-110-118-128-140-150 stitches. Continue with A.1 until the piece measures approx. 38-38-39-43-43-44 cm. Continue with stocking stitch and colour light beige over all stitches until the piece measures 46-48-49-51-52-54 cm. On the next row place the middle 18-18-18-20-20-20 stitches on a thread for the neck and finish each shoulder separately. OVERVIEW OF THE NEXT SECTION: Cast off/decrease for the neck and place stitches on a thread for the diagonal shoulder. Read NECK and DIAGONAL SHOULDERS before continuing. NECK: Cast off for the neck 3 stitches 1 time, 2 stitches 2 times, then decrease 1 stitch 4-5-5-5-5-6 times - read DECREASE TIP. DIAGONAL SHOULDERS: AT THE SAME TIME when the piece measures 50-52-54-56-58-60 cm, place the stitches by the armhole on a thread for the diagonal shoulder; to avoid cutting the strand, work the stitches before placing them on the thread. Place 6-7-8-9-10-11 stitches 4 times, then place the last 7-6-6-6-8-8 stitches on the thread. All stitches are now cast off or on the thread. Place the 31-34-38-42-48-52 stitches from the thread back on circular needle size 4.5 mm. Work 1 row of stocking stitch; to avoid holes when turning in the middle of the piece pick up the strand between 2 stitches and work it twisted together with the first stitch on the left needle. Cast off loosely. Work the other shoulder in the same way. BACK PIECE: Cast on and work in the same way as the front piece. Match A.1 to the front piece so the stripes are the same. Work until the piece measures 50-52-54-56-58-60 cm. On the next row cast off the middle 36-38-38-40-40-42 stitches for the neck and finish each shoulder separately. OVERVIEW OF THE NEXT SECTION: Decrease for the neck and place stitches on a thread for the diagonal shoulder. Read NECK and DIAGONAL SHOULDERS before continuing. NECK: Decrease 1 stitch for the neck on each row from the right side, 2 times - remember DECREASE TIP. DIAGONAL SHOULDERS: AT THE SAME TIME place the stitches by the armhole on a thread for the diagonal shoulder; to avoid cutting the strand work the stitches before placing them on the thread. Place 6-7-8-9-10-11 stitches 4 times, then place the last 7-6-6-6-8-8 stitches on the thread. All stitches are now cast off or on the thread. Place the 31-34-38-42-48-52 stitches from the thread back on circular needle size 4.5 mm. Work 1 row of stocking stitch; to avoid holes when turning in the middle of the piece, pick up the strand between 2 stitches and work it twisted together with the first stitch on the left needle. Cast off loosely. Work the other shoulder in the same way. SLEEVES: Cast on 72-76-80-84-88-92 stitches with double pointed needles size 3 mm and colour moss green DROPS Belle. Work 3 rounds of rib (knit 2, purl 2). Change to colour light beige and continue the rib until the sleeve measures 14 cm. Change to double pointed needles size 4.5 mm. Knit 1 round and decrease 18-20-22-24-26-28 stitches evenly spaced = 54-56-58-60-62-64 stitches. Insert 1 marker in the first stitch on the round; it will be used when increasing under the sleeve. Work A.1 in the round and increase 2 stitches under the sleeve – read INCREASE TIP-2. Increase like this every 2½-2½-2-2-1½-1½ cm a total of 11-12-13-14-15-16 times = 76-80-84-88-92-96 stitches. Continue with A.1 to finished length. Cast off when the sleeve measures 47-46-45-44-42-40 cm. Work the other sleeve in the same way. ASSEMBLY: Sew the shoulder seams. Sew the side seams, starting where you cast on 1 new stitch on each side and sew (inside this stitch) down to the beginning of the rib (leaving a split in each side). Sew in the sleeves inside the 1 stitch on the front and back pieces. NECK: Using short circular needle size 3 mm and colour light beige, knit up 116-128 stitches around the neck (including the stitches on the thread). Work rib in the round (knit 1, purl 1) for 5 cm. Change to colour moss green and continue the rib until the neck measures 11 cm. Loosely cast off with knit over knit and purl over purl. Fold the neck double to the inside and sew down. To avoid the neck being tight and rolling outwards, it is important that the seam is elastic. |
|||||||||||||
Diagram explanations |
|||||||||||||
|
|||||||||||||

|
|||||||||||||

|
|||||||||||||
Have you finished this pattern?Tag your pictures with #dropspattern #promiseofspringsweater or submit them to the #dropsfan gallery. Do you need help with this pattern?You'll find 32 tutorial videos, a Comments/Questions area and more by visiting the pattern on garnstudio.com. © 1982-2025 DROPS Design A/S. We reserve all rights. This document, including all its sub-sections, has copyrights. Read more about what you can do with our patterns at the bottom of each pattern on our site. |
|||||||||||||


With over 40 years in knitting and crochet design, DROPS Design offers one of the most extensive collections of free patterns on the internet - translated to 17 languages. As of today we count 314 catalogues and 11820 patterns translated into English (UK/cm). 11820
We work hard to bring you the best knitting and crochet have to offer, inspiration and advice as well as great quality yarns at incredible prices! Would you like to use our patterns for other than personal use? You can read what you are allowed to do in the Copyright text at the bottom of all our patterns. Happy crafting!
Post a comment to pattern DROPS 241-7
We would love to hear what you have to say about this pattern!
If you want to leave a question, please make sure you select the correct category in the form below, to speed up the answering process. Required fields are marked *.