
Popular categories
Looking for a yarn?


Comments / Questions (14)
![]() Brigitte wrote:
Brigitte wrote:
Hoi, is het eerste knoopsgat 15 cm gemeten vanaf de eerste naald. Dus direct bij het overgaan naar 5 mm breinaald starten met het knoopsgat. Of moet de kraag eerst dubbel worden gevouwen?
21.01.2025 - 12:27DROPS Design answered:
Dag Brigitte,
Het knoopsgat zit inderdaad bij de overgang naar een grotere naald.
21.01.2025 - 20:02
![]() Laulau wrote:
Laulau wrote:
Frage zu: Pfeil-3: 10-8-14-20-22-20 Maschen gleichmäßig verteilt zunehmen = 257-273-297-321-341-369 Maschen. Hat sich hier ein Fehler eingeschlichen? Wenn ich bei xl 321 M habe, komme ich nicht auf eine gerade Rapportzahl. 321-18RM= 303M-1M für die letzte M. =302:6=50,333M. Bei Pfeil 1 und 2 passt es. Bei 3 nicht. Oder habe ich was falsch verstanden?
11.01.2025 - 10:47DROPS Design answered:
Liebe Laulau, nach 3. Pfeil ist aber A.1 fertig und man wird dann Glattrechts mit grau stricken. Viel Spaß beim Stricken!
13.01.2025 - 08:46
![]() Carina wrote:
Carina wrote:
Hola Por qué la lana Nepal hace tantas bolitas? He hecho esta chaqueta y a los dos días ya tiene bolitas Gracias
23.11.2024 - 22:20DROPS Design answered:
Hola Carina, la formación de pelusa es un proceso natural que sucede hasta en las fibras más exclusivas. Es un signo natural consecuencia del uso y desgaste que es difícil evitar, y que es más visible en áreas de mayor fricción de tu prenda como por ejemplo en los brazos y puños de un jersey. Puedes hacer que tu prenda se vea como nueva eliminando la pelusa, usando un cepillo de telas o un removedor de pelusa.
24.11.2024 - 21:00
![]() Diana wrote:
Diana wrote:
Hello, do you knit short rows before you start the yoke ?
09.10.2024 - 03:47DROPS Design answered:
Hi Diana, No, there are no short rows in this pattern. The neck is worked with full rows, with 9 band stitches on each side. Happy knitting!
09.10.2024 - 06:58
![]() HERBELIN wrote:
HERBELIN wrote:
Bonjour, dans la partie « manches » vous dites : reprendre les mailles de l’arrêt de mailles en attente et relever en plus une maille dans chacune des mailles montées sous la manche. Mais le nombre total de mailles annoncées ne semblent pas comptabiliser la ou les mailles relevées en plus. Ou bien je n’ai pas bien compris comment il faudrait faire. Pourriez vous m’éclairer sur ce point s’il vous plaît ? Merci par avance.
06.06.2024 - 13:30DROPS Design answered:
Bonjour Mme Herbelin, lors de la division, vous avez monté 6-8-8-10-12-12 mailles sous chaque manche, vous allez maintenant relever 1 maille dans chacune de ces 6-8-8-10-12-12 mailles et tricoter les 48-50-56-62-62-66 mailles en attente, vous aurez ainsi 54-58-64-72-74-78 mailles au total. Retrouvez cette étape dans cette leçon, photo 18 B. Bon tricot!
06.06.2024 - 16:40
![]() Judy Stickle wrote:
Judy Stickle wrote:
Is the first buttonhole measured from the cast-on edge? Thank you!
17.03.2024 - 13:19DROPS Design answered:
Dear Judy, you should cast off for the first buttonhole, when neck edge measures 13-13-13-15-15-15 cm (from the vast on edge.) Happy Knitting!
17.03.2024 - 14:51
![]() Carina wrote:
Carina wrote:
Menos la tercera flecha que sí está puesta en el lado del revés, entonces cambio las flechas a un fila antes o una después?
13.11.2021 - 23:46DROPS Design answered:
Hola Carina, en el caso de las flechas solo se tiene que aplicar el Tip-2 para los aumentos, por lo que no importa el lado por el que se trabajen los aumentos. El Tip-1, que es el que indica por qué lado se trabajan los aumentos, solo se aplica cuando se indique en las instrucciones escritas (lo cuál no es el caso al trabajar el patrón A.1).
14.11.2021 - 18:38
![]() Carina wrote:
Carina wrote:
Hola Dices que todos los aumentos se hacen por el lado derecho pero las flechas de aumentos del patrón están puestas en el lado del revés, qué estoy viendo mal? Gracias
13.11.2021 - 23:02DROPS Design answered:
Hola Carina, puedes ver la respuesta arriba.
14.11.2021 - 18:39
![]() Karen Nanos wrote:
Karen Nanos wrote:
How do you make a “knit 1 twisted” stitch in the beginning of the Atlanterhavsveien jacket pattern?
26.10.2021 - 13:15
![]() Lois A Chisholm wrote:
Lois A Chisholm wrote:
In the section about the Body, it says 24 cm=24 inches. How long is the body supposed to be from the armpit to the beginning of the bottom ribbing?
19.10.2021 - 00:49DROPS Design answered:
Dear Lois, please refer to the shcematic drawing at the bottom of the pattern description and diagrams, for checking measurements. Hapy Stitching!
19.10.2021 - 01:48
|
||||||||||
Atlanterhavsveien Jacket#atlanterhavsveienjacket |
||||||||||
 |
 |
|||||||||
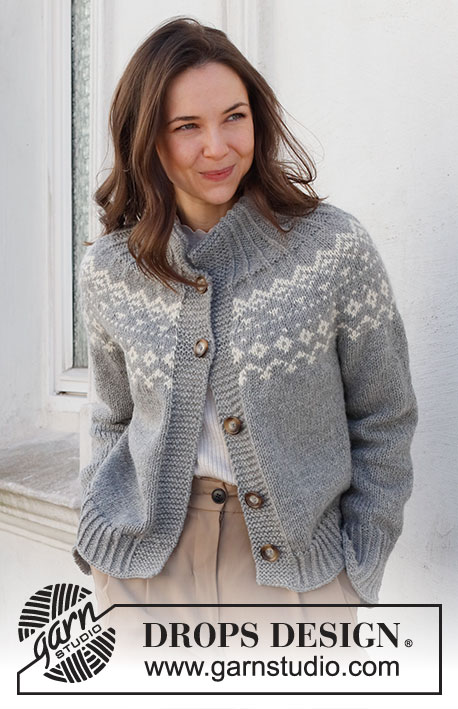
Knitted jacket in DROPS Nepal. Piece is knitted top down with double neck edge, round yoke, Nordic pattern on yoke and edges in rib. Size: S - XXXL
DROPS 228-9 |
||||||||||
|
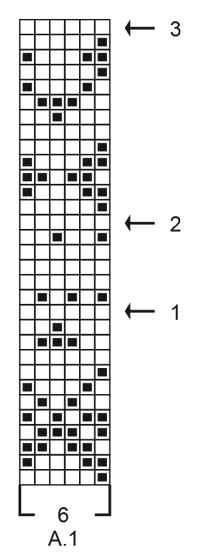
---------------------------------------------------------- EXPLANATION FOR THE PATTERN: ---------------------------------------------------------- GARTER STITCH (back and forth): Knit all rows. 1 ridge vertically = knit 2 rows. INCREASE TIP-1: All increases are done from the right side. Increase 1 stitch by making 1 yarn over at the end of every purl section. On next row (wrong side) knit yarn overs twisted to avoid holes. INCREASE TIP-2 (evenly): To calculate how to increase evenly, use the total number of stitches on row (e.g. 144 stitches), minus bands (e.g. 18 stitches), and divide the remaining 126 stitches by number of increases to be done (e.g. 37) = 3.4. In this example increase by making 1 yarn over after alternately approx. every 3rd and 4th stitch (do not increase over bands). On next row work yarn overs twisted to avoid holes. PATTERN: See diagram A.1. Work the entire pattern in stocking stitch. KNITTING TIP: To avoid the knitting tension to tighten when working pattern, it is important not to tighten the strands on back side of piece. Switch to a higher needle number when working pattern if the pattern is somewhat tight. DECREASE TIP (applies to mid under sleeves): Begin 3 stitches before marker thread and knit 2 together, knit 2 (marker thread is between these 2 stitches), slip 1 stitch knitwise, knit 1, pass slipped stitch over stitch worked (= 2 stitches decreased). BUTTONHOLES: Decrease for buttonholes on right band (when garment is worn). Decrease from right side when 4 stitches remain on row as follows: Make 1 yarn over, knit the next 2 stitches together, knit the last 2 stitches. On next row (wrong side) knit the yarn over to make a hole. Decrease first buttonhole when neck edge measures 13-13-13-15-15-15. Then decrease the next 4-4-5-5-5-5 buttonholes, approx. 11-11½-9½-10-10½-11 cm apart. CAST-OFF TIP: To avoid a tight cast-off edge when casting off, you may use a larger needle. If this still is too tight make 1 yarn over after approx. every 6th stitch while casting off (cast off yarn overs as stitches). ---------------------------------------------------------- START THE PIECE HERE: ---------------------------------------------------------- JACKET - SHORT OVERVIEW OF THE PIECE: Work double neck edge and yoke back and forth on circular needle from mid front, work top down. Now divide yoke for body and sleeves. Work body back and forth on circular needle, top down. Work sleeves in the round on double pointed needles/short circular needle, top down. DOUBLE NECK EDGE: Cast on 94-97-100-103-106-112 stitches (including 9 band stitches in each side towards mid front) on circular needle size 4 mm with colour grey in DROPS Nepal. Purl 1 row (= wrong side). Then work a rib as follows: ROW 1 (= right side): 9 band stitches in GARTER STITCH - read explanation above - * knit 1 twisted, purl 2 *, work from *-* until 10 stitches remain, knit 1 twisted, and finish with 9 band stitches in garter stitch. ROW 2 (= wrong side): 9 band stitches in garter stitch, * purl 1 twisted, knit 2 *, repeat from *-* until 10 stitches remain on needle, purl 1 twisted, and finish with 9 band stitches in garter stitch. Repeat 1st and 2nd row until rib measures 13-13-13-15-15-15 cm. The neck edge is folded double later and assembled so that the neck edge is 6-6-6-7-7-7 cm. Insert 1 marker after band at the beginning of row mid front. Work yoke as explained below. Measure yoke from this marker. YOKE: Switch to circular needle size 5 mm. Continue rib as before. Remember BUTTONHOLES on right band - read explanation above. When piece measures 1 cm, increase 1 stitch in each of the 25-26-27-28-29-31 purl sections - read INCREASE TIP-1 = 119-123-127-131-135-143 stitches. Continue rib with knit 1 twisted/purl 3 (seen from right side). When piece measures 3-4-5-6-7-8 cm from marker, increase 1 stitch in every purl section – remember INCREASE TIP-1 = 144-149-154-159-164-174 stitches. Purl 1 row from wrong side (work bands in garter stitch and purl yarn overs twisted to avoid holes). Then work in stocking stitch back and forth with 9 band stitches in garter stitch in each side towards mid front. REMEMBER THE KNITTING TENSION! When piece measures 5-6-7-9-10-11 cm from marker, increase 37-38-45-46-53-61 stitches evenly – read INCREASE TIP-2 = 181-187-199-205-217-235 stitches. Purl 1 row from wrong side (work bands in garter stitch and purl yarn overs twisted). On next row (right side) begin pattern, i.e. work next row as follows from right side: 9 band stitches in garter stitch, work A.1 until 10 stitches remain on row (= 27-28-30-31-33-36 repetitions of 6 stitches), work first stitch in A.1 so that pattern begins and ends the same, and finish with 9 band stitches in garter stitch. Continue pattern back and forth like this. AT THE SAME TIME on every row marked with arrow in A.1, increase stitches evenly as explained below. Read KNITTING TIP and REMEMBER INCREASE TIP-2! Arrow-1: Increase 42-48-48-60-60-66 stitches evenly = 223-235-247-265-277-301 stitches (there is now room for 34-36-38-41-43-47 repetitions of A.1 of 6 stitches). Arrow-2: Increase 24-30-36-36-42-48 stitches evenly = 247-265-283-301-319-349 stitches (there is now room for 38-41-44-47-50-55 repetitions A.1 of 6 stitches). Arrow-3: Increase 10-8-14-20-22-20 stitches evenly = 257-273-297-321-341-369 stitches. Work in stocking stitch without increases with grey and 9 band stitches in garter stitch in each side towards mid front until piece measures 20-22-24-26-28-30 cm from marker at the neck. On next row divide yoke for body and sleeves, i.e. work next row as follows: Work as before over the first 43-46-49-52-57-62 stitches (= front piece), slip the next 48-50-56-62-62-66 stitches on a stitch holder for sleeve, cast on 6-8-8-10-12-12 new stitches on needle (= in the side under sleeve), work as before over the next 75-81-87-93-103-113 stitches (= back piece), slip the next 48-50-56-62-62-66 stitches on a stitch holder for sleeve, cast on 6-8-8-10-12-12 new stitches on needle (= in the side under sleeve), and work as before over the last 43-46-49-52-57-62 stitches (= front piece). Finish body and sleeves separately. NOW MEASURE PIECE FROM HERE! BODY: = 173-189-201-217-241-261 stitches. Work in stocking stitch back and forth with 9 band stitches in garter stitch in each side towards mid front until piece measures 24 cm from division. 6 cm remain until finished measurements. Try the jacket and work to desired length. Now increase as explained below to stop the rib from contracting. Knit 1 row from right side while increasing 29-34-37-39-45-49 stitches evenly - remember INCREASE TIP-2 = 202-223-238-256-286-310 stitches. Switch to circular needle size 4 mm and work rib as follows: ROW 1 (= wrong side): 9 band stitches in garter stitch, * purl 1 twisted, knit 2 *, work from *-* until 10 stitches remain on needle, purl 1 twisted, and finish with 9 band stitches in garter stitch. ROW 2 (= right side): 9 band stitches in garter stitch, * knit 1 twisted, purl 2 *, work from *-* until 10 stitches remain, knit 1 twisted, and finish with 9 band stitches in garter stitch. Repeat 1st and 2nd row until rib measures 6 cm. Cast off by knitting from right side - read CAST-OFF TIP! Jacket measures approx. 54-56-58-60-62-64 cm from shoulder and down. SLEEVES: Slip the 48-50-56-62-62-66 stitches from stitch holder in one side of piece on double pointed needles or a short circular needle size 5 mm and pick in addition up 1 stitch in each of the 6-8-8-10-12-12 new stitches cast on under sleeve = 54-58-64-72-74-78 stitches. Insert 1 marker thread in the middle of the 6-8-8-10-12-12 stitches under sleeve. Move the marker thread upwards when working - marker should be used for decrease stitches mid under sleeve. Begin round at the marker thread, and work stocking stitch in the round with grey. When piece measures 2 cm from division, decrease 2 stitches mid under sleeve - read DECREASE TIP. Decrease like this every 6-5-3½-2½-2-2 cm 6-7-9-12-12-13 times in total = 42-44-46-48-50-52 stitches. Continue until sleeve measures 35-34-32-31-30-28 cm from division (shorter measurements in the larger sizes because of wider neck and longer yoke). 10 cm remain until finished measurements. Try the jacket and work to desired length. Knit 1 round while increasing 9-10-11-12-10-11 stitches evenly - remember INCREASE TIP-2 = 51-54-57-60-60-63 stitches. Switch to double pointed needles size 4 mm. Work rib in the round (= knit 1 twisted/purl 2) for 10 cm. Cast off by knitting - remember CAST-OFF TIP! Sleeve measures approx. 45-44-42-41-40-38 cm from division. Work the other sleeve the same way. ASSEMBLY: Fold the top approx. 6-6-6-7-7-7 cm of rib at the neck down on the inside of garment (down to marker inserted inside band). Fasten rib to get a double folding edge. To avoid a tight neck edge that sticks out it is important to keep the seam elastic. Sew opening towards mid front together on bands with neat little stitches. Sew the buttons on to the left band. |
||||||||||
Diagram explanations |
||||||||||
|
||||||||||
|
||||||||||

|
||||||||||
Have you finished this pattern?Tag your pictures with #dropspattern #atlanterhavsveienjacket or submit them to the #dropsfan gallery. Do you need help with this pattern?You'll find 33 tutorial videos, a Comments/Questions area and more by visiting the pattern on garnstudio.com. © 1982-2025 DROPS Design A/S. We reserve all rights. This document, including all its sub-sections, has copyrights. Read more about what you can do with our patterns at the bottom of each pattern on our site. |
||||||||||


With over 40 years in knitting and crochet design, DROPS Design offers one of the most extensive collections of free patterns on the internet - translated to 17 languages. As of today we count 314 catalogues and 11820 patterns translated into English (UK/cm). 11820
We work hard to bring you the best knitting and crochet have to offer, inspiration and advice as well as great quality yarns at incredible prices! Would you like to use our patterns for other than personal use? You can read what you are allowed to do in the Copyright text at the bottom of all our patterns. Happy crafting!
Post a comment to pattern DROPS 228-9
We would love to hear what you have to say about this pattern!
If you want to leave a question, please make sure you select the correct category in the form below, to speed up the answering process. Required fields are marked *.