
Looking for a yarn?


Comments / Questions (116)
![]() Hélène wrote:
Hélène wrote:
J'adore ce modèle, mais en consultant l'aide pour comprendre les diagrammes, il n'y a pas d'explications pour les vides représentés ici pour celui de A2. C'est sûrement très simple à comprendre, mais je n'y arrive pas. Merci d'avance pour votre réponse. :)
15.05.2022 - 21:00DROPS Design answered:
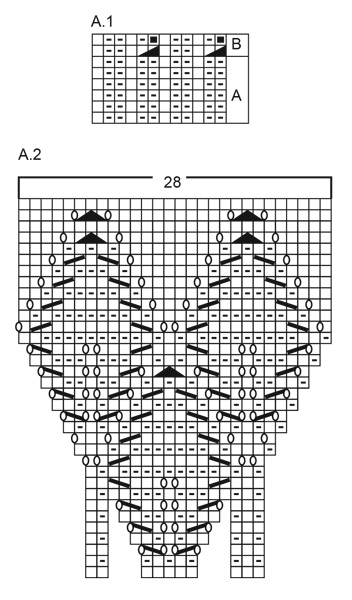
Bonjour Hélène, il y a des espaces vides dans le diagramme au tout début, car on va augmenter ensuite et pour conserver la bonne forme "plane" du diagramme, on doit procéder ainsi, autrement dit, le 1er rang de A.2 se tricote sur 10 mailles. (2ème tour = 1 m env, 1 m end, 1 m env, 1 m end, 1 m env, 1 m end, 1 m env, 1 m end, 1 m env, 1 m end). Bon tricot!
16.05.2022 - 08:32
![]() Giuseppina Roncacci wrote:
Giuseppina Roncacci wrote:
Salve, mi riferisco allo sprone tondo. Ho già lavorato col metodo topdown ma sul raglan e non ho avuto problemi con gli aumenti perché sono ben delineati e si eseguono su una stessa linea diagonale. Per il topdown con sprone tondo ho difficoltà a capire dove vadano inseriti gli aumenti in presenza di un diagramma ben preciso: vanno inseriti tra un rapporto e l'altro? Non so se riesco a spiegarmi, ma nel diagramma gli aumenti non sono indicati e non so come fare. Grazie in anticipo Pina
27.04.2022 - 18:11DROPS Design answered:
Buongiorno Giuseppina, ogni modello è a sè: in questo in particolare, gli aumenti si lavorano con il diagramma A.2 e poi ancora alla fine del diagramma, prima di separare le maniche. Buon lavoro!
28.04.2022 - 08:12
![]() Giuseppina Roncacci wrote:
Giuseppina Roncacci wrote:
Salve, sono un'appassionata della maglia e mi piace sperimentare cose nuove, così vorrei imparare a lavorare il topdown per lo sprone tondo. Ho capito come fare gli aumenti invisibili, ma non riesco a comprendere come inserirli all'interno di uno schema visto che non sono indicati. Ringrazio fin da ora chi vorrà aiutarmi. Pina
26.04.2022 - 21:46DROPS Design answered:
Buonasera Giuseppina, a quale parte del modello sta facendo riferimento? Buon lavoro!
27.04.2022 - 18:05
![]() Renate Palzer wrote:
Renate Palzer wrote:
Ich würde gern mit diesem Muster eine Pelerine stricken. Gibt es dafür eine Anleitung?
12.04.2022 - 23:55DROPS Design answered:
Liebe Frau Palzer, dieses Modell haben wir nur als Pullover oder Jacke - hier finden Sie aber unsere Anleitungen für Capes - vielleicht kann es Ihnen inspirieren. Viel Spaß beim stricken!
19.04.2022 - 08:57
![]() Nguyễn Liên wrote:
Nguyễn Liên wrote:
Bonjour, je n\'arrive pas à trouver le new Chart A2. S'il vous plait parlez-moi où je peux le trouver.
08.04.2022 - 17:16DROPS Design answered:
Bonjour Mme Nguyễn, si vous avez imprimé les explications après la date de la correction, le diagramme est correct ainsi, sinon, il peut être plus sage de l'imprimer à nouveau. Bon tricot!
08.04.2022 - 17:29
![]() Lene Kristiansen wrote:
Lene Kristiansen wrote:
Jeg kan ikke forstå hvad man skal med symbolet i omgang 3 0/0 den fede skrå streg er ikke forklaret. På forhånd tak
31.03.2022 - 16:25DROPS Design answered:
Hei Lene. I diagram A.2, 3. pinne er det to skrå streker mellom ikonet for 1 kast (0). Under Diagram står forklaringen: 5. symbol= 2 rett sammen symbols ELLER 6.symbol = ta 1 maske løs av pinnen som om den skulle strikkes rett, strikk 1 rett, løft den løse masken over masken som ble strikket. mvh DROPS Design
04.04.2022 - 12:39
![]() Rita Hellem Kvig wrote:
Rita Hellem Kvig wrote:
Hei, jeg får ikke omgang 14 til å stemme med neste omgang. Har 20 masker i omgang 14 ( A2).....men i løpet av neste omgang får jeg altfor mange masker til overs før rapporten er avsluttet. Er det en feil i omgang 15?
22.02.2022 - 14:06DROPS Design answered:
Hej Rita. I varje rapport på omgang 15 feller du 6 masker och ökar (med kast) 8 masker, så du kommer ha 2 maskor mer per rapport när den omgangen är stickad. Mvh DROPS Design
23.02.2022 - 10:28
![]() Hourdebaigt wrote:
Hourdebaigt wrote:
Bonjour Pensez vous que je peux faire une rehausse col sur ce très joli modèle. Merci
14.02.2022 - 10:00DROPS Design answered:
Bonjour Mme Hourdebaigt, probablement, mais je pense qu'il faudrait alors la tricoter en côtes 1/1 pour avoir une plus jolie transition entre le col et A.1. Bon tricot!
14.02.2022 - 10:49
![]() Friederike wrote:
Friederike wrote:
Hallo, ich habe voller Begeisterung begonnen mit der DROPS Big Merino den Pullover zu stricken, um nach dem Muster im glatt rechten Teil nach dem Beginn eines neuen Knäuels festzustellen, dass die Farbe ziemlich von den vorherigen Knäuel abweicht. Die Farb-Nr. und die Partie-Nr. sind völlig identisch. Leider kann ich beim Verkäufer nicht mehr reklamieren, da sie DROPS-Wolle nicht mehr führen und mein Kauf auch schon ein paar Jahre zurückliegt. Was kann ich jetzt noch tun?
29.01.2022 - 14:59DROPS Design answered:
Liebe Friederike, nehmen Sie bitte Kontakt mit einem unseren DROPS Superstore und erklären Sie den Fall, gerne werden Sie uns dann alles weiterleiten.
01.02.2022 - 09:43
![]() Wendy-Lynne MacKinnon wrote:
Wendy-Lynne MacKinnon wrote:
Where are the charts!?
25.01.2022 - 01:21DROPS Design answered:
Dear Mrs MacKinnon, you will find the diagrams and the chart at the bottom of the page, after the written pattern. Happy knitting!
25.01.2022 - 09:50
|
|||||||||||||||||||||||||
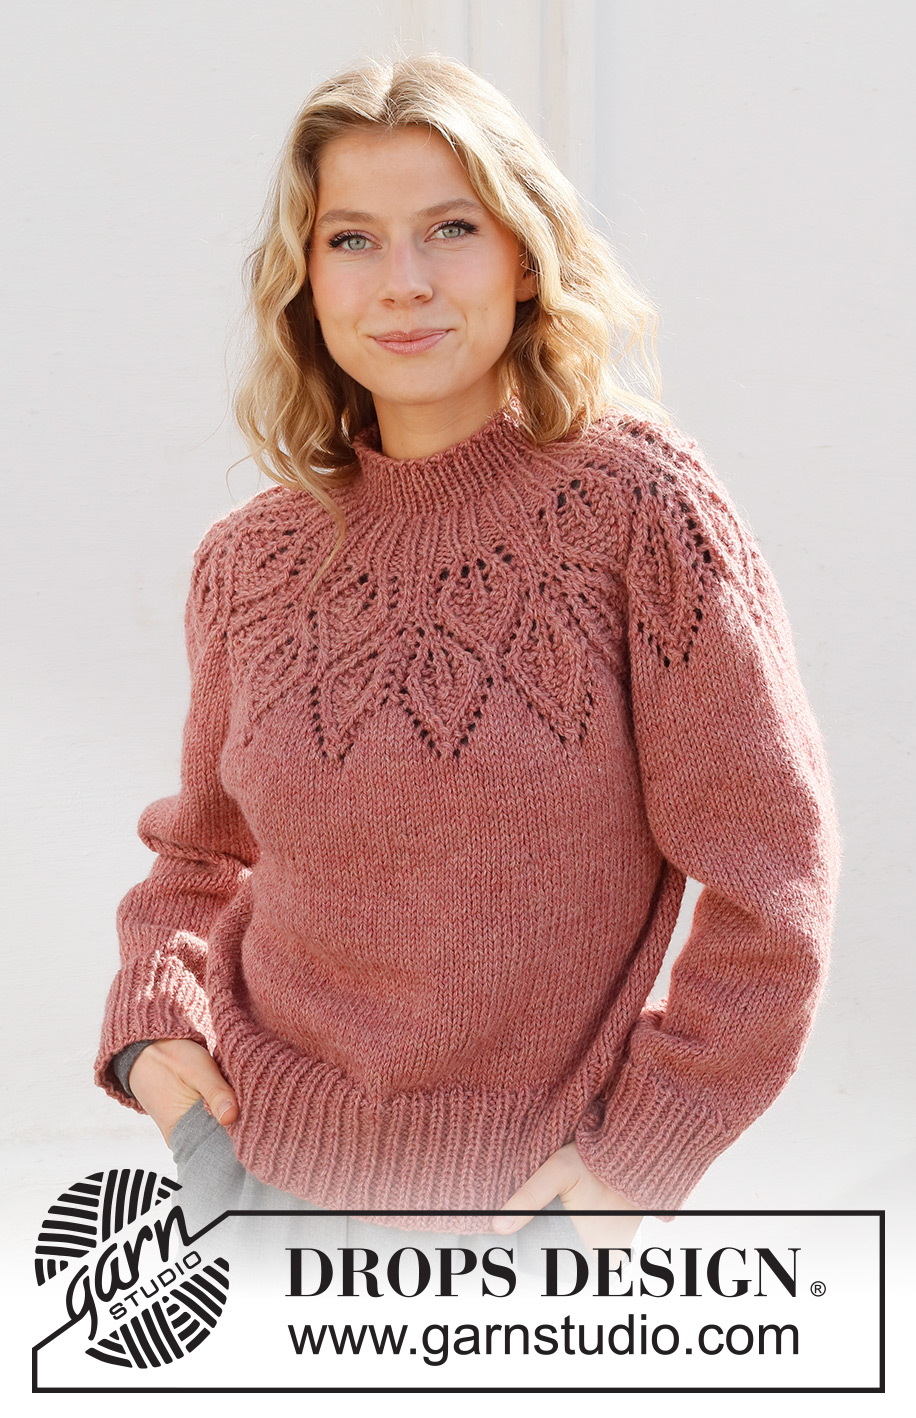
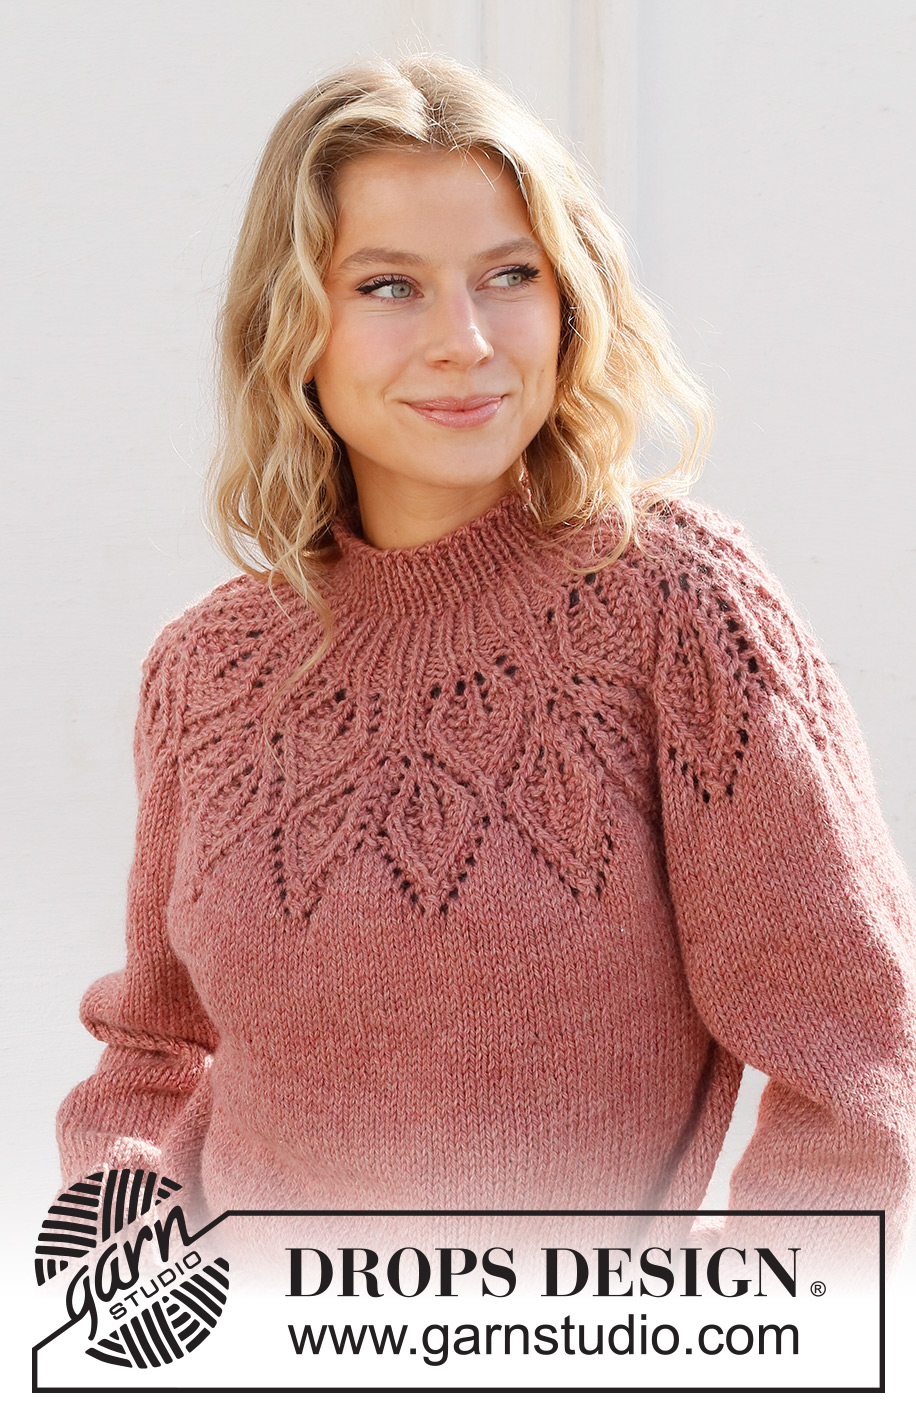
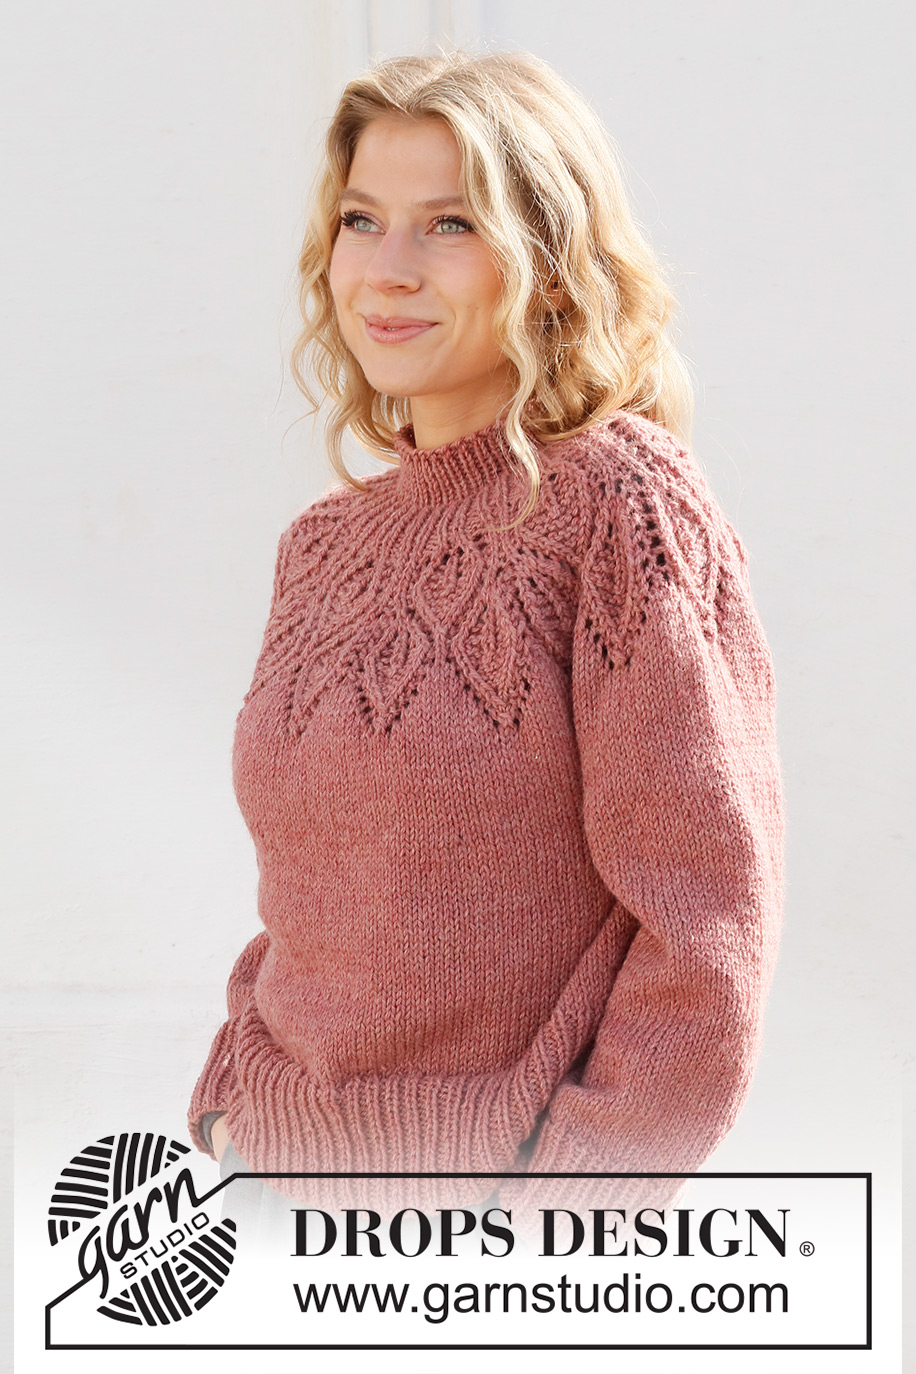
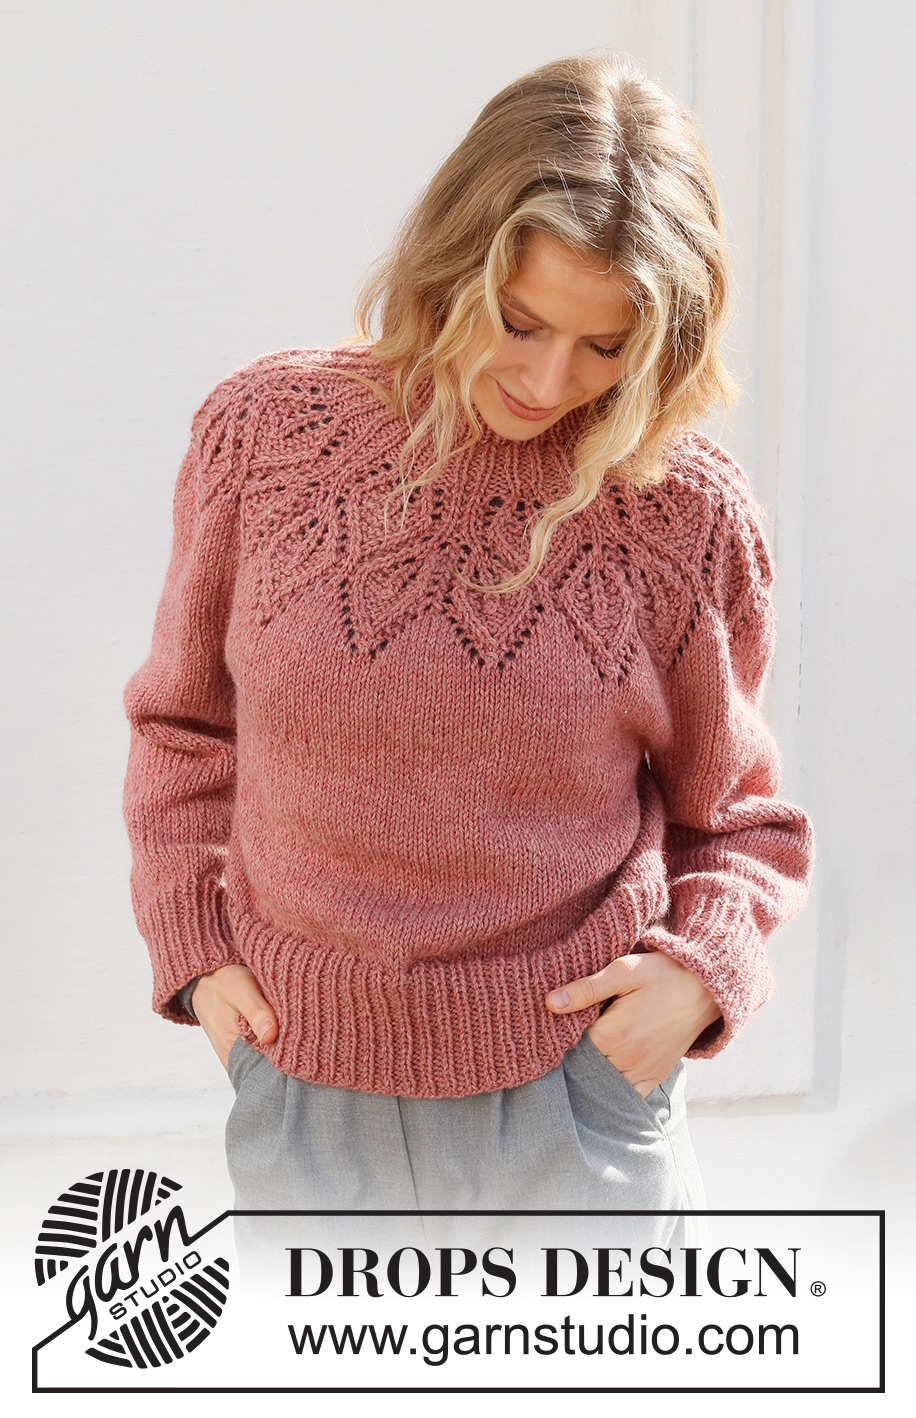
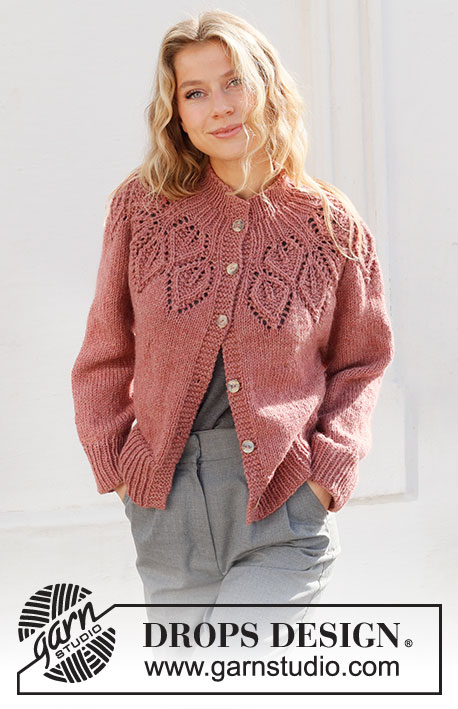
Autumn Wreath#autumnwreathsweater |
|||||||||||||||||||||||||
 |
 |
||||||||||||||||||||||||
Knitted jumper in DROPS Nepal. The piece is worked top down, with round yoke and leaf pattern. Sizes S - XXXL.
DROPS 228-1 |
|||||||||||||||||||||||||
|
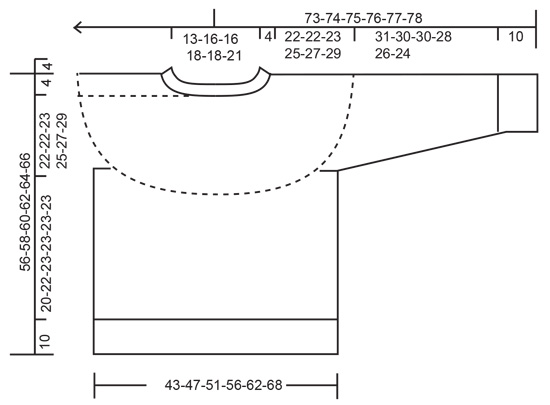
EXPLANATIONS FOR THE PATTERN: ------------------------------------------------------- PATTERN: See diagrams A.1 and A.2. INCREASE TIP (evenly spaced): To work out how to increase evenly, count the total number of stitches on the needle (e.g. 64 stitches) and divide by the number of increases to be made (e.g. 20) = 3.2. In this example, increase by making 1 yarn over after approx. each 3rd stitch. DECREASE TIP (for sleeves): Decrease 1 stitch on either side of the marker thread as follows: Work until there are 3 stitches left before the marker thread, knit 2 together, knit 2 (marker thread sits between these 2 stitches), slip 1 stitch as if to knit, knit 1 and pass the slipped stitch over the knitted stitch (2 stitches decreased). CASTING-OFF TIP: To avoid the cast-off edge being tight you can cast off with a larger size needle. If the edge is still tight, make 1 yarn over after approx. each 6th stitch at the same time as casting off; the yarn overs are cast off as normal stitches. ------------------------------------------------------- START THE PIECE HERE: ------------------------------------------------------- JUMPER – SHORT OVERVIEW OF THE PIECE: The neck and yoke are worked in the round with circular needle, from mid back and top down. The yoke is divided for body and sleeves and the body is continued in the round with circular needle. The sleeves are worked in the round with double pointed needles/short circular needle, top down. NECK: Cast on 64-68-72-76-80-84 stitches with short circular needle size 4.5 mm and DROPS Nepal. Knit 1 round, then work rib (knit 1, purl 1) for 4 cm. Knit 1 round where you increase 20-28-24-32-28-36 stitches evenly spaced – read INCREASE TIP = 84-96-96-108-108-120 stitches. Insert 1 marker in the round; the yoke is measured from this marker. YOKE: Work A.1A over all stitches (= 7-8-8-9-9-10 repeats of 12 stitches) for 4 cm, then work A.1B (= 2 rounds). There are now 70-80-80-90-90-100 stitches. Change to circular needle size 5.5 mm. Now work A.2 over A.1 (= 7-8-8-9-9-10 repeats of 10 stitches). REMEMBER THE KNITTING TENSION! When A.2 has been completed in height there are 196-224-224-252-252-280 stitches and the piece measures approx. 20 cm from the marker. Knit 1 round where you increase 18-11-27-27-47-42 stitches evenly spaced = 214-235-251-279-299-322 stitches. Continue with stocking stitch until the piece measures 22-22-23-25-27-29 cm. Now divide for the body and sleeves on the next round as follows: Work the first 30-33-35-39-43-48 stitches (= half back piece), place the next 46-50-54-60-62-64 stitches on a thread for the sleeve, cast on 8-8-10-10-12-12 stitches (= in side under sleeve), work the next 62-69-73-81-89-98 stitches (= front piece), place the next 46-50-54-60-62-64 stitches on a thread for the sleeve, cast on 8-8-10-10-12-12 stitches (= in side under sleeve), work the last 30-33-35-39-43-48 stitches (= half back piece). The body and sleeves are finished separately. THE PIECE IS NOW MEASURED FROM HERE. BODY: = 138-151-163-179-199-218 stitches. Continue with stocking stitch in the round until the piece measures 20-22-23-23-23-23 cm. There is approx. 10 cm left to finished length; try the jumper on and work to desired length. To avoid the following rib being tight, knit 1 round where you increase 24-26-29-31-35-37 stitches evenly spaced = 162-177-192-210-234-255 stitches. Change to circular needle size 4.5 mm and work rib (knit 1, purl 2) for 10 cm. Cast off with knit over knit and purl over purl - read CASTING-OFF TIP. The jumper measures approx. 56-58-60-62-64-66 cm from the shoulder down. SLEEVES: Place the 46-50-54-60-62-64 stitches from the thread on the one side of the piece on double pointed needles/short circular needle size 5.5 mm and knit up 1 stitch in each of the 8-8-10-10-12-12 stitches cast on under the sleeve = 54-58-64-70-74-76 stitches. Insert a marker thread in the middle of the new stitches under the sleeve and start the round at the marker thread. Work stocking stitch in the round for 4 cm, then decrease 1 stitch on each side of the marker thread – read DECREASE TIP. Decrease like this every 3½-3-2-1½-1½-1 cm a total of 8-9-11-13-15-15 times = 38-40-42-44-44-46 stitches. Continue with stocking stitch until the sleeve measures 31-30-30-28-26-24 cm. NOTE: Shorter measurements in larger sizes due to wider neck and longer yoke. Increase 4-5-6-7-7-8 stitches evenly spaced = 42-45-48-51-51-54 stitches. Change to double pointed needles size 4.5 mm and work rib (knit 1, purl 2) for 10 cm. Cast off with knit over knit and purl over purl - remember CASTING-OFF TIP. The sleeve measures approx. 41-40-40-38-36-34 cm from the division. Work the other sleeve in the same way. |
|||||||||||||||||||||||||
Diagram explanations |
|||||||||||||||||||||||||
|
|||||||||||||||||||||||||
 |
|||||||||||||||||||||||||
 |
|||||||||||||||||||||||||
Have you finished this pattern?Tag your pictures with #dropspattern #autumnwreathsweater or submit them to the #dropsfan gallery. Do you need help with this pattern?You'll find 27 tutorial videos, a Comments/Questions area and more by visiting the pattern on garnstudio.com. © 1982-2025 DROPS Design A/S. We reserve all rights. This document, including all its sub-sections, has copyrights. Read more about what you can do with our patterns at the bottom of each pattern on our site. |
|||||||||||||||||||||||||


With over 40 years in knitting and crochet design, DROPS Design offers one of the most extensive collections of free patterns on the internet - translated to 17 languages. As of today we count 320 catalogues and 12094 patterns translated into English (UK/cm). 12094
We work hard to bring you the best knitting and crochet have to offer, inspiration and advice as well as great quality yarns at incredible prices! Would you like to use our patterns for other than personal use? You can read what you are allowed to do in the Copyright text at the bottom of all our patterns. Happy crafting!
Post a comment to pattern DROPS 228-1
We would love to hear what you have to say about this pattern!
If you want to leave a question, please make sure you select the correct category in the form below, to speed up the answering process. Required fields are marked *.