
Popular categories
Looking for a yarn?


Comments / Questions (4)
![]() Valerie Robertson wrote:
Valerie Robertson wrote:
When working the body pattern A3 the off white yarn ends up being at the opposite side from where you need to use it next. Do you have to cut the yarn with each pattern row and end up with a lot of ends to weave in or is it better to bring the off white yarn back along the next row after you use it? Or is there a better way?
26.04.2024 - 16:43DROPS Design answered:
Dear Valerie, you could cut the thread or carry it back, but since off white is used in very small amounts if you carry the yarn you will waste a lot of off white yarn. Happy knitting!
28.04.2024 - 22:50
![]() Jo Busby wrote:
Jo Busby wrote:
I am trying to print this pattern but the picture and pattern diagrams are not downloading or printing. Help please.
27.09.2021 - 20:27DROPS Design answered:
Dear Jo, it must have been a temporary problem, as it works just fine in Europe now. Can you please try again? Thank you for your patience.
27.09.2021 - 20:53
![]() Lis-Beth Engström wrote:
Lis-Beth Engström wrote:
Hur ska jag fästa alla lösa vita trådar vid framkanten så att det blir snyggt?
04.01.2021 - 17:45DROPS Design answered:
Hej Lis-Beth, Her ser du forskellige måder at gøre det på. Vælg den som du synes er pænest: Fästa trådar
08.01.2021 - 11:12
![]() Svanhove wrote:
Svanhove wrote:
Can we knit it in round, with a steek method ? And how much yarn would I need ? Regards
11.11.2020 - 09:42DROPS Design answered:
Dear Mrs Svanhove, you can knit it in the round if you rather like to, but we unfortunately are not able to know how much yarn you would need; you might have to buy at least one extra ball of the base colour to be sure you will have enough. Happy knitting!
12.11.2020 - 08:40
|
|||||||||||||
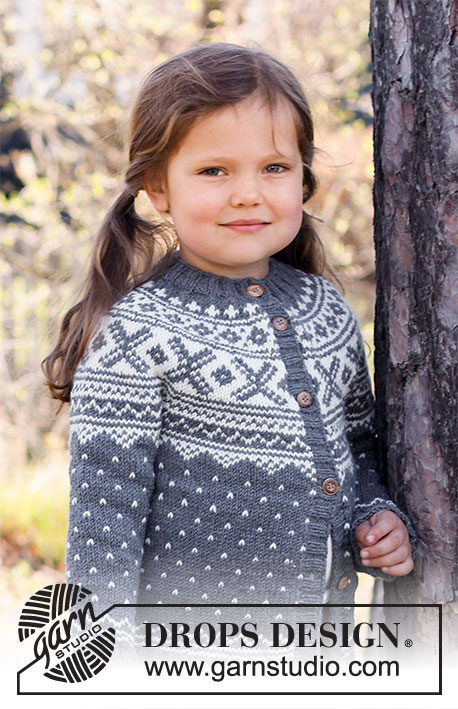
North Star Jacket#northstarjacket |
|||||||||||||
 |
 |
||||||||||||
Knitted jacket for children in DROPS Karisma. The piece is worked top down with round yoke and Nordic pattern. Sizes 2 – 12 years.
DROPS Children 37-2 |
|||||||||||||
|
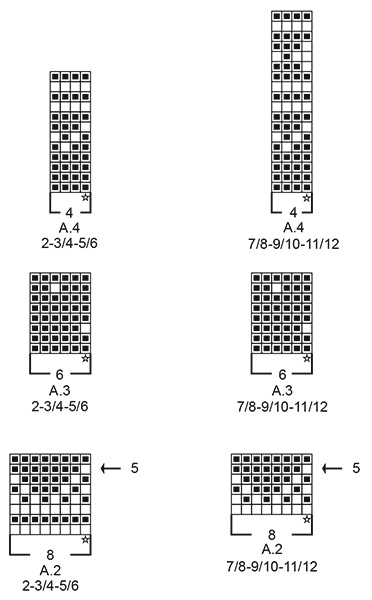
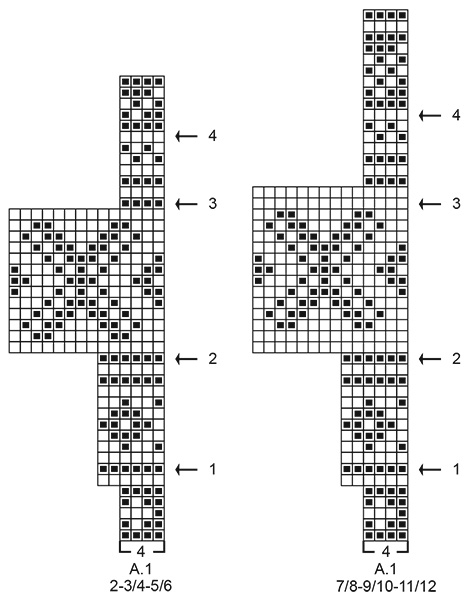
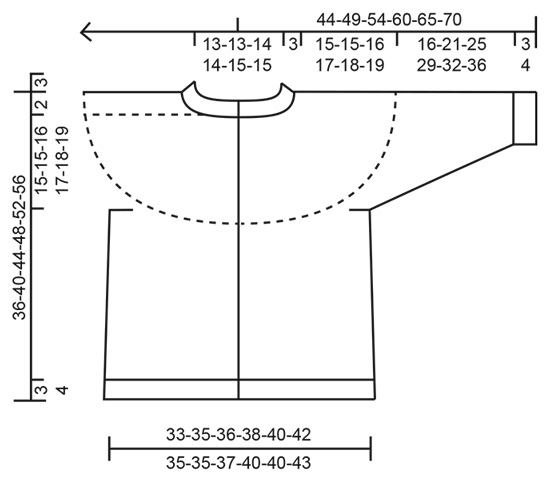
------------------------------------------------------- EXPLANATIONS FOR THE PATTERN: ------------------------------------------------------- RIDGE/GARTER STITCH (worked back and forth): Knit all rows. 1 ridge in height = Knit 2 rows. BUTTONHOLE ON NECK: When the neck measures 1½ to 2 cm work 1 buttonhole on the right-hand side (when the garment is worn). Work as follows, from the right side and when there are 5 stitches left on the row: Make 1 yarn over, purl 2 together, knit 2 and finish with 1 edge stitch in garter stitch. On the next row (wrong side) knit the yarn over to leave a hole. INCREASE TIP-1 (evenly spaced): To work out how to increase evenly, count the total number of stitches on the needle (e.g. 74 stitches) minus edge/band stitches (e.g. 2 stitches) and divide the remaining stitches by the number of increases to be made (e.g. 25) = 2.9. In this example, increase by making 1 yarn over after approx. each 3rd stitch. Do not increase over the edge stitches On the next row work the yarn overs twisted to avoid holes. PATTERN: See diagrams A.1 to A.4. Choose diagram for your size. The whole pattern is worked in stocking stitch. KNITTING TIP: To avoid the garment losing its elasticity when working the pattern, it is important the strands at the back are not tight. Increase a needle size when working pattern if this is a problem. If the knitting tension is not correct in height and your work is too tight, the garment will be too short and the armholes too small – to adjust for this you can work 1 extra round in the one-coloured sections. If your work is too loose, the garment will be too long and the armholes too big; to adjust for this, you can work 1 round less in the one-coloured sections. DECREASE TIP (for mid under sleeves): Decrease 1 stitch on each side of the marker-stitch as follows (the 5 next stitches are worked with dark grey): Work until there are 2 stitches left before the marker-stitch, knit 2 together, knit the marker-stitch, knit 2 twisted together (= 2 stitches decreased). CASTING-OFF TIP: To avoid the cast-off edge being tight you can cast off with a larger size needle. If the edge is still tight, make 1 yarn over after approx. each 4th stitch at the same time as casting off and the yarn overs are cast off as normal stitches. ------------------------------------------------------- START THE PIECE HERE: ------------------------------------------------------- JACKET – SHORT OVERVIEW OF THE PIECE. The neck and yoke are worked back and forth with circular needle, from mid front and top down. The band-stitches are cast off and the rest of the yoke continues back and forth with 1 edge stitch on each side. The yoke is divided for the body and sleeves and the body continued back and forth with circular needle. The sleeves are worked in the round with double pointed needles/short circular needle, top down. NECK: Cast on 84-84-88-88-92-92 stitches (including 5 band stitches on each side) with circular needle size 3 mm and dark grey. Purl 1 row (= wrong side). The next row is worked as follows: 1 edge stitch in GARTER STITCH – read description above, * knit 2, purl 2 *, work from *-* until there are 3 stitches left on the row, knit 2 and finish with 1 edge stitch in garter stitch. Continue this rib for 3 cm – remember the BUTTONHOLE on the right-hand side – read description above. When the rib is finished, work the next row from the right side as follows: Cast off the first 5 stitches (the bands will be sewn on here later), knit the next 74-74-78-78-82-82 stitches and increase 25-29-29-33-33-37 stitches evenly spaced over these stitches – read INCREASE TIP, then work rib as before over the next 4 stitches and finish with 1 edge stitch in garter stitch. Change to circular needle size 4 mm. Turn the piece, cast off the first 5 stitches, purl until there is 1 stitch left on the row (yarn overs purled twisted) and finish with 1 edge stitch in garter stitch = 99-103-107-111-115-119 stitches on the needle. Insert 1 marker after the edge stitch at the beginning of the row; the yoke will be measured from this marker! YOKE: Work 0-0-2-0-2-4 rows of stocking stitch with dark grey and with 1 edge stitch in garter stitch on each side. Read KNITTING TIP and then work the next row from the right side as follows: 1 edge stitch in garter stitch, work A.1 until there are 2 stitches left on the row (= 24-25-26-27-28-29 repeats of 4 stitches), work the first stitch in A.1 (so the pattern starts and ends in the same way on both front pieces) and finish with 1 edge stitch in garter stitch. Continue this pattern. The edge stitches are worked in the same colour as the first/last stitch in the pattern. REMEMBER THE KNITTING TENSION! AT THE SAME TIME on each row marked with an arrow in A.1, increase stitches evenly as described below – remember INCREASE TIP: Arrow-1: Increase 30-32-34-36-38-40 stitches evenly spaced = 129-135-141-147-153-159 stitches (there is now room 21-22-23-24-25-26 repeats of A.1 with 6 stitches). Arrow-2: Increase 42-36-44-38-46-40 stitches evenly spaced = 171-171-185-185-199-199 stitches (there is now room for 12-12-13-13-14-14 repeats of A.1 with 14 stitches). Arrow-3: increase 28-36-34-38-36-44 stitches evenly spaced = 199-207-219-223-235-243 stitches (there is now room 49-51-54-55-58-60 repeats of A.1 with 4 stitches). Arrow-4: Increase 16-20-20-20-20-24 stitches evenly spaced = 215-227-239-243-255-267 stitches (there is now room l 53-56-59-60-63-66 repeats of A.1 with 4 stitches). Continue working until there is 1 row left in A.1. The piece measures approx. 15-15-16-17-18-19 cm from the marker on the neck. On the last row in A.1 divide the yoke for the body and sleeves, from the wrong side as follows: Work 32-34-36-37-39-41 stitches as before (= front piece), place the next 44-46-48-48-50-52 stitches on 1 thread for the sleeve, cast on 6-6-6-8-8-8 new stitches on the needle (= in side under sleeve), work 63-67-71-73-77-81 stitches as before (= back piece), place the next 44-46-48-48-50-52 stitches on 1 thread for the sleeve, cast on 6-6-6-8-8-8 new stitches on the needle (= in side under sleeve) and work the remaining 32-34-36-37-39-41 stitches as before (= front piece). Body and sleeves are finished separately. THE PIECE IS NOW MEASURED FROM HERE! BODY: = 139-147-155-163-171-179 stitches. The first row is worked as follows from the right side (with off-white): 1 edge stitch in garter stitch, work A.2 until there are 2 stitches left on the row, work the first stitch in A.2 and finish with 1 edge stitch in garter stitch. Continue A.2 back and forth like this. AT THE SAME TIME on the row marked with arrow-5 in A.2, increase 8-0-4-8-0-4 stitches evenly spaced = 147-147-159-171-171-183 stitches. When A.2 has been completed, work A.3 in the same way (there is room for 24-24-26-28-28-30 repeats of A.3 with 6 stitches). A.3 is repeated in height until the piece measures 12-16-19-19-22-25 cm from the division in all sizes; there is approx. 7-7-7-10-10-10 cm left to finished length, you can try the jacket on and work to desired length. The next row is worked as follows from the right side: 1 edge stitch in garter stitch, work A.4 until there are 2 stitches left on the row (= 36-36-39-42-42-45 repeats of A.4 with 4 stitches), work the first stitch in A.4 and finish with 1 edge stitch in garter stitch. Continue like this until A.4 has been completed. Knit 1 row from the right side with dark grey and increase 33-33-33-37-37-37 stitches evenly spaced = 180-180-192-208-208-220 stitches. This is done to avoid the rib being tight. Change to circular needle size 3 mm. The first row is worked as follows from the wrong side: 1 edge stitch in garter stitch, * purl 2, knit 2 *, work from *-* until there are 3 stitches left on the row, purl 2 and finish with 1 edge stitch in garter stitch. Continue this rib for 3-3-3-4-4-4 cm. Cast off with garter stitch over garter stitch, knit over knit and purl over purl – read CASTING-OFF TIP! SLEEVE: Place the 44-46-48-48-50-52 stitches from the thread on the one side of the piece on double pointed needles size 4 mm and knit up 1 stitch in each of the 6-6-6-8-8-8 stitches cast on under the sleeve = 50-52-54-56-58-60 stitches. Insert 2 markers in the piece at the same time as working the last row in A.1: Start mid under the sleeve in the middle of the 6-6-6-8-8-8 stitches, work the first stitch after mid under the sleeve, and insert 1 marker in this stitch, work 24-25-26-27-28-29 stitches, work the next stitch and insert 1 marker in this stitch, and work the remaining 24-25-26-27-28-29 stitches on the round. Allow the markers to follow your work onwards; the one under the sleeve is used when decreasing and the one on top of the sleeve will be used when starting the pattern. Work PATTERN at the same time as you DECREASE under the sleeve as described below: PATTERN: Start the round mid under the sleeve in the stitch before the first marker-stitch and work A.2 in the round – count out from the middle of the sleeve to find where the pattern starts – the second marker-stitch on top of the sleeve should match the stitch marked with a star in A.2, and you will decrease under the sleeve at the same time as you work pattern. When A.2 has been completed, work A.3 in the same way. A.3 is repeated in height until the sleeve measures 12-17-21-23-26-30 cm, but finish after a round of «spots». Now work the whole of A.4. DECREASE: At the same time, when the sleeve measures 3 cm from the division in all sizes, decrease 2 stitches mid under the sleeve – read DECREASE TIP. Decrease like this every 2-2½-3-4-4½-4½ cm a total of 6-7-7-7-7-8 times. When A.4 has been completed and the decreases are finished, there are 38-38-40-42-44-44 stitches left on the needles and the sleeve measures approx. 16-21-25-29-32-36 cm from the division. The rest of the sleeve is worked with dark grey. Knit 1 round where you increase 6-6-8-6-8-8 stitches evenly spaced = 44-44-48-48-52-52 stitches. Change to double pointed needles size 3 mm and work rib (= knit 2 / purl 2) for 3-3-3-4-4-4 cm. Cast off with knit over knit and purl over purl – remember CASTING-OFF TIP. The sleeve measures approx. 19-24-28-33-36-40 cm from the division. Work the other sleeve in the same way. LEFT BAND: Knit up 80-92-100-112-120-132 stitches from the right side, along the edge of the left front piece and inside the 1 edge stitch using circular needle size 3 mm and dark grey (the number of stitches should be divisible by 4). The first row is worked as follows from the wrong side: 1 edge stitch in garter stitch, * purl 2, knit 2 *, work from *-* until there are 3 stitches left on the row, purl 2 and finish with 1 edge stitch in garter stitch. Continue this rib for 2½ to 3 cm – adjust so the band is the same width as the 5 stitches which were cast off on the neck. Cast off with knit over knit and purl over purl. RIGHT BAND: Work in the same way as the left band but after 1 to 1½ cm, work 5-5-5-6-6-6 buttonholes evenly spaced. The bottom buttonhole should be approx. 2 to 3 cm from the bottom edge. It is neatest to work the buttonholes in a purled section by making 1 yarn over and purling 2 together. ASSEMBLY: Sew the neck edge neatly to the edge of the bands, with the seam on the wrong side. Sew the buttons onto the left band. |
|||||||||||||
Diagram explanations |
|||||||||||||
|
|||||||||||||
|
|||||||||||||
|
|||||||||||||
|
|||||||||||||
Have you finished this pattern?Tag your pictures with #dropspattern #northstarjacket or submit them to the #dropsfan gallery. Do you need help with this pattern?You'll find 30 tutorial videos, a Comments/Questions area and more by visiting the pattern on garnstudio.com. © 1982-2025 DROPS Design A/S. We reserve all rights. This document, including all its sub-sections, has copyrights. Read more about what you can do with our patterns at the bottom of each pattern on our site. |
|||||||||||||


With over 40 years in knitting and crochet design, DROPS Design offers one of the most extensive collections of free patterns on the internet - translated to 17 languages. As of today we count 314 catalogues and 11821 patterns translated into English (UK/cm).
We work hard to bring you the best knitting and crochet have to offer, inspiration and advice as well as great quality yarns at incredible prices! Would you like to use our patterns for other than personal use? You can read what you are allowed to do in the Copyright text at the bottom of all our patterns. Happy crafting!
Post a comment to pattern DROPS Children 37-2
We would love to hear what you have to say about this pattern!
If you want to leave a question, please make sure you select the correct category in the form below, to speed up the answering process. Required fields are marked *.